Chromebooks have evolved drastically in the past decade or so. Comparing this month’s CES 2023 to what these devices were back in 2011 when they first came out, the technological difference between the two statures is immense. Today’s Chromebooks can install and use some of the best Linux apps in the business.
And the same goes for HandBrake—a top-shelf video transcoder with an open-source build that can convert the file format of videos back and forth between different codecs. You’ve just found the perfect guide if you’ve meant to get such a program for your Chromebook.
Follow along with the article as we talk about installing HandBrake on a Chromebook, including some of its most prominent features and highlights.
- In the meantime: Top 10 time-saving shortcuts to use on a Chromebook.
HandBrake’s best features
The following is our round-up of the most glaring highlights of HandBrake that millions of users enjoy across the board.
In-built presets for various devices
One of HandBrake’s prominent features relies on its insight to present many different profiles, so you can choose the one that is optimized for your device. If you don’t find one, HandBrake has a plan B in motion for you. You can then choose a universal profile tweaked to work with all devices.
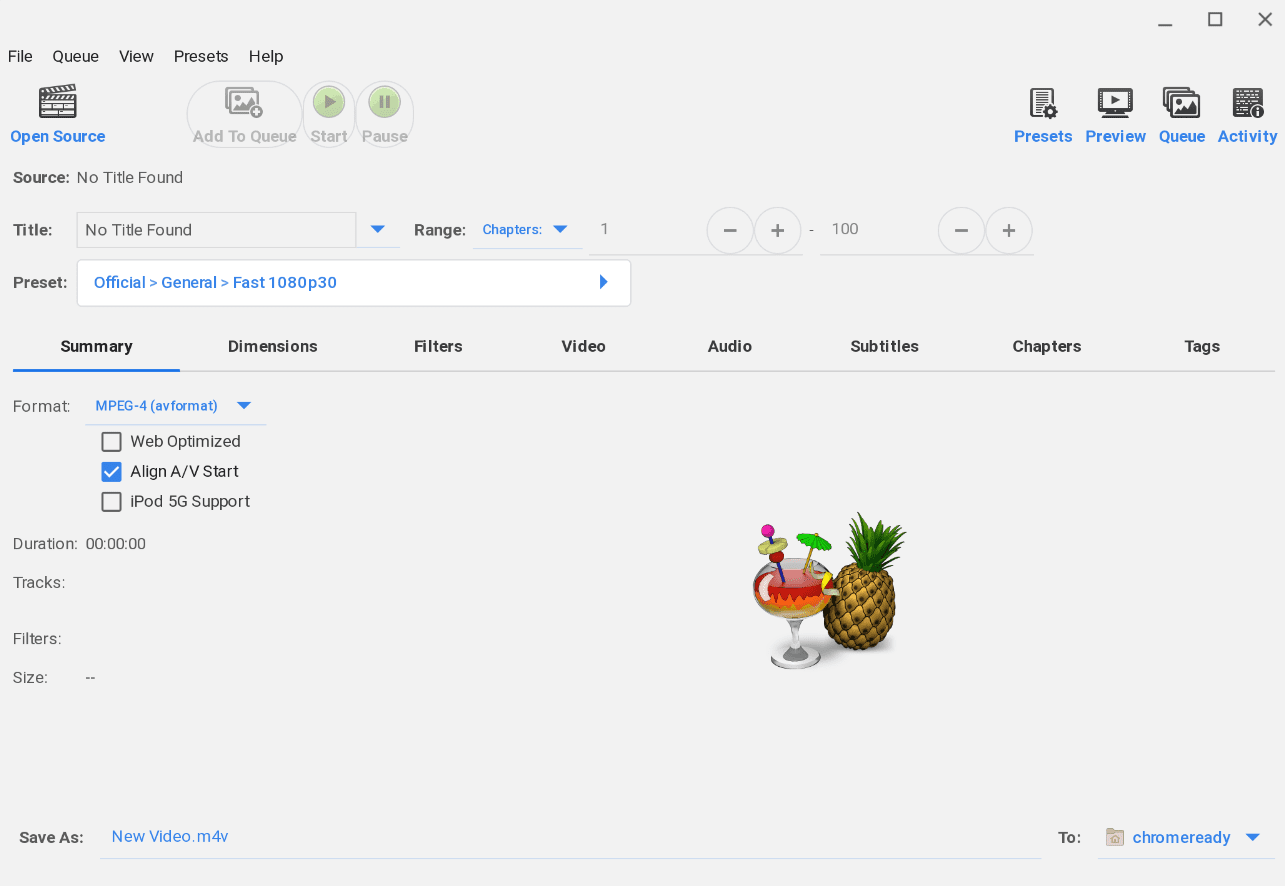
The “Presets” option can be easily accessed from the graphical user interface of the HandBrake app. It sits in the top-right corner and features a drop-down arrow to select the relevant profile for your device.
Plain and simple UI
Speaking of the user interface, HandBrake, despite pushing out all kinds of features for an effective video transcoding experience, is utterly simple when it comes down to its working interface. All the in-app tools are laid out with big icons with a label beside them.
Even if you’re new to this field of video codec conversion, HandBrake will make things easy for you to grasp and comprehend. This is something that not many another video transcoding software can boast about. However, things are not all that plain and simple.
The program features advanced tools to help you optimize your profile just how you want to improve your codecs. There is a load of basic and advanced options to help you customize your preferences. Therefore, HandBrake knows how to blend simplicity and intricacy in equal measure.
Widespread format support for video and audio
The developers of HandBrake have confirmed that their software can process “most common multimedia files,” not to mention the inclusion of DVD and BluRay along with the program’s compatible-to-work-with codec types. Additionally, some of the file containers that HandBrake works with include MP4, MKV, and WebM.
As for the video encoders, the application supports AV1, H.265, H.264, MPEG-4, MPEG-2, VP8, and VP9. Moreover, AAC / HE-AAC, MP3, FLAC, AC3, E-AC3, Opus, and Vorbis are some of the audio encoders that HandBrake is comfortable working with.
With such a far-reaching set of tools and functionalities, HandBrake can streamline your video conversion processes significantly, as it has for many around the globe. That’s just what our personal experience with the app tells us.
GPU acceleration
HandBrake features optional hardware-accelerated decoding as part of its secondary features. This functionality allows the device that HandBrake uses to offload some of the tasks to the GPU so that the main processor can focus on the more important operations.
This is a neat trick that many modern-day systems employ to speed up their performances in the time of need, especially if the running hardware is adequate and the software you’re running demands more resources. With HardBrake, therefore, you’ll be able to transcode videos comfortably even if you have a budget-range Chromebook.
Video filters
Although HandBrake is, by no means, a video editing app, it’s worth mentioning that it features a set of video filters to accommodate its user base. These include:
- Deinterlacing
- Decomb
- Denoise
- Detelecine
- Deblock
- Grayscale
- Colorspace
These are some of the most effective video filters that can help you revamp your clips as they’re transcoded to other formats. For best-in-class video filters and other accompanying features, check out these 5 best free online video editors with no watermark.
Editing features
Continuing the line-up of HandBrake’s video-editing-centric features, there is the option to crop, rotate, and scale your video clips inside the software. And don’t forget, all of these extra features are on top of the base functionality offered by HandBrake, which revolves around video transcoding.
Caption availability
Last but not least, there’s an innate perk of HandBrake that allows you to toggle on captions for your videos. Some of the standard protocols encompassed by the application on this front include VobSub, Closed Captions CEA-608, SSA, and SRT. The captions can also be AI-generated if you don’t have the time to write subtitles for clips manually.
Installing HandBrake on ChromeOS
Now that you know the kind of functionality HandBrake is packing, let’s dive right into its installation steps with no further ado. The gist is that the software in question is a Linux app and can only be installed on ChromeOS with the help of the operating system’s in-built Crostini Linux terminal.
If you’re using a dated Chromebook model and haven’t tried out Linux before, the feature might not be supported on your device. Look at the Chromebooks that run Linux apps to learn whether the device is compatible with Linux.
In addition, Linux doesn’t arrive enabled on supported Chromebooks. You need to configure it first to enjoy the diverse offerings of the platform. The process is simple and only takes about 5 minutes, more or less.
With that said, the following installation steps will take it from here. Do replicate them verbatim for the best results.
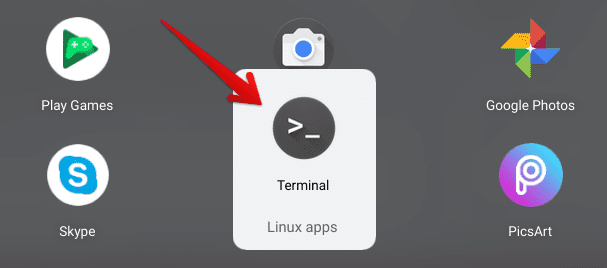
1. The first step is to open the Linux terminal on your Chromebook.

Opening the Linux terminal app
- One of the apps that you see in the screenshot above is PicsArt—a high-quality photo editor for Chromebooks.
2. After the Linux terminal app is all fired up, our primary focus will be to update and upgrade the container, so it doesn’t run into any potential problems during the installation of HandBrake. If we’ve learned anything from how to maintain your Chromebook, it’s to always keep the system up to speed with the latest available software version.
Use the following command to upgrade and update the Linux terminal in one go. You will be asked for a confirmation message as you go along the process, so do press the “Enter” key to further things when required.
sudo apt-get update && sudo apt-get dist-upgrade
Updating and upgrading Linux on ChromeOS
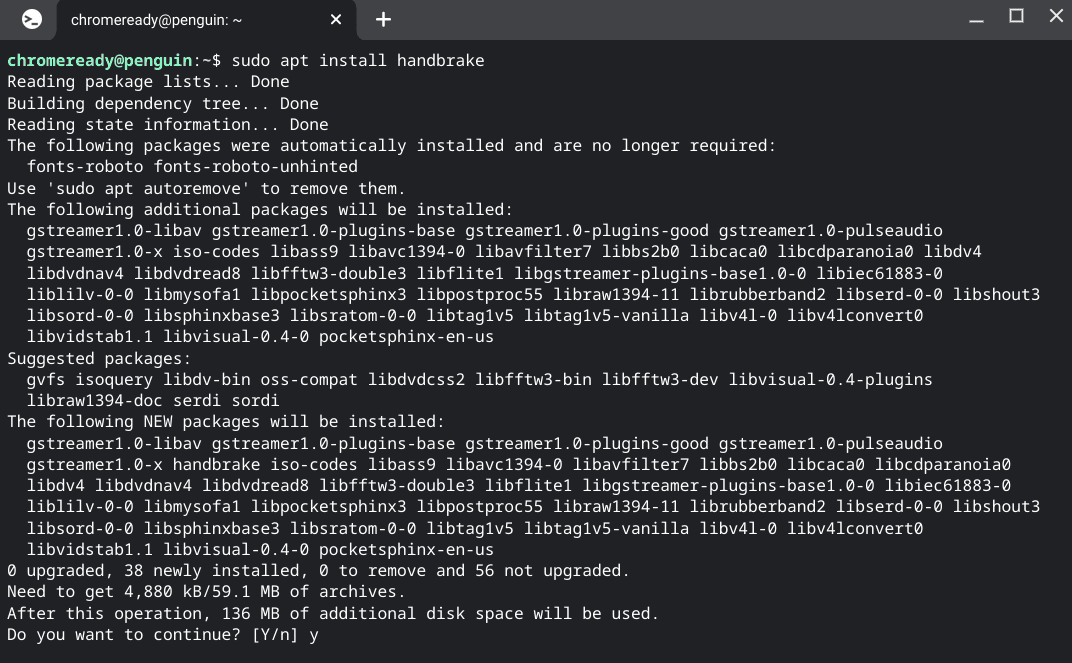
3. After getting your Linux terminal up to speed with the latest available version, we will install HandBrake. Use the following command in the Linux container to begin. Again, a confirmation message will ask you whether you wish to continue. Press the “Enter” key, and you’ll be ready.
sudo apt install handbrake

Installing HandBrake on ChromeOS
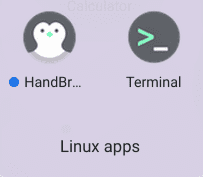
4. After the installation concludes, head over to the “Linux apps” folder on your Chromebook to find the HandBrake app installed there. The download shouldn’t take long since Handbrake is a reasonably lightweight application that performs right up to the mark.

HandBrake installed on ChromeOS
Now that we’ve got HandBrake installed on the system let’s fire it up and take it for a spin.
HandBrake working

HandBrake on ChromeOS
Firing up HandBrake leads you to its main user interface without breaking a sweat. No extra sign-up prompts, no pushing to purchase a premium version, nothing. It gets you into the working interface as quickly as possible, allowing you to start working when the software fires up.
The application is also full-screen optimized and works just as intended on ChromeOS. One of the many benefits of running Linux on a Chromebook is installing polished versions of applications that otherwise won’t sport the same working efficiency. The same is the case with Mozilla Firefox, should you choose to check it out.
To start using the HandBrake app, you must first upload a video to its mainframe. This can be painlessly done by clicking on the vividly apparent “Open Source” button in the top-left corner of the screen. Please be advised that for HandBrake to recognize videos and files, you must move all relevant media to the “Linux files” folder in your Chromebook’s “Files” app.
Only in that case will HandBrake allow you to upload files to its interface and further the transcoding procedure from there on out. Right beneath the “Preset” bar sits the “Format” option, allowing you to tweak the video format with which it’ll be exported outside the app.
We suggest spending some time with the HandBrake application and experimenting with its different features. That way, you’ll quickly learn the ins and outs of its interface and become more skilled at video transcoding.
Conclusion
Chromebooks are home to some of the best apps, whether these applications come from the Google Play Store, the Chrome Web Store, or the built-in Linux container. The presence of additional third-party software adds to the depth of ChromeOS and makes it wholly workable for a variety of different audiences across the world.
In this guide, we’ve looked at the installation of Handbrake on ChromeOS. It’s a high-class video transcoder that’s even easy on the system to hog crucial resources. Do let us know if you found the tutorial helpful for your case. As always, Chrome Ready wishes you good luck!
