LibreOffice is a free-to-use, open-source suite of productivity tools that helps users get their work done on the fly. The program can be installed easily on Chromebooks and is optimized for maximum performance. If you’re looking to become more effective with the app, this guide will cover 10 handy LibreOffice tips to get the most out of it.
Chromebooks are not exempt from some of the best desktop productivity applications in the business, including Microsoft Office. However, if someone were to look at another alternative to the latter, one that especially feels more like home on ChromeOS, you wouldn’t have to go far to stumble upon LibreOffice.
Keep on reading to discover the best tips to jumpstart your working efficiency with the suite by leaps and bounds.
- In the meantime, check out these 20 tips for first-time Chromebook users if you’re just starting out.
10 of the most useful LibreOffice tips to use
Here is our round-up of the best LibreOffice tips to help you get started with the pertinent applications more profoundly. So keep on reading until the end for the best results.
1. Encrypt your saved files with a password

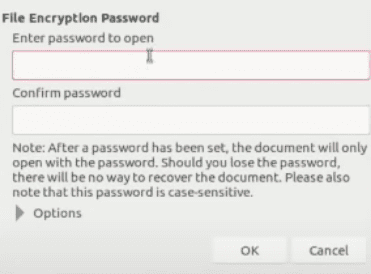
Setting a password for the saved file
Starting off this list of the 10 best LibreOffice tips is something that strikes home security-wise. If you’re cautious about not getting your work stolen or live in a dorm room where prying eyes are always a facet to watch out for, you may save all your documents and files with password protection. It’s pretty easy to get the ball rolling with this functionality.
As soon as you’re getting around to saving your file and setting a name for it, look at the bottom of the relevant window, and you’ll find an option to “Save with password.” Toggle it to proceed, and you’ll soon be shown a separate window walking you through the password-setting procedure.
Please be careful not to forget or lose the password that you’ll set for your files to come in case you don’t want to spend the rest of your life in regret. Unfortunately, LibreOffice does not offer you a way to restore your password-protected files in case you ever forget your password. The software’s security is in check—we must give the developers that.
2. Make the best of LibreOffice extensions
LibreOffice might feature a user interface that would initially dispel users in terms of looking for more ways to expand its already established capability, given its working mechanism. However, few people know that the program comprises a distinct section quite similar to the Chrome Web Store from where you can get new add-ons for the software.
You can remarkably add to the well-grounded capabilities of LibreOffice by slapping on more forms of downloadable content. Doing so can give you the upper hand in various situations and allow you to install more ease in your functioning. We highly recommend checking the extensions store of LibreOffice for valuable add-ons.
3. Utilize “Styles and Formatting.”
Many new LibreOffice users tend to stick to the basics and never venture outside their comfort zone. However, this is the exact opposite of what you should be doing. You can check out the dedicated “Styles and Formatting” section to make your document stand out more from the competition.
The latter will manifest when you use the correct type of style for your text and format it in a distinctive way. Thankfully, LibreOffice makes it relatively easy to follow through with your options, so you should be able to get the ball rolling quite effortlessly with the editor.
4. Set file format to read-only

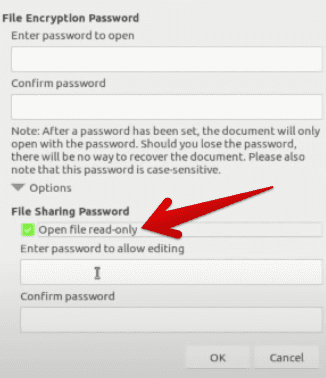
Setting the file to read-only
Creating a read-only document is a great way to circulate your work and files and not worry about having to deal with mess-ups. Depending on your circle, there is a chance that someone would like to be funny and attempt to disrupt the originality of your created document.
In other cases, users not be aware of your privacy and would like to implement their changes. Therefore, whenever you’re feeling cautious about this scenario, avoid worrying about the matter and opt for a distinct feature within LibreOffice that will help set your document’s format to read-only.
This will be done more or less the same way as you set your password in LibreOffice. As you finish your work and are just about to save the file to your local storage, click on “Save with password” to proceed. As you’re about to store the document, click on the “Options” button that’s present right beneath the “Note” area.
Doing so should allow you to tweak further the preferences of your file that is to be saved. All you have to do now is tap on the toggle that says “Open file read-only,” and you’ll be done for the most part. Click on “OK,” set a password, and let the file enjoy your place on your Chromebook. Again, please make sure to write down your password, so you’ll remember it.
5. Edit your PDF files with LibreOffice
Many users — even experienced ones — might not be aware of this already, but LibreOffice can be used to edit your PDFs just as well. So why opt for third-party PDF editors when you’ve got everything you need with this highly effective software? Simply double-tap on a PDF file on your Chromebook and select “Open with LibreOffice.”
That will do the trick and open up the LibreOffice editor with your PDF file loaded inside. It’s pretty easy to start from that point onward, so you shouldn’t be running into any hiccup. The lightweight editor will kick in afterward and let you make the required PDF changes, whether annotation or filling in.
6. Enable the “Hybrid PDF” option

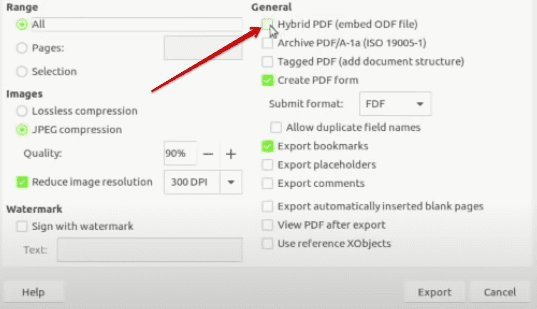
Enabling the “Hybrid PDF” feature
There’s one more tip that can help you switch up how you deal with PDFs on your Chromebook and pertains to a neat toggle called “Hybrid PDF.” The gist is that LibreOffice’s base functionality when working with a PDF, feels quite inadequate in the grand scheme of things. There are parts of the PDF that might not be formatted correctly.
However, by clicking on the “File” button in the toolbar, hovering over “Export As,” selecting “Export as PDF,” and finally enabling the “Hybrid PDF” feature under the “General” tab, PDF files will begin to feel more optimized. This is a noteworthy feature for all those who have to work with such file formats daily.
7. Use keyboard shortcuts to get around faster
Keyboard shortcuts are nothing short of a blessing, even on Chromebooks. Thankfully, LibreOffice features a swath of these that can be implemented to get around the user interface faster and make your working hours more productive. Now, there’s one tip within the tip that we’d like to offer to our readers to maximize their efficiency in this regard.
The regular Chromebook keyboard lacks function keys, such as F1, F2, and F3, but only on the surface and not quite entirely. There’s a way to make the top row of your Chromebook’s keyboard serve the purpose of function keys, so they’ll be able to get a great deal of work done for you in apps like LibreOffice.
Find out how to implement this tip with our guide on how to customize the keyboard on a Chromebook.
8. Always save your documents in the preferred file format
If you want LibreOffice to deal with your documents in a specific format, there’s a way to make that happen. There are various text or code editors out there that deal with plenty of different file types, so it genuinely helps when you stick to just one instead of many.
For example, if you’d like your document to be saved in the “.docx” format, click on “Tools” in the toolbar of the editor, followed by tapping on the “Options” button. Doing so will open another window on your end. Click on the “Load/Save” option next,, which should take you to the “Default File Format and ODF Settings” on the right side of the window.
From there, select whatever format that you’d prefer to have your files stored in. LibreOffice will make sure not to stray anywhere else from your selection.
9. Resume your work from the bottom of the editor
Some users may not bat an eye to what we’re about to tell you, but for the rest of us folks who are always time-strapped, each second matters. This tip is about saving an extra nanosecond or three and making sure you can jumpstart your momentum and carry it for the rest of your work.
Toggling on a particular feature within the LibreOffice app allows users to resume their work right from the very line they left previously. For instance, opening up an unfinished Microsoft Word document will get you started at the top of the page. However, upon clicking on “Tools” in the toolbar at the top and selecting “Options,” you’ll be able to switch that up.
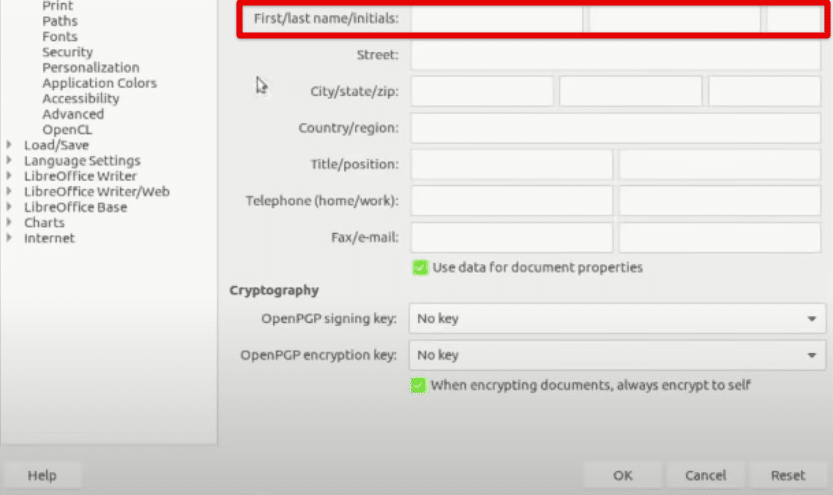
Clicking on the “Options” tab will open a new window for you where it’ll be possible to resume your work from the bottom of the editor. All you have to do is enter your username by inputting your first and last names and, finally, your initials. Then, you’ll finalize the process by saving your implemented settings.

Entering a username in LibreOffice
This may seem odd at first, but we’re trying to make LibreOffice remember our computer as a profile, so it always memorizes where we last left our work. So, moving forward, you can repeat the process with each of your files to get the job done similarly.
10. Amplify the efficiency of LibreOffice
There is a possible and easy way of making LibreOffice faster than before. For this,, you’ll need to ensure that your Chromebook can handle the extensive load in the first place.
Go into the “Memory” section within the “Options” window and dedicate more memory to the “Use for LibreOffice” area than what’s already put there. It’s an excellent way to speed things up while not overworking the operating system. Try it on your end, and let us know how it goes.
Conclusion
LibreOffice is an advanced suite of applications that helps Chromebook users negate the need for a full-fledged Microsoft Office desktop experience. It works just as intended and has a vibrant community where new users are heartily welcomed.
Thanks to the integration of Linux with Chromebooks, ChromeOS is capable of much more as an operating system. Users have access to a more elite set of applications like OpenShot Video Editor and GIMP, among the top 20 Linux apps in the business. Do let us know whether you tried the tips discussed above on your end.
Chrome Ready wishes you good luck!
