At first glance, Chrome OS doesn’t appear to be the best choice for playing video games. Little does the majority know; this sleek operating system will be getting official Steam support sometime very shortly. You’ll be able to play AAA games on your Chromebook natively with the help of a Linux container. As for the present-day capability of Chrome OS gaming-wise, the Google Play Store has some of the finest options available on Chrome OS for mobile gaming.
In addition to that, you can download games from sources other than Play Store and even get yourself offline games to play on your Chromebook. Last but not least, the in-built Linux feature makes it possible for Chrome OS users to try out some of the best Nintendo DS games. We’ve covered a whole guide on the subject, so do check that out here.
It turns out that you can also play Nintendo Wii U games on a Chromebook. The console is home to a collection of genuinely iconic titles, including Mario Kart 8, The Legend of Zelda: Breath of the Wild, and Super Mario 3D world. If you’ve been meaning to relive classic memories of your childhood but don’t want to bother getting a new Wii U again, let this article guide you in using your Chromebook instead for the matter at hand.
In this article, therefore, we’ll be walking you through the process of installing Cemu on Chrome OS and playing Nintendo Wii U games through it. So without any further ado, let’s jump right into the guide.
Playing Wii U games on Chrome OS
To play Wii U games on your trusty Chromebook, you will need to install a dedicated emulator. This is a particular type of software that can mimic the working of another operating system, which, in this case, is the Nintendo Wii U. There are different types of emulators available online for a diversity of platforms. Still, we’ll be looking into Cemu—a Nintendo Wii U emulator for this tutorial.
Once we’re done with that, we’ll set up Cemu and get it to play some Wii U games. This is the general game plan of this guide that we’ve laid out for you. Let’s go in-depth in the relevant sections now.
How to install Cemu Emulator on Chromebook
Cemu is a Wii U emulator popularly available for installation on Windows 10 PCs. However, it’s also compatible with Linux and can be installed on Chromebooks similarly. Speaking of which, an important announcement is due here. We’ve mentioned that Linux will be the raison d’etre of playing Wii U games on Chrome OS, and not every Chromebook has that feature, especially those manufactured before 2018.
If you haven’t used Linux on your device before and are unsure whether it’s available as a feature or not, take a look at this guide for a list of Chromebooks that are compatible with Linux. If your device is unsupported, you might want to consider installing Linux separately.
However, you will have to go through a considerable number of steps to get this done, so let’s get started right away. The following steps are going to take it from here.
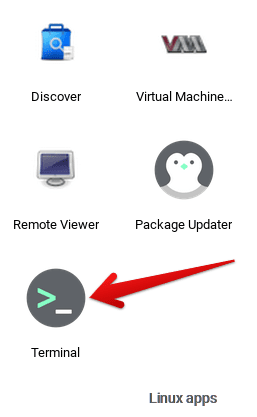
- The first step is to launch the Linux Terminal on your Chromebook. Take a quick look here if you want to be guided through the initial setup process.

Opening the Linux Terminal
2. This is where you’ll start entering commands to install Cemu. The first command that you have to enter is given below. Copy and paste the exact command line and press the “Enter” key in the Terminal to begin.
- You may have to enable copy and paste settings in the Terminal before starting using the “CTRL + C” and “CTRL +V” shortcut key combinations.
sudo dpkg --add-architecture i386

Entering the command line in the Linux Terminal
3. Entering the first command won’t show you any ongoing process. Your username will return just the way it was in the next line. You now have to enter the next command. This is where the installation of WineHQ begins, which is a high-performance software that allows Windows applications to be installed through the Linux Terminal. Use the following command in the container and press the “Enter” key to move ahead.
wget -nc https://dl.winehq.org/wine-builds/winehq.key

Installing WineHQ through Linux
4. The last step will download the WineHQ security key. You now have to add that security key to the system. Do that by using the following command.
sudo apt-key add winehq.key
Adding the WineHQ security key
5. You now have to bring the WineHQ repositories to the Linux system. The following command and the one after that will do this for us.
echo "deb https://dl.winehq.org/wine-builds/debian/ buster main" | sudo tee /etc/apt/sources.list.d/wine.list

Adding the WineHQ repository
6. Continue the process by inserting the following command. Press the “Enter” key once done to finalize the repository addition.
echo "deb https://download.opensuse.org/repositories/Emulators:/Wine:/Debian/Debian_10 ./" | sudo tee /etc/apt/sources.list.d/wine.list

Adding the Wine repository
7. The next step is to add another security key. This is yet another requirement of the WineHQ app that we have to fulfill. Use the following command to get this over with.
sudo apt-key adv --keyserver keyserver.ubuntu.com --recv-keys DFA175A75104960E

Adding another security key
8. You’re nearing the end now. Before we move further, we should check the Linux container for any impending updates. You can use the following command to update the Linux container. Find out how to upgrade the Terminal here.
sudo apt update

Updating the Linux Terminal
9. Now that you have a fully updated Linux container, let’s get into the process of installing WineHQ on your Chromebook. We will use the following command to make the prospect come to fruition. Copy it and paste the command line into the Terminal, similar to how you’ve done until now, and press the “Enter” key to continue. Sometime during the installation, you will be required to confirm the process. Typing “Yes” in the Terminal and pressing the “Enter” key or simply clicking on the “Enter” key will help you get through that.
sudo apt install --install-recommends winehq-stable

Installing WineHQ
10. With WineHQ fully installed, the next step is to download some necessary packages to accommodate Cemu further in this process. Use the following command to do just that. You will be needing to follow the on-screen instructions whenever the Terminal asks you to do something, such as confirming the installation. Therefore, be wary of that during this step.
winecfg

Downloading the required packages
11. We finally have to get into the installation of the Cemu Wii U emulator now. Get things rolling with the following command in your Linux Terminal. Press the “Enter” key once you’ve inserted the command line to begin the download.
wget http://cemu.info/releases/cemu_1.21.1.zip

Installing the Cemu emulator
12. After the installation process concludes the next task is to extract the Cemu emulator. We have a finely constructed command to make that happen. Use the following in your Terminal to move forward.
unzip cemu_1.21.1.zip

Extracting the Cemu emulator
13. The final step of installing the Wii U emulator at hand is to launch it. We will have to use the following command to do that. There’s one catch about this, though. You will have to start this application using the same command each time you play a Nintendo Wii U game. This is because there’s no dedicated app icon for this software that would be present in the “Linux apps” folder. Perhaps, we’ll see an improvement in this regard down the road when Linux finally comes out of its Beta phase and starts receiving massive updates.
wine cemu_1.21.1/Cemu.exe

Launching the Cemu emulator
That’s about it for the installation of the Cemu emulator. We’ve laid out the process in simple-to-follow words, so you should have no trouble in getting the program on your Chromebook. However, until now, what you’ve done is only half the whole affair. Cemu will pave the path for us to play Nintendo Wii U games, but we do need to get our hands on some titles to play. That’s exactly what we have to discuss now.
Getting Nintendo Wii U games to play on Chrome OS
Emulators are notorious for running pirated games that can be downloaded from the internet effortlessly, but we do not encourage going that route. There is a perfectly legal method of owning Nintendo Wii U games and playing them through the emulator. Still, the major prerequisite is to have a Nintendo Wii U console. You would then need to perform a process called homebrewing, which allows the console to run software other than the one initially intended by the developers.
In other words, you would be creating an emulator out of your Nintendo Wii U. Once that’s done, the next job is to rip the Nintendo Wii U DVDs, which is another reasonably complicated process. To avoid all of the processes above, you can check out a website called Roms Fun and Roms Mania for pirated editions of Nintendo Wii U games. Downloading titles from these sites is painless. You visit the website, browse through the massive collection of Nintendo Wii U games they have, and proceed to download them. Some of the best Nintendo Wii U games that you can try out include:
- Xenoblade Chronicles X
- Mario Kart 8
- Super Mario 3D World
- Super Smash Bros. for Nintendo Wii U
Using the Cemu emulator to play Nintendo Wii U games
Now that you know what’s required to play Nintendo Wii U games on your Chromebook and you’ve possibly fulfilled the requirements as well, the next step is to delve into the Cemu emulator and finally get to playing those endearing titles. Get started by firing up your installed Cemu emulator on the Chromebook by using the following command.
wine cemu_1.21.1/Cemu.exe
Doing so should launch the emulator on your device. Once it has fired up, you’ll see how the interface is pretty involved and complex for users, especially newcomers—however, no need to fret here. You’ll get used to the Cemu emulator in due time.
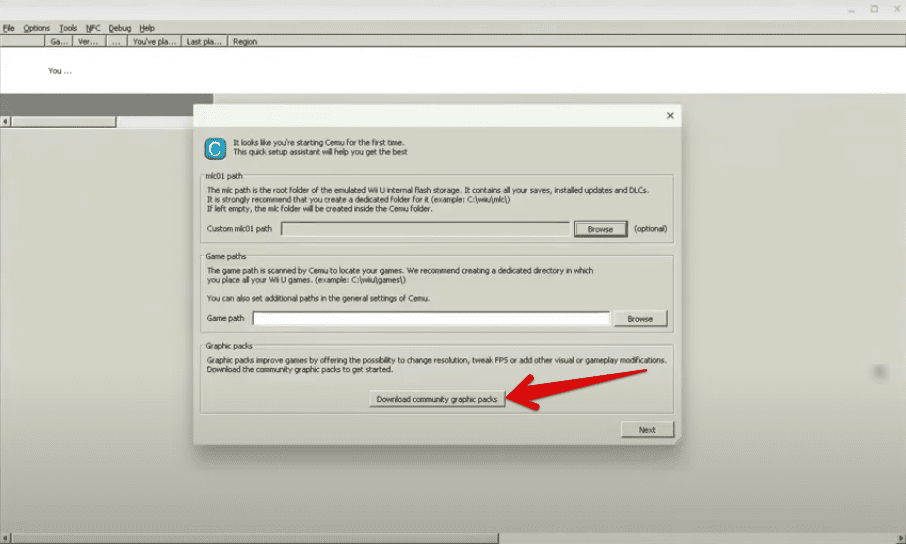
Therefore, when the application launches for the first time on your Chromebook, it’ll show you a welcome prompt. This will get you to know how things work around Cemu and what you should be doing to get started with the emulator. First things first, it pays to have a few mods to help you enhance your Nintendo Wii U gaming experience on Cemu. The software will prompt you to download the “Community graphics packs.”
This ensures a smooth, stable experience and allows the emulator to play the games with maximum performance. After all, optimized graphics are one of the many benefits of using an emulator to play retro titles. Once you’ve clicked on “Community graphics packs,” you’ll be prompted to select the download and proceed with it accordingly. The whole of this procedure won’t take long so that you can dive into the downloads comfortably.

Downloading the community graphic packs
Once you’ve got that down, the next step is to load the Nintendo Wii U ROM that you have and finally get into playing it. One final thing you can do before starting the game is customizing the controls. This will make the experience more enjoyable for you, but that’s perfectly understandable if you want to get started right away.
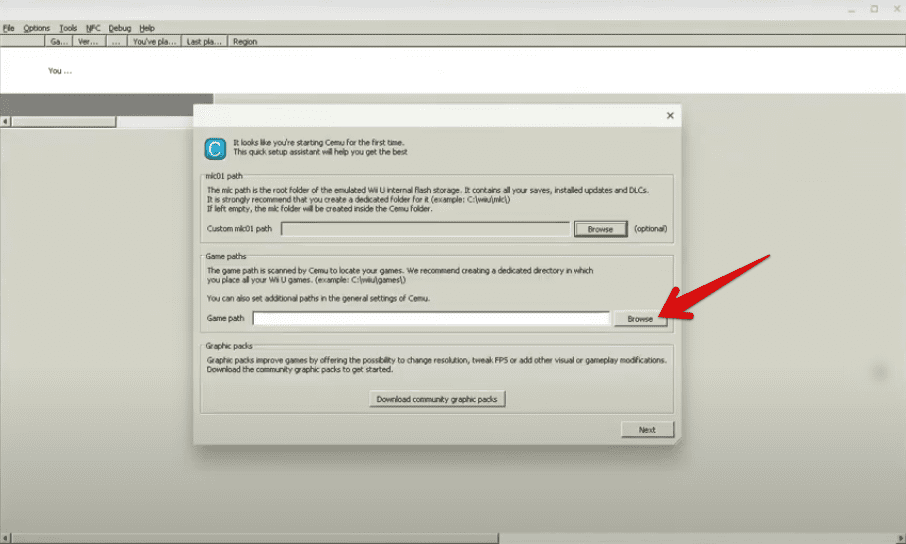
All your downloaded ROMS will automatically appear in the Cemu emulator. Still, if, for instance, a title doesn’t appear within the interface, you can painlessly click on “Browse” in the introductory prompt and navigate to your Chromebook’s local storage to select the Wii U title. Once done, your game will begin to load and play shortly.

Loading the Nintendo Wii U ROM into the Cemu emulator
If you want to tweak the controls first, you can refer to the top toolbar of the emulator and click on “Controls.” You can then follow the on-screen settings and choose whatever suits your preferences.
We’ve now concluded the article. We genuinely hope that you’ve imparted helpful information from this write-up.
Conclusion
Nintendo Wii U is one of the greatest consoles to go down in history, and there’s no wonder that people wouldn’t want to try out its offerings every once in a while and relive golden memories on a modern-day device. If you’ve got a Chromebook at your disposal, you’re in luck as there’s a highly specialized emulator called Cemu that can be installed on Chrome OS through Linux to play Nintendo Wii U games.
Ensure that you thoroughly follow the instructions listed in this guide for an outstanding experience. We hope you have a great time playing Wii U games on your Chromebook. Chrome Ready wishes you happy gaming!
- Are you interested in playing out some of the best T-Rex games on a Chromebook? Check out this guide for our top picks.

1 comment
Hi the “wine cemu_1.21.1/Cemu.exe” is not working