Chromebooks are exceptionally stable and consistent machines that benefit from frequent system updates. ChromeOS- the operating system that these sleek devices run- is incredibly lightweight and exempt from the usual perplexing processes prevalent in Windows PCs and other mainline desktop operating systems.
However, there are occasions when a Chromebook can start acting up and bring forth the usual pangs of crashing and inconsistent performance levels. Fret not in that case because fixing a Chromebook that crashes is nothing more than a cakewalk. In this guide, we’ll learn the best ways to resolve the issues of a crashing Chromebook.
Keep on reading until the end for a detailed guide.
- A related note on a Chromebook’s most trusty software: How to make Google Chrome use less RAM on your PC.
Best ways to fix a crashing Chromebook
In case your Chromebook has started to act a certain way that’s unusual for it, and you’re observing crashes more and more often now, there are ways you can approach to restore your device’s consistent performance levels. Here’s everything you can do step-by-step to ensure the latter truly comes to fruition.
Give your Chromebook a hardware reboot
Unlike a normal restart, where you reboot a Chromebook by holding down the “Power” key, there’s another type of restart that resets your device’s hardware. Don’t worry. This is not a factory reset we’re talking about that potentially wipes all locally present data on a device.
Instead, this Chromebook-exclusive restart method pertains to the hardware components of your Chromebooks, including the keyboard and the trackpad, that could interfere with the device’s performance levels, thereby leading to regular crashing. To perform a hardware reboot, press and hold the “Power” key followed by a swift press of the “Refresh” key.
The latter is shaped like a circular arrow and is in place of the F3 key on your Chromebook’s keyboard. It shouldn’t be too hard to find, but we’re leaving a photo of the keys you need to press to perform a hardware reboot successfully, just in case.
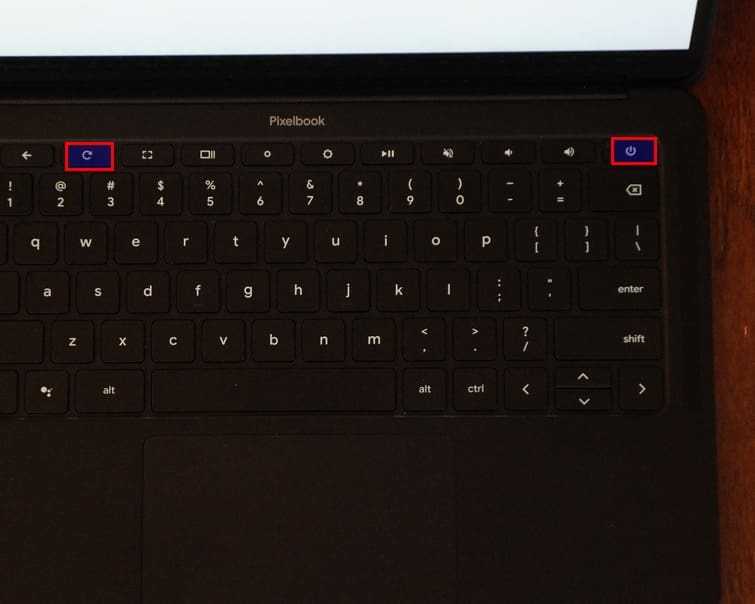
Key combination for a hardware reboot
As soon as the device boots on, try using it to see whether the crashing issue persists. We’re confident you’ve solved the case already, but if things haven’t worked out, keep reading to try the following potential solutions.
Don’t overwork your Chromebook
We’ll explain that headline a little so things can be put into more perspective. Overworking a Chromebook means venturing beyond the hardware constraints of the device. For instance, if you’re using a low-end Chromebook with mediocre specifications, don’t try to go out of its depth to run something like Blender.
In the same way, be wary of your Chromebook’s functional capacity by its processor, RAM, and GPU. Some of the fastest Chromebooks out there feature top-of-the-line hardware specifications, which is why they’re able to stand out in terms of sheer performance.
When you’re not paying attention to what your Chromebook can and cannot do, that’s when you’re asking for trouble. The key is to stay within the device’s functional capacity boundaries for the best results. For instance, installing a few Play Store apps and Linux software will be fine if you’ve got a Lenovo Chromebook Duet 3.
Working just in tandem with this tip is the next one. You’ll next need to be able to learn to monitor your Chromebook’s performance levels after assessing its potential to stop it from freezing or crashing now and then.
Analyze your Chromebook’s performance
Monitoring your Chromebook’s system performance is the diligent way forward to avoid crashing, freezing, stuttering, or anything similar. Luckily, we can approach this in various ways to make this possible, including heading over to the main “System Internals” page in Chrome using the following address.
chrome://sys-internals

The “System Internals” page on Google Chrome
Next up, there’s the Google Chrome Task Manager to turn our attention to, and it’s quite a convenient tool at one’s disposal, allowing users to get to the bottom of whatever process is acting resource-hungry. By simply pressing the “Search” and “Esc” keys on your Chromebook’s keyboard, you can bring up a dedicated tool to help you terminate unresponsive tasks.
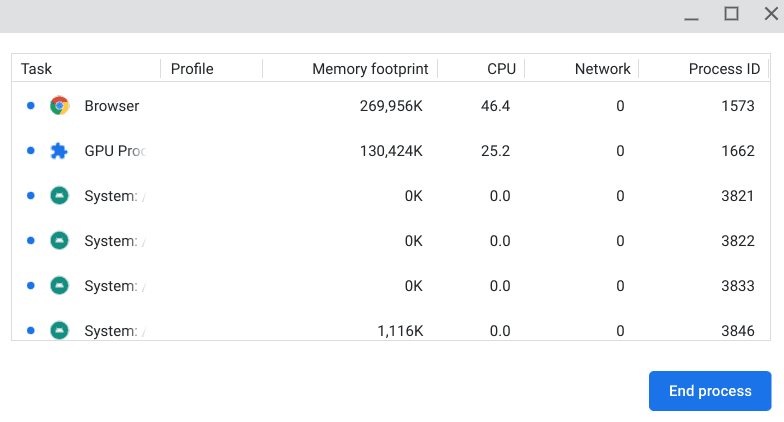
The Google Chrome Task Manager
Whenever your device starts becoming irregular in terms of its performance, one of the best ways to act is to bring up the Task Manager tool and identify applications that are taking up the most CPU and internal memory usage.
That way, as soon as the culprit is detected, you can tap on its entry and select “End Process” to liberate your device of resource-intensive processes acting out of line. It’s quite a handy program to employ whenever you want to, especially when a Chromebook is crashing consistently.
For a more detailed guide with step-by-step instructions, check out our detailed guide on the Chromebook’s Task Manager and how to use it to the best of its ability.
Uninstall useless apps
The next potential trick to help you eliminate a Chromebook’s crashing behavior is to delve into your launcher section and dig up applications that you no longer need. Often, an oversaturated RAM section of the device can lead to inconsistency on your device, which would ultimately cause it to crash over and over again.
Head to the launcher section on your Chromebook and look at all those applications that can do better without hoarding all that space on the device. Then, start shortlisting these programs and uninstalling them one by one by performing a right-click and then choosing “Uninstall,” as shown in the screenshot below for SoundCloud.
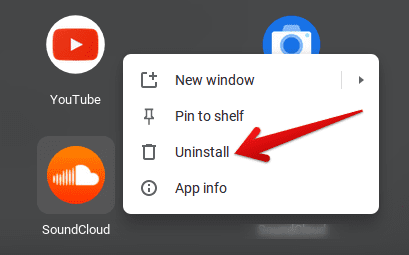
Uninstalling SoundCloud
Repeat the procedure as often as needed until you’re all out of unwanted apps and processes. Therefore, keep reading from the following section to learn what to do next.
Free up some space
Uninstalling applications you don’t have to use anymore is a good step, but you can certainly do much better. The next step is to free up some space on your Chromebook, both internal memory and storage. To proceed, go to the “Files” system app and click on the “More” button in the top-right corner to proceed.
That way, you can visualize the available storage space on your Chromebook. If the functional level of storage space is critically low, take a moment to free up RAM on your Chromebook that the device itself desperately needs.
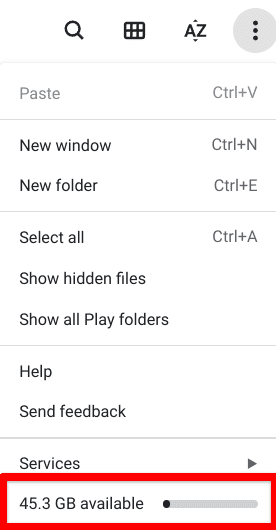
Available Chromebook storage space
On a side note, we recommend looking into the best cloud-based storage solutions for your Chromebook, such as pCloud and Google Drive. That way, you won’t have to depend on your device’s local storage anymore, and you will always keep the device as lightweight as possible.
- Related read: 5 unconventional ways to save storage space on Chromebook.
Delete the Google Play Store’s cache and data
The Google Play Store is one of the major constituents of a Chromebook’s feature set. The famous Android marketplace paves the way for ChromeOS users to enjoy some of the top-rated apps, making global waves. There’s much to explore in this regard, from the best educational apps to high-performance productivity tools.
With that said, in our dedicated guide on how to fix issues with the Google Play Store, we’ve pointed out multiple factors to consider that can trouble the overall working of your Chromebook if you’re not being cautious enough. In some cases, an issue could protrude to the rest of the operating system and cause the Chromebook to crash incessantly.
One of the most profound ways of dealing with this issue is by clearing the data and cache of the Google Play Store. Find the “Google Play Store” section in the “Manage Android preferences” area in your Chromebook’s “Settings,” and you’ll see the following screen.
Make sure to clear both “Clear Storage” and “Clear Cache” before you leave.

Clearing the storage and cache of Google Play
Doing so can often be the difference between a crashing Chromebook and a non-crashing one, so here’s hoping you’ll find this neat trick handy on your end. However, if this does not pay off, go ahead and try the following technique in line and keep up the hustle.
Erase Chrome’s browsing history and cache
Spending tons of time on the internet and using your Chrome browser for a while now with your Chromebook can undoubtedly lead one to accumulate a lot of browsing history and cache subsequently. To speak of the cache, this particular browsing component loads web pages faster than your previous visits.
However, in due time, the cached data can expand and thereby cause inconsistencies with new information that gets updated with the website. This is one of the leading causes of regular Chromebook crashes.
It’s imminent for you to cater to your Google Chrome history and cache to keep your device working in full flight. Try out the following steps, learn how to open up the “History” section in Chrome, and follow through with the rest of the proceedings accordingly.
1. After opening the Chrome browser, click the “Customize and control Google Chrome” button in the top-right corner to access the browser’s “History.”

Clicking on the “History” button
2. After completing the previous step, you will be taken to a different tab on your Chrome browser. Click on the “Clear browsing data” option on the left column of the “History” page. Doing so should launch another Google Chrome tab and take you to the relevant page, as shown ahead.
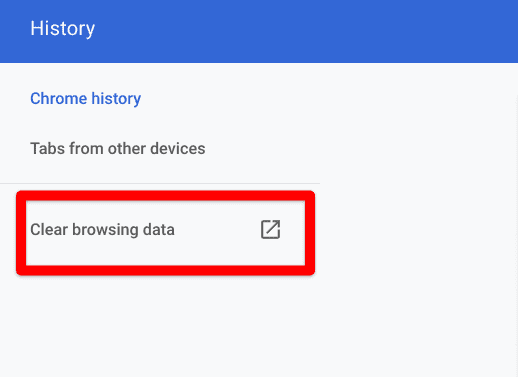
Clicking on “Clear browsing data”
3. You can delete your browsing history after completing the previous step, but before that, you will need to adjust a couple of advanced parameters to follow through.
The time range has to be selected so the browser can begin the clean-up process accordingly. The options available are “Last hour,” “Last 24 hours,” “Last 7 days,” Last 4 weeks,” and “All time.”
If possible, please go ahead with the “All time” option here and continue toward the rest of the settings. The “Basic” section is what you’ll need to tend to next. Check the box beside “Cookies and other site data” and “Cached images and files.” Once you’ve done that and double-checked your selections, click on “Clear data” to complete the operation.
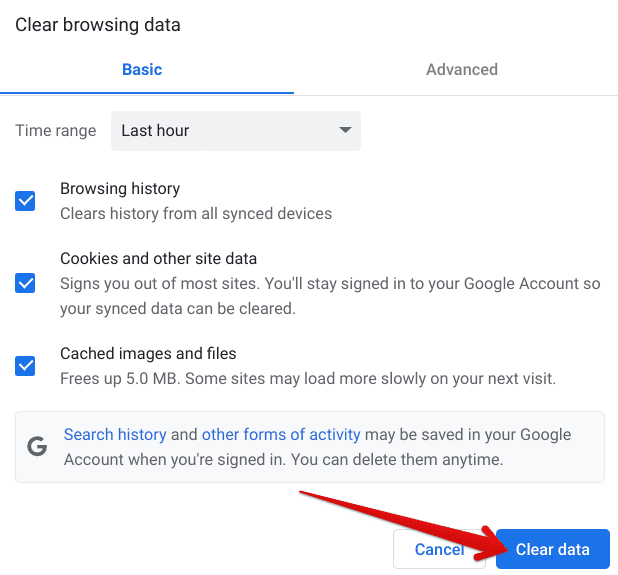
Clearing browsing data
That’s all there is to know about clearing your Google Chrome history and cached data. You now know how to accomplish the task at hand and potentially make your device flourish just like usual again in the context of its performance.
However, we advise tending to the “Advanced” tab when clearing the history for more options related to deleting your search results on Chrome. Clearing up your browsing history and cached data is one of the best ways to fix a crashing Chromebook, so here’s hoping it’ll get the job done on your end.
- For a more extensive tutorial with detailed instructions, check out our write-up on how to check and clear your browsing history on Google Chrome.
Try a Powerwash
If nothing else has worked until now, then it appears we will have to nudge you toward a Powerwash. This is ChromeOS’ way of saying “hard reset,” wiping all existing data on the device’s local storage. Reminder: Now’s the perfect time to start adopting cloud storage. Drive is generous enough to start users with 10 GB of free storage.
Therefore, it’s of utmost necessity to ensure that all critical data on the device has been backed up before using the Powerwash feature. Consider using an external or USB flash drive to sort this out effectively. If your Chromebook doesn’t have the correct port to connect to your peripheral, you may as well look into purchasing a USB-C hub.
Anyhow, it bears noticing that performing a successful Powerwash on a Chromebook has substantially helped users in the same boat as you. Since individuals have to go ahead and download system updates on the device again, the Chromebook fixes itself somewhere along those lines.
To execute a Powerwash, you need to head over to the “Settings” app of your Chromebook and click on the “Advanced” dropdown menu in the sidebar to the left side of the screen. Once you’ve done that, a list of options should appear. Choose “Reset settings,” and the Powerwash feature should pop right up. Click on “Reset” to begin the operation.

The Powerwash feature on a Chromebook
For step-by-step instructions on Powerwashing (Resetting) a Chromebook, check out our interlinked guide for the best results.
Recover the operating system
Our last ace is a complete recovery of the operating system. This is made possible by a dedicated tool called Chromebook Recovery Utility that you can easily download from the Chrome Web Store. It’s lightweight, fast, and pretty effective at what it does, so indeed the correct application for the job we’re trying to do here.
If you own a Chromebook that you bought not too long ago and has pretty appreciable specifications, it shouldn’t be crashing consistently even after you Powerwash it. This indicates that something more grave is troubling your Chromebook, and it might have to do something with your operating system in general.
That is why we need to download the Chromebook Recovery Utility extension to follow through with the process correctly. You will require an external USB drive with up to 8 GB of free space. Clear it from any useful data beforehand since the recovery process will format your flash drive.
- You will also need to put in your Chromebook’s model to use the Chromebook Recovery Utility.
Download the tool from the Chrome Web Store, launch it, follow the on-screen instructions, which should be pretty easy to do, and wait until the operating system is installed. Once done, insert the drive into your Chromebook and boot up the recovery mode with the help of the “Esc,” “Refresh,” and “Power” keys.
It’ll all be automated from that point onward, so there is no need to put in any manual effort next. The recovery process will take some time but will wrap up sooner or later. If you’d like more detailed instructions on how to recover your Chromebook, give our guide a read explaining how ChromeOS recovery is simpler than you think.
After a successful recovery, you won’t have to put up with a crashing Chromebook—that’s for sure. We’ll now be concluding the write-up, having gone through various ways of fixing a Chromebook that crashes, freezes, or puts disrespect on the usually flawless name of ChromeOS.
- Related read: How to use a Linux computer to recover your Chromebook
Conclusion
From being able to sport the convenience of the Google Play Store to running the Crostini Linux terminal, Chromebooks are capable machines, and they only seem to improve over time. For instance, earlier this year, Steam alpha made good use of the suitable timing and landed on a select number of Chromebooks.
- To learn more about this, look at our guide on Steam alpha launching on Chromebooks, including a how-to guide discussing the installation of Steam alpha on dedicated Chromebooks.
In this guide, we’ve cast a lens on the flip side of things by discussing the most critical ways of fixing a crashing Chromebook. In our opinion, keeping your concurrently opened tabs in check is the best way to minimize system freezes, but be sure to let us know in the comments section ahead what method worked wonders for you instead.
Chrome Ready wishes you good luck!
- Before you go: The Ultimate guide to taking screenshots on Chromebook in 2022.
