If you have got your hands on a brand-new Chromebook in recent times and can’t wait to get into it, take a step back first and read this complete guide. The default ChromeOS experience is excellent, but what if we could tell you that your Chromebook can become much faster and more accessible, provided that you start pulling on the right strings?
That’s right. The tune-up ahead is a compilation of some of the best tricks and hacks to help you get the most out of your device. Most people are unaware of the forthcoming processes, so they start delving right into their device, which isn’t bad, but not the greatest of decisions either. Follow along as we show you how to start on the right foot.
- Recommended read: Fast Chromebooks: The Ultimate Guide.
Tuning your Chromebook for maximum output in 15-20 minutes
Tuning your Chromebook, so it offers you the best levels of performance and speed is a step-by-step process where you have to check off all boxes on a particular list.
The moment you sort everything in order is when you’ll start observing significant results, not just throughout the whole operating system but within the Google Chrome browser.
With no further ado, let’s check out what measures we can take to make a Chromebook a cut above the rest of its counterparts.
Get rid of excess programs, Chrome extensions, and other software
One of the first constituents of the whole tune-up process warrants you to take a close, hard look at your installed software, apps, and Google Chrome extensions. Often, we lose track of what we install on our devices and end up gathering a whole ton of unwanted applications.
In cases like that, removing apps you no longer need highly encouraged to prevent the system from getting filled up. Try checking out your launcher by pressing the “Search” key to see if any duplicate applications are also present within the mix that can do better without hoarding all that space on your Chromebook.
The same goes for Google Chrome extensions. Although these play a significant role in boosting our productivity with the world-renowned internet browser, it’s still necessary to uninstall those add-ons that have nothing to offer you. Lastly, Linux apps can potentially make up a vibrant portion of your Chromebook’s storage, given their variety.
However, Linux, too, takes up a dedicated portion of your hard drive, and you might remember this from the beginning of the configuration of Linux apps on ChromeOS. Therefore, you might not want to fill that space if it’s not needed. Doing so will boost your Chromebook’s performance and let it breathe easier when working with resource-intensive programs.
Completing this initial step shouldn’t take more than 4-5 minutes since uninstalling applications is quick and effortless. All you need to do is right-click on an app by tapping with two fingers simultaneously on your Chromebook’s trackpad and then choosing “Uninstall.” That should do it.
The following is an example of how it’s done while targeting Amazon Prime Video.
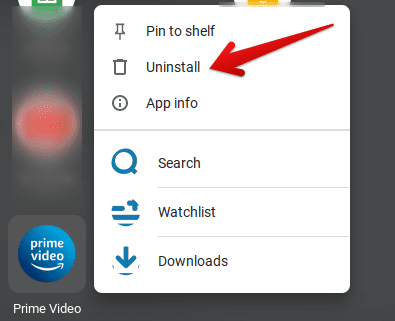
Uninstalling Amazon Prime Video from the Chromebook Launcher
Delete the Chrome browser’s cache and history
The next step in line pertains to the Chrome browser, and this is something that often goes unnoticed. Several users complain about a Chromebook running slow but forget to inspect their browsers closely. If you’ve had your device for a while now, your copy of Google Chrome may have accumulated tons of junk, cache, and other unwanted files.
In doing so, your browsing speed is sure to get bogged down in one way or the other. What once felt outright blazing-fast would then tend to exhibit substandard performance levels, and we’re sure you don’t want that. On the flip side, it’s nothing but easy to get into the Chrome browser first and access the app’s “Settings” to erase its cache and history.
We’ve curated a detailed guide on the matter at hand, dubbed “How to check and clear your browsing history on Google Chrome,” should you choose to check it out for more information. That implies when you’re clearing your Chrome search history; the applications take care of the cache and dell.
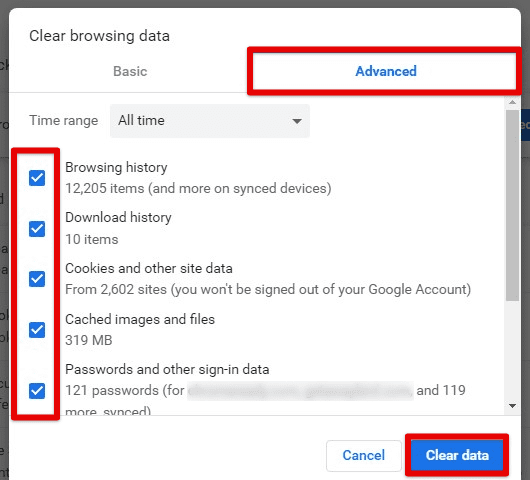
Clearing cache, cookies, and browsing history
Make sure you select the “Time range” to “All time” for the best results. That way, your Chromebook will likely get super fired up for the period ahead.
Make Chrome pre-load pages
Another neat Google Chrome trick can amplify the browser’s performance considerably in the long run. If you tinker around with the program long enough, you’re bound to run into a setting called “Preload pages for faster browsing and searching.”
It can be enabled once to allow you smoother access to websites moving forward. Get started by opening Chrome settings by clicking on the three vertical dots button called “Customize and control Google Chrome” in the top-right corner of the screen. Once done, multiple options will appear on the screen. Click on “Settings” to move forward.

Customizing Google Chrome
When you’re finished, search for the functionality in question using the in-app search bar by typing in “Preload.” You should be taken straight to the “Cookies and other site data” section afterward. Click on the latter, scroll down, and finally enable the “Preload pages for faster browsing and searching” feature. This is how you’ll get the process over with.

Enabling the preload feature
Go ahead and try using your Chromebook browser. The results won’t be instantly noticeable, but you’ll see the change pouring in after a while.
Update your Chromebook
We cannot emphasize the significance of having your Chromebook fully up-to-date enough. Google is consistently pushing out scheduled updates for ChromeOS so the operating system can get newer feature additions. In addition, the latter is alongside the swath of security patches, bug fixes, and other tweaks to keep the system running perfectly.
- ChromeOS 106 has brought smart translation functionality and a “Follow site” feature, among other enhancements.
The best part is that a Chromebook can update on the fly without the user having to get into the download part manually. Once it has finished downloading updates, the system will notify you with a prompt that says, “Your Chromebook needs to restart to update.”
From that point onward, you will need to reboot the Chromebook for the changes to take effect. Whenever that prompt appears, could you do us a favor and not ignore it? Instead, save whatever work you’re doing and rush to restart the device primarily.
That way, you’ll always find your Chromebook performing up to the mark. In addition, developing a habit of updating your Chromebook will do you well for your time ahead with your Chromebook.

Checking ChromeOS for updates
Slap on the dark mode
In mid-August, ChromeOS 104 brought several visual changes to the operating system that made a Chromebook stand out from a visual perspective. Part of the whole tune-up process is to make your device look good and not just perform like a fighter jet.
Thankfully, the new stylized set of ChromeOS wallpapers that allow users to switch between day and night systematically is no less than a blessing. The new “Radiance” and “Element” wallpaper types bring the best of both worlds, boasting a day-like iteration during the day while transforming into the night’s fashion when the moon comes out outside.
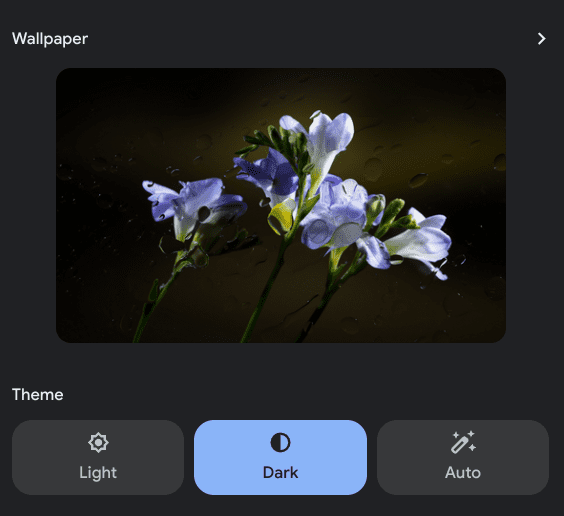
Light and dark themes in ChromeOS
Don’t forget to roam around the personalization section and determine what future changes you can make. There’s even an option to set a screensaver on your Chromebook, which we’ve been personally doing as well. Lastly, you can even toggle on a feature that gets you a new wallpaper daily.
- Related read: Top 10 Wallpaper Packs for Chromebook.
Manage your installed extensions
Another major way you can tune your Chromebook is by delving into the extensions section of your Google Chrome browser and making sure no extension is going out of its way. It’s possible to manage attachments on your Chromebook to the point that they perform as per your instructions.
For starters, you may choose to disable some extensions on your end to keep them from running on the device momentarily. In addition, you can look for extension updates manually to ensure the maximum level of performance out of each add-on. Last but not least, extensions that you no longer need should be uninstalled without any extra delay.
It would help if you kept tabs on your Chrome extensions so they don’t become too resource-intensive. That way, you can save on precious system resources that would help your Chromebook perform up to the mark and prevent any add-on from doing anything it is not supposed to be doing.
- Related read: How to know if a Google Chrome extension is safe.
Configure Google Assistant
Google’s AI-powered digital assistant is willing to go the extra mile for you—all you need to do is configure it for the better. We have outlined a complete Google Assistant guide that you should check out for detailed information regarding the matter at hand.
Assistant can help you tackle a wide variety of tasks on ChromeOS. For starters, it lets users set alarms, create reminders, and even helps you with navigation through Google Maps. In addition, it can play songs for you from YouTube just with the help of voice commands, not to mention the added functionalities of checking the weather and controlling the volume.
It’s worth the time it’ll take to set up Google Assistant on your end, which shouldn’t take longer than a couple of minutes. At first, the AI tool will try to create a record of your voice to store in its database. However, as soon as that is done, you can use Assistant swimmingly.
- Related read: How to activate/deactivate Google Assistant on Chromebook.
Clear your storage to ensure adequate RAM
One of the best ways to pimp your Chromebook out from the performance perspective is to check how much free RAM is available and clear it if the results are unsatisfactory. There are various ways to get this done, including launching the Task Manager to check all concurrently running background processes.
You can effortlessly remove unneeded tasks utilizing RAM on your Chromebook by selecting the entry first and then clicking “End task.” Oh, and in case you’re unaware, the Task Manager can be fired up by pressing the “Search” and “Esc” keys on the Chromebook. It’s a great way to keep your internal memory usage in check.
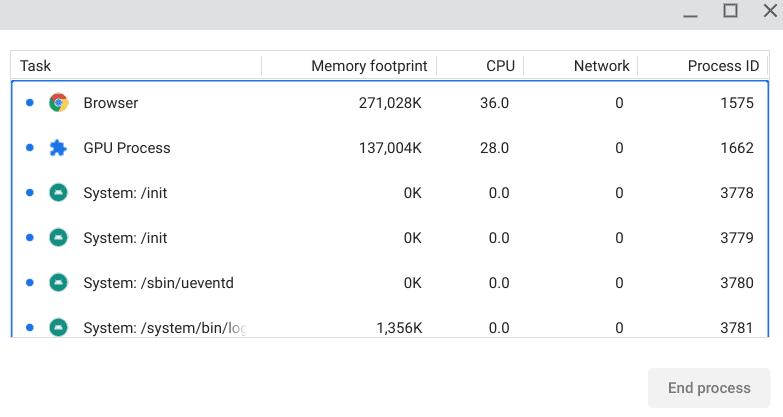
ChromeOS Task Manager
Enlarge the size of the cursor for better accessibility
Call us biased, but we fare the original size of the ChromeOS cursor to be a little too small for one’s liking. If you do not have a problem with how it looks, read on with the following subsection, but if you want to try out a different size for a change, hear us out.
Thankfully, ChromeOS has no shortage of accessibility tools and features, comprising ChromeVox, dictated speaking, and a bevy of other features. One of these anointed functionalities pertains to the touchpad, which, in turn, allows you to adjust the cursor size. Look at the screenshot below to understand what we’re talking about here.
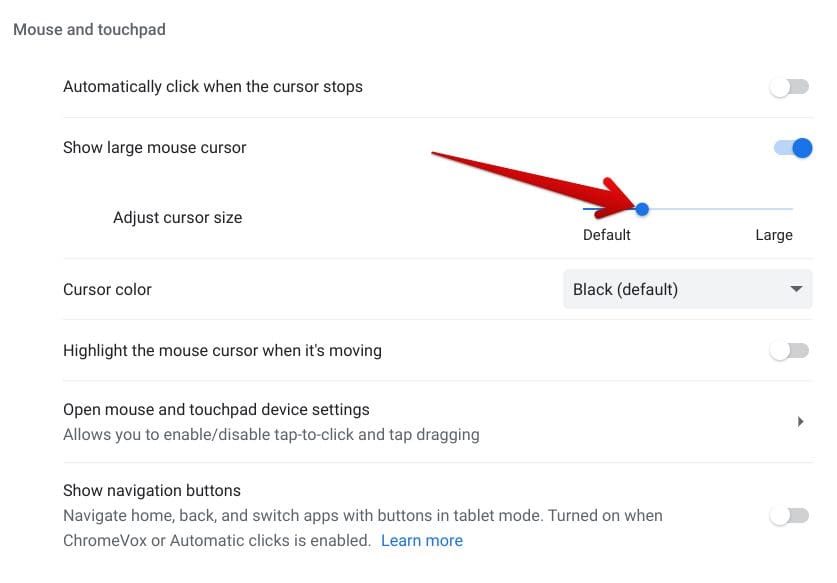
Adjusting the cursor size
Open the “Settings” system app, click on “Advanced” in the side panel, and finally select “Accessibility” to get to the next step. You will then need to click on “Manage accessibility features” to get to the proper space where ChromeOS keeps all these nifty features.
Scroll down until you find the “Mouse and touchpad” section, and you’ll find the option to adjust the cursor size. Easy peasy. Tweak the slider as per your requirement and notice the results kicking in instantly.
Don’t forget about the Night Light feature
While you stroll around with your Chromebook, be aware of handy functions that can help you gain the upper hand in specific scenarios. Similar to the blue light filter feature in mobile phones, a “Night Light” tool can make your Chromebook much more comfortable to use during nighttime.
It’s tucked away in your status bar and can be toggled on with just the touch of a button. The feature is convenient and filters out the blue light rays from the screen, so health issues such as eye strains and headaches have a considerably lower likelihood of affecting you. Check out the screenshot below for an idea of how to get this done.
Of course, getting the ball rolling with a feature like this takes less than a minute, so this shouldn’t take much time out of your 20-minute Chromebook tune-up.
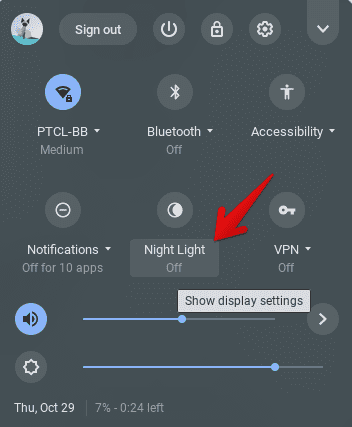
Turning on Night Light on ChromeOS
Optimize Chrome to let you quick-search websites from the URL bar
As for the last pointer affiliated with the tune-up process of your Chromebook, we have at our disposal an utterly practical tool that will help you get around your favorite websites much more quickly as opposed to before. The functionality’s name is “Site search,” and it’s self-explanatory.
There’s a setting within Google Chrome that allows you to automate the “search” process in sites, so you no longer need to delve into it manually. Doing so can speed up your browsing and make your work hours more productive.
If you’ve got a few websites that you work from or need to check in with them frequently for something specific, this is the feature to try. Begin by typing the following into the address bar of your Chrome browser. Press the “Enter” key when you’re done to proceed.
chrome:settings/searchEngines
Once done, you should be able to visualize the following on your end. Here, it’s possible to specify websites you need to create shortcuts for. On a side note, this is where you can also change your default search engine and switch it up for other options, such as Bing or Yahoo.
As you use it over time, chrome automatically piles up suggestions for you, but you can always “Add” more websites using the specified button. Furthermore, you can also inactivate or activate the shortcut feature for your websites on this page.
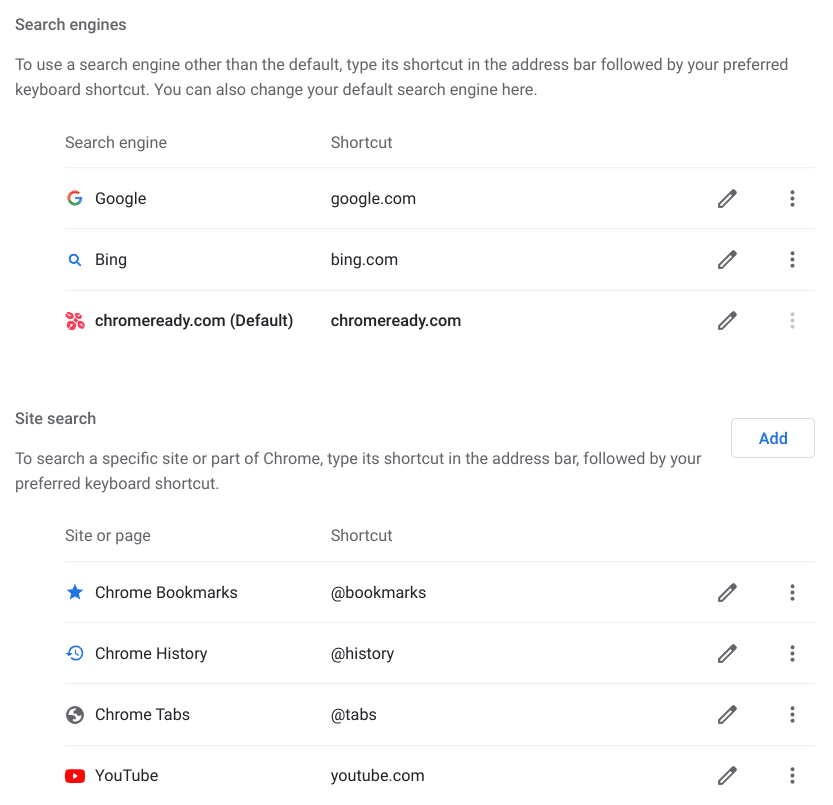
The Site Search feature in Google Chrome
Onward to the actual convenience of the tool in question. When you type in the website’s name, such as Chrome Ready, in the Google Chrome address bar, a highlight should appear, offering you to perform a “Site search” by pressing the “Tab” button.
As you press it, the next step will be to type in your query so you can instantly be redirected to the search results. If you ask us, this is one of the most convenient facets of your Chromebook’s tune-up. So do not miss out on something as helpful as this.

Using the Site search feature to search on Chrome Ready
Conclusion
ChromeOS is a magnificent operating system that does not convolute users with many processes and ongoing tasks that ought to confuse the person on the other end. Instead, Chromebooks have harnessed the capability of simplifying things to the point where it’s unchallenging to distinguish between different graphical elements.
Using this tune-up-oriented guide, Chromebook users can carry on with their devices swimmingly until their respective end-of-life dates and even beyond. Make sure that you’re implementing each tip outlined above for nothing but the most productive results. As always, Chrome Ready wishes you good luck!
- Trending read: How to install and use Reddit on Chromebook.
