Chromebooks are no slouch when it boils down to accessibility features. From letting you slap on a thoroughly new look to delving deep into experimental features like Calendar View, there’s a lot that you can tweak on ChromeOS to enhance the user experience. Somewhere along those lines, there’s even a way you can modify the way your cursor looks on the desktop.
In this guide, we’ll explore all possible methods that show you how to customize cursors on Chromebook. If this is something you’ve been eyeing for a while now, we highly recommend imparting knowledge from the forthcoming instructions. With no further ado, let’s get started.
- In the meantime: How to add fonts in Google Docs.
Customizing cursors on ChromeOS
It turns out that there are two possible ways you can switch up your Chromebook’s cursor for something different and more unique. In the first method, we’ll use the operating system’s built-in functionality to tweak the size and color of the cursor. Unfortunately, that’s just about it regarding the initial cursor modifying venture.
The second method is a bit more involved and allows you to take your cursor from one level to the next, thereby skyrocketing its overall aesthetic appeal. We’ll go through these techniques individually, so it’ll be easier for you to grasp them on the fly. Let’s begin with the first one right away.
Option #1. Using the in-built ChromeOS feature to change the cursor
First up, we’ve got nothing but a sleek part of native ChromeOS functionality to help us find our way with changing the cursor. Quite evidently, this method boasts the added flexibility of not having to tend to any out-of-the-box software, application, or program from online, the Chrome Web Store, or the Google Play Store.
All you need to do is go into your Chromebook’s “Settings” app, dig out the relevant accessibility feature, and get to work afterward. Since the process can get a bit involved, we’ll show you how to do it ourselves. The following instructions will take it from here in a step-by-step manner.
1. The first step is to open the “Settings” app on your Chromebook. This can be done painlessly by using your ChromeOS shelf or looking up the system utility through the Chromebook Launcher. Either way, it should be a walk in the park.
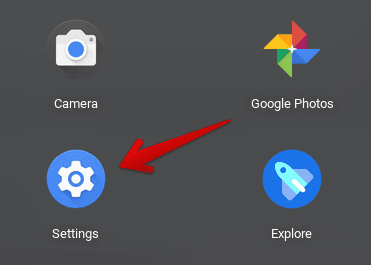
Opening “Settings”
2. The next step is to click on “Accessibility” in the side panel of the “Settings” window. Check out the following screenshot for a better visual explanation.
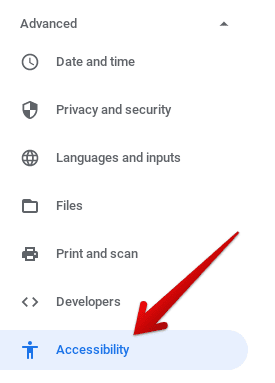
Viewing “Accessibility” options
3. As you’re taken to the “Accessibility” section of the “Settings” app, focus your attention on the middle of the screen and click on “Manage accessibility features.”

Managing accessibility features
4. As soon as you’ve passed the previous step, you will be taken to the “Accessibility” section of your Chromebook. Here, scroll down until the “Mouse and touchpad” area. This is where it’ll be possible to change your Chromebook cursor. Let’s start with the size of the component first. Enable the “Show large mouse cursor” prompt to get going.
Once done, tweak the size using the scale at will. Finally, change the color of the cursor using the provided options. Users at the moment can choose from 8 different cursor colors, including Pink, Blue, Cyan, Magenta, and others. It’s also possible to toggle on the highlight feature that makes the cursor prominent when it’s on the move.

Changing the Chromebook cursor
That’s about it for changing your Chromebook cursor the native way! We like to opt for decency in this regard by keeping the cursor color default and tweaking the size to about one-third of the scale. That’s just our cup of tea. If you’re looking for something more ingrained in this scenario, keep reading until the next subtitle’s end.
Option #2. Using a Chrome Web Store extension to install different cursors
Chromebooks benefit from the most high-rated Google Chrome extensions you’ll ever use, making many people’s lives much easier.
Whether you’d like some Google Meet extensions to take care of your video conferencing requirements or perhaps a handy tool to view and organize your browsing history, these simple add-ons are terrific, especially when you’ve got the right ones.
We’ll be borrowing the help of the Chrome Web Store again to get some of the best cursors on ChromeOS. Let us check out the installation steps that the add-on in question warrants so you don’t have to struggle to download the extension for yourself.
1. The first step is to head to the official Cute Cursors Chrome Web Store page. When you’re there, click on the “Add to Chrome” button, as shown in the screenshot below.

Adding Cute Cursors to Chrome
2. After clicking on “Add to Chrome,” a prompt will appear from the top of the page, asking you to confirm the installation of the extension. Click “Add extension” here, as shown in the screenshot below.
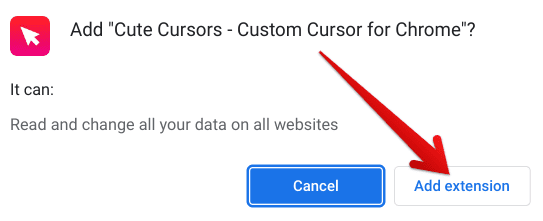
Confirming the installation
3. As soon as you’re done, the extension installation will commence. The file size of the add-on is somewhere around 5 MB, so the process shouldn’t truly take long. Proceed toward the confirmation page of the installation, as you can comprehend from the screenshot below, to finalize the procedure.

Cute Cursors extension installed
That’s about it for installing the Cute Cursors extension on your Chromebook. It’s time to take it for a spin and see what the add-on can do for you.
How to use Cute Cursors to change the ChromeOS cursor
As soon as you have the extension installed on your end, proceed toward clicking on the relevant icon in your extension toolbar. You might as well pin it, too, just in case you need access to it next time for faster results.
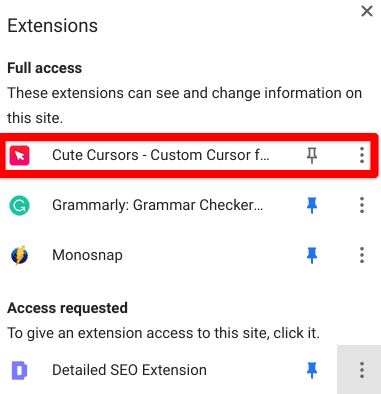
Launching the Cute Cursors extension
Clicking on the extension will lead you to a pop-up about the Cute Cursors add-on. This is precisely where you’ll be able to change your Chromebook cursor for the most part. Just check out the vibrant collection the developers have crafted for its users.
From iconic Android games like Cut the Rope to legendary comic characters like Batman, there’s a great collection of cursors you can choose from in this extension, hence why we picked it for the write-up. All you have to do now is click on any cursor you see, and changes will be applied to your system accordingly. Sounds great, doesn’t it?
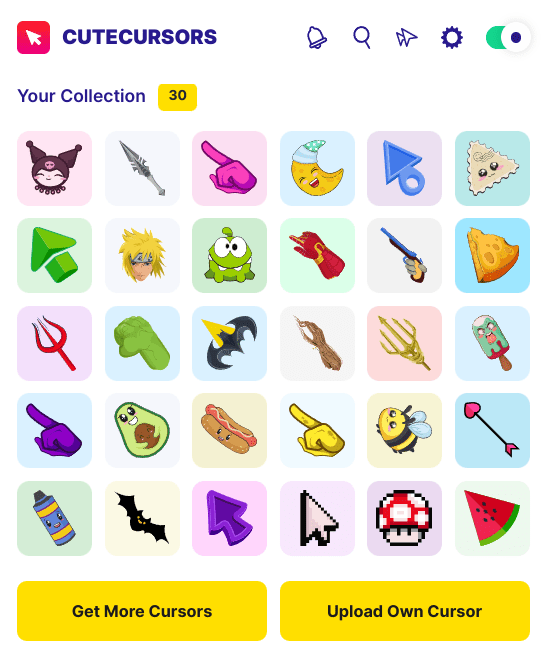
Picking the cursor of your choice
The best part is that Cute Cursors lets you upload your cursor to the application in case you’re into stuff like that. You can practically create a cursor out of any image, depending on precisely what you’re looking for. Of course, if you want to make a picture-perfect Chromebook cursor, you’ll have to make an effort likewise.
Apart from the usual stuff, there’s also an option to get more cursors within the extension. Just click on the relevant button, and you’ll be taken straight to the storefront of a bustling number of different cursor packs. From what we could tell at first glance, the collection of Cute Cursors’ cursor packs includes the likes of Genshin Impact, Pokemon, and even Cuphead.
You’ll spend 5-10 minutes before finally deciding which cursor pack you should go for. Well, that’s about it for the second method on the list, as it’s time to wrap the article up.
Conclusion
If you have grown tired of using the same Chromebook cursor repeatedly, let this guide instill a new perspective on your end. The previous sections have taken you through two distinctive ways of changing the cursor of the operating system, so you finally have some versatility to look forward to.
Both methods work excellent and are tailored to suit particular audiences. For instance, the first technique—where you use the native ChromeOS setting to modify the device’s cursor—is for those who are looking for a minimal change without the added effort of downloading any third-party software.
If it gets the job done for you, feel free to look into it more, as we’ve explained above. However, getting yourself the Cute Cursors extension is better for the best results if you’re out for something more advanced. There’s a wide variety of cursors on there that you can download on the go without having to blink twice.
