Chrome OS has been subject to steady evolution over the years since its release. It started with humble beginnings but is now so much more than a mere web browser, as people used to refer to it in the past decade. This sleek operating system is now blessed with the functionality of the Google Play Store, essentially unlocking a full-fledged world of Android apps that work like a charm on Chromebooks.
However, the Google Play Store on Chrome OS is similar to how it is on any other Android smartphone, despite the optimization differences for Chromebooks. For instance, one of the most highly optimized Chrome OS applications that you can get from the Play Store is SoundCloud. Therefore, it’s not rare for users to run into several different issues with the Play Store, making it impossible to utilize the platform.
This is why we’ve decided to round up the most common issues you might encounter on your adventures with the Google Play Store, right along with their definite fixes. Knowing how to solve problems as soon as they manifest is a great way to be productive and omniscient about recurring Play Store hiccups. So let’s dive right into this article with a brief introduction to Google Play.
- Find out how the Google Play Store and the Chrome Web Store fare against each other in this descriptive comparison article here.
What is the Google Play Store?
The Google Play Store is a feature-rich platform that houses more than 2.89 million Android applications as of 2022. The gigantic catalog of these programs is ever-growing, and you’ll always find a diversity of different apps to explore and try through Google Play on your Chromebook.
- Our detailed Google Play beginner’s guide should help you get started if you are new to Google Play Store.
Now that you have a clear idea of the effectiveness of this unique platform making its way to Chrome OS let’s get into the most common issues one can encounter with it and how to resolve them promptly.
Most common issues with the Google Play Store and how to fix them
The following list lists the most frequently occurring Play Store problems that may hinder you from downloading applications, launching the Play Store app, recrudescent crashing, or downloads and updates stopping midway. Without any further ado, then, let’s dive into all of these straight away.
1. Applications won’t start downloading
If applications do not start downloading on the Google Play Store that you have installed on your Chromebook and keep saying “Pending,” don’t worry at all. This is one of the most typically occurring Play Store issues that can arise for several reasons. We’re going to diagnose each of its originating points and guide you on how to fix it without breaking a sweat.
How to fix this issue
The following are the many different ways to fix the issue of Play Store applications not downloading on your Chromebook.
Restart the device
Restarting your device is one of the foremost things to try after encountering the issue of Play Store apps not downloading. Sometimes, all you need is a fresh restart, and you’ll potentially be well on your way to download and use the many various offerings of Google Play.
On Chromebooks, a function that’s better to perform instead of a regular reboot is a hard reset. This can be done by simultaneously pressing two different keys on your Chromebook’s keyboard. You need to input the “Power” and the “Refresh” key together, so the device can reset its hardware components and freshen the system up altogether.
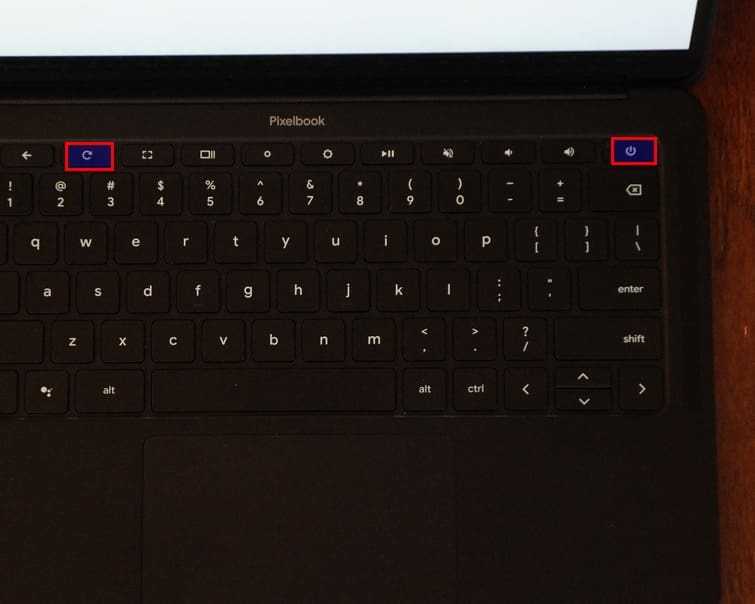
The key combination for a hard reset
Once you have the device up and running, try relaunching the Play Store to see if the issue has been resolved now. With some spell of luck and fortune, you’ll be able to install apps peacefully on your device now. However, if this doesn’t work, continue to the next fix.
Clear the data and cache of the Google Play Store app
If you’ve been using the Google Play Store frequently for a considerable amount of time now on your Chromebook, it may have accumulated a ton of cache and data. This particular occurrence might be causing the Play Store to be filled up from the inside, thereby being unable to install any further applications on the device.
That is why you must keep checking with the Play Store’s stored-up cache at least and clear it promptly. Making a habit of doing this can prevent you from running into many Google Play-related issues. The cache is intended to enhance the user experience by allowing data to be perceived faster by a specific program.
However, when it lingers unsupervised for long, it can give rise to multiple issues. Without any further ado, then, let’s talk about how you can clear both the data and cache of the Google Play Store app on your Chromebook.
1. To get started, open the “Settings” system app of your Chromebook. You’ll quickly find this in your Chromebook Launcher section or on the shelf if you have it pinned there.
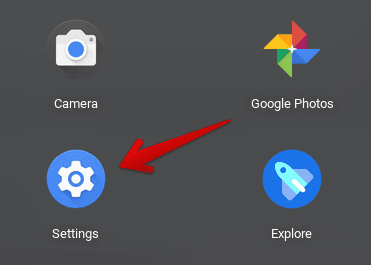
Opening “Settings”
2. Once done, select the “Apps” section present on the column to the left of the screen.
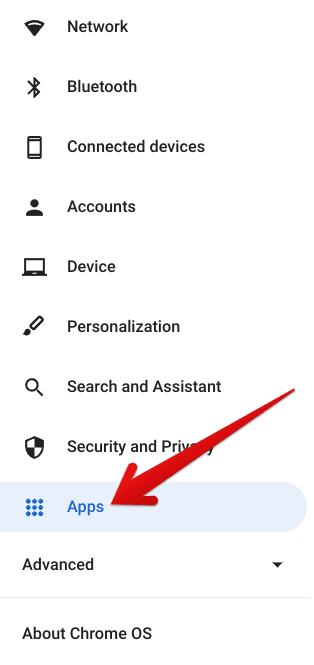
Clicking on the “Apps” button
3. After completing the last step, you’ll be taken straight to the “Apps” section of your device’s settings. Here, you’ll see the “Google Play Store” option listed among other buttons. Click on the arrow beside it to get to the next step.
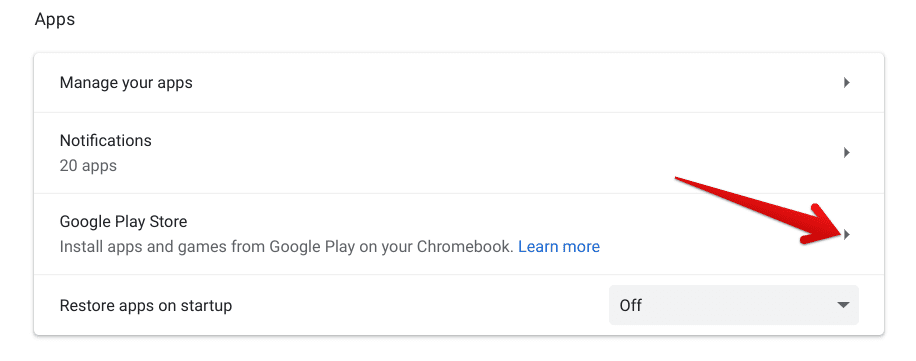
Clicking on the “Google Play Store” button
4. Once done, you’ll see the contents of the screen changing on your Chromebook. The next step is to click on the subsequently appearing “Manage Android preferences” button. Doing so will launch another window on your end.

Clicking on “Manage Android preferences”
5. You’ll now be within the main control panel of all the various Android processes present on your Chromebook. To continue, please click on the “Apps and notifications” button as instructed in the screenshot below.
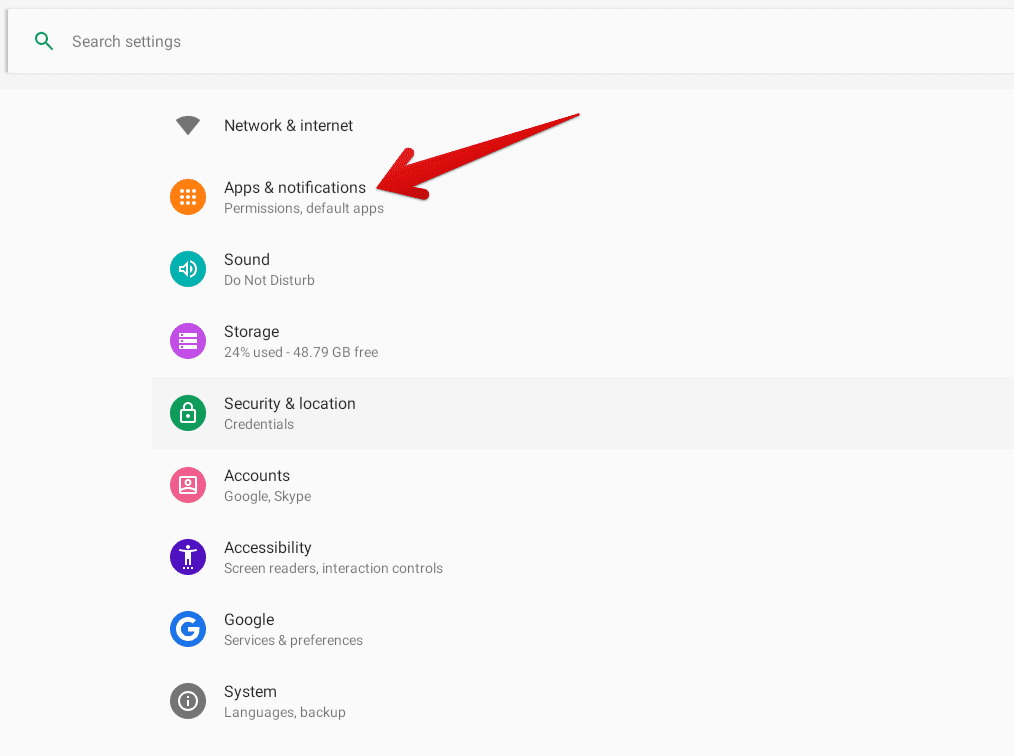
Selecting “Apps and notifications”
6. Good going so far! However, clicking on “Apps and notifications” still won’t get us quite where we need to be. The next step is to click on “See all apps” to continue and improve the visibility of on-display applications.
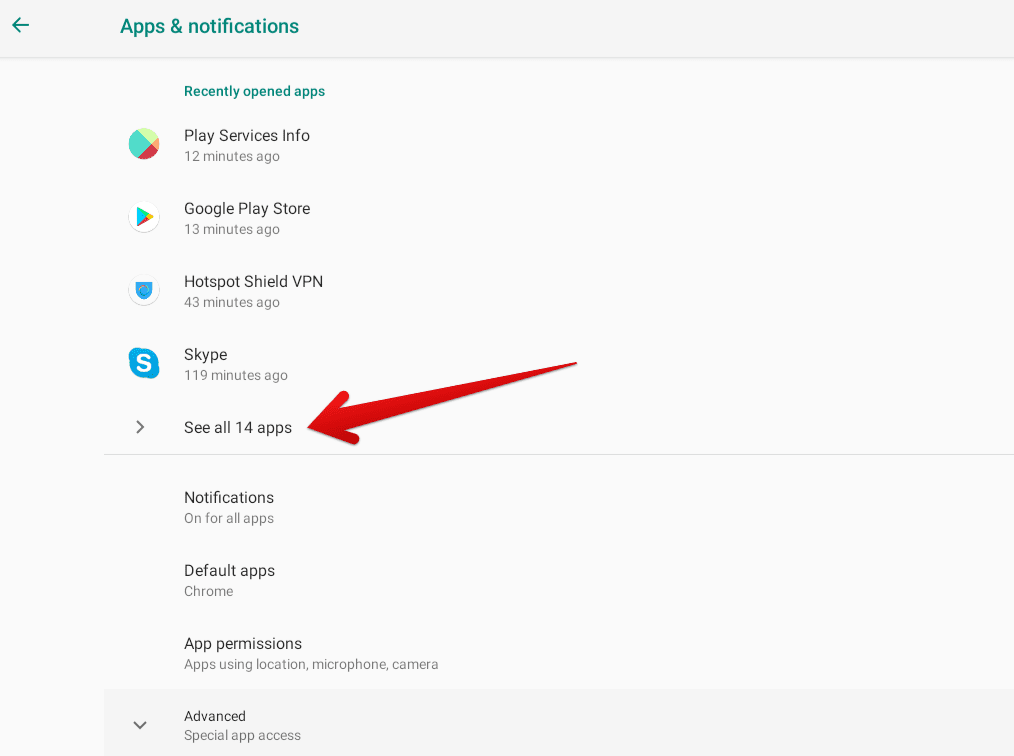
Expanding the options
7. You’re almost at the end now. Please scroll down the list of applications until you find Google Play Store. Click on it as soon as you see it to continue.

Selecting Google Play Store
8. The next step is to click on the “Storage” option. This will take you to the cache and data area to complete this task. The following screenshot is a visual explanation of this process.

Clicking on “Storage”
9. You’ll now be able to clear the data and cache of the Google Play Store painlessly. First, click on the relevant buttons as specified in the screenshot below. We recommend clicking on “Clear cache” before you click on “Clear storage.” It’s much better that way. Once you’re done, please click on the “X” button in the top-right corner of the opened window to close the application and finalize the process.

Clearing the storage and cache of Google Play
That was all about clearing the data and the cache of the Google Play Store to fix the apps, not downloading hassle potentially. If the problem continues to persist upon checking, you should clear the data and cache of Google Play Services as well. We’re going to get right into that in the following section.
Clear the data and cache of Google Play Services
After clearing the data and cache of the Google Play Store application, it’s worth repeating the same procedure for Google Play Services. Doing so can also help you kickstart your Play Store’s working and allow it to operate normally again. That’s because Google Play Services is an integral part of this platform that manages a ton of core components of the Play Store.
We need it to be performing at its level best to ensure a smooth and stable Play Store experience on Chrome OS. However, with filled-up data and cache slots, the latter is far from possible.
Therefore, as advised in the previous section, clearing the cache and storage can potentially fix the issue of Play Store applications not downloading.
The following steps will walk you through the process of getting this done on your Chromebook.
1. Please refer to the previous subtitle for completing the preliminary steps of this tutorial. Repeat the procedure until the 7th step in the “Clear the data and cache of the Google Play Store app” section and then continue by scrolling down the list of installed applications and selecting “Google Play Services.”

Selecting Google Play Services
2. You’ll now arrive at the main Google Play Services app page. This is where you can choose to adjust the settings of your applications in numerous methods, but we won’t get into any of that for now. Continue the process by clicking on “Storage,” as shown in the screenshot below.

Selecting Google Play Services’ “Storage”
3. Now, this is the ideal section of the application where it’ll be pretty painless for you to clear both the cache and the storage of Google Play Services. Doing so will significantly increase your chances of fixing the apps not downloading issue on your Chromebook. To get started, we advise clearing the cache first and then selecting “Clear storage.” Close the app window to finish the procedure when you’re done with both of these tweaks.

Clearing the storage and cache
Trying this potential fix will take its toll on the Google Play Store’s error-popping behavior and allow you to breathe a little easier when you’re downloading applications through it now. By trying all three solutions detailed above, you should now be able to install and use Play Store applications on the fly hassle-free.
Let’s move on to the following common issue that hinders the whole Chrome OS experience.
The Play Store app won’t launch
At times, you’ll often find the Play Store application not loading or launching on your Chromebook. Upon clicking on the app icon, the icon would darken out and circle, trying to load in its foreground. This would go on and on without any further development. Let’s get into the fixes of this common issue.
How to fix this issue
The following methods have worked for other users in fixing the Play Store app not launching.
Free up your RAM
One of the most alarming reasons your Chromebook’s Play Store application isn’t launching is that it does not have enough RAM to load and run apps. If that is the case, you’ll find it challenging to use your device altogether, and you might even run into other performance-related problems that can hinder your Chrome OS experience. Getting your RAM or memory filled up isn’t uncommon on low-end devices that come with 2 GB of available RAM.
If you’ve got a device such as this, you better take special care and not store too much data on the Chromebook’s local storage to the point that it doesn’t get overly congested. You’re better off utilizing the best cloud-based storage solutions to get the job done and not run out of memory as well.
Some of the best practices that you can incorporate for freeing up RAM on your Chromebook include removing extra accounts from your device that you no longer need and firing up the Chrome OS Task Manager to monitor what is running in the background. Active processes without you knowing hog up memory like no other program. You best be careful not to let anything run unsolicited.
Another tip is to install specific extensions that save RAM for you on the device. These include The Great Suspender and OneTab. If you want to read more about these add-ons and other tricks for clearing your device’s memory, check out our descriptive article on how to free up RAM on a Chromebook.
Giving your device room for breathing is a definite way to fix the Play Store application not launching issue. However, if the problem persists, continue to the next potential solution.
- Have you got performance issues on your Chromebook? Check out this tailored guide for a bunch of tips and tricks to speed your device back up.
Try running fewer apps at a time
If the Play Store application on your Chromebook isn’t launching, you might have too much on your plate at one given moment. In addition, If your device isn’t anything like the Lenovo Chromebook 3 that can handle multiple applications running concurrently well on its own, it might be best of your interest to stay cautious and launch only those apps that you need when multitasking.
You also have to be wary of background processes running on your device. For this purpose, the Task Manager can help you out profoundly. All you have to do is press the “Search” and the “Esc” keys together to fire up this utilitarian program and observe how many apps are running on the device. If you see something you do not need, click on it and follow it by selecting “End process.” That should do the trick for you.
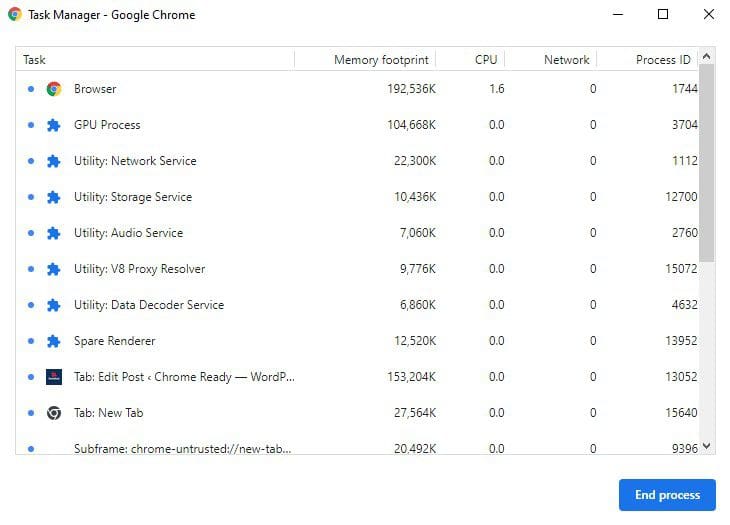
Chrome OS Task Manager
Hopefully, you should be able to run the Google Play Store application on your Chromebook without any further problems.
Applications won’t update
Another classic Google Play issue is that the applications you’re trying to update won’t finish the download and complete the process. This happens to dozens of people, so you’re not alone facing this problem. Let’s get to the fixes of the problem right away.
How to fix this issue
The following is how you can get Play Store applications to update normally again.
Clear storage space
If applications won’t update on your device, this is a clear sign that you’re low on storage space. Even if the system doesn’t prompt you to clear your storage and free up some space, you should certainly check the amount of available storage you have left on the device.
One of the easiest ways of doing this is to head over to the “Files” system application on your Chromebook and click on the three vertical dots in the top-right corner symbolizing “More.” Once done, you should be able to see the amount of storage left on your device at the very bottom of the section, as specified in the screenshot below.
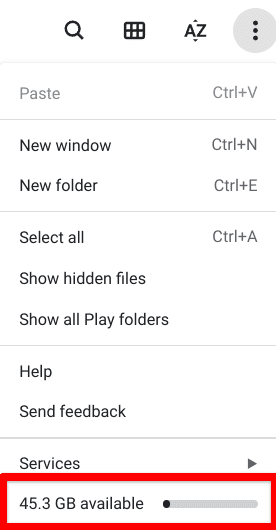
Available Chromebook storage space
As you can presume, we’ve got plenty of room on our device, but yours might be oversaturated with data. Consider transitioning to the cloud with your essential, large-sized files if that is the case. pCloud is a fantastic option in this regard. Furthermore, try deleting unwanted files and applications that take up storage on the device.
If clearing significant space on the device doesn’t help, keep reading for more ways to fix the applications not updating issue.
Remove your Google account and add it afresh
Another way you can fix the issue of applications not updating on your Chromebook is to remove your Google account used to sign in to the device. Once done, you’ll add it back again and confirm whether doing this has resolved the problem for you.
Removing the primary account from your Chromebook is a somewhat tricky process. To do this, you’ll need the help of another device as it cannot be done on the same Chromebook as the one you want to remove your Google account from. Try a Windows PC for the best results or another Chromebook if you have one.
To get started, use this direct link to get straight to your Google account’s management portal. Once you’re there, click on “Security” in the column to the left side of the screen.
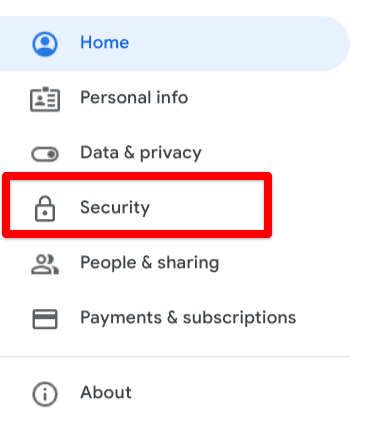
Clicking on “Security”
Next is to scroll down and find the “My devices’ section. As soon as you’re there, click on the “Manage devices’ option to continue.
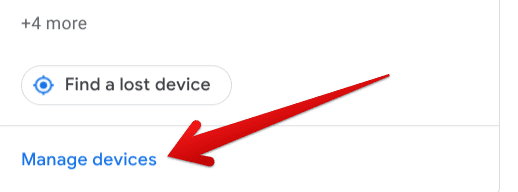
Managing devices
You now have to locate your Chromebook among your Google account-enabled devices and click on the three vertical dots to its top-right. Once done, select “Sign out” to finalize the process.
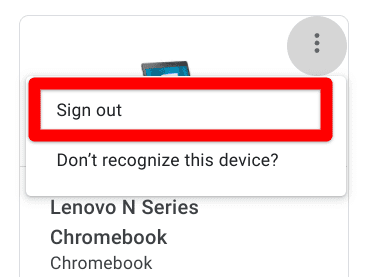
Signing out of the Chromebook
When you next boot your Chromebook, you will be prompted to sign in again due to an error of some sort. You’ll sign back in, let the device sync your settings, and try launching Google Play to confirm whether the issue has gone away or not. If even signing out and back in hasn’t helped you either, there are additional fixes to try as well.
Additional ways to fix
If applications won’t update on your Chromebook, it’s worth clearing the data and cache of the Google Play Store app and Google Play Services as well to resolve the issue potentially. We’ve already laid out the guidelines for doing this in one of the previous sections, so you can easily refer to that for step-by-step instructions.
The Play Store app keeps crashing
If you can launch the Play Store application just fine and even applications and updates are usually downloading, but the Google Play app itself keeps crashing consistently, there are a bunch of fixes that you can try. Let’s get into them right below.
How to fix this issue
You can approach the following methods to fix the Play Store app crashing on your Chromebook.
Remove the Google Play Store and activate it again
In this unfortunate case, one of the first things to try is to remove the Google Play Store from your Chromebook and make it functional again. This can be done quickly by heading over to the “Settings” app on the device, selecting “Apps,” and then clicking on “Google Play Store.” Once done, the option to “Remove” the app should be vividly apparent on your screen. Click on it to finalize the process.

Removing Google Play Store
Right after that, you should be taken back to the “Apps” section of the device’s settings. Don’t turn the Play Store feature on just yet. Perform a hard reset first by pressing the “Refresh” and the “Power” key together.
As soon as your Chromebook is back on, go to the “Apps” area of your settings again and select “Turn on” right beside “Google Play Store.”
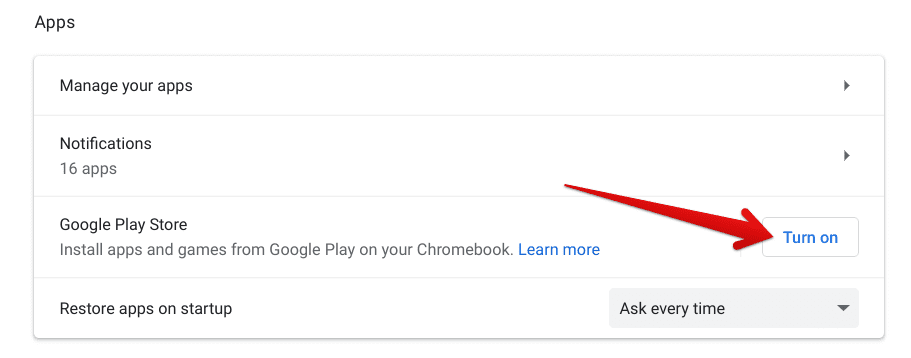
Turning on the Google Play Store
- If you’re after a more detailed guide, read this in-depth guide on how to activate the Google Play Store on a Chromebook.
After completing this procedure, try using the Play Store application to see if you’re reencountering crashes. If the issue persists, continue to the final fix on this list for you.
Perform a Powerwash
Performing a “Powerwash” restores your Chromebook to factory settings. It’s another term for factory resetting Chrome OS. There’s a strong likelihood of fixing Google Play’s consistent crashing upon Powerwashing the device, so we recommend doing this is as a last resort if all other methods have failed.
To learn how to perform a Powerwash, check out this detailed guide. By successfully taking this approach, you should be using your device error-free from there on out.
Conclusion
Google Play is one of the most crucial Chromebook features that allow these slick devices to do more and be more. You cannot operate partially and let the platform offer you a substandard experience. This article outlined the most common fixes you can encounter with the Google Play Store app on Chrome OS and talked about their fixes.
Do keep this handy guide pinned to your Chrome browser to get back to it whenever the need arises. The embedded instructions are easy to follow, so you should have no trouble employing the solutions we’ve talked about. Chrome Ready wishes you good luck!
