Technology is at the forefront of everything today. Windows PCs, Chromebooks, Macs – all are advancing steadily over time, and there’s no telling where we’ll be ten years from now. One of the most useful functionalities that have made it to the face of modern-day computers is cloud-based storage. It’s something that negates the necessity of having a physical hard disk drive or an external USB drive to store your documents, photos, videos, and other data.
Now, different developers have come out with their cloud-based storage solutions to accommodate themselves and source them out to end-users. One of the prominent examples, in this case, is Google Drive, which is arguably the best cloud storage option you natively have on Chrome OS. However, it’s important to acknowledge another contender amidst the competition that may even come across as better than Drive—pCloud.
Therefore, in this article, we will talk about everything there is to know about this terrific cloud storage solution, including how to install and configure it on your Chromebook. Let’s dive right into the guide without any further ado then.
What is pCloud?
pCloud is a well-established European company that has made its stance exceedingly clear on being a top-tier cloud-storage providing service. It is known for being reinforced with high-end security—a Switzerland-based enterprise—so worrying about your data getting lost or misused shouldn’t be a cause for concern. In terms of functionality and overall features, pCloud has been rated as one of the best cloud storage of the preceding year by TechRadar—a technology tycoon.
It’s available on a wide variety of platforms, including Windows, Mac, Linux, Google Play Store, and Chrome Web Store as well, so compatibility isn’t going to be an issue. Many people have pCloud as their go-to cloud storage for all digital forms of media content across the interweb, including photos, videos, audio tracks, documents, and even web pages. The developer even gives you 10 GB of free storage to get started with and test the service out before purchasing the paid plan.
Now that we’re a little aware of what functionality pCloud is packing let’s check out some of this software’s best features.
pCloud’s best features
We’ve gathered pCloud’s most noteworthy features below so you can see eye to eye with millions of fellow pCloud users and realize its potential.
Starts you off with 10 GB of free storage
You heard that right. While pCloud does offer users premium annual and lifetime plans, too, you don’t have to pay a dime to get started with it. It offers you 10 GB of free storage right off the bat, which is excellent for new users to acclimate themselves with.
This amount of storage is more than ample to give you an idea of how pCloud operates and whether it’s the right cloud storage solution for you or not. As opposed to OneDrive’s 5 GB of free storage limit, pCloud is out there offering double of that.
Painlessly simple user interface
pCloud employs a user interface that’s painlessly simple for everyone to grasp, even newbies. You won’t find a shard of complexity anywhere within the service that could make you scratch your head in confusion. In addition, it employs several management-oriented features within the interface, so finding your data won’t become a chore when you genuinely need it.
This also means that you’re free to add whatever you want to in pCloud, even if the volume exceeds several gigabytes. Still, you’ll be capable enough of finding what you stored without breaking a sweat. It also doesn’t matter if you’re using pCloud through its desktop client or from the Google Play Store – its tip-top user interface will make it a breeze to access your files anywhere you use it.
Share feature
pCloud is big on sharing. It’s a boon if you’ve got friends and co-workers who are also pCloud users and also a convenience for those who are not. To start with the former, you can invite your pCloud using friends to what the product calls shared folders. Upon invitation, you and your squad can collaborate on the shared files, with you being the administrator, of course. This means that you’re in control of setting the type of access users will get upon invitation to the shared folder.
The types of accesses typically include Manage, Edit, and View. In this manner, it becomes seamless to work with other pCloud users on the platform. However, the cloud storage solution doesn’t tend to like-minded users only. As for those who don’t have a pCloud account, the service offers a unique panacea. It involves dynamic link sharing to non-pCloud personnel right from the browser or the Play Store app, so others can access it and download the attached file.
Top-tier safety measures
The developers affirm that pCloud utilizes the power of TLS/SSL encryption whenever information is being exchanged between your device and the servers of this platform. In addition, the top-tier safety measures do not end here. At least three server locations are used for keeping your files in a highly secure manner. This method of diversifying your assets goes a long way in guaranteeing their security day in day out.
What’s more, pCloud offers an additional service to its users that must be purchased. It’s called pCloud Crypto, and it’s all about encrypting your data and protecting it with a password. This will allow you to delve into a systematic procedure called client-based encryption. This means that the only person who can ever unlock the encrypted files will be you, as you’ll be provided with the passkey that can bypass the protective layers.
Cross-platform functionality
As iterated earlier, pCloud provides all of its users with cross-platform functionality. This means that the application is not only available for desktops but can also be used on mobile operating systems as well. Therefore, it doesn’t matter what type of device you’re using. The convenience of pCloud’s service will stretch out across most modern-day systems and allow potential users to look into collaboration and get all of their stuff back as per their feasibility.
Lifetime subscription solution
It turns out that this cloud storage solution is also allowing users to purchase lifetime subscriptions, and not many other similar products can do the same. You can get the Premium 500 GB plan for a one-time upfront payment of $175, while the Premium Plus 2 TB package can be yours forever for as low as $350.
How to install pCloud on Chromebook
Now that you’re aware of pCloud’s most well-established features let’s get into the raison d’etre of this article and talk about its installation on Chrome OS. There are various ways you can get pCloud to work on your trusty Chromebook, and we’re going to cover all of them one by one in this section. Without any further chit-chat then, let’s get started right away.
Option #1. Using the destkop client of pCloud on Chrome OS
The first option you can utilize for using pCloud on your Chromebook is accessing the platform through its desktop client. This is one of the easiest ways of getting started with this cloud storage solution provider, so you shouldn’t be running into any difficulty. We’re also here to walk you through the process.
To begin, click on this direct link to get straight to the official website of pCloud. Once done, you should see a sign-up section on the main page located on the right-hand side. This is where you’ll create your account on the platform to use it. Without a properly working account, it’s impossible to avail oneself of pCloud. Therefore, choose the method you’d like to use to sign up for the platform.
At the moment, you have the option of registering an account with Apple ID, Gmail, and Facebook. In addition, you can also sign up using your email address. We’re going to go with our Google account because it’s fast, swift, and painless. Before you proceed, it’s worth noting that you have an option here to choose which data region you’d like to go for: the European Union or the United States. The former is set by default for new users but can be easily changed by clicking on the drop-down arrow right beside “European Union,” as shown in the screenshot below.
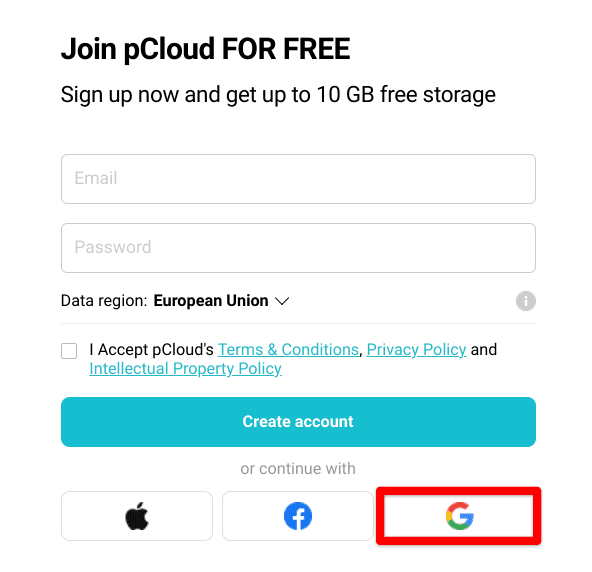
Signing up for pCloud
Once done, you’ll be prompted to accept pCloud’s terms and conditions and click on “Create account.” It should be a pretty straightforward process, so you can quickly go through it without breaking a sweat. After all this, you’ll be taken to the main pCloud desktop client with a “my.pcloud.com” URL. The following is how the platform looks on your Chromebook.
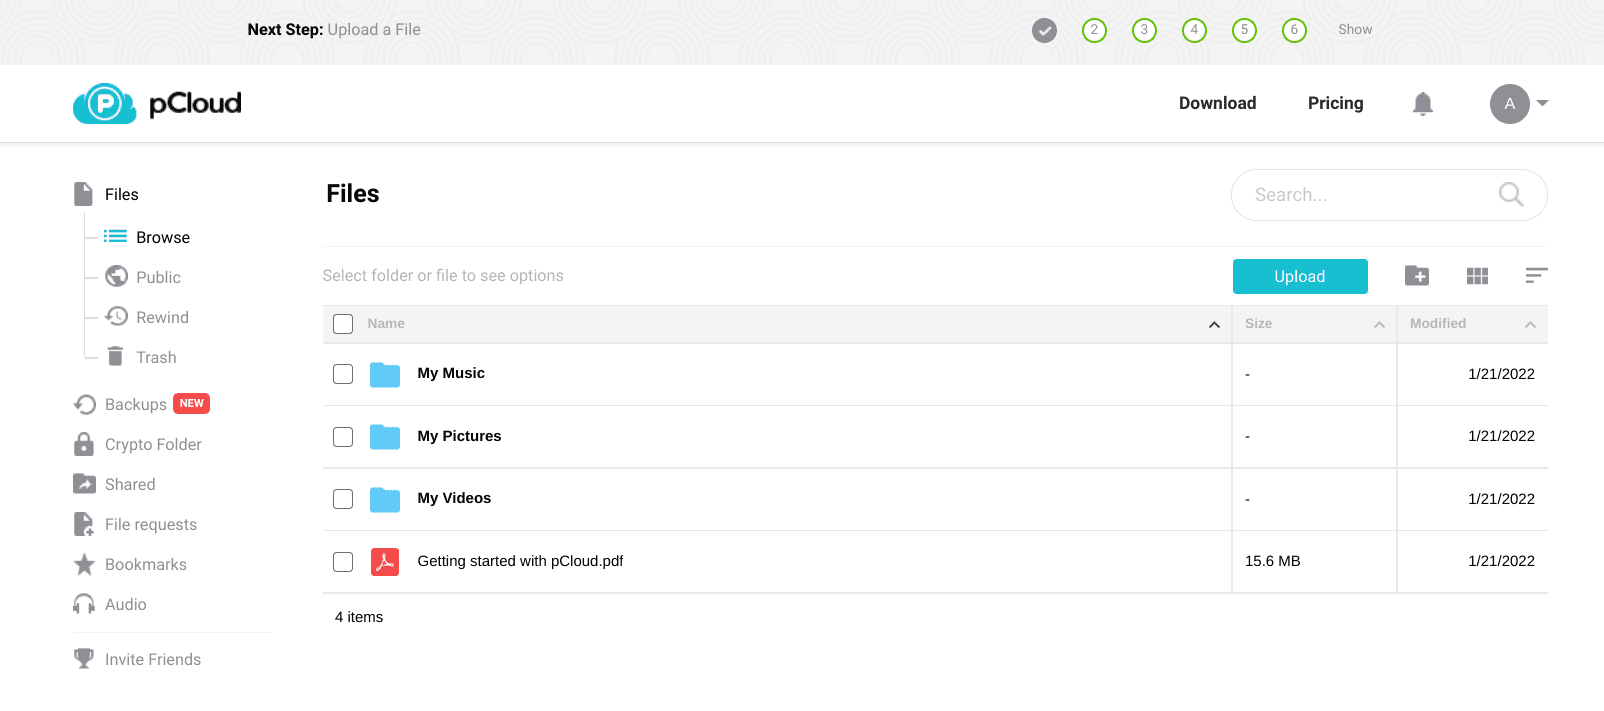
pCloud desktop client interface
The screenshot above is the major visual interface of pCloud on a Chromebook. This is your control center, where you can upload new files to the domain, view, and download existing ones, and manage your data painlessly. If you’d like the pCloud app to give you a tour, you can check out the pre-installed “Getting started with pCloud” PDF for in-depth instructions.
First-time users will have 3 GB usable when they initially start with pCloud. But don’t worry because the rest of the data can be “unlocked” by completing specific tasks. For instance, uploading a file gets you 1 GB for free, and doing that is as easy as ABC. So let’s show you how to do that. First, find the “Upload” button in the screenshot below and click on it on your screen. You can even click on the “New Folder” button beside “Upload” to place your uploads in a different destination.
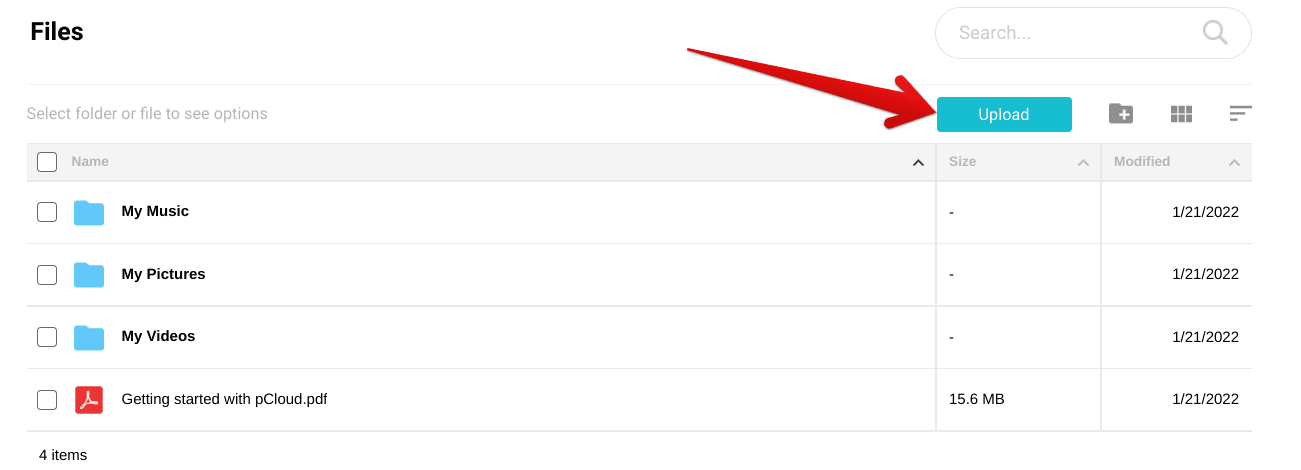
Uploading a file to pCloud
A small-scale window will appear on your screen as soon as you click on “Upload.” This is where you’ll be uploading your files to pCloud. To begin, click on “Browse For Files” to open up your Chromebook’s local storage. This is where you’ll have to pick the files that you want to upload to the cloud storage platform in question.
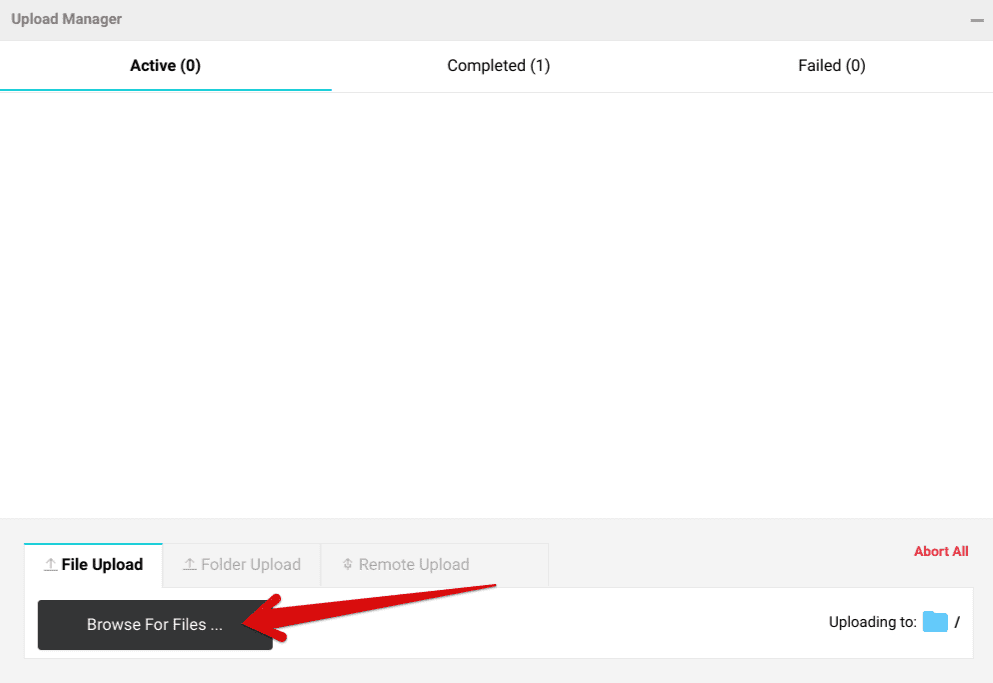
Browsing to upload files
We’ve selected a stylish wallpaper of Jin Sakai from Ghost of Tsushima. Its progress will appear under the “Active” tab as the photo uploads. Once the progression is finished, the image will be transported to the “Completed” tab. Wait until your file has been fully uploaded before closing the upload window.

Upload in progress
Once you close the upload window, the photo that has arrived on pCloud will now be visible in the “Files” section. You can even select it to find that the platform provides you with multiple image editing options. These include downloading, printing, opening the location, renaming, copying, moving, deleting, and viewing the revisions of the photo if there are any. If it were any other file than a photo, you would have fewer options, but all of them would be resourceful nonetheless.
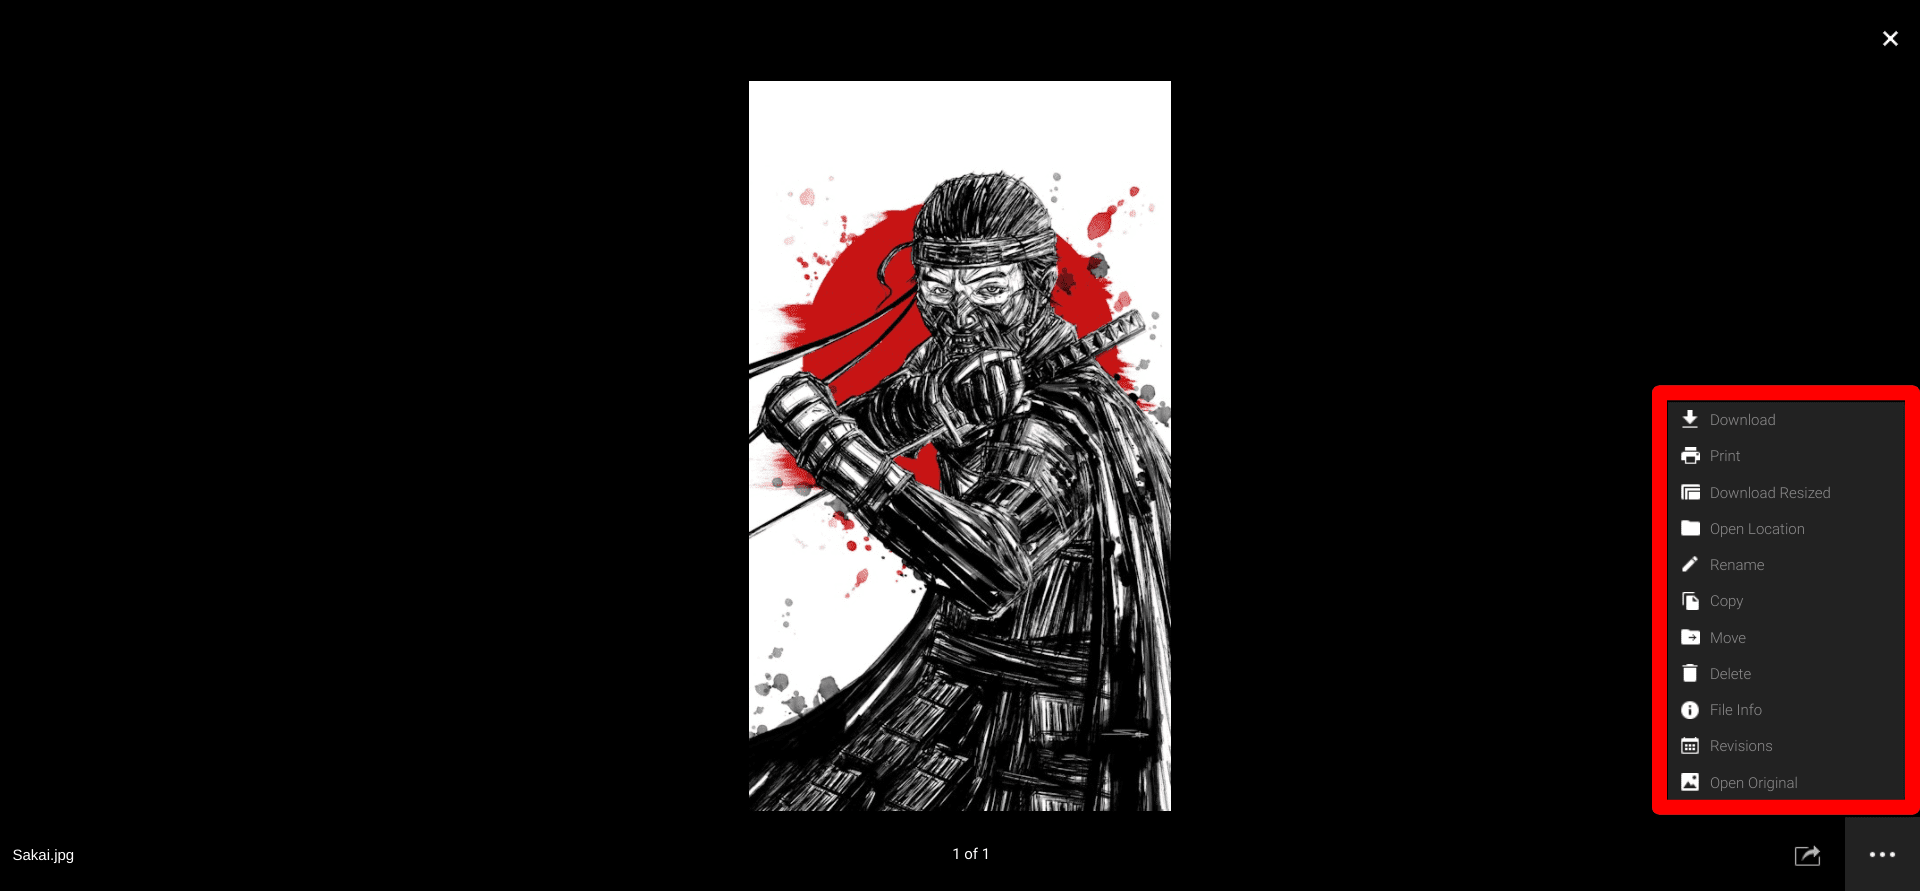
Editing options for photos
All right, this is about as detailed as we can get regarding the desktop client of pCloud. We’ve still got a bunch of other methods to try out and use pCloud on Chrome OS, so let’s get into those right away.
Option #2. Using the Google Play Store to install pCloud
As iterated earlier, pCloud can be grabbed from the Google Play Store as well if you’re on a Chromebook. However, make sure that your device is compatible with Play Store functionality before getting started. Now then, let’s get right into the process of installing pCloud from Google Play.
- The first step is to fire up the Google Play Store on your Chromebook.
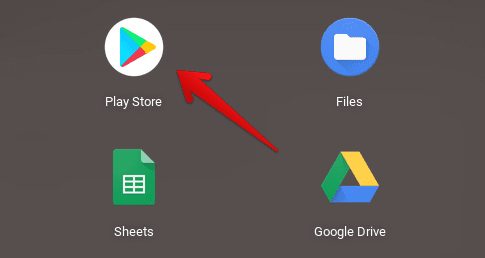
Opening the Play Store
2. Once done, type in “pCloud” into the search bar of the Google Play Store and press the “Enter” key to get straight to the official pCloud app page on the platform.

Searching for pCloud on the Play Store
3. This is where you’ll be able to see the “Install” button. Click on it to begin the download.

Installing pCloud
4. Once you’ve been notified that the installation has finished, go to your Chromebook Launcher to find pCloud. It should look similar to the app icon shown in the screenshot below.
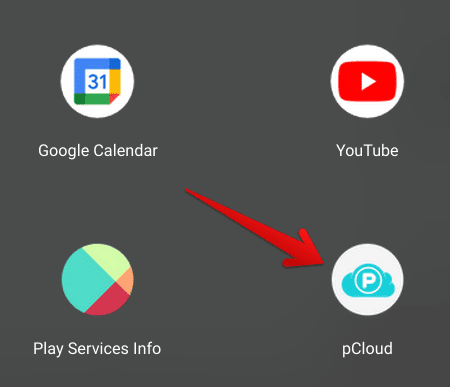
pCloud installed
That’s about it for installing pCloud on Chromebook. Next, let’s check out how it operates and how you can configure the application to get more out of it.
How to use and configure the Play Store version of pCloud on Chromebook
When you first launch the pCloud application, you’ll be met with a welcome screen that’ll prompt you to sign in. The options available will be similar to when we were trying to sign up on the desktop client of pCloud. Therefore, you should have an account on the platform by now, so sign in with whatever you did previously, and you’ll be good to go.
As soon as you sign in, the first prompt that will appear on the screen will urge you to upgrade to the Premium plan. After that, you can click on the cross mark in the top-right corner of the prompt, which should close it down. Once done, you’ll get another prompt, and this will be about one of the many genuine features of pCloud called “Automatic Upload.”
The feature works best if you’re on an Android mobile but can be availed of on your Chromebook too. It syncs photos right from your system’s gallery or the “Files” system app in the case of Chrome OS and saves them to pCloud painlessly. You can click on “Turn ON Automatic Upload” to enable the function right away or select “Later” if you’re not up for it right now.
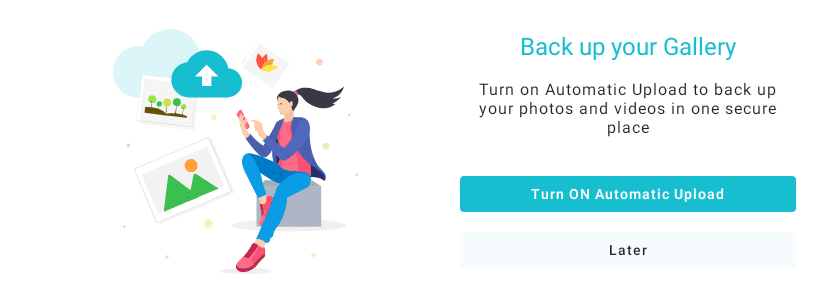
Upload feature of pCloud
The next thing you’ll see on your device will be the main pCloud interface. It’ll be mostly the same as the desktop client that we checked out above, but we believe the Play Store variant is even more convenient to use. If you remember correctly, we uploaded a wallpaper of Jin Sakai while using the web-based version of pCloud. In the screenshot below, you can observe how the same photo is also available on the Play Store version of the application. This is the convenience that cloud-based storage is all about—omnipresent across all platforms.
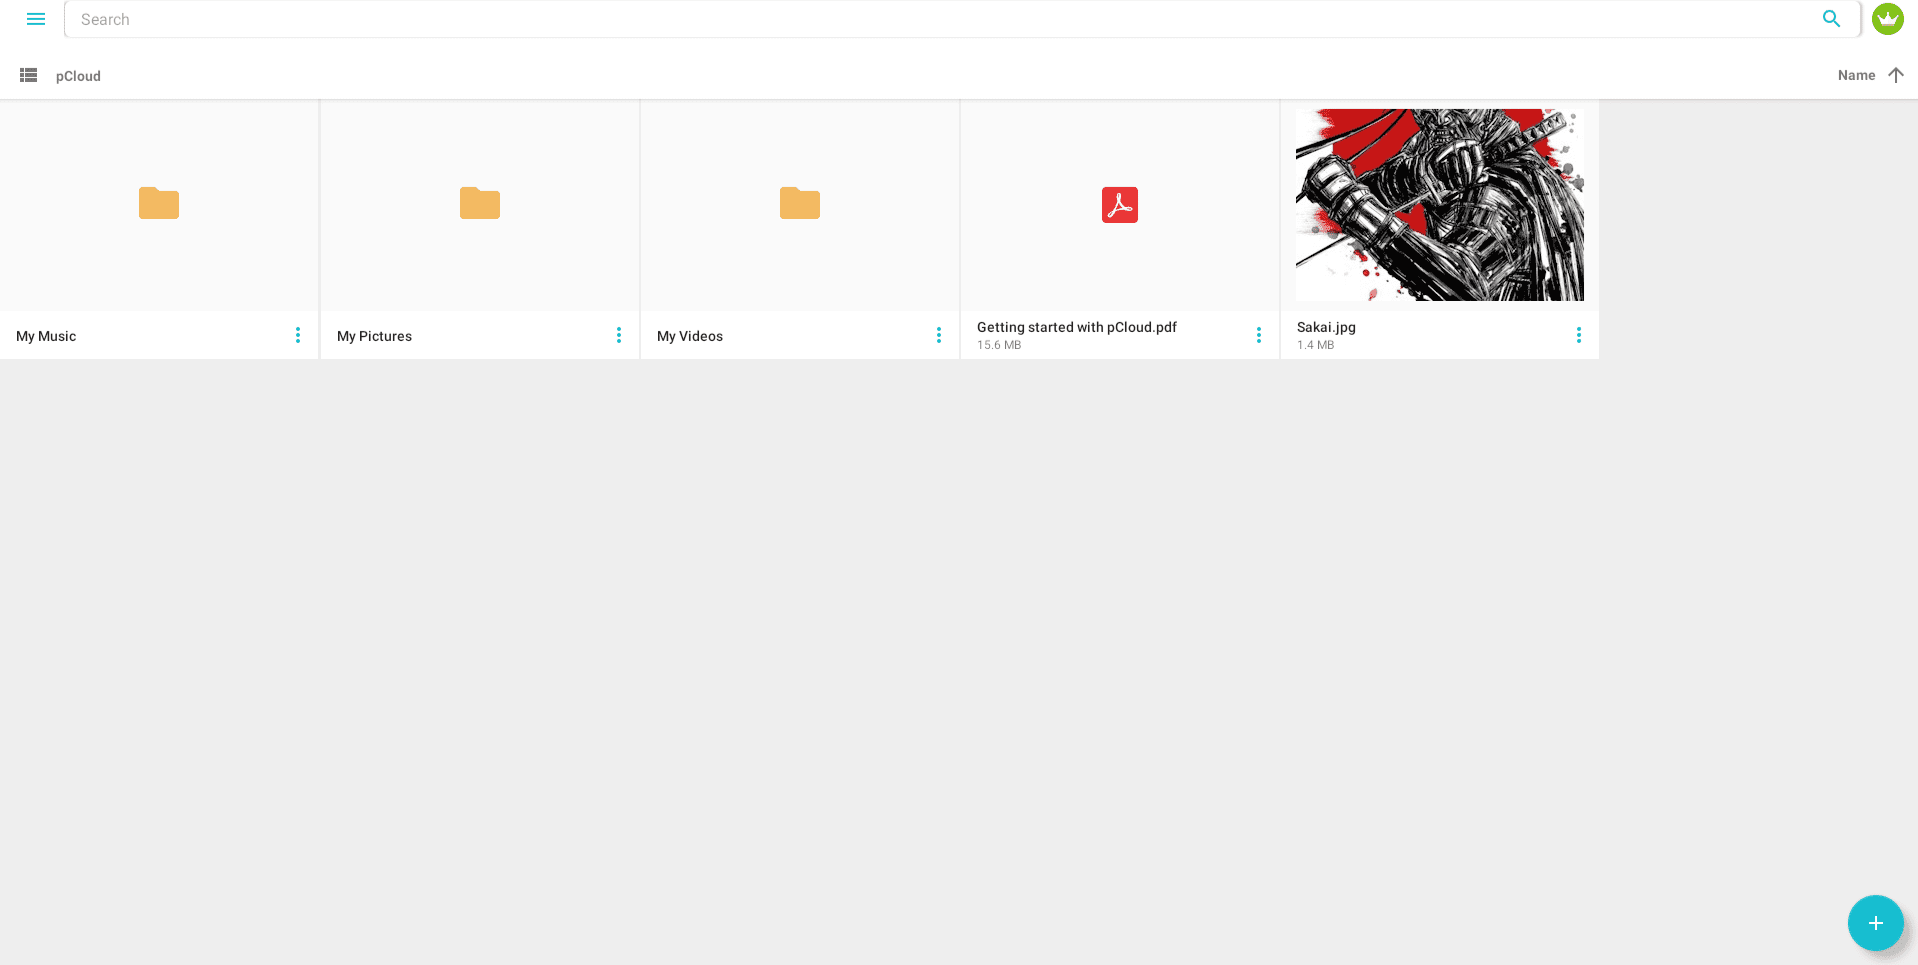
pCloud Play Store app interface
If you want to upload files to pCloud from your Chromebook, click on the “+” icon that’s present in the bottom-right corner. Once done, three options will appear right beside the icon: “New Folder,” “Upload,” and “Camera.” While you can also opt for creating a new folder and taking photos from your camera, clicking on “Upload” will do for now. Your Chromebook’s local storage will open right away, allowing you to pick the files of your preference and upload them right to pCloud.
Other than that, it’s handy to configure the application on your device as well. To get started with that, click on the hamburger icon right beside the search bar in the upper-left corner to reveal more options. Once done, select “Settings” and proceed to the next step.

Selecting pCloud’s settings
Now that you’re within the “Settings” section of pCloud, you’re free to configure it with many options. The major ones include applying a passcode lock, managing your notifications, enabling Automatic Upload and freeing up the device storage subsequently, toggling off “Metered Network” that lets you download files and folders only over Wi-Fi, clearing the cache, showing system files within pCloud, and changing the theme.
Explore the settings section on your own and see what changes you can make to enhance your user experience. The following screenshot is how the “Settings” area of pCloud looks when launched on a Chromebook.
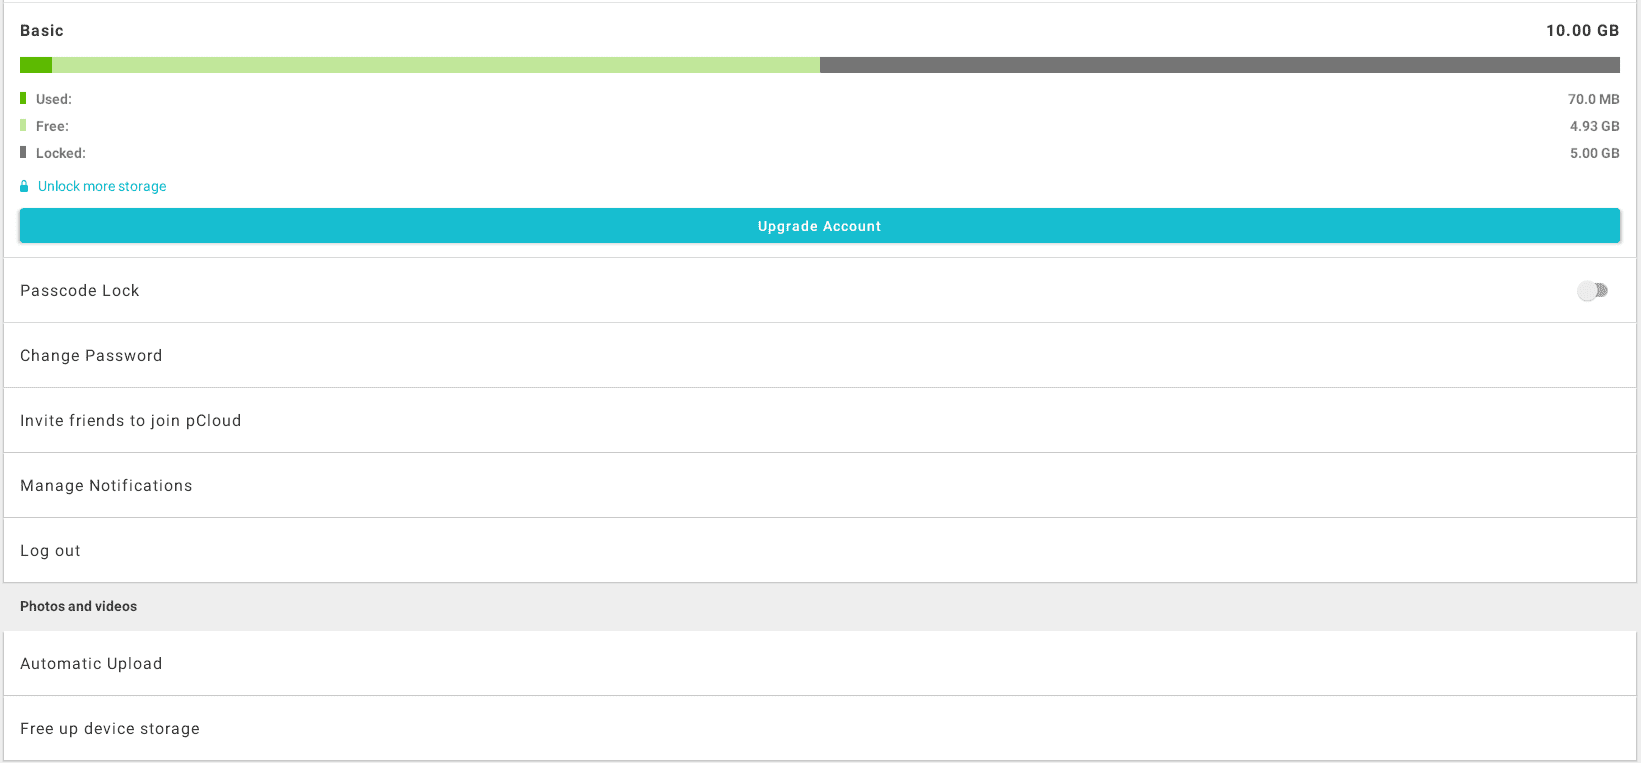
pCloud settings configuration
Option #3. Using pCloud as a Chrome extension
The third and final way of working with pCloud on your Chromebook is downloading its Chrome extension from the Chrome Web Store. By utilizing this method in harmony with any of the two methods illustrated above, you’ll be maximizing the efficiency of using pCloud to the very full.
The pCloud Chrome extension lets you save text, images, videos, and any other document that you might find on the internet instantly from right within the browser. So let’s probe further and check out how to install it. The following steps are going to take it from here.
- Head over to this direct link for getting straight to the official extension page of pCloud on the Chrome Web Store. Once you’re there, click on “Add to Chrome” to continue.

Adding pCloud to Chrome
2. Once done, a prompt will appear at the top of the window, asking you to confirm the installation. Click on “Add extension” to finalize the process.
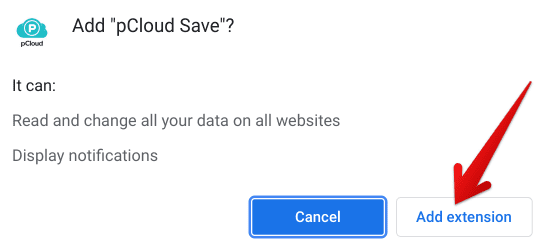
Confirming the installation
3. Extensions are usually small in size, so the installation shouldn’t take more than a few seconds. Once it has finished, you’ll be prompted with the following message on your browser.

pCloud added to Chrome
Good going so far! You’ve perfectly added pCloud to the Chrome browser. You need to click on the extension icon within the extensions toolbar to use it. Doing so will prompt you to sign in. We recommend using the same account for all three types of pCloud applications for the best results.
Once you’ve signed in, you can upload any text, document, and photo you see while browsing by double-tapping on it and selecting “Save to pCloud,” as shown in the screenshot below. It’s just a brilliantly convenient way of utilizing the cloud, so we genuinely advise getting to grips with it.
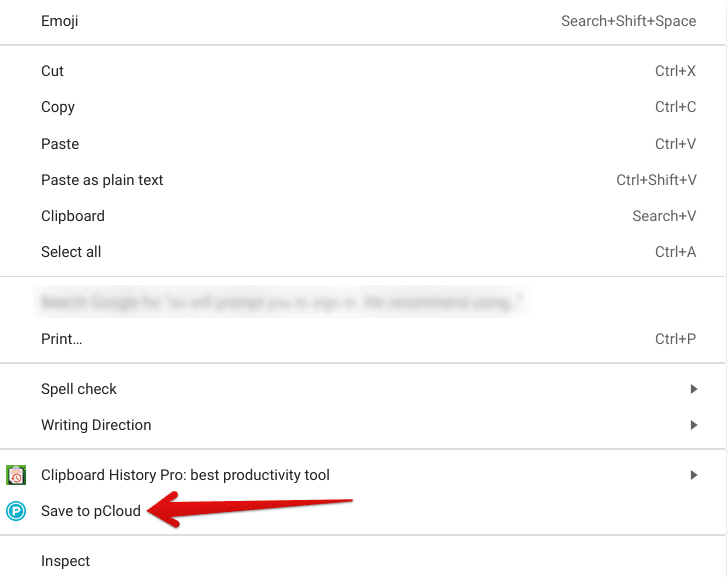
Saving to pCloud
Conclusion
pCloud is a highly effective cloud storage solution available for various platforms. We recommend trying it out on your Chromebook if you’ve been looking for an effective, simple, and easy-to-operate cloud service to store your essential files and data on.
In this article, we’ve talked about all the different ways of installing pCloud on Chrome OS and how it can be configured to your liking as well. We hope that the process has been simplified now that you’re aware of all things pCloud. Do let us know in the comment section if you found this write-up helpful. Chrome Ready wishes you good luck!
