Advertisements constitute a significant part of businesses running online. They strive to bring in traffic to websites and target distinct audiences to make the organization grow. Their presence in marketing campaigns being held worldwide is unmatched and, therefore, exceedingly integral for startups trying to stretch across the spectrum.
However, with all that being said, advertisements are not for everyone. They can get pretty intrusive and borderline annoying when all you see on a website are ads and nothing else. So it can pay off to know how to block ads in cases like those, especially if you’re on a Chromebook.
- Similar Read: How to fix issues with the Google Play Store on Chromebook.
Blocking ads on a Chromebook
In this article, we’ll discuss all the different ways you can steer clear of adverts and enjoy an ad-free browsing experience on Chrome OS.
Option #1. Optimizing the built-in browser settings to block ads
The first method you can use to block ads on a Chromebook is built right into the Chrome browser. So you don’t have to stray any further than Google Chrome to take care of a particular type of advertisement when you’re surfing the internet. That said, it’s worth noting that there are multiple variants of adverts perceivable online, and none of them are identical.
For instance, some of the most common forms of modern-day online advertisement include displaying banner ads, video ads, and playable ads on mobile smartphones. However, another type of this digital promotion comprises a whole window for displaying a particular ad. This form of advertisement is commonly known as interstitial advertisement and is also referred to as a pop-up or a pop-ups advert. Quite honestly, pop-up ads are the most annoying among the different advertisement categories.
If you’re a fan of streaming movies for free online, you might be familiar with websites like CMovies, 123Movies, or FMovies. They house all the latest movies, television shows, and documentaries, but these platforms solely operate on the revenue generated from their ad campaigns. This is why you’ll find all types of advertisements there, including interstitial ads or pop-up ads, banner ads, and video ads.
The first option for blocking ads on Chromebook targets pop-up ads in particular, so websites like the ones we mentioned earlier can be navigated a little easier. Therefore, follow the steps given below to learn how to prevent unwanted pop-ups from loading on your device.
1. The first step is to click on the “Customize and control Google Chrome” button in the top-right corner of your Chrome browser window.

Customizing Google Chrome
2. You should be seeing a whole list of options in that particular area once done. Select “Settings” from this list to get to the next step.
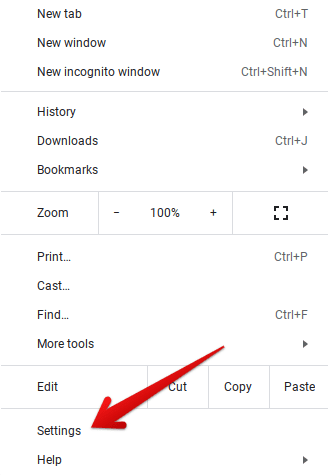
Clicking on Google Chrome’s “Settings”
3. As soon as the Chrome browser’s settings are open, the next step is to click on “Privacy and security” on the column to the left side of the screen.
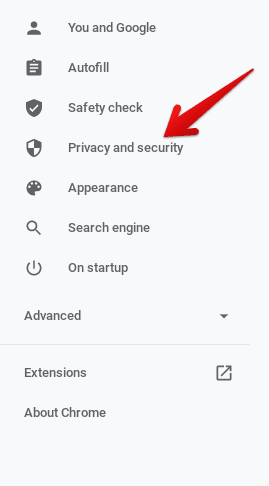
Clicking on “Privacy and security”
4. You’ll now be taken to the “Security and Privacy” section of your browser’s settings to speed things up automatically. Once you’re there, select “Site Settings” to proceed.
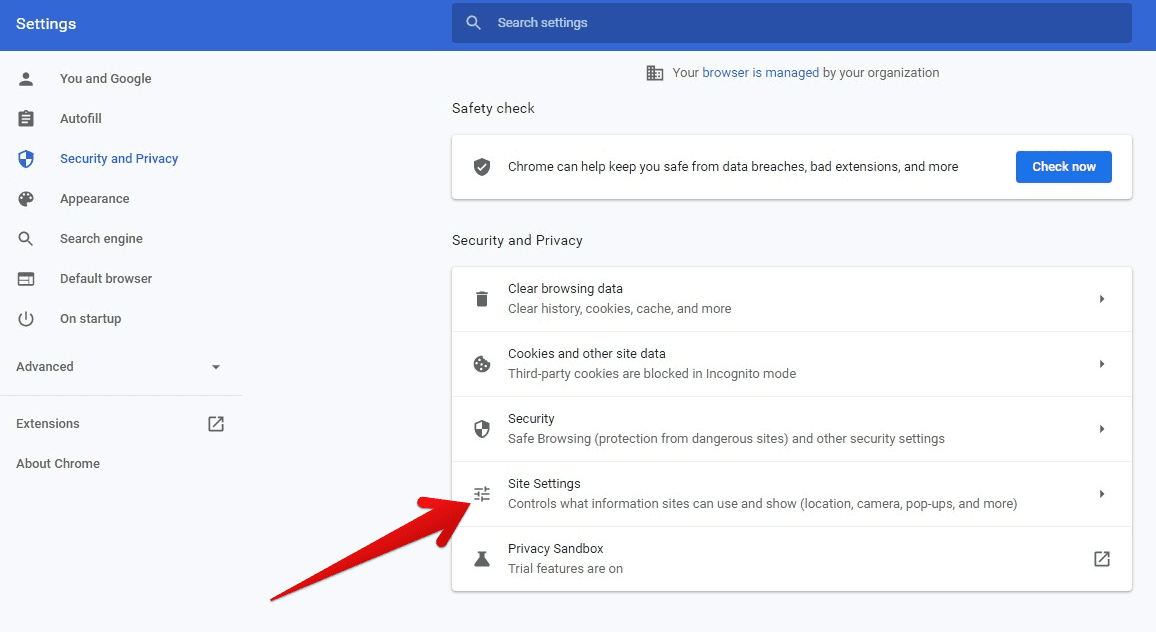
Opening “Site Settings”
5. Good going so far! As soon as you’re within the “Site Settings” section of your browser’s settings, scroll down and find “Pop-ups and redirects.” You’ll see the description “Don’t allow sites to send pop-ups or use redirects” below this option. Click on the arrow beside here to continue to the next step.
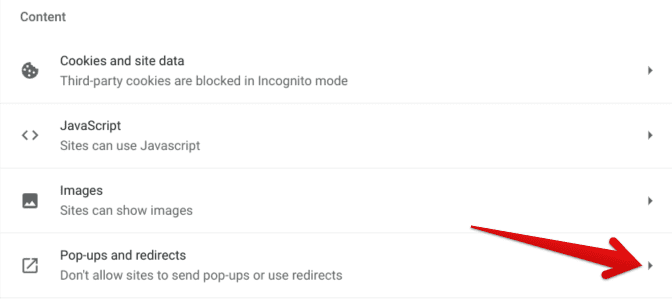
Clicking on “Pop-ups and redirects”
6. The next page that will appear on the screen is where you’ll be able to block websites from sending pop-ups or using redirects—clicking on the appropriate option as specified in the screenshot below to get to the next step.

Clicking on the relevant option
7. However, you’re not entirely done yet. There is a chance that you’ll still get pop-ups from certain websites, so you have to make sure you’re completing this whole procedure here. You’ll also find the “Customized behaviors” section on the same page as above. This is where you’ll find all the websites you have subscribed to.
Having a subscription means you’ll get pop-ups and redirects even though you’ve disabled them from your browser’s settings. You need to check out the “Customized behaviors” area and check for websites that you’ve allowed to send you pop-ups and use redirects. If you see a site you don’t want to be disturbed by, click the three vertical dots button beside it. The following screenshot depicts where to click.
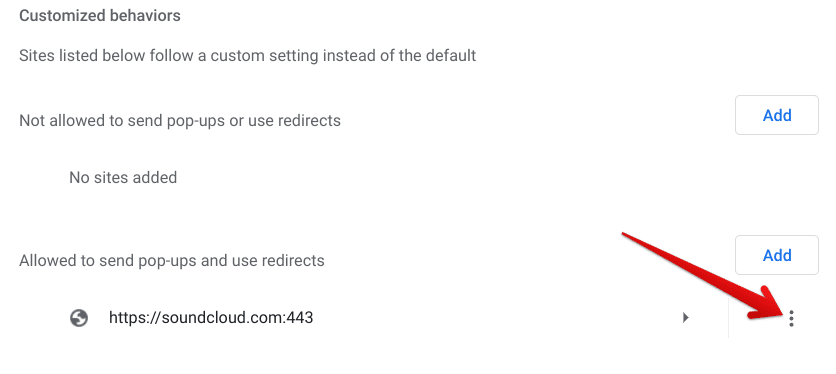
Clicking on the options button
8. Doing that will provide you with three different options. First, click on “Remove” to delete the website from the “Allowed to send pop-ups and use redirects” section.
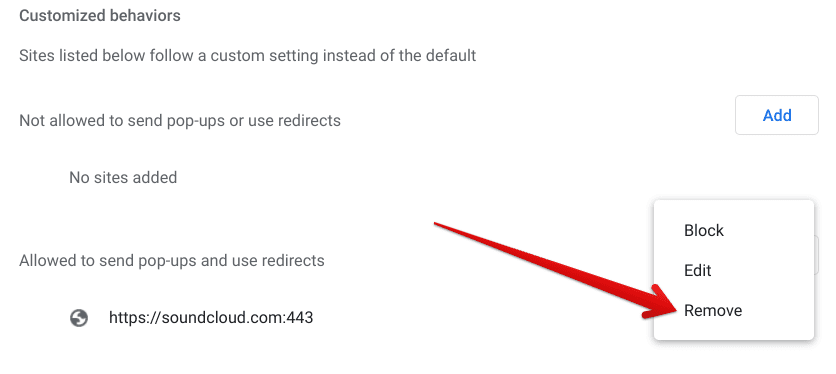
Removing the website
That’s about it for blocking interstitial ads on your Chromebook. However, it’s worth noting that if you still manage to see pop-ups on the device despite disallowing sites from showing you pop-ups, there’s a chance that your Chromebook has been infected with malware, and it needs to be secured. Find out everything there is to maximizing a Chromebook’s security here.
With the first method of blocking ads on Chrome OS out of the way, let’s check out the second one, which millions of users across the spectrum have preferred.
Option #2. Using a Chrome Web Store extension to block ads on a Chromebook
Most ads can be blocked on a Chromebook by opting for a particular Chrome Web Store extension called AdBlock. It’s genuinely one of the most effective programs available online for the matter at hand. Over 10 million people have installed this extension on their devices and enjoy an interruption-free browsing experience.
In this section, we’ll go over the installation of AdBlock on a Chromebook and talk about how to use it effectively. The following steps are going to take it from here.
1. The first step is to use this direct link and get straight to the official AdBlock extension page on the Chrome Web Store. Once you’re there, click on “Add to Chrome” to get to the next step.

Adding AdBlock to Chrome
2. A prompt will appear from the top screen, asking you to confirm the installation. Click on “Add extension” to get to the next step.
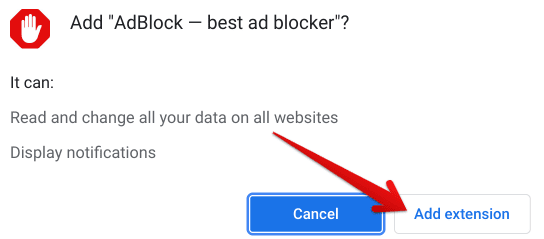
Confirming the installation
3. The download will finish momentarily, and you’ll soon be notified that the AdBlock extension has been added to Chrome.

AdBlock added to Chrome
Congratulations on successfully installing AdBlock on your Chromebook!
The best part is that the working mechanism of the extension is pretty straightforward. Upon installation, AdBlock will begin operating on its own. You can, however, make it more approachable by pinning it to the extensions toolbar, so you can quickly see how many ads it has blocked from appearing on the screen.
To get started with AdBlock, visit any advertisement-heavy website you usually go to while making sure AdBlock is installed. As soon as you arrive there, the extension will begin operating automatically, allowing you to see the number of ads it has blocked on a specific page.
The following screenshot shows how effective the extension is. As you can comprehend, there is also an option where you can choose to pause ad-blocking on the website you’re on. This will be done by clicking on “Once” or “Always.”
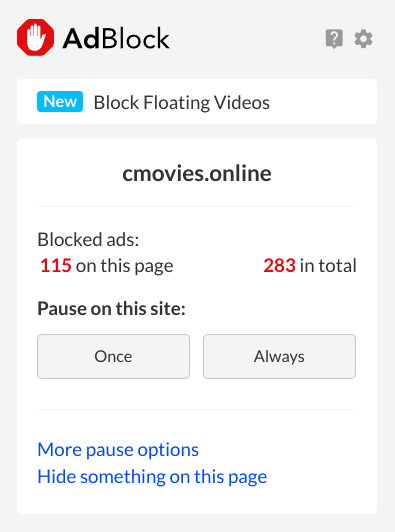
AdBlock working
That’s about the second method for blocking ads on a Chromebook. Keep on reading to discover the final one.
Option #3. Installing a specific adblocker browser from the Google Play Store
The third and final option revolves around a special Google Play Store application that lets you browse without incorporating ads right from the get-go. This app is a web browser called “FAB Adblocker Browser” and has over 10 million downloads on the platform. It’s feature-rich and speedy, too, so you should be able to make it your go-to internet browser without compromising a lot.
The trade-off of ad-blocking will be worth it, though, as you’ll be able to surf the internet worry-free consistently. Without any further delay, let’s get right into the installation steps.
- We’ve written a highly detailed Google Play Store beginner guide, should you choose to check it out here.
1. The first step is to fire up Google Play on your device. That can be done through the Launcher section of the Chrome OS interface or from the shelf area if you have it pinned there.
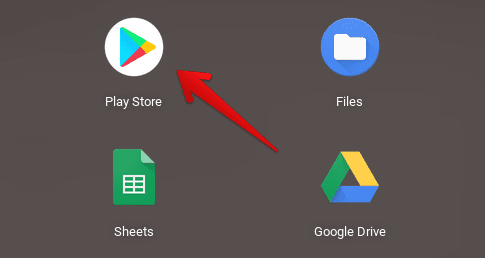
Opening the “Google Play Store”
2. You now have to type in “FAB Adblocker Browser” in the search bar of the Play Store interface. You’ll receive multiple suggestions during this press, but pressing the “Enter” key will do fine.

Searching for FAB Adblocker Browser
3. Pressing the “Enter” key will take you directly to the official app page on the Play Store. Next, click on “Install” to begin the download. Since the app’s file size is around 48 MB, it won’t be long until you can finally start using the browser.

Clicking on the “Install” button
4. Once you’re notified that the application has been installed, go to your Chromebook’s Launcher area to find the browser installed. Then, click on it to take it for a spin on the device.
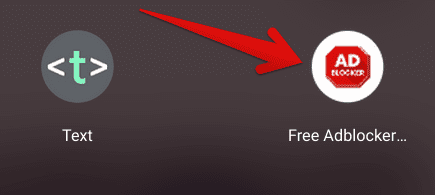
FAB Adblocker Browser installed
Now that you have successfully installed the browser on your Chromebook let’s explore its working mechanism and further this method.
FAB Adblocker Browser’s working
After clicking on the app icon and launching the FAB Adblocker Browser, one of the first things that you’ll have to do is agree to the app’s terms and conditions. After that, it’ll display an entire web page where the browser will inform you of its policies, including how it never tracks your data and prevents other websites from doing it.
Another praiseworthy feature of the browser is that it anonymizes all data analytics and ensures that everything stays transparent. You, the user, can always control what happens to the data. After reading through everything, you can proceed by clicking on the “Continue” button.
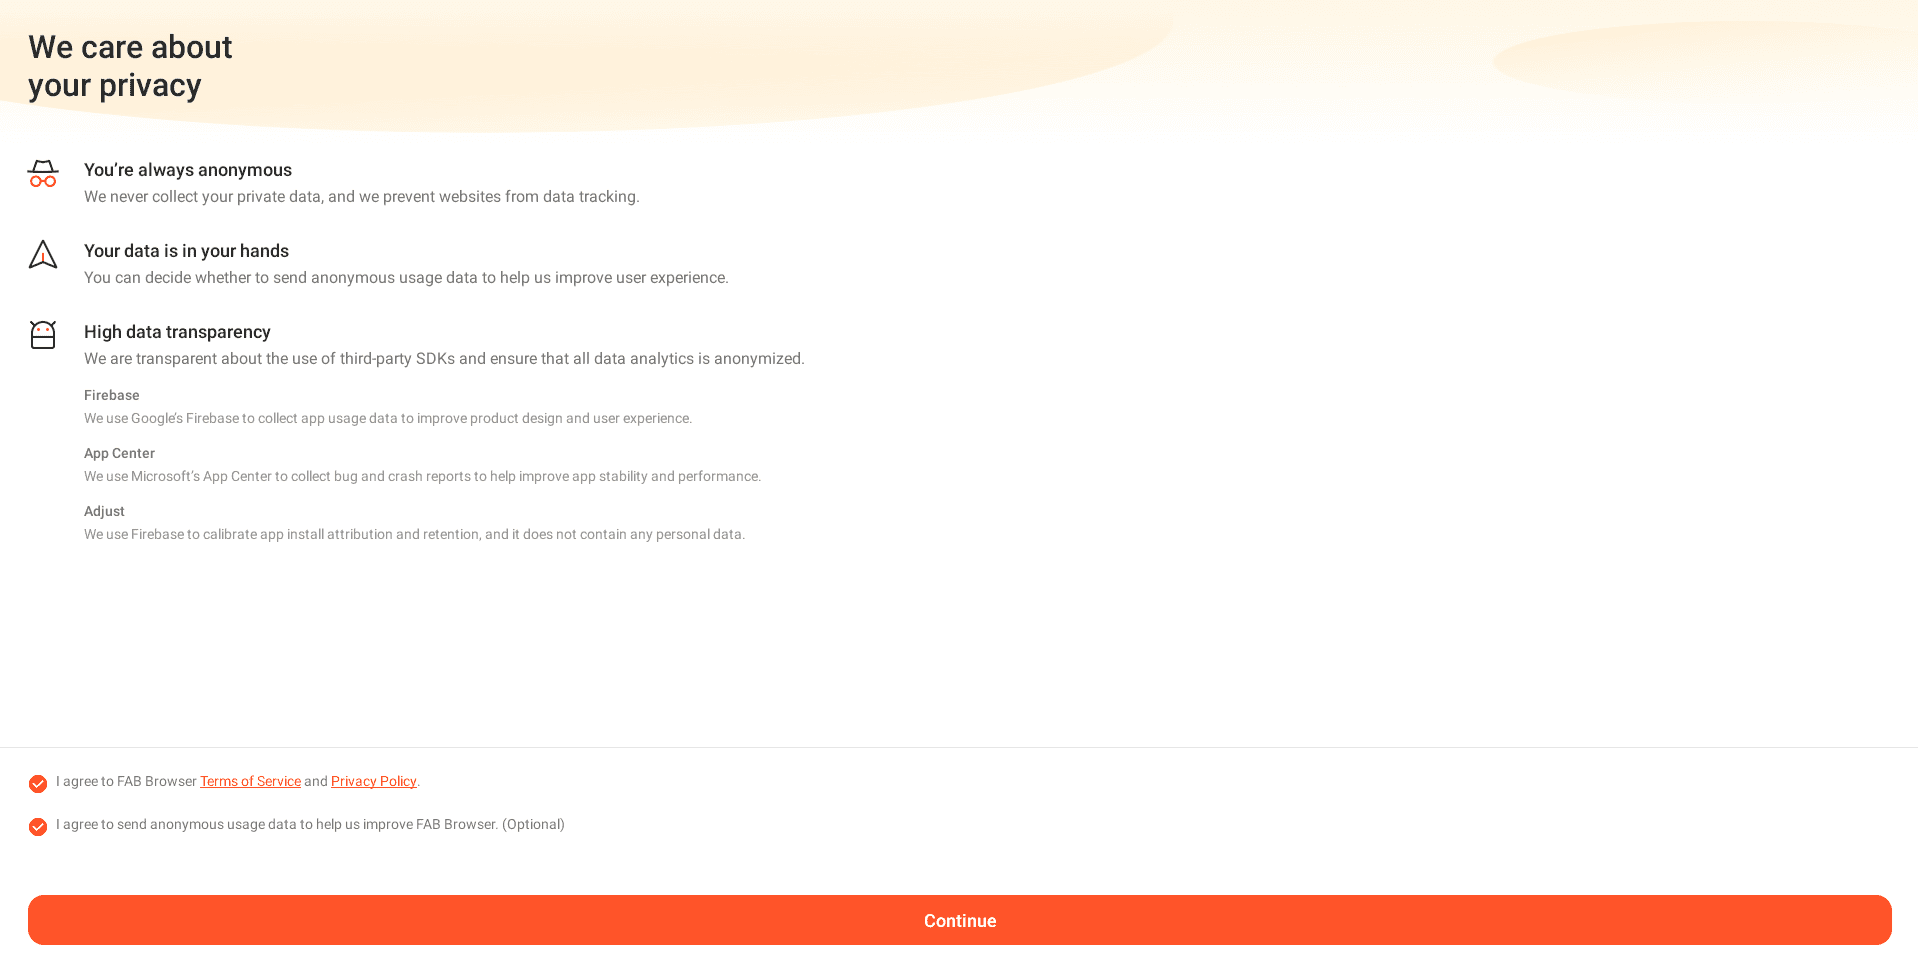
Agreeing to FAB Adblocker’s TOS
The next step will be to select your default search engine. You’ll get multiple options to go with here, so choose whatever you suit best. Since we’re acclimated to Google, we’ll go with it for this tutorial.
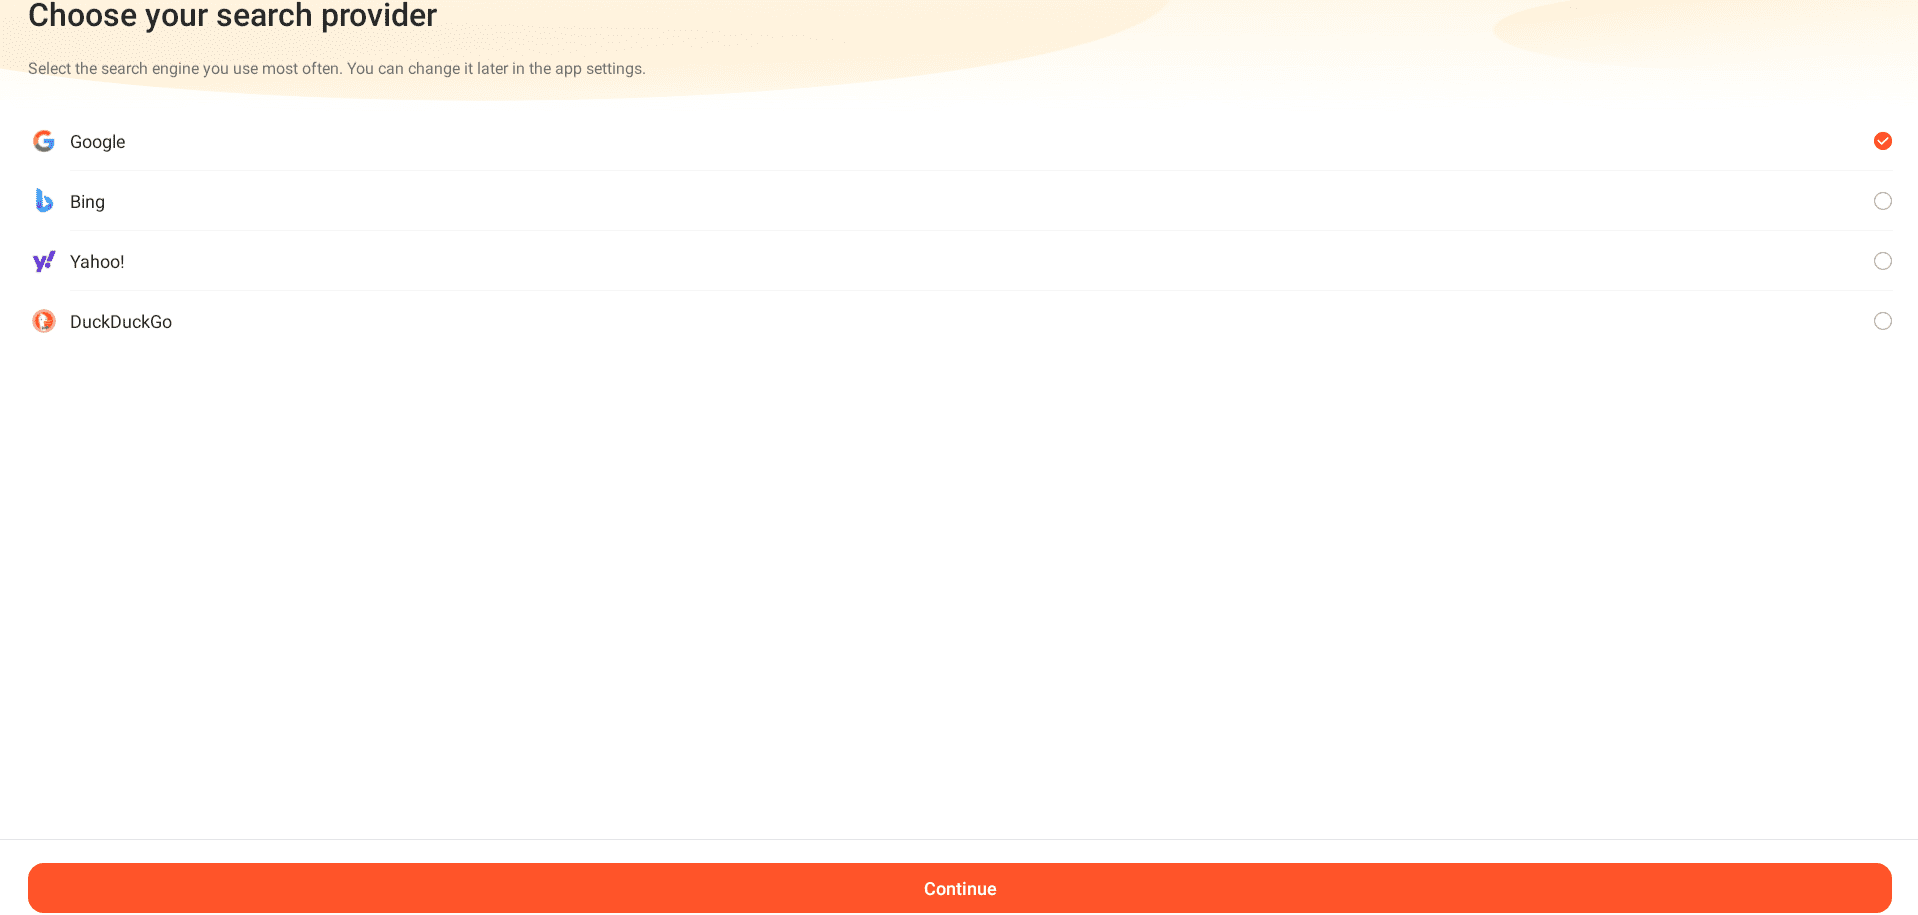
Choosing the search engine
After you’ve chosen the default search provider, you’ll be taken to the main interface of the FAB Adblocker Browser. The home page is where you can add shortcuts, browse the web with the help of the search bar, and even tweak the web surfer’s various settings.
It’s easy to see how the browser uses a clean, simple, and elegant interface. Even though it’s a Google Play Store app, it works with complete optimization and doesn’t lag in performance. We were able to browse the interweb effortlessly, and the speed with which we were doing that was exceedingly close to that of Google Chrome.
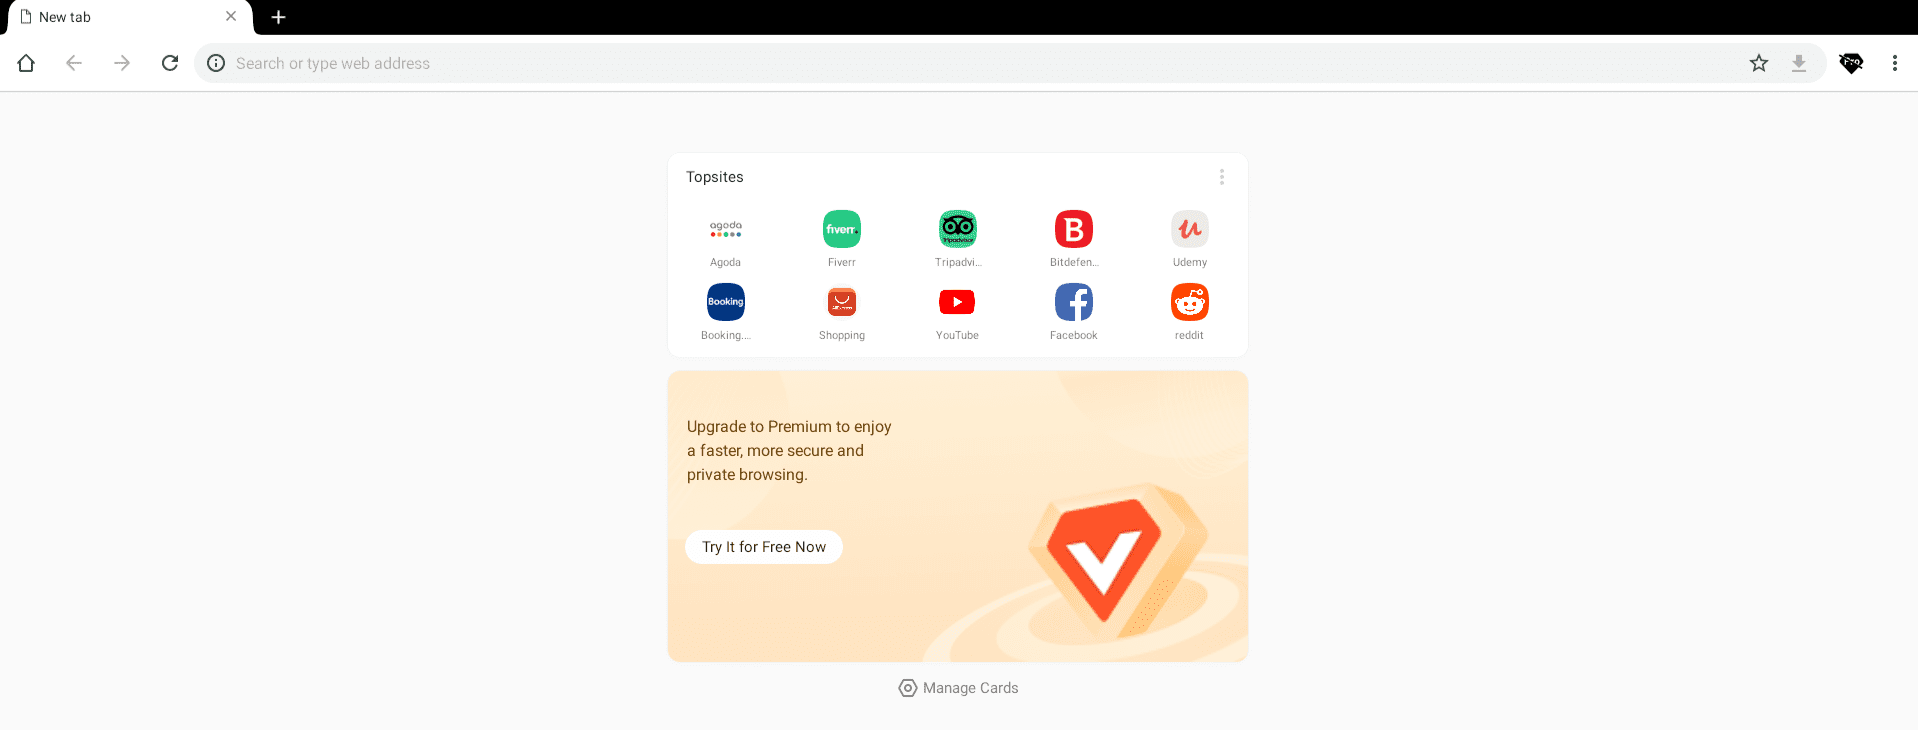
FAB Adblocker Browser user interface
When we visited Reddit using the FAB Adblocker Browser, we were immediately notified how many ads were blocked instantly from appearing with the help of a prompt that surfaced from the bottom of the screen. Upon inspecting further through the “Adblocker” feature within the options section, we were able to see how many ads were blocked and how much data we were able to save.
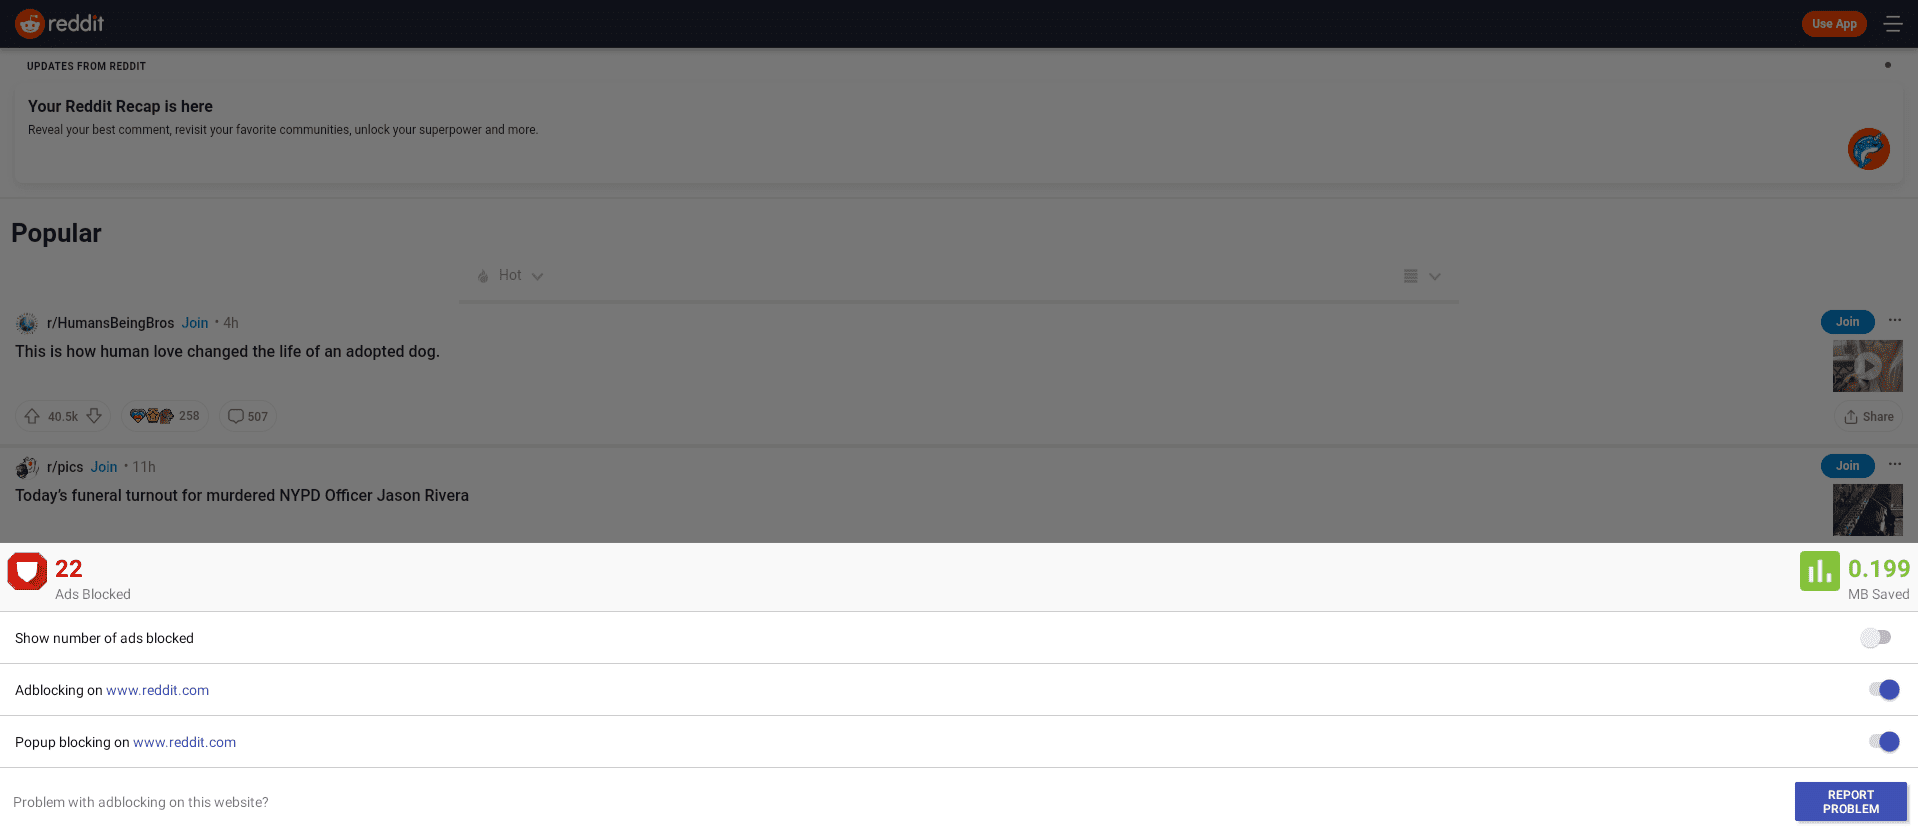
Ad-blocking feature
The browser also features a premium-grade membership that you can purchase. The application is flexible with the paid plans and offers multiple subscriptions. You can get it annually for somewhere around $27, but monthly and quarterly for $2.82 and $7.69, respectively.
Give FAB Adblocker Browser a go and see if it makes the cut for you. If you don’t find it feasible for your work, you can always opt for any of the first two methods to block ads on a Chromebook.
Before concluding the article, here’s something to consider before removing ads from your browser.
A word from Chrome Ready
Our readers are advised to use the above described ad-blocking methods on websites overloaded with innumerable adverts—ones where it’s virtually impossible to get across from one point to the other without frustration.
As for websites like Chrome Ready, the online publishing industry is centered on ads. Without this necessary evil, it’s impossible to keep producing quality content and cover the costs of maintaining a business on the interweb.
Our site’s user interface is specifically designed to ensure ad campaigns stay minimal, so you won’t find anything getting in your way to irritate you and impede your browsing experience.
Therefore, we ask that you block advertisements on websites where you genuinely have to. Here’s hoping that you’ll be on the same page as us and agree to our humble request.
Conclusion
If advertisements go unsolicited, you’re soon pulling your hair out in confusion as your screen gets convoluted with tons of resilient adverts. It might do you better to opt for an ad-blocking measure in cases like those, especially if you’re using a Chromebook. You’ll be able to benefit from a more seamless browsing experience that way, one that doesn’t allow intrusive ads to hinder your ability to surf the internet.
Therefore, we’ve talked about the best ways to block ads on a Chromebook in this article. There are three different methods to approach in this regard, with the most desirable one being AdBlock—a free-to-use Chrome Web Store extension that boasts a 10-million+ user base. However, don’t hesitate to try other options that we’ve enlisted in this guide.
It’s always advisable to experiment with different options before finalizing a single one. There’s nothing better than finding something that suits your preferences. Chrome Ready wishes you good luck!
- Pimp out your Chrome browser with these 10 best themes for Google Chrome.

1 comment
Thank you for this article; lots of helpful info!
I’ve wanted to ask this question for a long time to someone really well-versed in the tech world. I have been online since the early 90’s. I remember the pre-Internet days of Prodigy, CompuServe, AOL, etc. I think I even had a subscription to something called GEnie, run by General Electric, at one point. Here’s the thing: I am able to discipline my browsing to the point that I click through on Very Few Ads. I only bookmark sites which have minimal ad clutter (I have ChromeReady bookmarked now, but honestly am noticing the clutter and that’s not a good thing!)
Here’s my question: Am I some kind of strange outlier? I honestly have never understood the business model of Facebook, YouTube and some of these other online juggernauts, because, very simply, I refuse to acknowlege the commercial content. I didn’t get popcorn at the movies either, back when we could watch movies in person.