Google Docs is one of the primary components of Google Workspace, which was formerly known as G Suite. It is a full-fledged text editor with many features and a simple-to-operate user interface. This makes the software highly desirable for people all around the spectrum, whether if they are corporate individuals working in an enterprise or simply getting the product for personal use. However, if you’ve been meaning to find out how to flip an image on Google Docs, the answer may not be so vividly apparent.
This brings us to the article in question, where we’ll show you how Google Docs can be utilized to implement basic photo editing features effortlessly. We’ll make sure to jot down the tutorial in easy-to-understand terms, so you can grasp the concept painlessly, even if you’re a beginner. Without any further chit-chat, let’s dive right in.
- On a side note, check out the 8 best code editors to use on your Chromebook.
Flipping images on Google Docs
Method #1. Using the in-built Google Docs functionality
The following steps are going to take it from here.
- The first step is to load up Google Docs on your Chromebook or any other device if you’re not on Chrome OS. You can do that through the web-based version and the Play Store variant of the application. We will use the browser version of Google Docs to illustrate this tutorial.
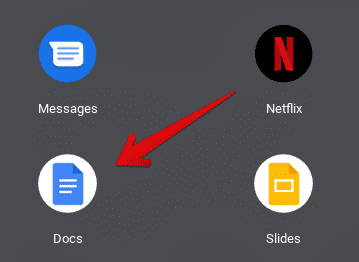
Launching Google Docs on Chrome OS
2. As soon as you’ve arrived at the home screen of Google Docs, the next step is to select a document to work on. You can choose an existing one that already has images you want to flip, or you can create a blank document to work on it from scratch. We’re going to go with the latter for this tutorial.

Select a blank document to work with on Google Docs
3. Once you’ve created a blank document and you’re inside the text editor’s interface, the next step is to insert a photo. We’re assuming you’ve done that by now, but we still need to cover every facet of this guide by keeping newbies in mind. Click on “Insert” on the toolbar at the top, and that should bring up a column of options on your end. You will then have to hover on “Image” to expand the area and reveal all the options that you can use to upload an image on Google Docs. Fortunately, you have a lot of flexibility in this regard.
You can upload from your computer’s local storage, directly search the web for the image you want, upload from Google Drive, Google Photos, haul the image in using its URL, or, finally, use your device’s camera to snap a photo and then insert it into the document seamlessly. Choose whatever option seems more suitable for you to get to the next step.
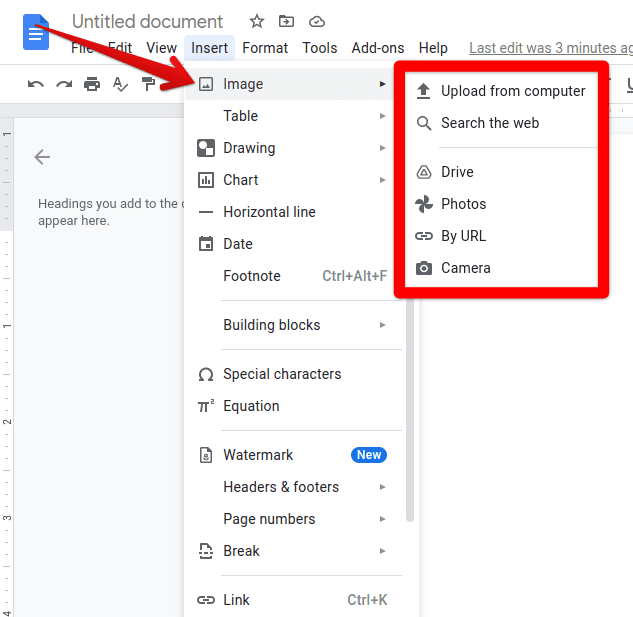
Uploading an image on Google Docs
4. Once you have your image inserted into the Google Docs editor interface, the next step is to copy or cut it. You can do that by right-clicking on the image to bring up the relevant options. You’ll also observe that certain shortcut key combinations can also be implemented for copying and cutting. These include “CTRL” + “C” and “CTRL” + “X” respectively. You can choose whatever works better for you to continue. Do bear in mind that copying can create a duplicate of the image while cutting will remove the image from a certain area but will have it copied simultaneously so it can be pasted somewhere. We recommend cutting the photo over copying as it’s simply a more hassle-free affair as compared to copying in the long run.
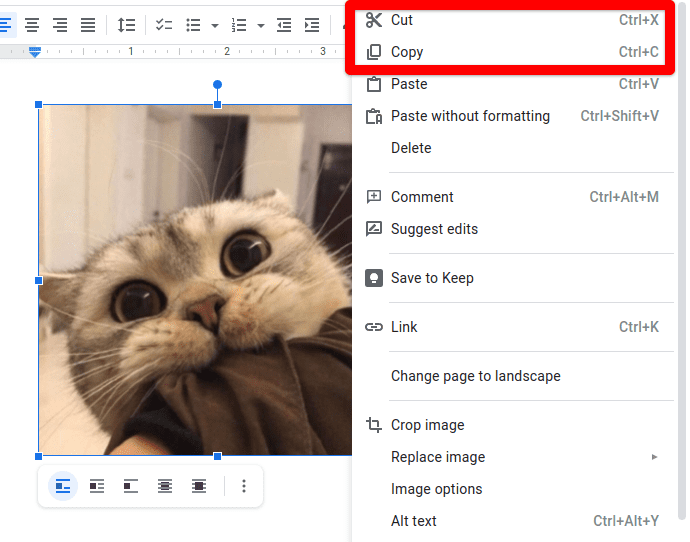
Cutting or copying the inserted image in Google Docs
5. The next step is to go to the top toolbar once again and click on “Insert.” However, you’ll be hovering over “Drawing” this time compared to the “Image’ option in one of the previous steps. Doing so should give you two further options to go with: “New” and “From Drive.” Both of these are centered around importing an image, where clicking on “New” puts you straight in the “Drawing” interface while choosing “From Drive” lets you integrate with Google Drive to bring in the images you want. We recommend clicking on “New” here to accommodate the last step in this guide. That said, clicking on “From Drive” is also workable for users.
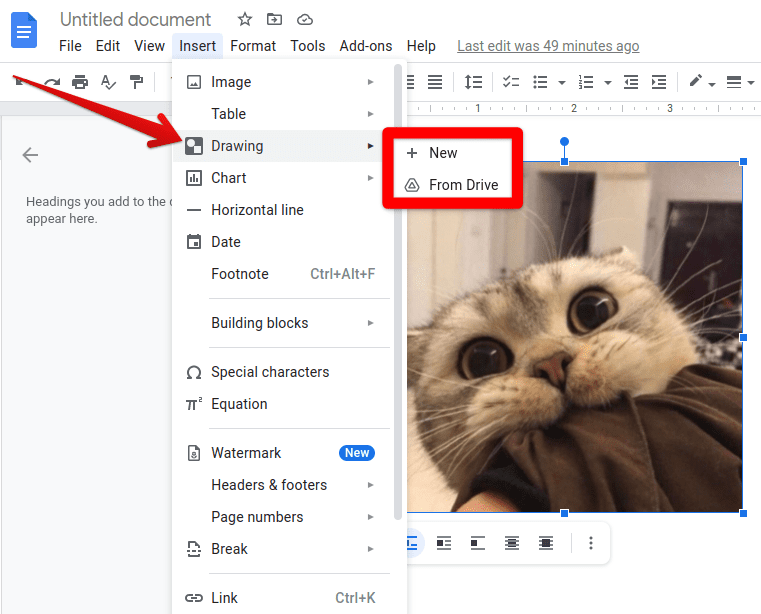
Opening up the “Drawing” menu in Google Docs
6. After clicking on “New,” the “Drawing” menu will open, and this is where you’ll be able to flip your images. However, before we get to that, you’ll have to insert the image in the interface at hand. To do that, you can double-tap anywhere in the middle of the screen and select “Paste.” Alternatively, you can also use the shortcut key combination of “Ctrl” + “V,” which should do the trick for you. Once your image has been inserted, continue to the next step.
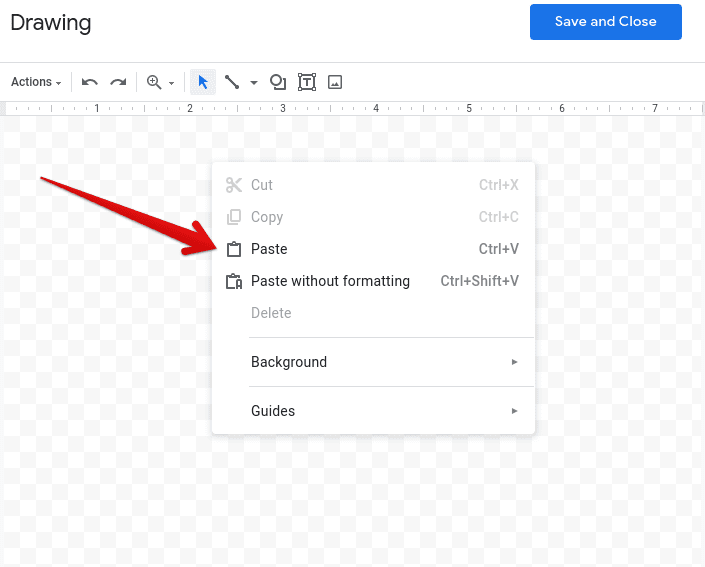
Pasting the image in the “Drawing” interface
7. You now have to click on the “Actions” button in the toolbar at the top of the “Drawing” interface. Once done, scroll down a little and find “Rotate.” Please hover over the area to expand it and get the options we’ve meant to have. As you can comprehend from the elaborate screenshot below, you’ll be met with four different options after hovering over “Rotate,” where two of them will be “Flip horizontally” and “Flip vertically.” Choose whatever you want to flip your image on Google Docs and click on the option accordingly to get to the next step. Make sure that you’ve clicked on the image so it’s selected and the “Rotate” button can appear under the “Actions” tab.
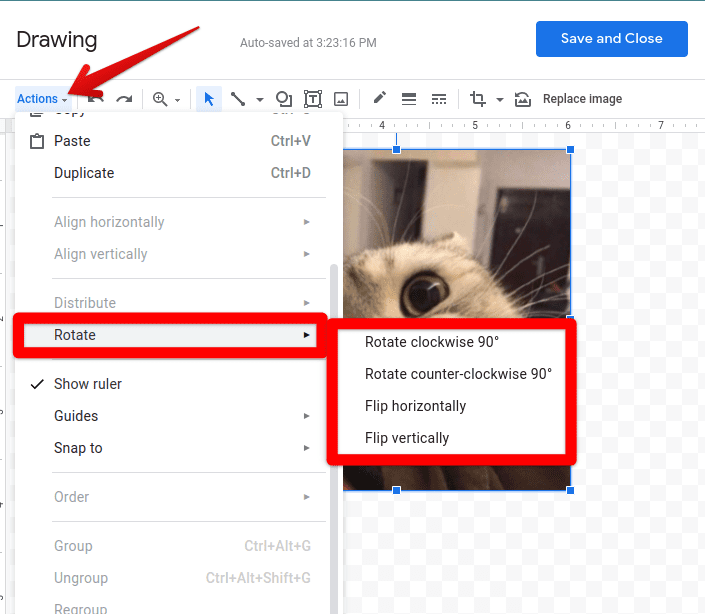
Flipping an image in Google Docs
8. Now that you have flipped the image according to your preference, the final step that’s left to be done now is to click on the “Save and Close” button. This not only saves your progress but returns you to the main text editor interface so you can continue working on your document.
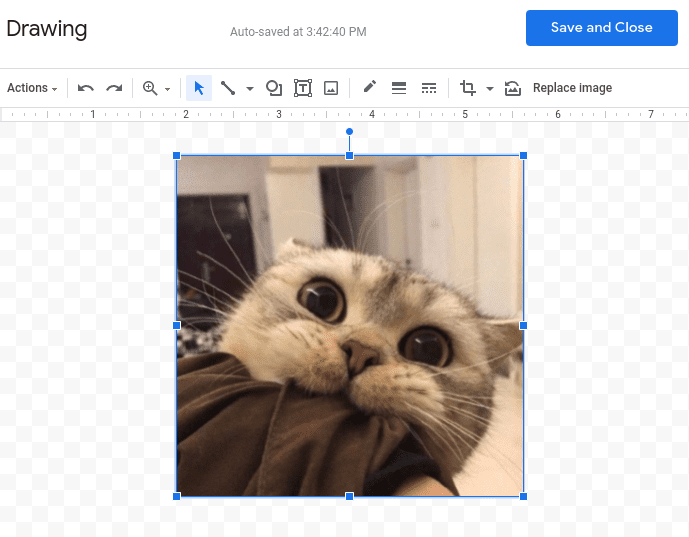
Saving the progress and closing the “Drawing” interface
That’s about it for how to flip an image in Google Docs. We’ve laid out the process in simple-to-understand terms, so you should have no issue getting this done now. However, this isn’t the only option. You have to flip images in this text editor. Read on as we explore other methods of giving pictures a makeover on either your Chromebook or any other Windows PC.
Method #2. Using a third-party app to flip images
You do not have to use Google Docs to flip images necessarily. Instead, you can use any third-party software, a Google Play Store application, or even a browser-based web app for this purpose. Our guide on the best tools for editing images on a Chromebook can fill you in on everything that’s required for the task in question. Still, we’ll be talking about Pine Tools for this section—a fast and efficient browser-based application that can flip images for you without breaking a sweat.
It takes away the need to go through the extra steps of downloading any application for image flipping, but it requires a stable internet connection. The following is a step-by-step guide on how to flip an image using Pine Tools so that you can insert it into Google Docs.
- Start by clicking on this link and heading straight to the official Pine Tools web app. Once you’re there, click on “Choose File” to import the image that you want to flip from your local storage. However, it’s better that you choose how you want the image flipped—either horizontally or vertically—before inserting the image for the best results.
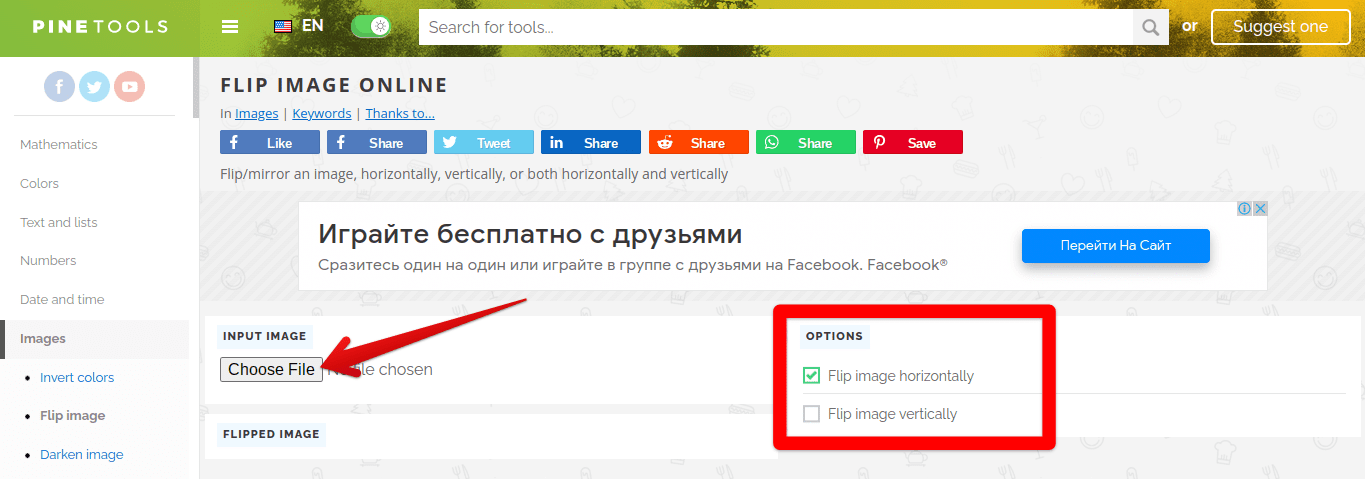
Choosing a file on Pine Tools
2. After uploading your image, a flashing “Flip” button will appear at the bottom of the page, hinting you to click on it. Complete this step to get to the next one.
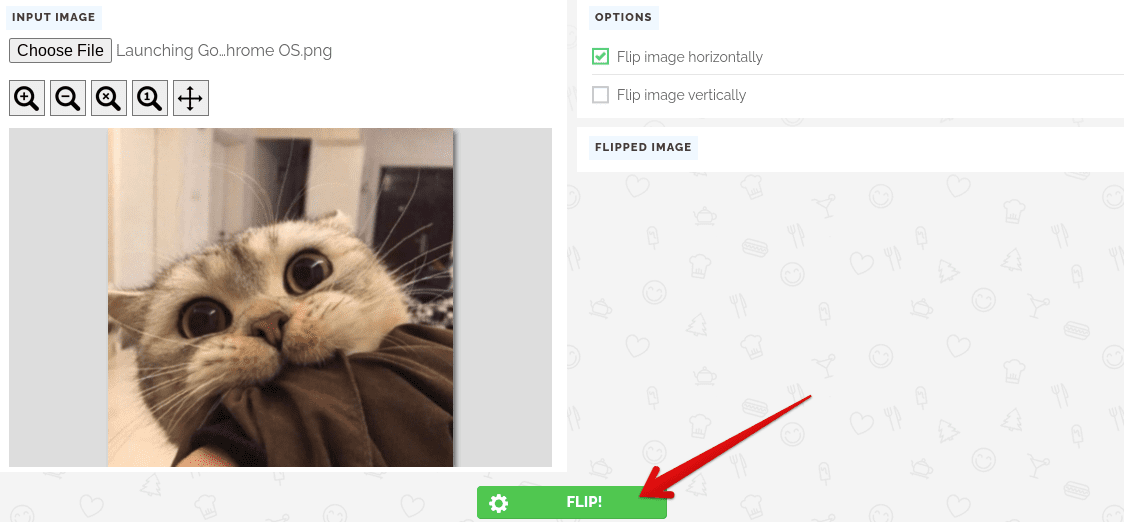
Clicking on the “Flip” button to reorient the image
3. The web app will now flip the image in the direction you’ve instructed it to. Next, you’ll find the end product situated to the right of the screen under the “Flipped Image” tab. You can also tweak a few settings related to the image. This includes zooming in and out, restoring the original scale of the image, and even choosing the format to download the photo in. Once you’ve gone through those, if needed, double-tap on the photo to bring up a list of options and swiftly select “Save image as” to download the image to your device’s local storage. You’ve now completed this process.
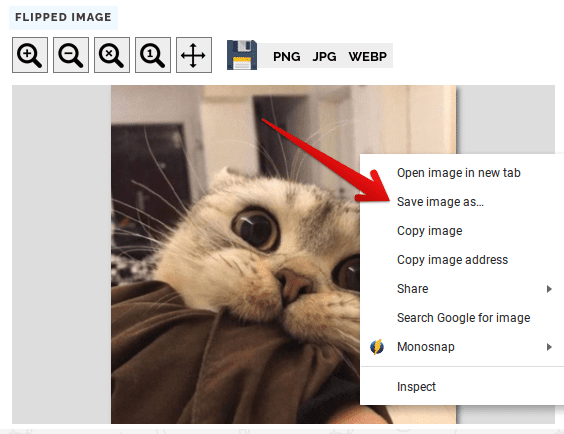
Saving the flipped image
Pat yourself on the back for making it this far. You’ve learned how to flip an image using Google Doc’s built-in functionality and with the help of a third-party image-editing tool as well. If there’s anything that remains, it’s inserting the flipped image in your Google Docs file, and you should be done. You can refer to Step 3 of the first method detailed above if you’re unsure how to do that.
Consider rotating in Google Docs too.
Many users might find it workable to rotate their images in Google Docs just as well. Doing that is nothing but effortless in the text editor, so you should genuinely consider this functionality to see if it floats your boat or not. It’s a far less involved process than flipping an image, and even if you don’t want to do it within Google Docs, you can easily use the Chrome OS built-in photo editor to rotate the photo and insert it into the app in question.
To rotate an image within Google Docs, you can approach two different methods. The first one is relatively easy and requires you to click and drag the “Rotate” button. This will promptly allow the image to be oriented just like you want it to be. Depending on where you want to rotate, you can drag the button toward the left side or the right side. The following screenshot specifies where to click when selecting an image in Google Docs.
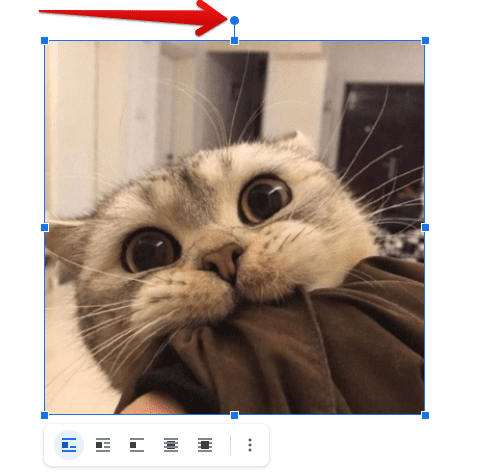
Rotating an image in Google Docs
Another way that you can use to rotate an image in Google Docs is to first double-tap the selected image and then click on “Image options.” That will open up a side menu on your screen where you’ll easily rotate the image.
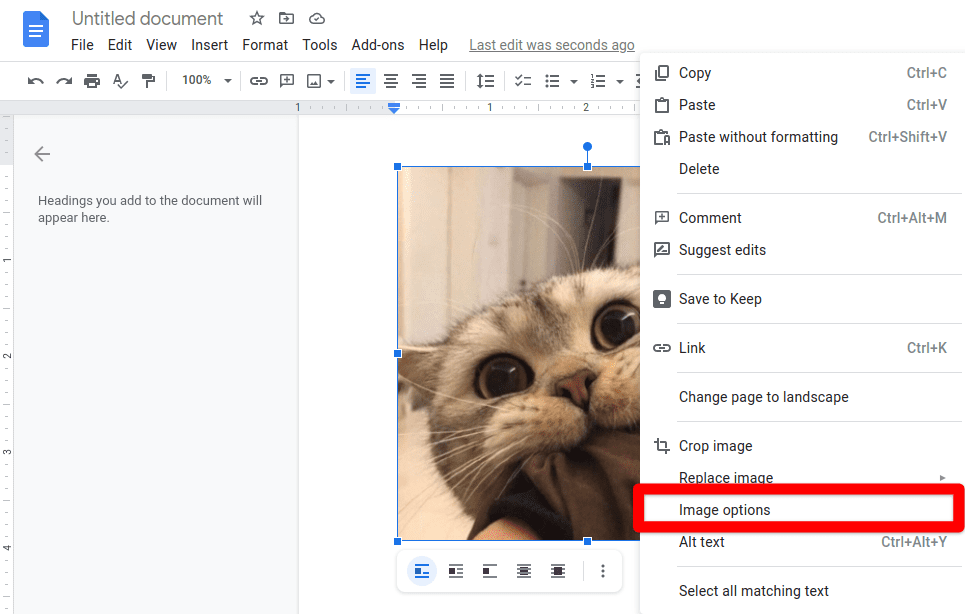
Clicking on “Image options”
Once done, click on the “Rotate” button in the side menu, which should do the trick. Clicking on it once will rotate the image by 90° so you can click on it as many times as you’d like to get the desired result. In addition to that, if your preferred angle isn’t a multiple of 90, you can specify the value of the angle yourself using the option given right beside the “Rotate” button. This is more versatile and fitting to a niche number of users, should they ever require such functionality. The following screenshot specifies the area in question and pinpoints the “Rotate” button that you need to click on.
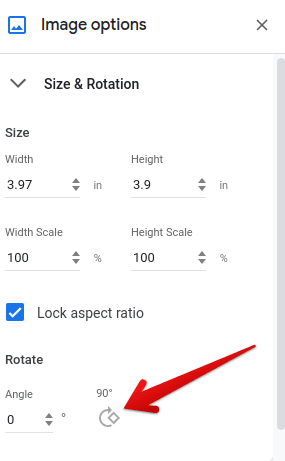
Rotating an image in Google Docs
That’s about it for rotating an image in Google Docs. We’ve outlined two different methods that you can use to change the orientation of your image in the text editor, so the tutorial should have you sorted regarding this. Apart from flipping images, it’s worth noting that rotating them can also produce desirable effects. Therefore, we consider it a viable option in text editors, even though their base purpose doesn’t involve images. Still, the extra features are more than welcome by us and possibly millions of users around the globe.
Conclusion
Google’s suite of desktop productivity applications is now prevalent in every major operating system as of today as we near the end of 2021. The trifecta of these apps: Google Docs, Google Slides, and Google Sheets, come preinstalled on Chromebooks, too, due to their speedy user interface and uncomplicated design elements. Therefore, it’s no wonder how this product has risen to stardom as time has progressed. To talk about Google Docs, it’s one of the finest text editors that one can come across in 2021, and the best part is that it’s free.
You can even grab the application from the Google Play Store and start working on it effectively. However, you will come in close contact with photos somewhere along your journey with the software, so you should know how to flip images in Google Docs so you’re not left feeling helpless when the time comes. We’ve talked about just that in this article and have shown that even if this text editor isn’t built like the best photo editors out there, it’s still capable enough to dish out basic photo editing functionality on a reliable basis.
We hope you’ve found this in-depth, helpful write-up for your cause. Chrome Ready wishes you good luck!
- Google Docs is a part of the Google Workspace suite of productivity applications, one of the best alternatives to Microsoft Office. If you want to find out more of those, check out this in-depth listicle.
