Chromebooks may not be the preferred choice of the device when it boils down to running virtual desktops on it, but that doesn’t mean it can’t. As a matter of fact, it’s rather easy but lengthy to install Windows on Chrome OS and go on to get a multitude of applications for it as well. This is to prove that such a prospect is indeed possible on these minimalistic devices, and if you’re looking to venture even beyond, there’s a special application that can check all the boxes you require.
Enter Oracle VM VirtualBox, a powerful, feature-rich, and highly versatile x86 and Intel/AMD 64 virtualization software that enterprises can use, businesses, and homes alike. It’s a professional-grade software that receives constant regulatory updates, has a sizable community, and is available on a wide variety of platforms.
Therefore, in this article, we’ll pin down how to install VirtualBox on your Chromebook easily and effortlessly. Without any further ado, then, let’s jump right in, starting with the features first.
VirtualBox Features
Open-Source
Right from the start, Oracle VM VirtualBox is free to use and is open-source in nature. Falling under the open-source software category (OSS), therefore, the application can be accessed by anyone on the internet while also being able to make modifications to its code and distribute it as per one’s liking. By collaborating with others in such a way, the reach of software expands, and more possibilities open up. VirtualBox is made with the intent to do just that.
VM Groups
VirtualBox has a neat feature in its toolshed that allows it to group multiple virtual desktops and control them collectively. However, you can also manage each virtual machine individually if you require it so. Using the VM Groups feature, you can sort different desktops into different groups and perform operations that you would otherwise have to implement separately. Some of those operations include Start, Pause, Reset, Close, Sort, Show in File System, and Discard Save State.
Guest Addition Feature
Guest Addition is a convenient feature that has a lot to do with your installed guest operating systems on VirtualBox. It is actually a bunch of software packages that greatly improve how the host system integrates and communicates with the supported guest systems. Performance enhancements include simultaneous adjustment of video resolution, accelerated rendering of 3D graphics, seamless windows, and many more. A feature called “Share Folder” rooting from Guest Addition allows one to access the host operating system files while using a supported guest one.
Portable
The Oracle VM VirtualBox is highly portable. By that, it doesn’t mean that you can pick it up and get rolling with it everywhere. Portability refers to the degree of compatibility with other operating systems here. That is to say; it can be used on 32 and 64-bit operating systems based on Intel x86-64 processing units. This software also uses Type 2 Hypervisor to remove the host operating system from the supported guest operating systems. Moreover, you can use a recurring image format across all operating systems on it. Using the Open Virtualization Format (OPF), the export and import of virtual machines are nothing but a painless process.
Installing VirtualBox on Chromebook
Getting VirtualBox on your Chromebook is straightforward and uncomplicated. However, not every Chromebook can handle this software, so be sure your internals are packing some good punching power. Additionally, you’ll be needing the help of the Linux OS in your Chromebook, so have that at the ready as well.
- If you’re unsure about Linux and how to get it running on Chrome OS, this article will explain the concept in a simple way.
With the initial disclaimer out of the way, let’s jump right into the installation for VirtualBox.
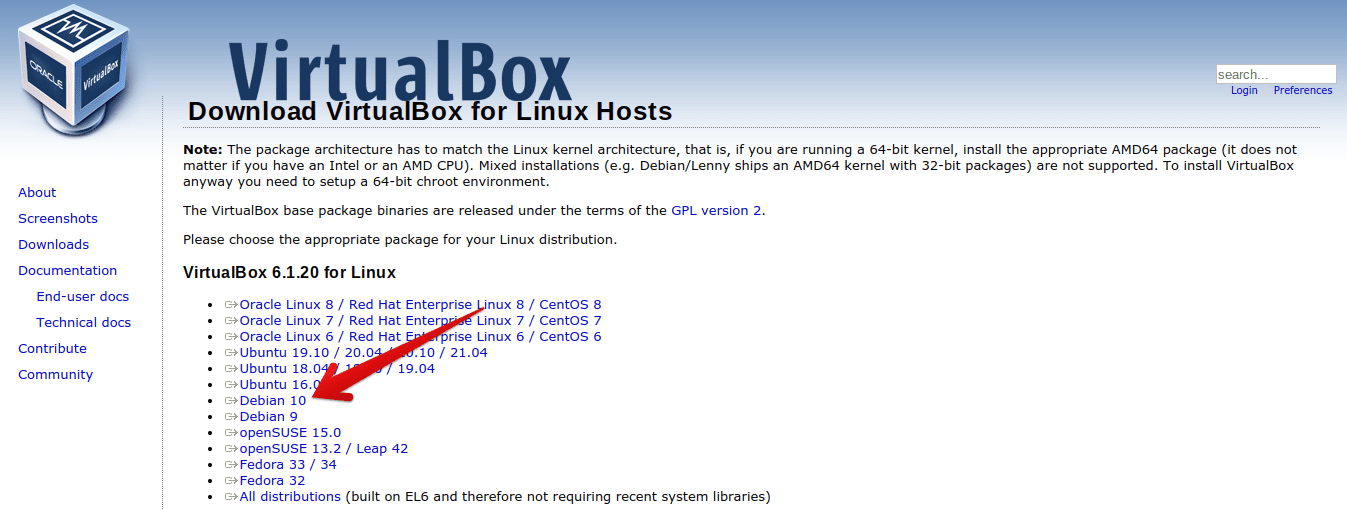
1) Begin by clicking on this link and going to the official VirtualBox download page for Linux hosts. When you’re there, select the “Debian 10” package from the list that appears before you.

Selecting Debian 10 For Installing VirtualBox
2) Doing so will begin downloading the “Debian 10” package on your Chromebook. It’s somewhere around 80 MB, so do give it a moment to finish. When the download has been completed, go to your “Files” and double-tap on the package you’ve just installed. You should see an option called “Install with Linux.” Click on it to continue.

Installing VirtualBox With Linux
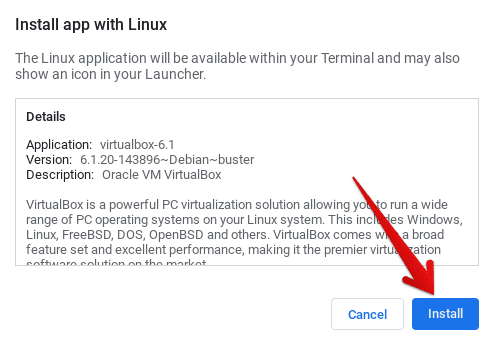
3) As soon as you do that, an installer will pop up where all the information for installing VirtualBox will be loaded. Click on “Install” to continue.

Installing VirtualBox
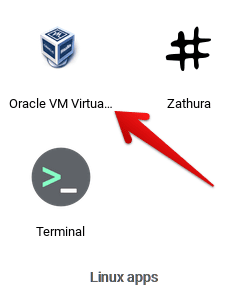
4) Right after that, the installation will begin and will probably take a while. Therefore, when you’ve been prompted that everything is wrapped up, make haste to your Launcher and find the application sitting in your “Linux apps” folder.

Oracle VM VirtualBox Installed
There you have it! VirtualBox has been successfully installed on your Chromebook due to the courtesy of Linux. Launch it to give it a go and see how it works.
- Note: If the installer runs into the following error, “E: dpkg was interrupted, you must manually run ‘dpkg –configure -a’ to correct the problem,” simply open your Linux Terminal, type in “dpkg — configure -a,” and press Enter. That should fix the issue, and when you attempt to install VirtualBox again, you won’t run into any more errors.
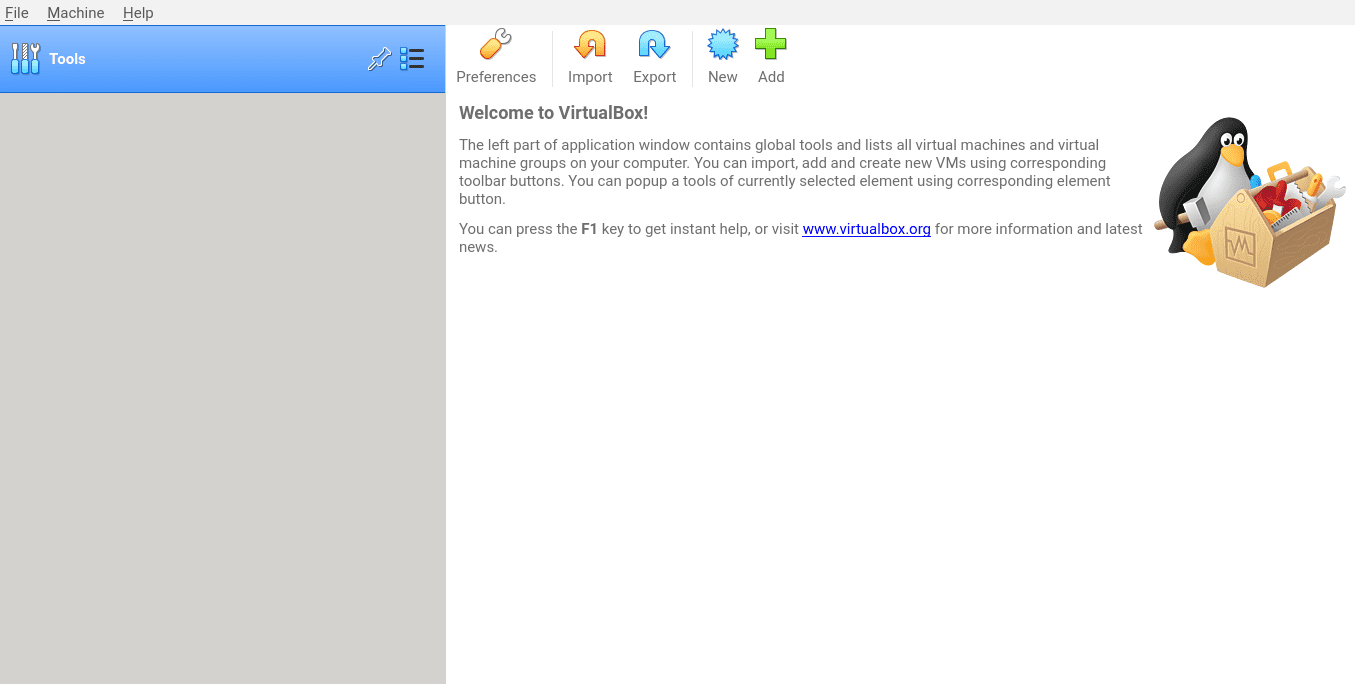
VirtualBox Working

VirtualBox on Chrome OS
After launching VirtualBox, you’ll be presented with a user-friendly interface and welcome note first off. As you can comprehend from the image above, there are multiple things that you can do before getting into installing a virtual machine. You can tweak your preferences, check out the help desk for important information and news, and check for updates. After going through all of that, you can easily import or export appliances by going to the “File” section or make a new cloud virtual machine. The possibilities are seemingly endless with this convenient virtualization product.
Conclusion
Despite having a less hardware-oriented setup, Chromebooks are still capable of doing several things. Running other virtual machines is surely one of them, thanks to the functionality of Linux integrating with Chrome OS. A handy tool like VirtualBox is sure to handle all your needs in that regard, and now with this straightforward tutorial, you know how to get it up and to run on your very own Chromebook. Chrome Ready wishes you good luck!

9 comments
When I try to install the file with Linux it says “An error occurred during the installation of your Linux application” and this is the fifth time i tried and it still doesn’t work.
“Not installable
Depends: libgcc1 (>= 1:3.0) but it is not installable
Depends: libgl1 but it is not installable
Depends: libopus0 (>= 1.1) but it is not installable
Depends: libpng16-16 (>= 1.6.2-1) but it is not”
since this article was put up. a new debian version was released, “debian 11” not debian 10, i had the same issue, now it works fine, reply if it still does not work
VirtualBox can be installed on chromebook – as shown above but for me it does not work – trying to start a VM produces an error:
Kernel driver not installed (rc=-1908)
The VirtualBox Linux kernel driver is either not loaded or not set up correctly. Please try setting it up
again by executing
‘/sbin/vboxconfig’
as root.
If your system has EFI Secure Boot enabled …
There is no workaround!
https://support.google.com/chromebook/thread/71351618/vms-not-working-in-virtualbox?hl=en
The guide here suggests “ChromeReady” got VirtualBox to work – did you? If so how?
Yeah it says the same thing for me…
The following packages have unmet dependencies:
virtualbox-7.0: Depends: libvpx5 (>= 1.6.0) but it is not installable
Recommends: libsdl-ttf2.0-0 but it is not going to be installed
Recommends: kmod but it is not going to be installed or
kldutils but it is not installable or
module-init-tools but it is not installable
Recommends: linux-headers-generic or
linux-headers-generic-pae but it is not installable or
linux-headers-686-pae but it is not installable or
linux-headers-amd64 but it is not going to be installed or
linux-headers-2.6-686 but it is not installable or
linux-headers-2.6-amd64 but it is not installable or
linux-headers but it is not installable
Recommends: linux-image but it is not installable
Recommends: gcc but it is not going to be installed
Recommends: make or
build-essential but it is not going to be installed or
dpkg-dev but it is not going to be installed
Recommends: binutils but it is not going to be installed
Recommends: pdf-viewer
it did not work on my asus chromebook cx1 I have no idea
it worked for me followed everything and got the error. i ran the dpgk –configure -a code with root access and it worked with debain 11
Do you really want to run a virtual machine inside of a virtual machine ?
I mean if you have the latest intel 7 it might work fine who knows ?
Have in mind that Linux for ChromeOS is a virtual machine already
it says this when i want to install it
The following packages have unmet dependencies:
virtualbox-7.0: Depends: libvpx5 (>= 1.6.0) but it is not installable
Recommends: libsdl-ttf2.0-0 but it is not going to be installed
Recommends: kmod or
kldutils but it is not installable or
module-init-tools but it is not installable
Recommends: linux-headers-generic or
linux-headers-generic-pae but it is not installable or
linux-headers-686-pae but it is not installable or
linux-headers-amd64 but it is not going to be installed or
linux-headers-2.6-686 but it is not installable or
linux-headers-2.6-amd64 but it is not installable or
linux-headers but it is not installable
Recommends: linux-image but it is not installable
Recommends: gcc but it is not going to be installed
Recommends: make or
build-essential but it is not going to be installed or
dpkg-dev but it is not going to be installed
Recommends: binutils but it is not going to be installed
Recommends: pdf-viewer