Chromebooks have increasingly become a popular choice for many users around the world. Their simplicity, fast boot times, and security have made them favorites for educational institutions, businesses, and individual users. However, there’s a common misconception that Chromebooks are not as customizable as traditional laptops. In this article, I’ll walk you through 20 ways to personalize your Chromebook, to make it truly yours.
Why choose a 2023 guide?
In a dynamic technology landscape, having up-to-date guidance is paramount to optimizing your user experience. A latest guide isn’t just a luxury—it’s a necessity, teeming with the most recent insights and adjustments to help you harness the full potential of the modern Chromebook experience.
As we navigate through continual shifts in features — with new additions gracing the platform, some being retired, and others undergoing transformations — it’s clear that a static guide would quickly become obsolete. Therefore, I firmly believe in the importance of renewing the guide annually, ensuring it serves as an invaluable resource in helping users stay ahead, adapt to changes swiftly, and enjoy a seamless and enriched experience year after year.
20 ways to customize your Chromebook in 2023
1. Change your wallpaper
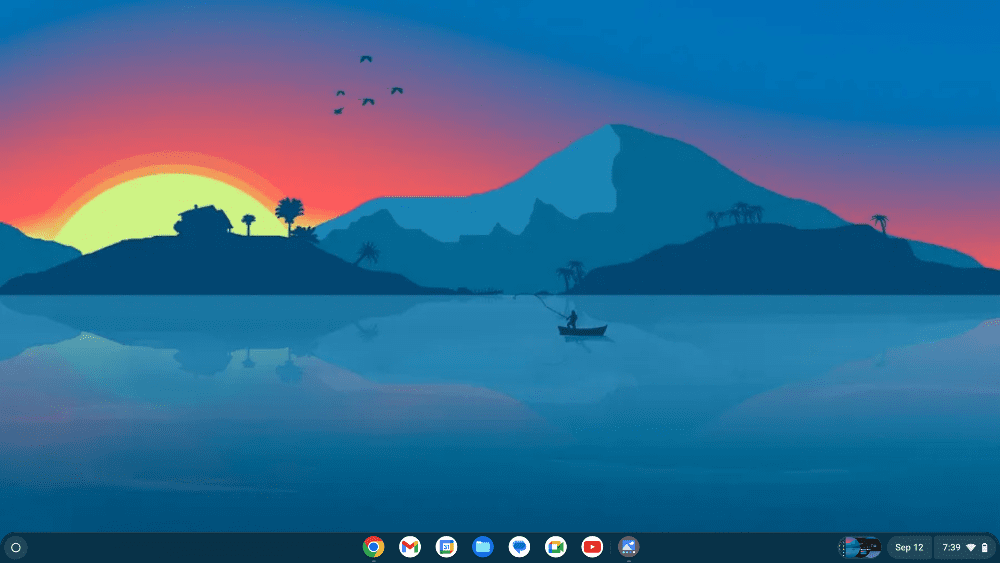
New wallpaper applied
Starting simple, changing the wallpaper can make a huge difference. Chromebooks come with a set of default wallpapers, but you can also use your own images.
- Go to your desktop.
- Right-click (or tap and hold) and choose “Set wallpaper.”
- Browse through the available options or upload your own.
Step-by-step guide here: Personalize your ChromeOS: A guide to changing the wallpaper
Personally, I love uploading pictures from my travels. It’s a daily reminder of the beautiful places I’ve been and the memories made.
2. Customize your shelf
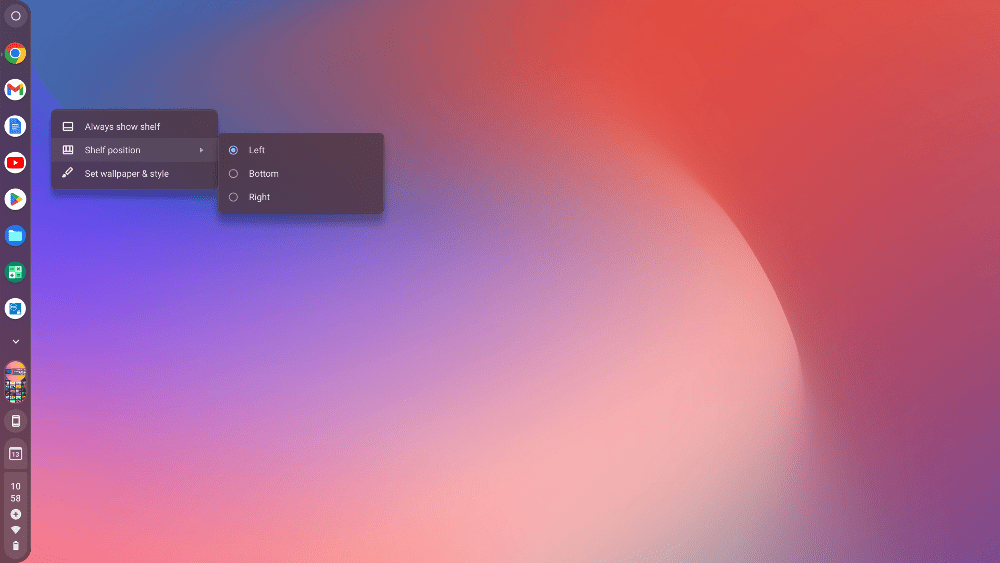
ChromeOS Shelf Position
The shelf is the taskbar of the Chromebook, where pinned apps appear. You can move it around and customize which apps appear.
- Right-click the shelf.
- Choose “Shelf position” to move it to the left, bottom, or right of your screen.
- Drag apps onto the shelf to pin them or right-click on an app to unpin.
Step-by-step guide: Your comprehensive guide to ChromeOS shelf customization
I often place my most-used apps on the shelf. It’s all about reducing those few extra seconds searching for an app!
3. Change the app grid
You can customize the way apps appear in the launcher.
- Click on the launcher (circular icon on the bottom-left corner).
- Click and drag apps to rearrange them or right-click to add them to a folder.
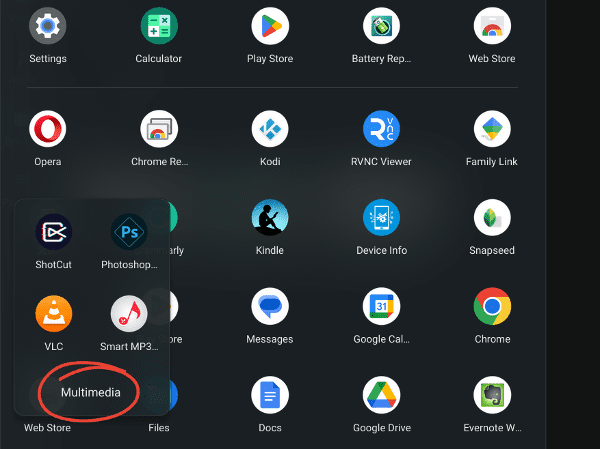
Grouping apps in ChromeOS Launcher
Folders are a lifesaver! I group similar apps together; for instance, all my photo editing tools are in one folder.
4. Update your profile picture
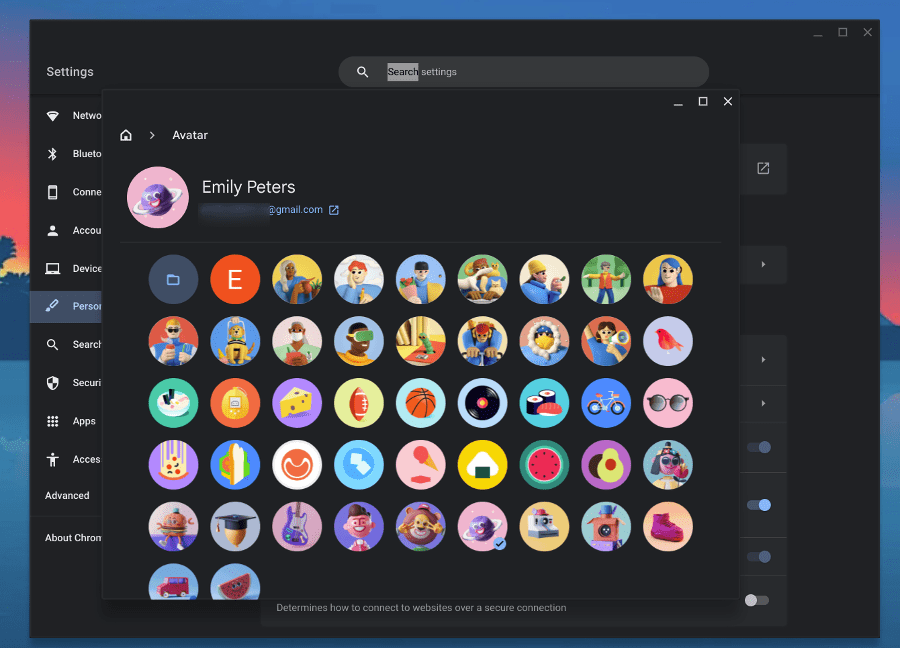
Changing profile picture on Chromebook
Your profile picture can be a picture of you, an avatar, or any image that represents you.
- Click on the shelf (bottom-right corner).
- Go to “Settings.” (gear icon)
- Under “Personalization,” click on “Set your wallpaper & style”.
- Click on your profile picture and choose a new one!
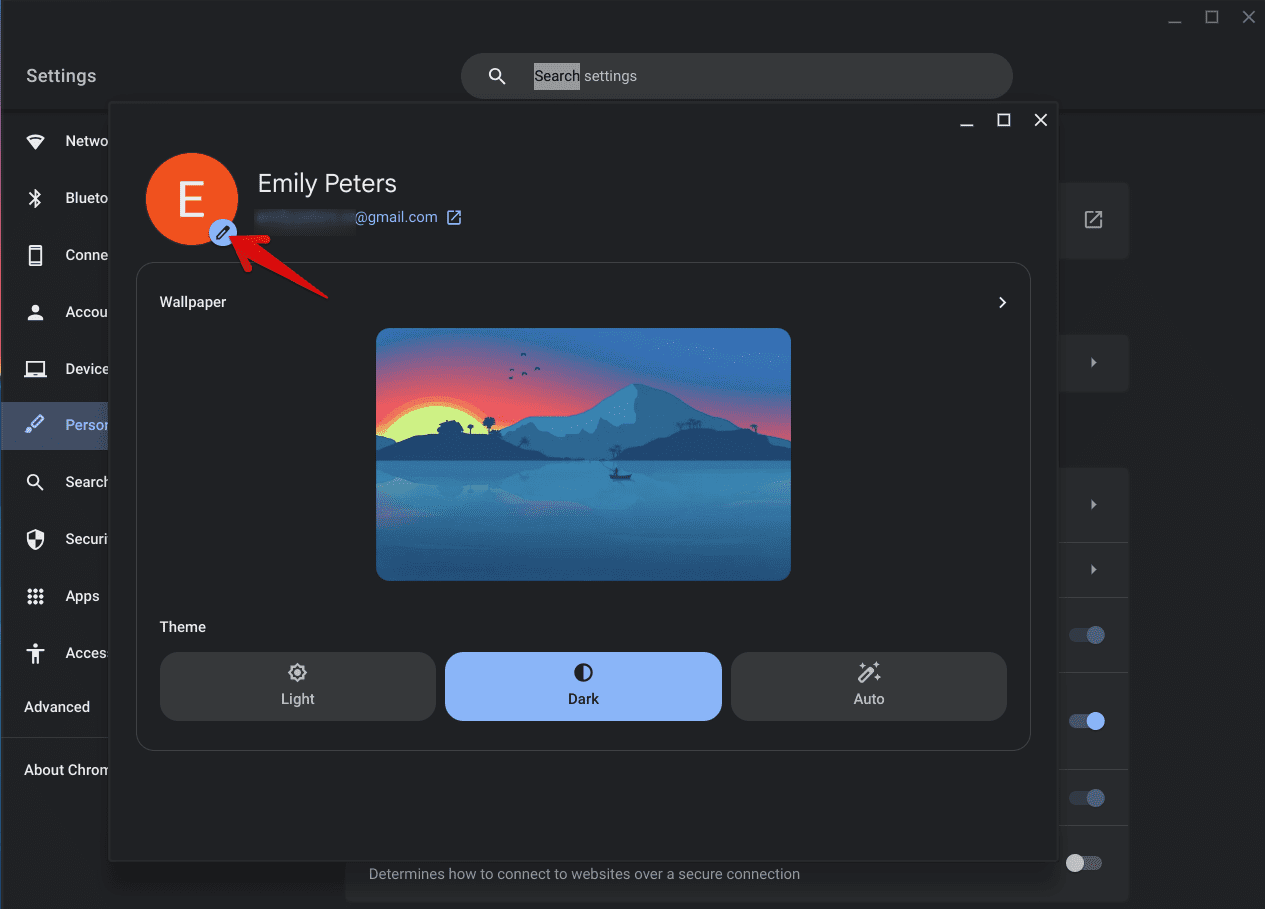
Changing Profile Picture in ChromeOS
It might seem trivial, but every time I switch on my Chromebook and see a quirky image, it brings a smile to my face.
5. Use a custom cursor
You can switch to a larger cursor or invert its color for visibility.
- Go to “Settings.”
- Under “Accessibility,” click on “Cursor and touchpad.”
- Turn on “Show large mouse cursor” and adjust the cursor size using the slider.
- You can also choose a different color to the cursor.
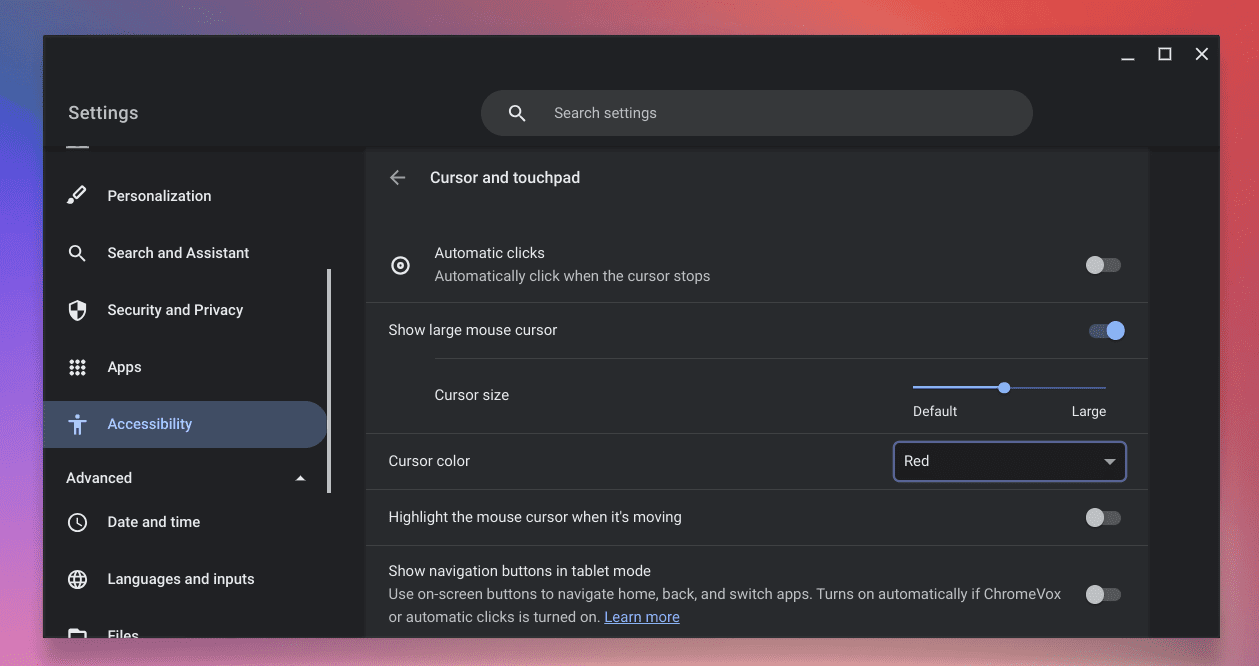
Cursor customization on ChromeOS
6. Keyboard remapping
If there’s a particular key you don’t use much, you can change its function.
- Go to “Settings.”
- Under “Device,” choose “Keyboard.”
- Remap keys as you wish.
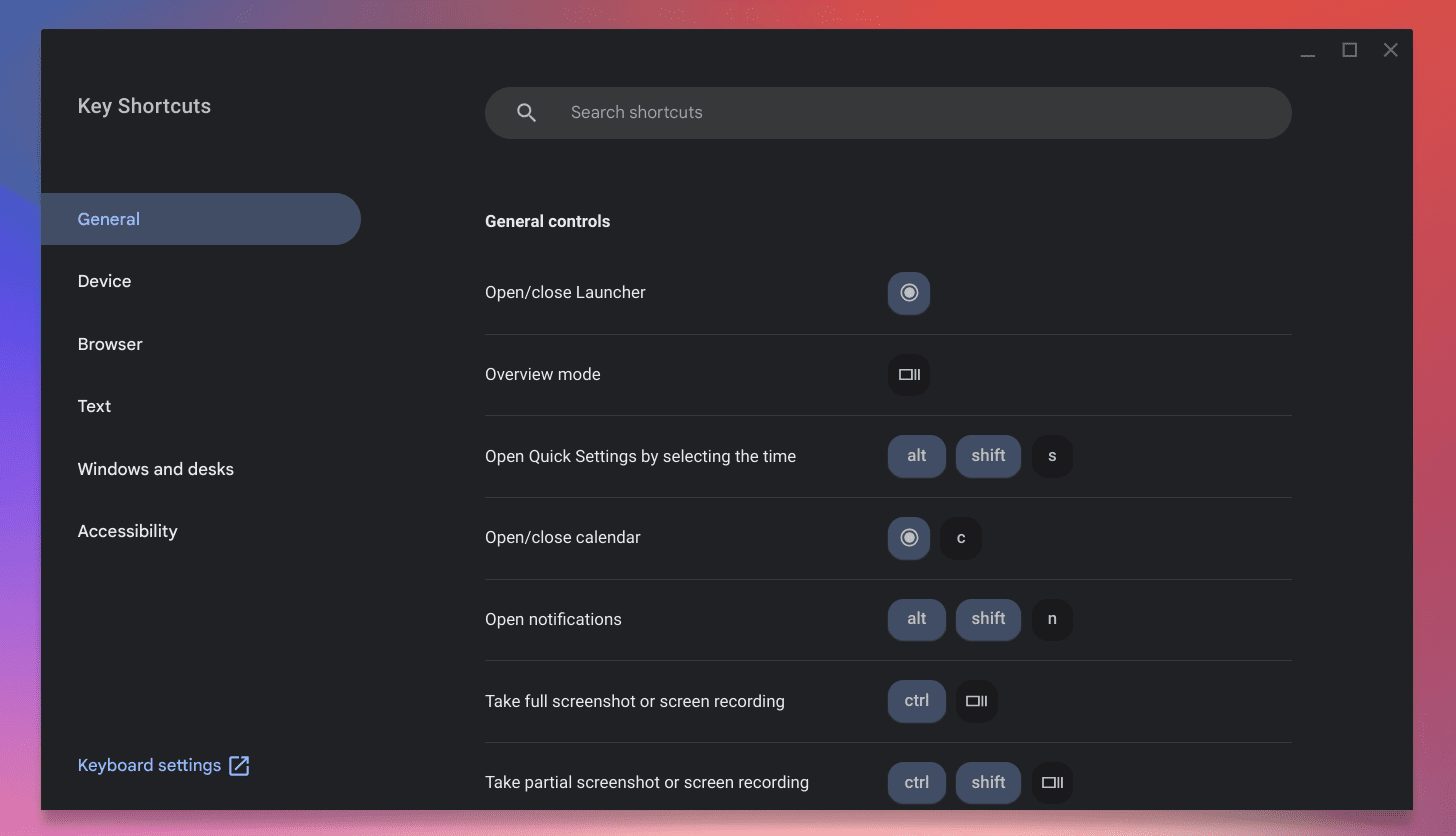
ChromeOS keyboard shortcuts
This feature is beneficial for programmers. I’ve personally remapped the search key to be the Caps Lock – it’s just more familiar that way.
7. Night light
Staring at screens can strain our eyes. Chromebooks have a ‘Night Light’ feature to reduce blue light.
- Go to “Settings.”
- Under “Device,” choose “Displays.”
- Turn on “Night Light.”
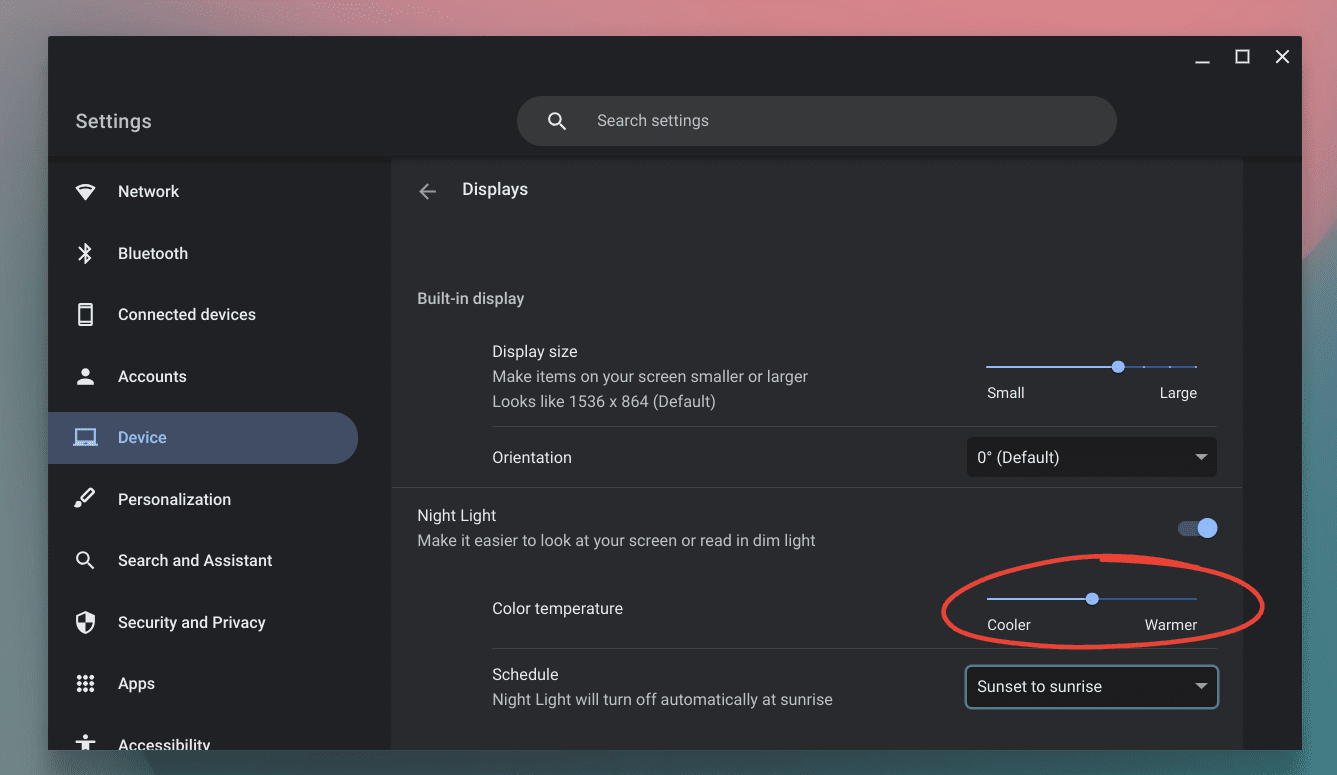
Adjusting Night Light mode’s color temperature
My eyes have certainly felt the difference. I turn it on especially when working late at night.
8. Enable Android apps
Many newer Chromebooks support Android apps.
- Go to “Settings.”
- Under “Apps,” click on “Google Play Store.”
- Enable it and access a wide range of Android apps.
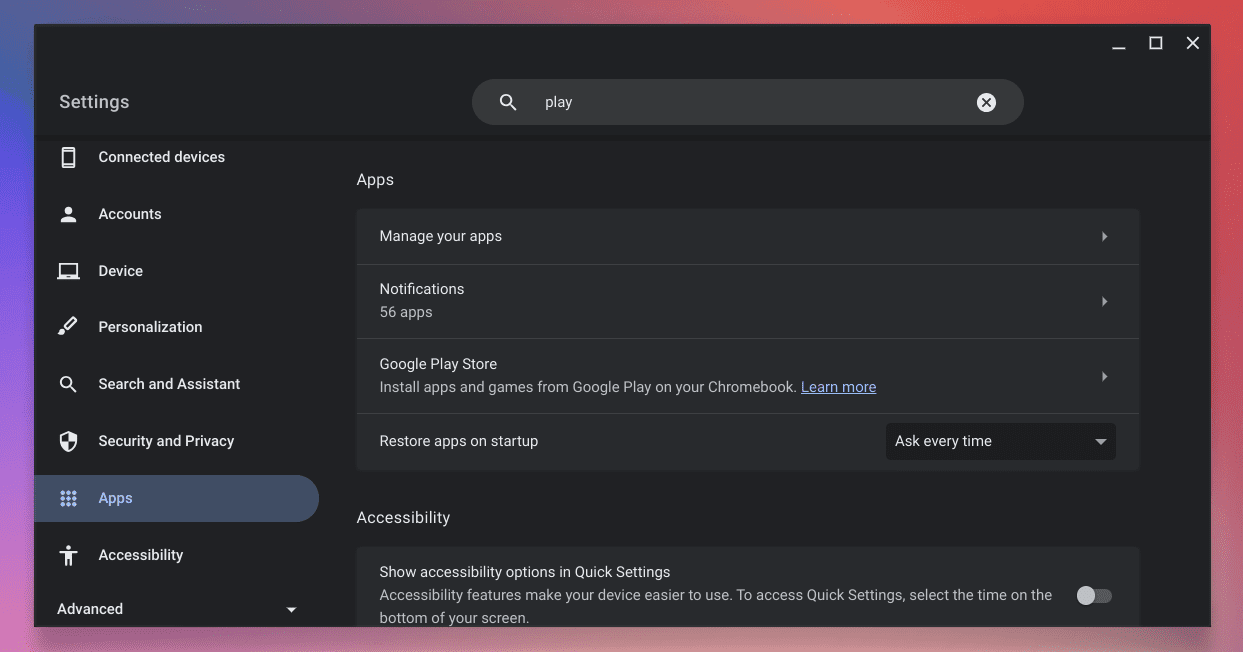
Google Play Store setting in ChromeOS
I cannot tell you how much broader my app choices became after enabling this. However, some apps don’t scale perfectly, which can be a minor annoyance.
9. Choose a stylized font
- Go to “Settings.”
- Under “Search and Assistant,” choose “Display and magnification.”
- Click on “Website text size and font”.
- This will open Chrome settings.
- Pick your preferred font style.
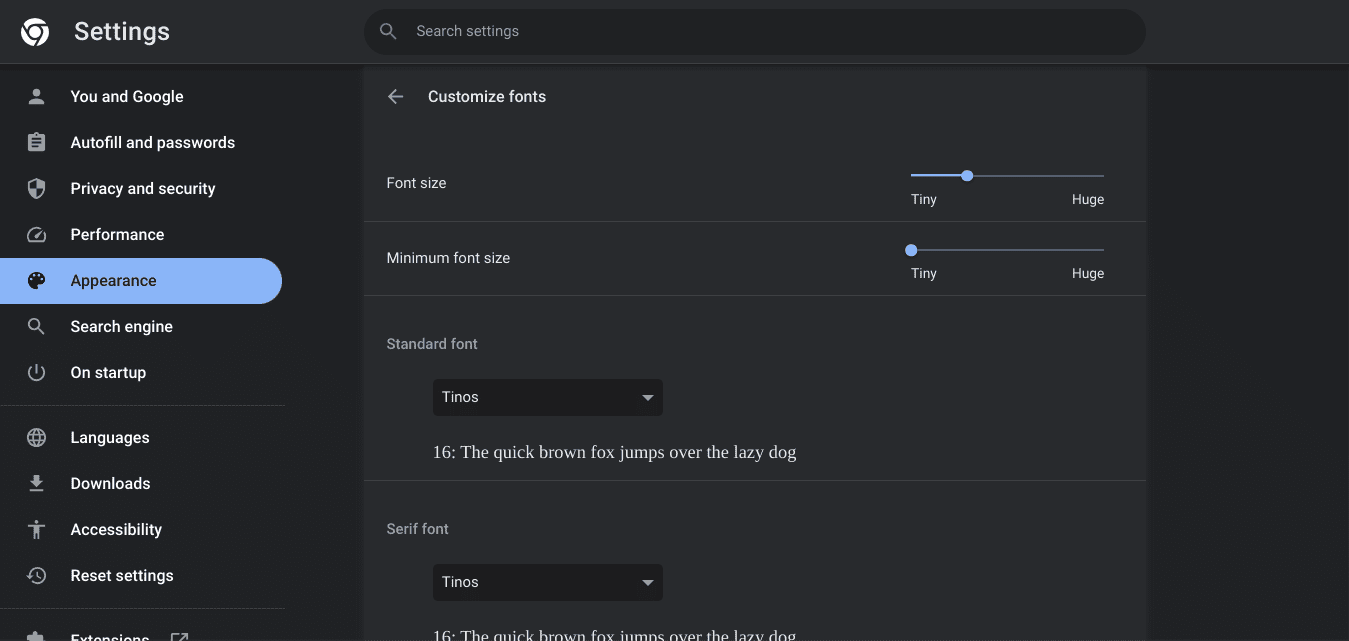
Chrome font settings
I’m a fan of playful fonts, but I also understand it’s not for everyone. It’s all about your personal style.
10. Accessibility features
Chromebooks have numerous accessibility features.
- Go to “Settings.”
- Choose “Accessibility.”
- Explore features like “Display and magnification,” “Text-to-Speech,” or “Audio and captions.”
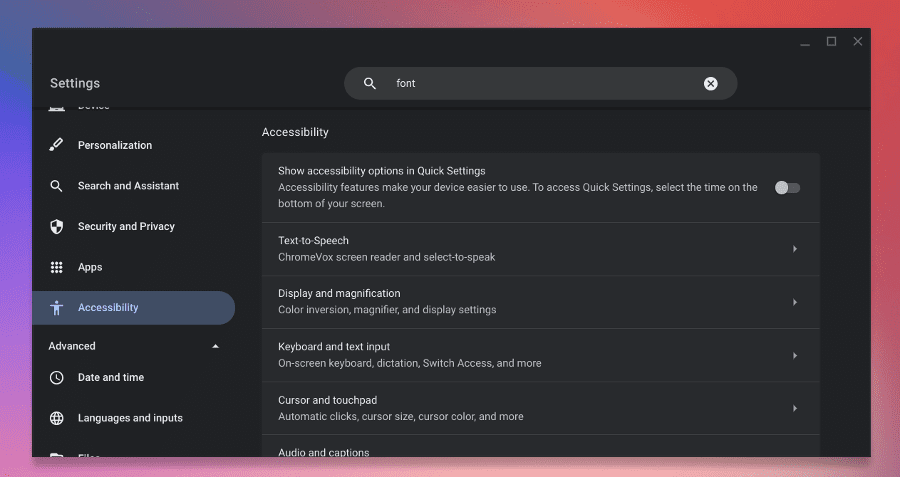
ChromeOS accessibility settings
11. Change touchpad speed
- Go to “Settings.”
- Under “Device,” choose “Touchpad.”
- Adjust the touchpad speed.
- Enable reverse scrolling if that makes your scrolling experience better.
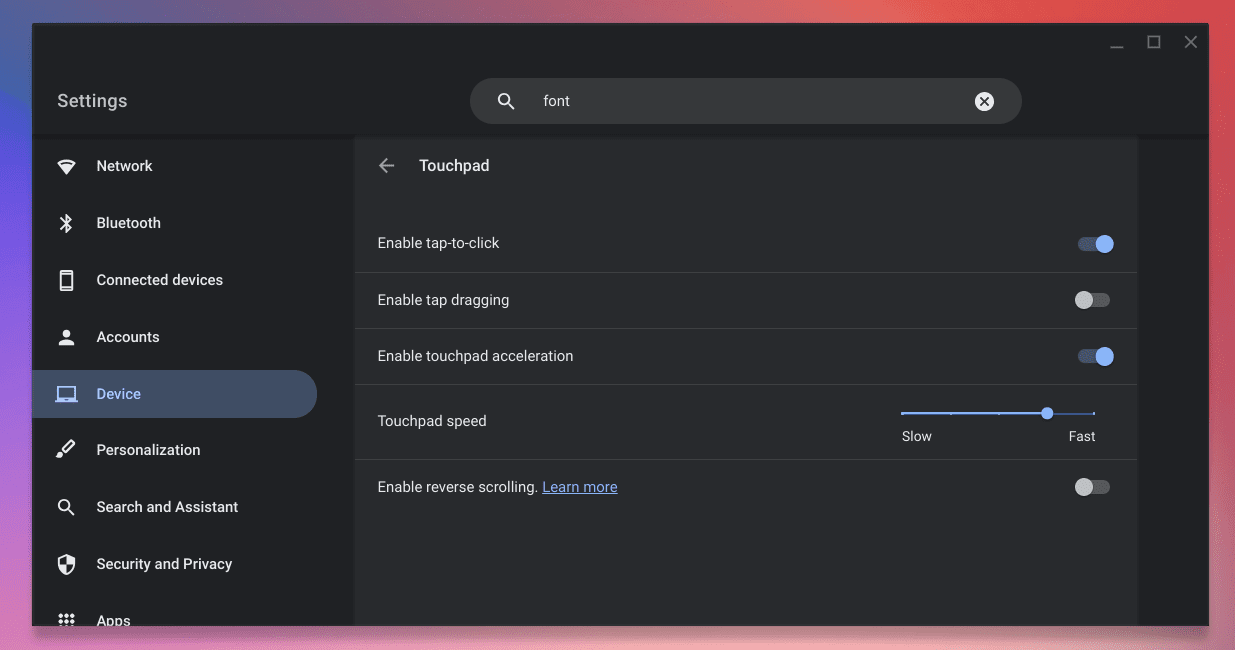
ChromeOS touchpad settings
I prefer a faster touchpad speed – it makes navigating quicker and smoother for me.
12. Dark and light theme
- Go to “Settings.”
- Under “Appearance,” switch between dark and light theme.
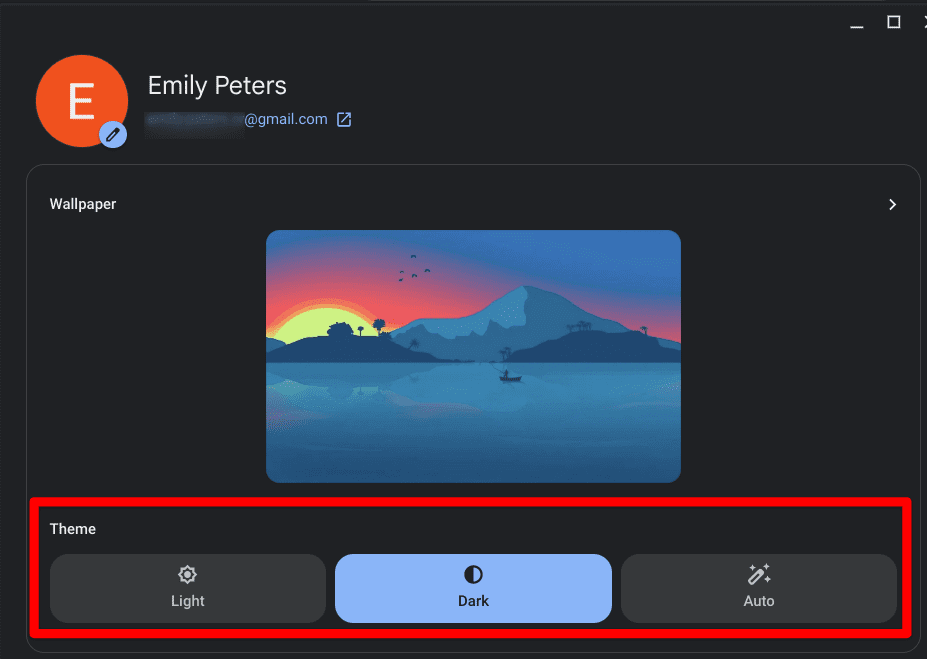
Dark and light mode themes in ChromeOS
While I love the dark theme for late-night browsing, during the day, the light theme feels more refreshing. Set the mode to ‘Auto’ and let ChromeOS adjust based on the time of day.
13. Pin websites to the shelf
If you frequently visit a website, pin it! You read it right. You can pin a website to the ChromeOS shelf. Here are the steps on how to do it:
- Open the website that you want to pin.
- Click the three dots in the upper right corner of the Chrome window.
- Hover over “More tools” and select “Create shortcut”.
- In the “Create shortcut” dialog box, type a name for the shortcut.
- Check the “Open as window” box if you want the website to open in a separate window.
- Click “Create”.
Step-by-step guide with screenshots here: How to add a website to the Chromebook Shelf
The website shortcut will be added to the Launcher. You can then drag and drop it to the shelf to pin it.
Here are some additional things to keep in mind:
-
- You can pin multiple websites to the shelf.
- To remove a pinned website or app from the shelf, right-click on it and select “Remove from shelf.”
I have my favorite news portal and YouTube pinned. It’s as good as having an app!
14. Guest mode and picture accounts
When someone wants to borrow your Chromebook, enable guest mode. Or create picture accounts for frequent users.
Step-by-step guide: How to use your Chromebook as a Guest
15. Adjust notification settings
- Click on the system tray.
- Click on “Notifications.”
- Customize which app notifications you want to see.
I’ve turned off a majority of my notifications. Less distraction!
16. Change your Chrome theme
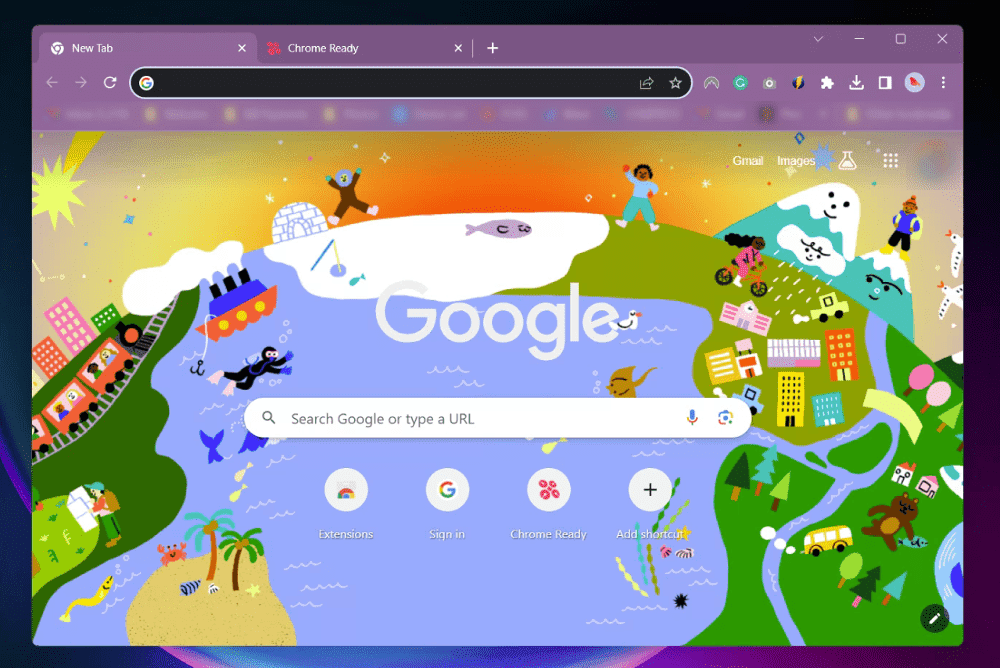
Google Chrome with new theme applied
Customize Chrome’s appearance.
- Go to the Chrome Web Store.
- Search for themes.
- Choose and apply one you like.
Step-by-step guide: The 10 best themes for Google Chrome
17. Add extensions
Extensions can dramatically enhance Chrome’s capabilities. Explore the Chrome Web Store for extensions that cater to your needs.
Step-by-step guide: How to manage extensions on Google Chrome
However, don’t go overboard. Too many extensions can slow things down. I learned that the hard way!
18. Multiple desktops
If you multitask, this is for you.

Virtual desks in a Chromebook
- Swipe up with three fingers on the touchpad.
- Click on “New desk” on the top right.
Step-by-step guide: Using a virtual desktop on ChromeOS
It’s like having multiple monitors. I often separate work and personal tasks this way.
19. Turn on offline access
For apps like Google Drive, enable offline access to continue your work without an internet connection.
Step-by-step guide: The guide to mastering offline mode on Chromebook
This was a lifesaver during a recent power outage when I was working on an important document.
20. Play with experimental features in Chrome Flags
Chrome Flags houses experimental features that haven’t yet made it to the mainstream Chrome OS. Here, you can tweak several settings to make your Chromebook work more in line with your preferences. However, tread with caution because these are not fully developed features and can sometimes cause glitches. To access these features:
- Open the Chrome browser and type “chrome://flags” in the address bar.
- You’ll see a list of experimental features that you can enable or disable.
Refer to our guide: Unlock New Features: A Guide to the Best Google Chrome Flags
I enjoy playing around with these, especially on weekends. Sometimes, I stumble upon really cool features that make my user experience much smoother. But a word of caution: always ensure to backup important data, as some features might be unstable.
BONUS! Setting up a PIN for quicker access
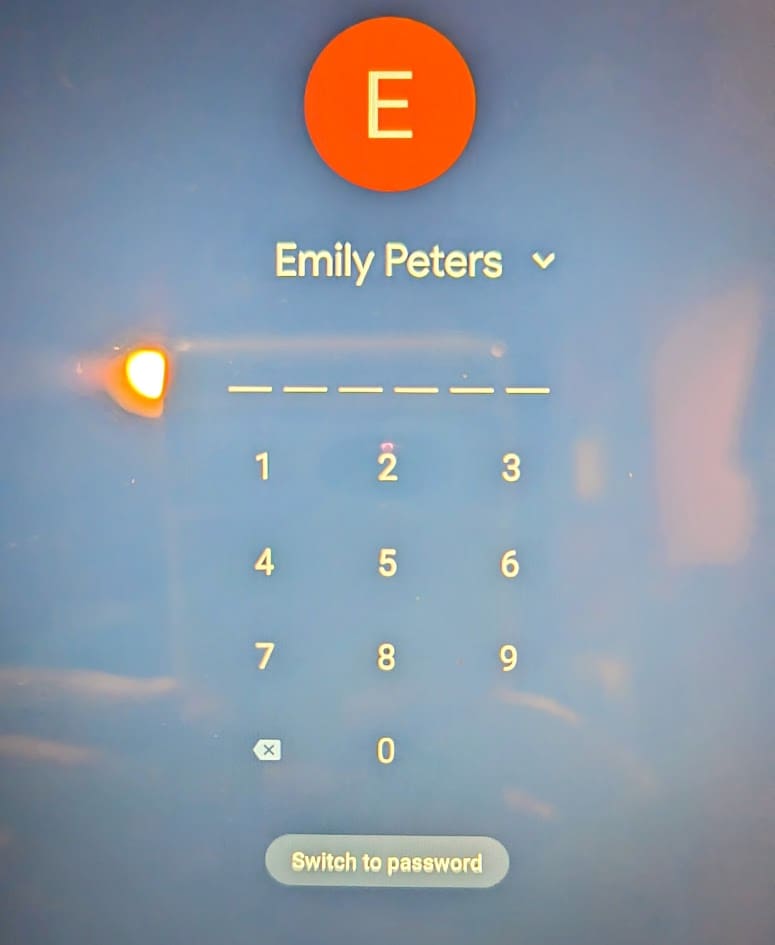
Logging with PIN in ChromeOS
In the grand scheme of personalizing your Chromebook, adding a touch of convenience with heightened security is something that we often overlook. Setting up a PIN can be a simpler and faster way to unlock your Chromebook compared to typing a long password every time, especially when you are in a hurry.
To set up a PIN, follow these simple steps in this detailed tutorial.
Having adopted the PIN feature recently, I found it to be a game-changer. It not only saves time but also offers a respite from typing the password repeatedly, especially when I have my hands full, and I need quick access. It’s a small step that significantly streamlines the login process, making it a touch faster and a bit more personal. Do keep in mind, setting up a strong PIN is vital to ensure the security of your device.
Conclusion
In our explorative journey through the myriad ways to customize your Chromebook in 2023, we have traversed through various nuances, features, and personal touches that can truly elevate your user experience. As we stand here, in the vibrant landscape of 2023, it is crystal clear that the Chromebook has metamorphosed into a dynamic, user-friendly, and highly adaptable device, catering to a wide spectrum of users with varied needs and preferences.
Customizing your Chromebook not only makes it uniquely yours but can also improve productivity and user experience. While these are my personal preferences and tips, I encourage you to explore and find what best suits your style. Remember, every tool, including a Chromebook, is as efficient as the user allows it to be. Enjoy personalizing!
