Chromebooks are light, speedy, and simple machines that come with the promise of top-tier security. Google has made several specialized tweaks to ChromeOS, so the operating system is no longer at a nascent stage where it’s incapable of going past mediocrity. This is a nod toward the Play Store and the Crostini Linux terminal present on ChromeOS.
However, since the Chrome browser and ChromeOS go hand in hand, these two complement each other’s features and functionality. Atop the multiple layers of ingrain security that Chromebooks have, Google Chrome employs a neat Password Manager feature, which has been explicitly curated to safe-keep users’ passwords.
In this guide, we’ll explain how to use the Password Manager tool on Chromebooks to the best of its capacity, so you can start utilizing this convenient feature and instill more flexibility in your online lives. With no further ado, let’s get going,
What is the Password Manager feature on ChromeOS?
The branding “Google Password Manager” is relatively new and was previously unfound in the Chrome browser in that specific sense. Formerly, Google Chrome comprised a “Passwords” section within the “Autofill and passwords” area of Chrome’s main settings, but that has been switched in favor of “Password Manager.”
From what we’ve observed, “Password Manager” serves as a more coherent union of a user’s collective passwords in Chrome. Not only is the interface of this upgraded section more intuitive, but there are separate tabs on the left side of the area now. These include “Checkup,” which lets you confirm your stored passwords’ authenticity, and “Settings.”
What you see here is a redesign of the Password Manager’s feature former self, which was pretty barebones. Using this functionality, you can keep your saved passwords in check, test them for any anomalies, and even tweak how the function pitches in as a whole. It’s apparent how Google has significantly improved this department in 2023.
Now that you know the gist of it, let’s get on with the practicality of the matter and learn how to utilize Password Manager in the Chrome browser.
Using Password Manager in Chrome
Password Manager in Chrome can be accessed painlessly from the “Settings” section, but if you’d like to cut things even shorter, there’s a keyboard shortcut that you can employ. Press “Alt” and “E” together, and it should open up the “Customize and control Google Chrome” overlay menu for you. From there, choose “Google Password Manager” for the next step.
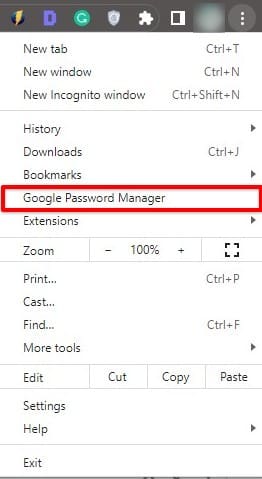
Accessing the Google Password Manager section
You should now be taken straight to the “Password Manager” window in the Chrome browser, making it possible to assess the passwords you currently have stored in the browser. A list of these will manifest on your end, so you, as a user, can readily check out your saved entries by proving your identity first.
This will be done according to the operating system you’re using to access Password Manager. On ChromeOS, accessing a password will require you to enter your Gmail account’s password first. Once cleared, you can view and copy your passcodes in a moment.
The “Passwords” feature
To put things into perspective, focus on the tabs on the right. Upon entering Password Manager, you’ll be taken to the “Passwords” tab, the first available section. From there on out, you may add passwords manually or scroll through the ones already a part of your account.
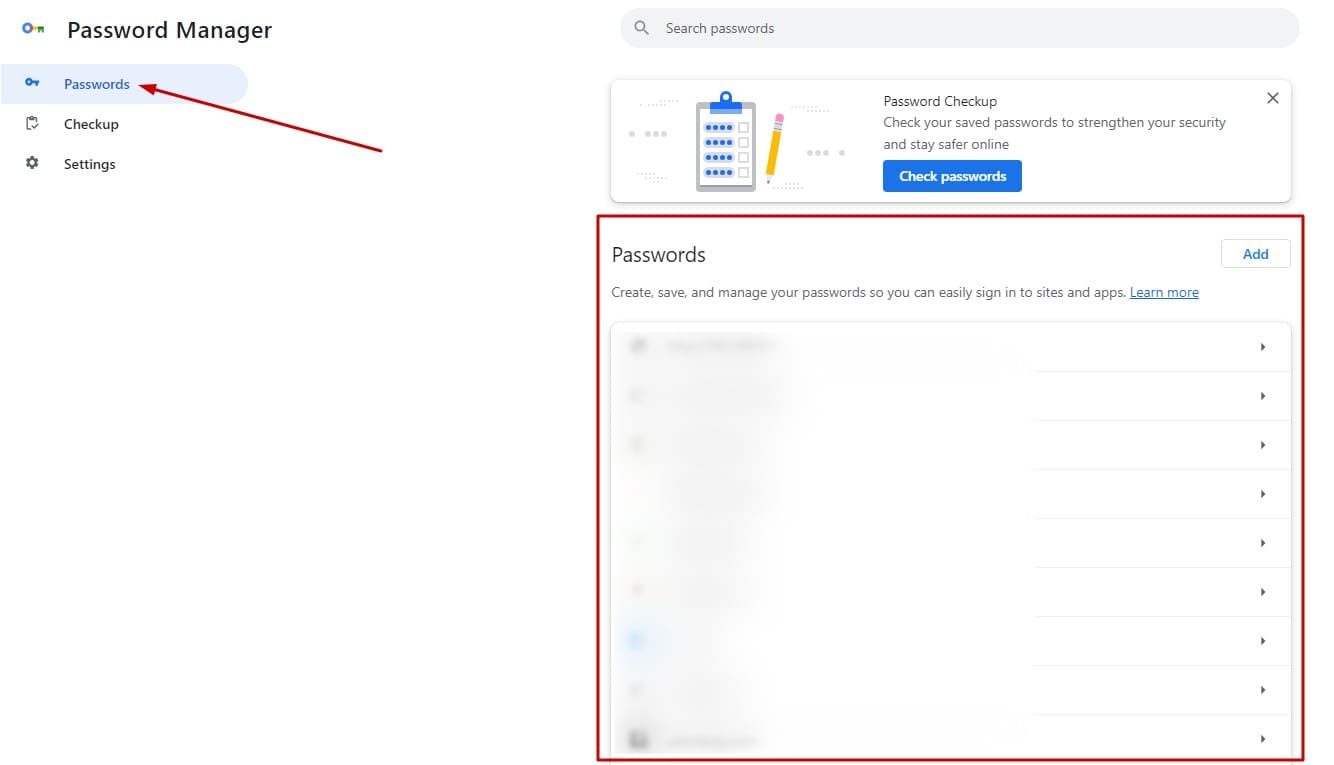
The Passwords tab in the Password Manager section
Notice those arrow signs alongside each password? Those depict that clicking any entry would lead you toward the password’s access, but again, you must go past the verification step here for the best results. Chromebook users are sure to sort that out without breaking a sweat.
The “Checkup” feature
Moving onto the “Checkup” area, consider it a diagnostic tool that runs a deep scan on your selected passwords and verifies whether they’re safe to use or are somewhere vulnerable. The “Checkup” area aims to find reused and old passwords and prompt you to change them for a more secure working experience with Chrome.
When you click the “Checkup” button, the scan will begin automatically, and the results will pile up immediately. Depending on the volume of the content saved, you’ll either visualize passwords that haven’t been compromised, reused passwords, and even weak passwords that can be changed almost instantly.
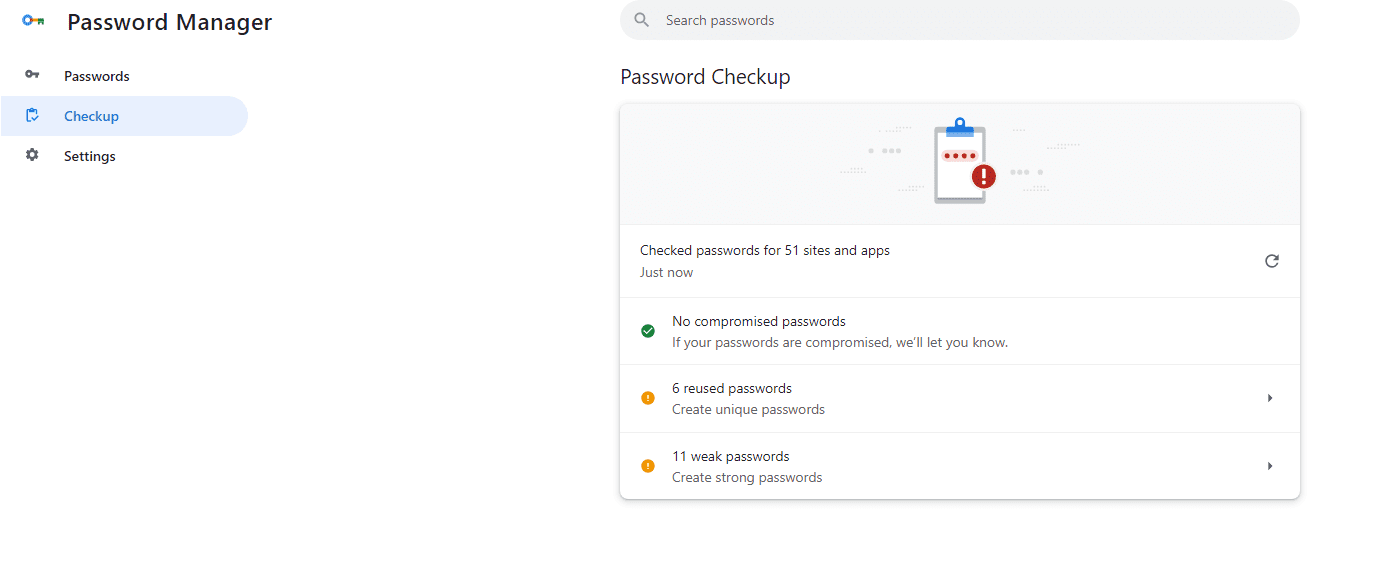
The “Checkup” feature of the Password Manager
Entering the “Reused passwords” and “Weak passwords” sections will allow you to make the relevant changes required to change the passwords that aren’t up to the mark. The latter function, in particular, is handy, given how it automatically scans our existing passwords database and suggests that we take relevant action in cases where it’s mandatory.
The “Settings” area of the Google Password Manager
Lastly, there’s “Settings,” and this particular sector is chock-full of optimizations for the Password Manager feature on your Chromebook. Here, one of the things you can pull off is import and export passwords in case you’ve been using a different password manager before and are now moving to Chrome’s in-built feature instead.
After clicking on “Settings” on the tab on the left side, the contents of the page you’re on will transform. A swath of options will promptly manifest, starting off the deluge of settings with “Offer to save passwords.” If you disable this feature, you will no longer be receiving prompts that let you save your passwords whenever you’ve entered them anew on a website.
Keep this toggled on for your convenience. Next up, the “Sign in automatically” feature is another worthwhile tweak that doesn’t let you go through the pangs of a site’s login page. It readies your profile immediately and gets you signed in on a website when you access its domain.
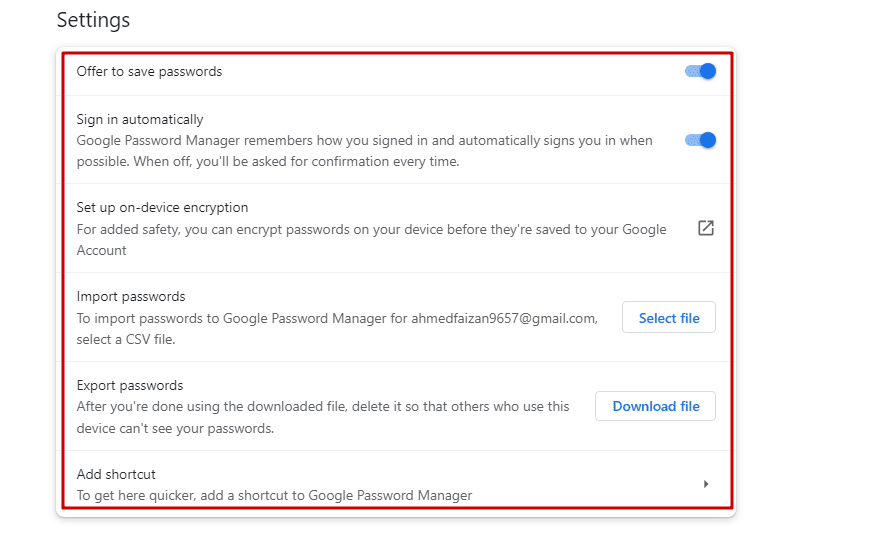
Adjustable settings for the Google Password Manager
We will skip the “Set up on-device encryption” and “Add shortcut” features because these warrant their sections. To the best of your interests, you can employ the following two tools: “Import passwords” and “Export passwords.” You might already know these time-saving utilities if you’ve owned multiple devices over time.
Importing passwords means loading passwords onto a device you’ve downloaded from elsewhere, i.e., another device of yours. Exporting is the polar opposite—you’re pushing passwords out in a dedicated file to use them all on another device.
It’s as simple as that, but more detailed instructions regarding the process have been laid out in another one of our articles here. Make sure to check that out for a step-by-step explanation of the process. The write-up was from when the Password Manager did not exist independently.
With the fundamentals being dealt with, let’s move on to another pertinent feature that users can benefit from.
How to install the Password Manager Shortcut on ChromeOS
It turns out that this newly designed Password Manager feature comprises a shortcut to its name that Chromebook users can install on their end in a couple of steps. Doing so can be convenient in the long run, given how easy it is to access the launcher section on ChromeOS and look for the application you need.
In the “Settings” section of Google Password Manager, click the “Add shortcut” button to initiate the process.
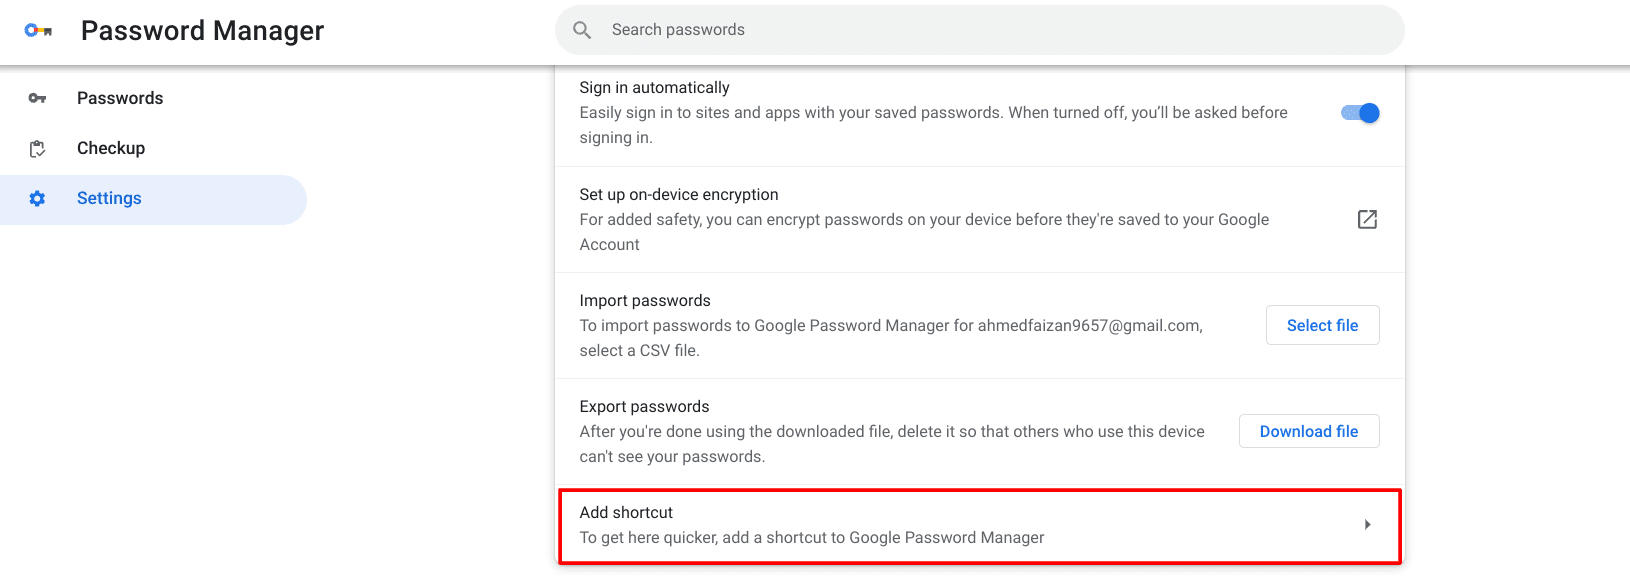
Clicking on “Add shortcut”
You should now see a prompt appearing in the top-right area of the Chrome browser’s interface, asking you to confirm the installation. Click “Install,” and the feature will find a home on your device.
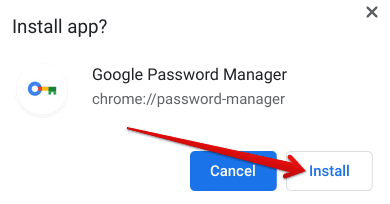
Installing Password Manager on ChromeOS
You may as well check the launcher area by clicking the “Search” key on your Chromebook’s keyboard to find Google Password Manager duly installed there. That’s about it.

Google Password Manager installed
It’s now easily possible to launch Password Manager on your Chromebook anytime you want from the launcher area, thereby having a significantly better mode of accessibility after completing all the steps above.
How to set up on-device encryption on a Chromebook
Next, it’s worth looking into the encryption service Google offers to users of ChromeOS and other operating systems if enhanced security is what they’re after. This feature, called “On-device encryption, ” is geared toward “turning your device into a key used to lock passwords before they’re saved to Google Password Manager.”
That’s pretty much the gist of it, as per the developers. However, the caveat here is that if you lose the encryption key, which happens to be your device, you’ll also lose all your saved passwords. Best protect the key with your life, then. Click the “Set up on-device encryption” option within Password Manager’s “Settings.”
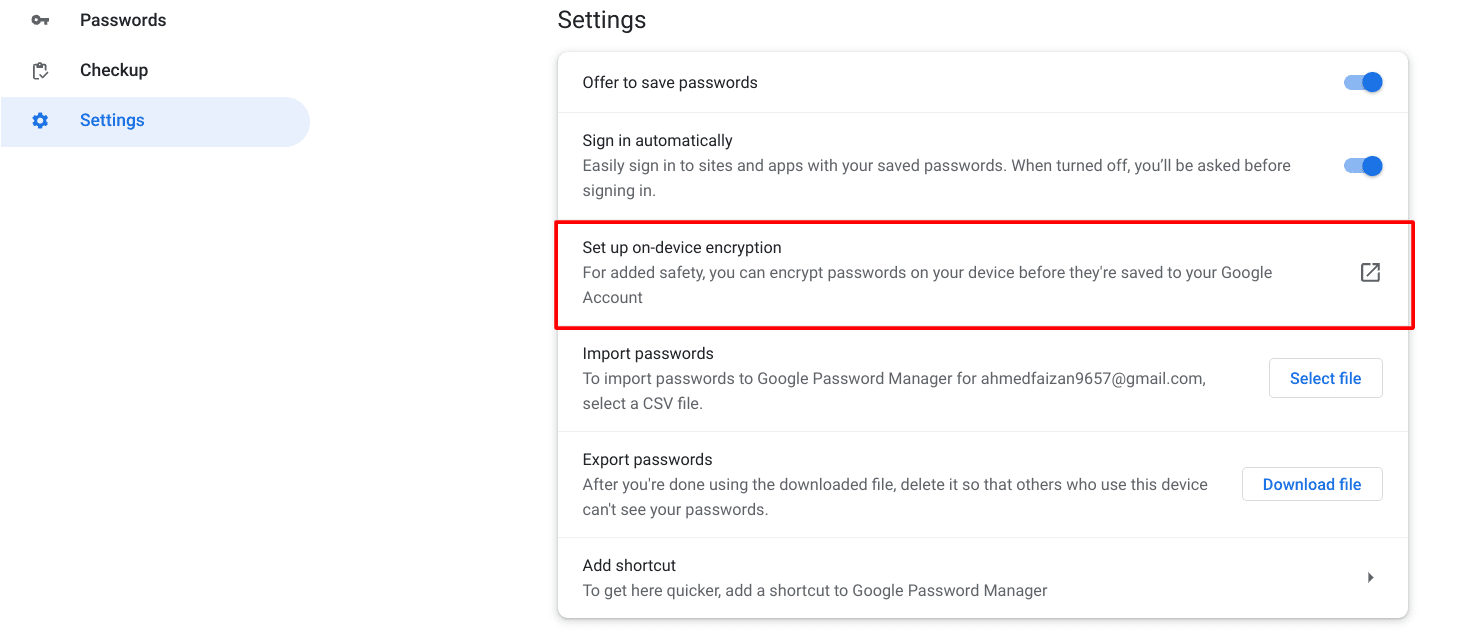
Getting started with “On-device encryption”
Once done, you’ll be taken to a new page on the Chrome browser. Here, Google will briefly describe the pros and cons of password encryption. If you feel this feature is suitable for you and you’ll be able to handle the risk associated here comfortably, click on “Next.”
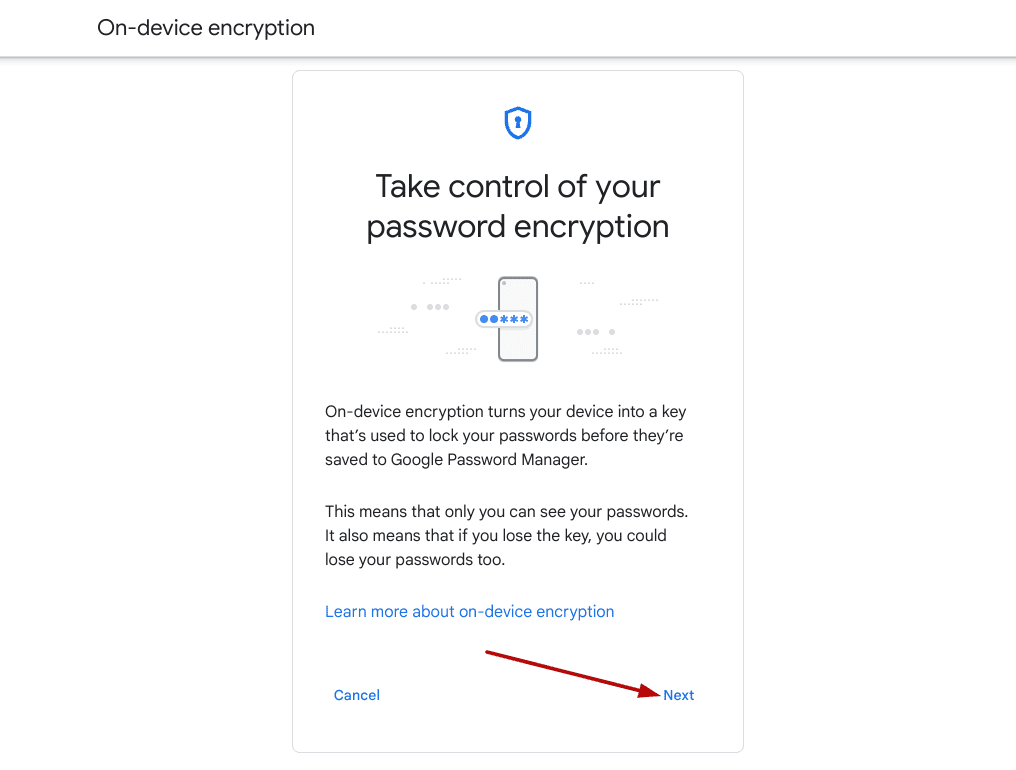
Clicking on the “Next” button
The next step rotates around yet another clarification by Google, highlighting what to expect from the on-device encryption functionality and what steps you should take to ensure you don’t run into trouble.
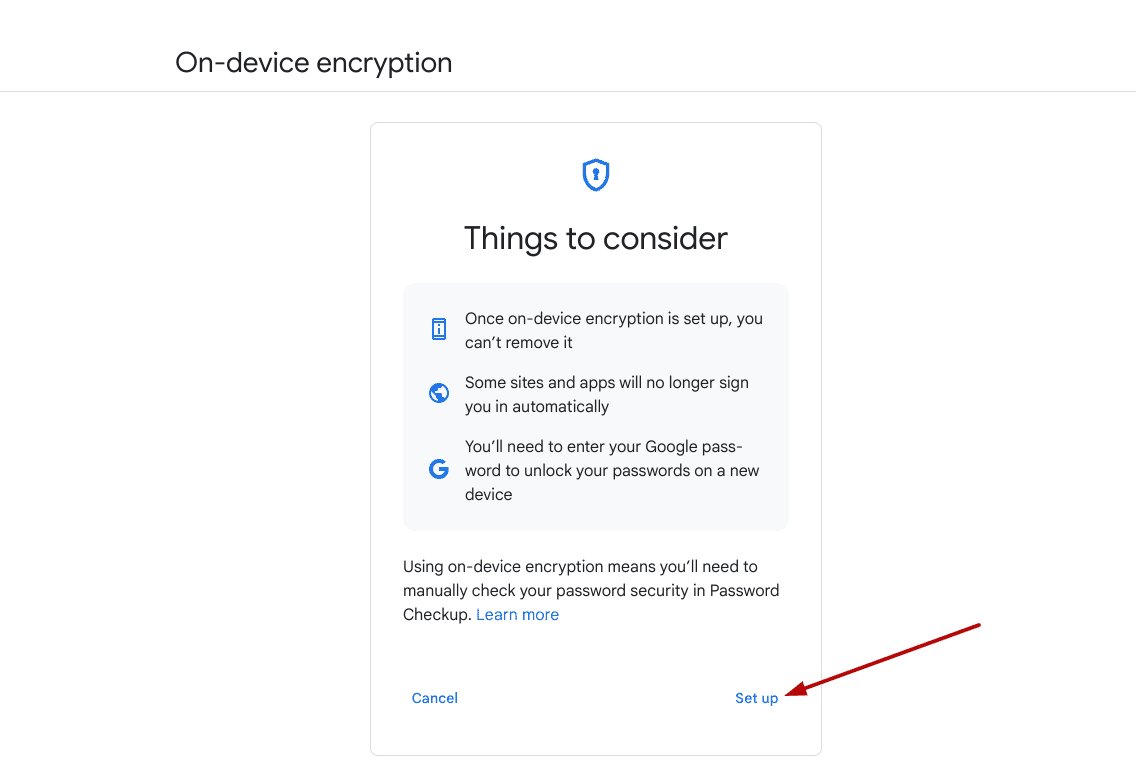
Setting up on-device encryption on ChromeOS
After clicking “Set up,” you will be prompted to sign into your account with your password again. Given the gravity of the situation, this is nothing but a logical step from the developers’ side. As soon as you sign in, follow the on-screen instructions, and you will have your passwords encrypted on your Chromebook in no time.
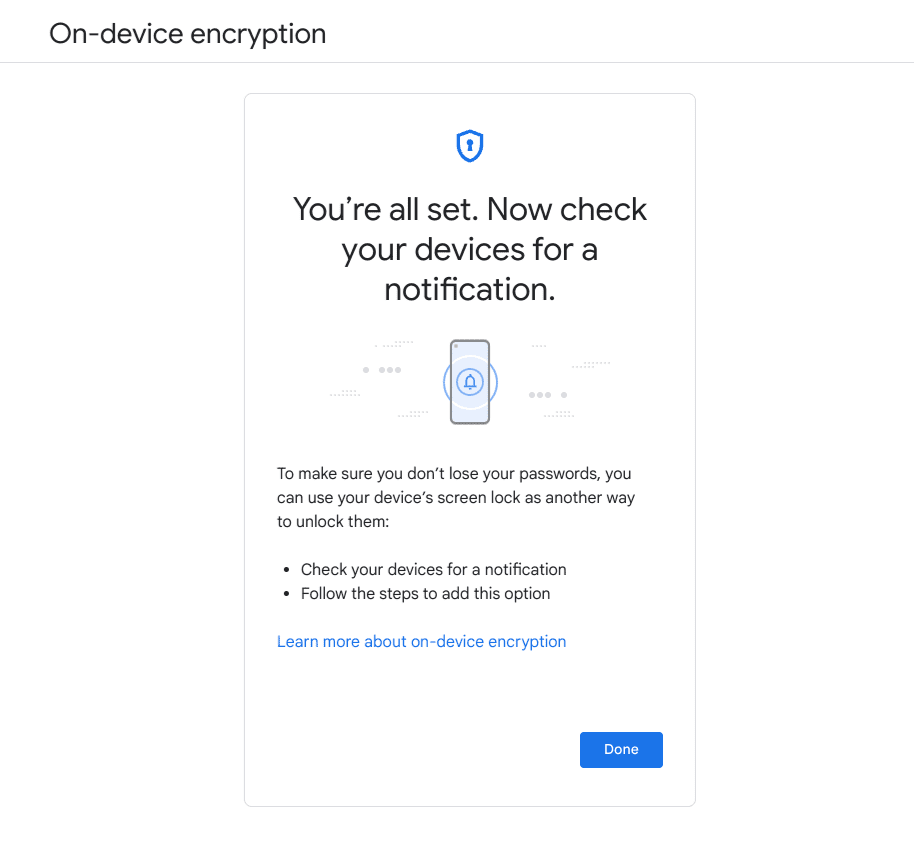
On-device encryption is all setup
Just make sure you remember your account password, and you’ll be good to go. Another convenient way that Google offers to help us prevent getting locked out of our passwords is affiliating the encryption with the screen lock of your mobile phone.
At the end of the process above, a notification will have been sent to your other devices that use the same email. You can use your smartphone to unlock your passwords when needed. Check the phone and set up the screen lock feature for the best results. Congratulations! You’ve made it to the end.
Recommended alternatives for managing your passwords on a Chromebook
Before we top off the guide, it bears noticing that there are plenty of other high-quality password managers you can install on your Chromebook and enjoy seamless security afterward. Of course, none of them are going to come as close to the in-built Google Password Manager, but they’ll still get the job done comfortably.
Some options worth signaling you toward for your Chromebook include LastPass, which is pretty much the preferred choice of millions of concerned users at this point, 1Password, and DashLane. Installing LastPass on a Chromebook can happen in a variety of ways. You can look forward to the LastPass Android app or the Chrome extension—whatever tickles your pickle.
LastPass offers automatic password changes, password sharing, two-factor authentication, emergency contact availability, optimized performance on ChromeOS, and, of course, an exceptionally robust password vault that safe-keeps your passwords like its life depends on it.
Other reliable options include Keeper, RoboForm, and Enpass. We recommend giving each option a shot to see which application suits your preference the most.
Conclusion
ChromeOS is a pretty secure operating system. Google says that since Chromebooks have dawned upon the world, there hasn’t been a single ransomware attack that these devices couldn’t handle. That’s a pretty hefty claim right off the bat, especially for someone who’s looking to get a Chromebook for the first time.
Anyhow, the reason Chromebooks are so secure is that they employ a range of security-centric features across the board, guaranteeing a tight security standard that allows them to maintain themselves at the highest level. And thanks to facilitative features such as Password Manager, one can only enjoy Chrome usage seamlessly and securely.
In the comments section below, let us know if you’ve found the guide helpful. As always, Chrome Ready wishes you good luck!
