Chromebooks are some of the most user-friendly machines on the planet; hence the reason so many opt for them in the day and age we live in today. However, if you’re an elderly looking to make your experience even smoother on ChromeOS, there are measures to approach that can accomplish the task at hand for you.
In this guide, we’ll learn the best ChromeOS tips and tricks for seniors that can potentially change the way you use Chromebooks on a frequent basis. Given how these sleek devices are loaded to the brim with accessibility features and tools, Make sure to read until the end for the best results.
15 of the best Chromebook tips for seniors
We’ve gathered a bunch of useful information for older people in this section that can be easily absorbed and incorporated on your end. Therefore, let’s get straight into the good stuff with no further ado.
1. Check out ChromeVox
ChromeVox is a ChromeOS exclusive feature that functions as a screen reader. Although this is an accessibility-centric tool that’s meant to facilitate those with some form of visual deterioration, you can use ChromeVox for regular use cases as well, such as having the system read stuff out loud for the purpose of entertaining any people next to you.
But, of course, its primary function is to help anyone who has difficulty seeing, so if you’re an elderly who can benefit from such a feature on their end, toggle it on right away to test it out. To get started, head over to your Chromebook’s “Settings” app and select “Accessibility” from the left side panel. You should then be able to click on “Text-to-Speech.”
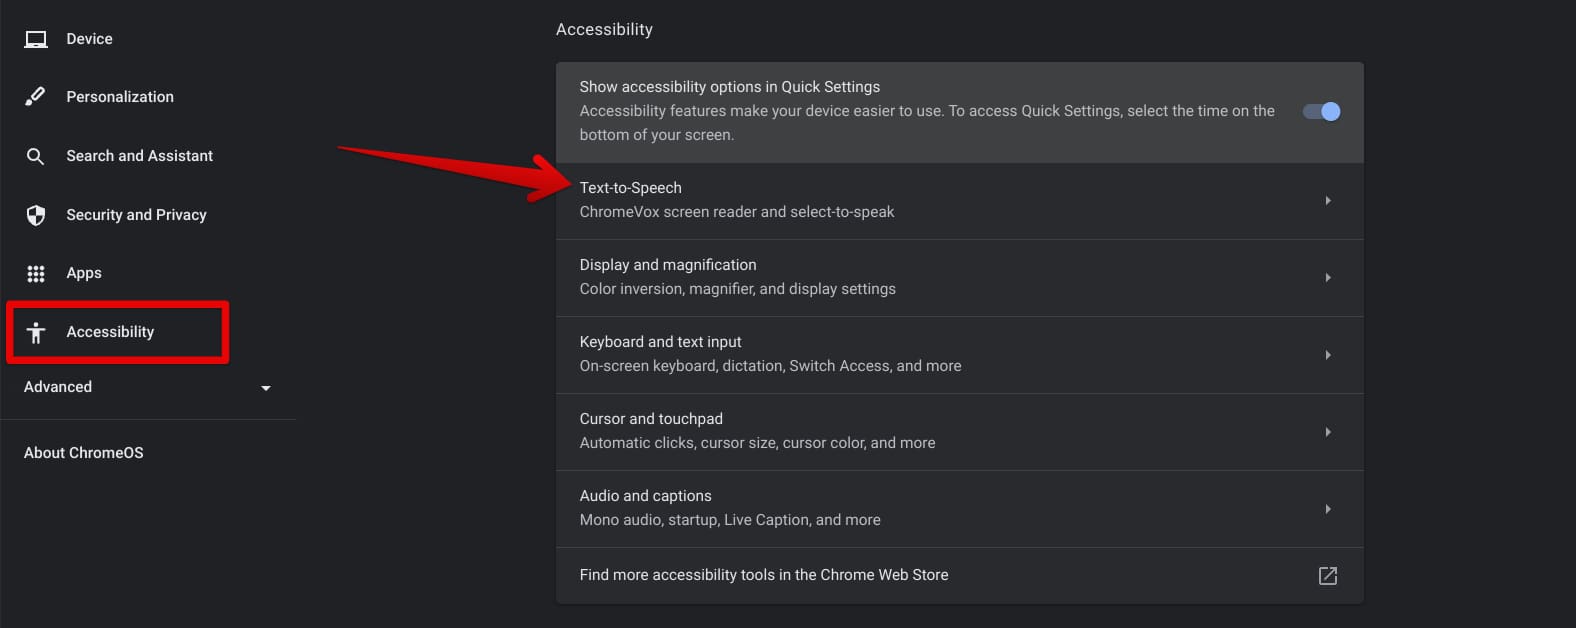
Selecting the “Text to Speech” section
You’ll find ChromeVox within the “Text-to-Speech” section, allowing you to toggle it on just like that. Although we haven’t tested it yet ourselves, Google also says that ChromeVox supports braille feedback with a compatible device, so those with severe eyesight issues can handily rely on the feature at hand to use their Chromebook.
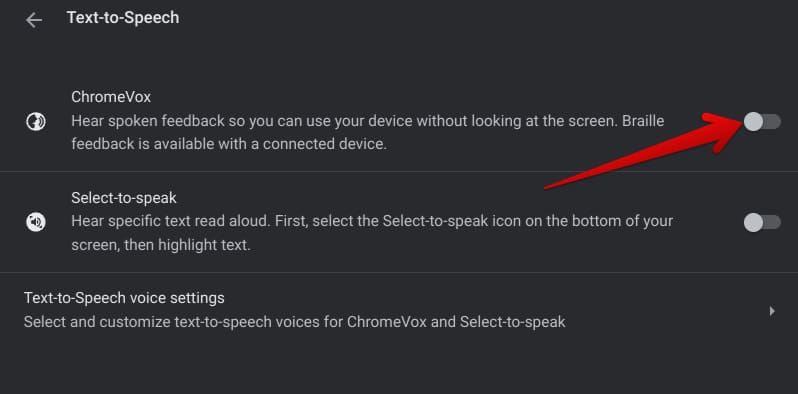
Enabling ChromeVox
Over time, Google has developed ChromeVox significantly and revamped it so the screen reader accommodates an even broader audience. That is why you’ll find a separate settings section dedicated to the feature that comprises many optimization tools and other functionalities. To access it, tap on the gear-shaped icon on ChromeVox’s title bar.

Accessing the “ChromeVox Options” area
You’ll then be taken to the ChromeVox Options area, which will detail all the preferences you can adjust with regard to tweaking the optimal ChromeVox experience. From enabling or disabling verbose descriptions to adjusting the pronunciation echo, there’s a lot to get into here.
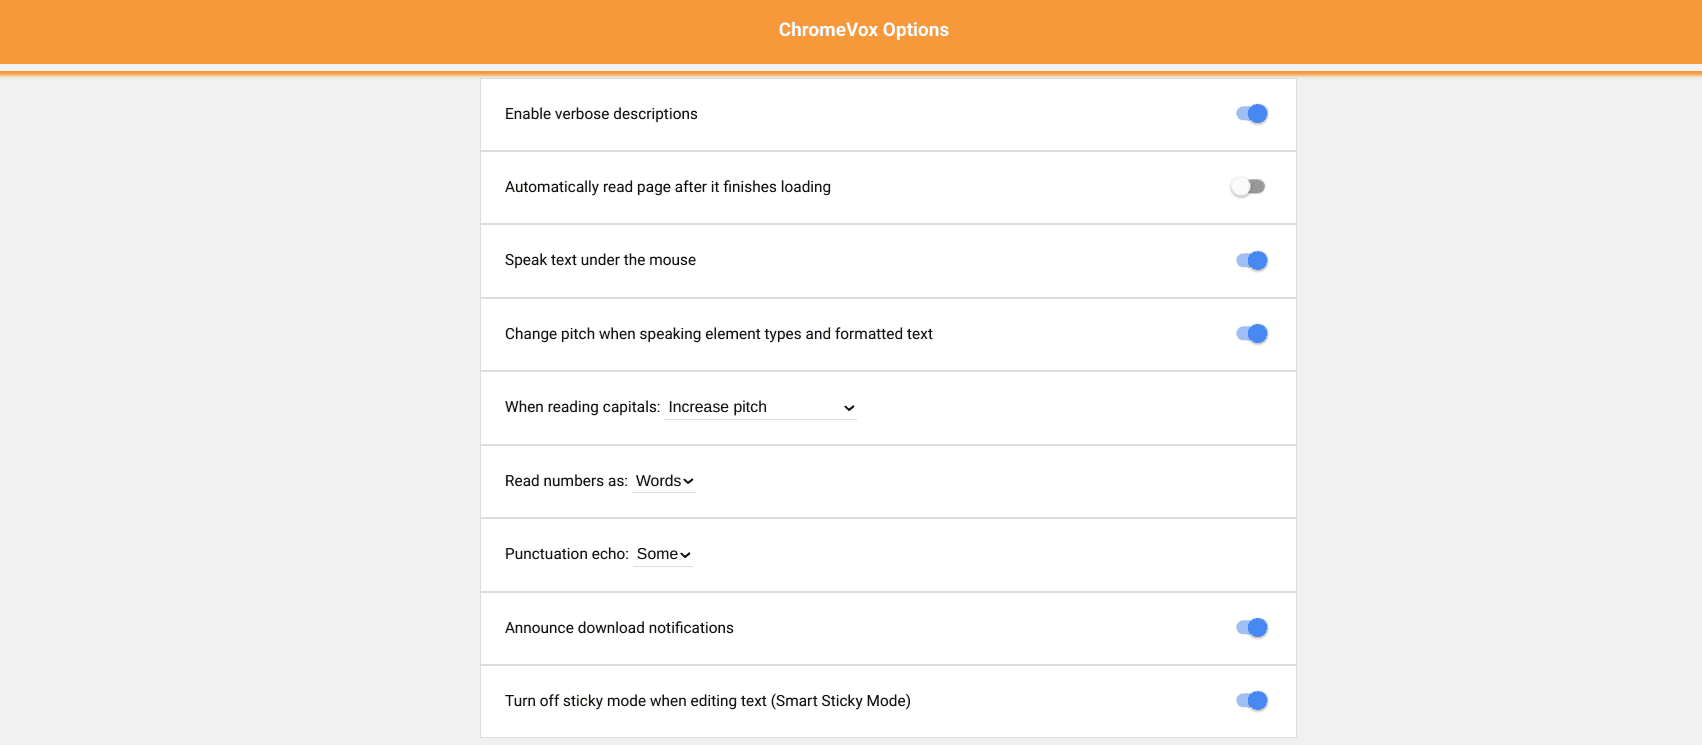
ChromeVox’s settings
Spend some time in this area, and you’ll automatically understand what settings can help you out and which ones don’t concern you at all. In case you have a hard time reading things, ChromeVox can act as a feature to rely on.
2. Pin your most-used apps to the shelf
Tired of having to open the launcher section time and time again to use your favorite apps? Well, you can painlessly pin them to the ChromeOS shelf area for easier access from here on out. Simply right-click on any app within the launcher and select “Pin to shelf.” That will do the trick for you.

Pinning the Netflix app to the shelf
- The app that you can see in the screenshot above is Netflix—one of the best entertainment and streaming apps all around for ChromeOS.
And here’s a pro tip for you. If you wish to launch the applications pinned to the shelf in an even easier way, simply press and hold the “Alt” key followed by the number key corresponding to the app that you want to open. For instance, if you have the YouTube PWA placed in the third spot on the shelf, press “Alt” followed by “3,” and the program will pop right up.
3. Benefit from Dictation
Striking one full century of consistent ChromeOS updates, ChromeOS 100 brought us a revitalized version of the Dictation feature that, to this date, is coming in handy across the world. It’s basically a speech-to-text tool—quite contrary to text-to-speech—that does the typing for you on the basis of voice input.
The functionality is super useful for even young students, teachers, and other individuals belonging to professional organizations, let alone senior citizens who would prefer the easiest route possible to using an electronic device. To get started with Dictation, enable it first from the “Keyboard and text input” section of your Chromebook’s settings.

Enabling the Dictation feature
After toggling the feature on, press the “Search” and “D” keys together with your cursor present on any text box, and the distinct “Dictation” feature icon will appear, allowing you to speak and get text in a written format painlessly. You can now easily type with your voice and take away your reliance on the ChromeOS keyboard whenever you feel like it.
- Related read: How to customize keyboard on a Chromebook.
4. Toggle Caps Lock with ease
Those new to ChromeOS might find it odd that there is not a default Caps Lock key on the Chromebook keyboard. Wwe speculates that in an attempt to make things remain more streamlined on the keyboard, Google saw it fit to add a relevant shortcut key for enabling the Caps Lock feature instead of incorporating a separate key.
To enable the functionality, therefore, and start typing in all capitalized letters, press “Search” and “Alt” together. You’ll also observe that a specialized icon hinting at the activation of Caps Lock will surface shortly afterward in the Status Tray area, which is where you can observe signs such as the Wi-Fi icon, your remaining battery, and the time.
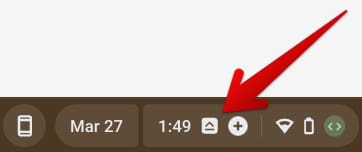
Caps Lock enabled
5. Use automatic clicks
There is another accessibility-oriented feature on your Chromebook that helps automate the clicking process. That way, you won’t even have to click on anything; the system will do that for you instead. To enable this and tweak its further settings, head to the “Settings” app.
Click on “Accessibility” yet again on the side panel to move forward. As you do that, you will be taken to the relevant area in the settings area. Take things forward by selecting the “Cursor and touchpad” option.
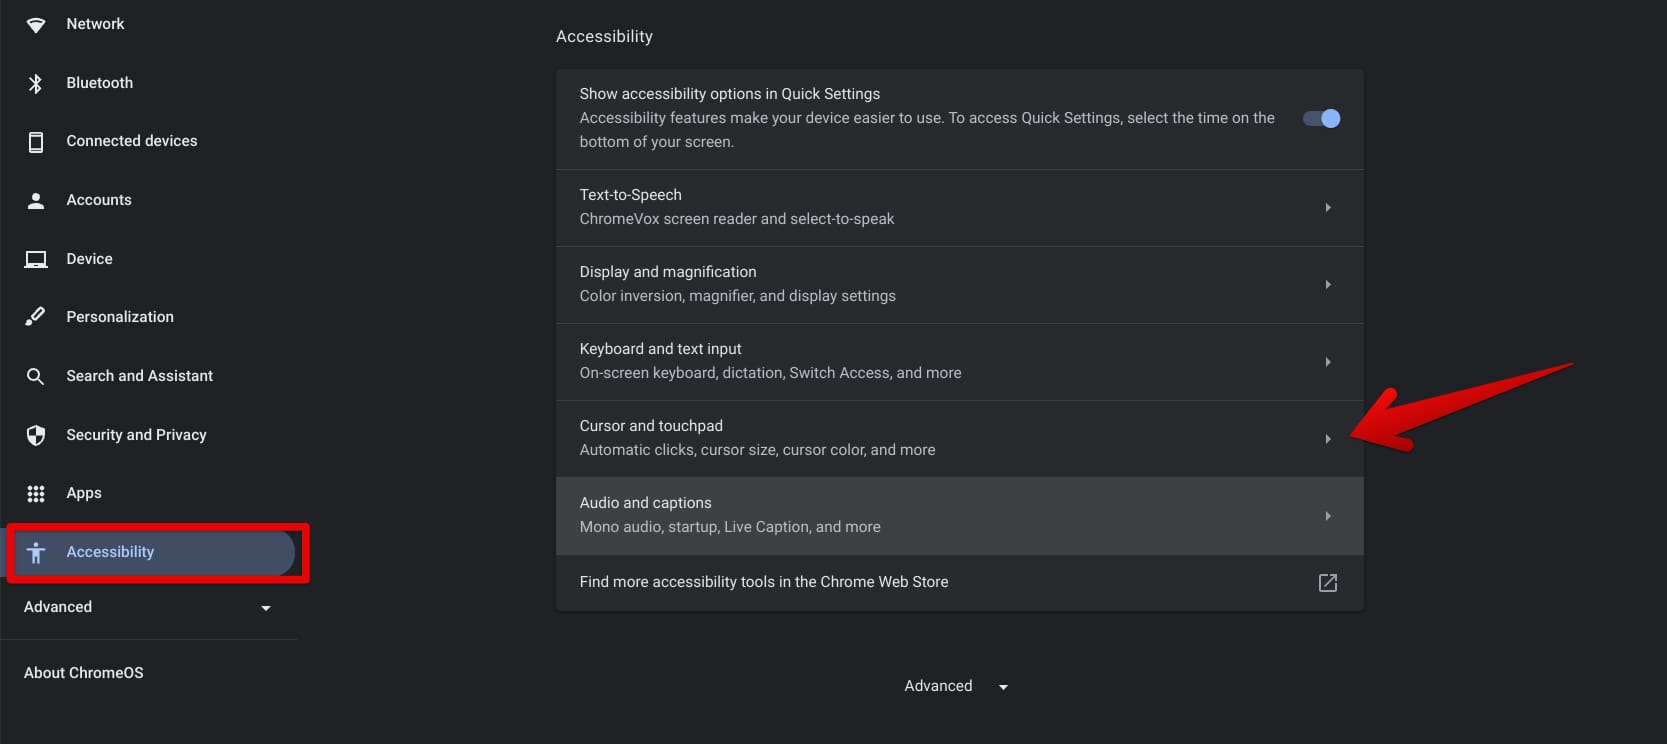
Selecting the “Cursor and touchpad” option
As you’re taken to the various “Cursor and touchpad” preferences, look for “Automatic clicks” and enable the toggle right beside it. Once done, you should see a myriad of follow-up settings appearing for the “Automatic clicks” feature, allowing you to tweak the feature out so it works just according to your predilection.
You can specify the delay time, adjust the size of the cursor area, and even tell the tool to ignore minor cursor movement for the purpose of avoiding inconveniences.
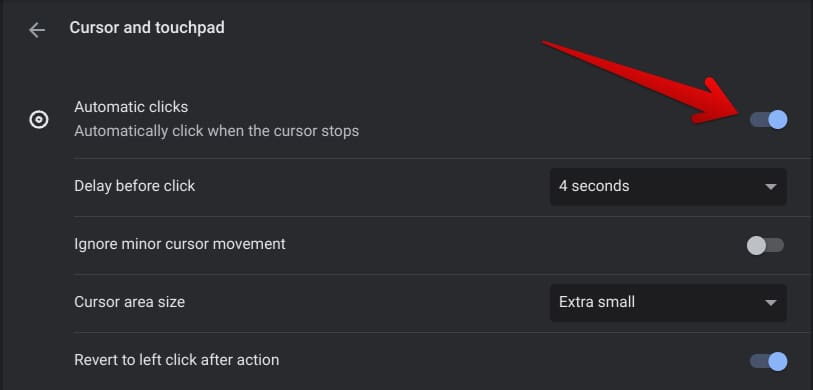
Automatic clicks enabled
6. Turn on Night Light
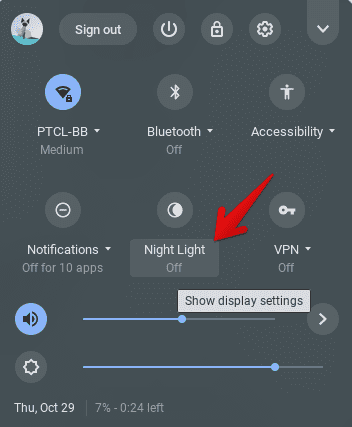
Turning on Night Light on ChromeOS
As a senior, you can benefit from all the nifty little health-maintaining strategies you can get your hands on, so it’s certainly worth knowing about Night Light. Your Chromebook screen that you see in front of you radiates all types of light rays, and some of them, mainly blue light, are better off avoided as much as possible.
Therefore, whenever you find yourself using your Chromebook in areas with dim background lighting, consider giving the device’s Night Light feature a go. This functionality filters blue light rays coming from the screen, so it’s less likely for you to suffer from eye strain, fatigue, and other pertinent problems that way.
Pro tip: If you’d like to have more in-depth control over filtering blue light rays, the Screen Shader Chrome extension for ChromeOS is your best bet.
- A must-read for heightened ChromeOS usage: Top 9 accessibility extensions for Google Chrome.
7. Magnify the screen for better readability
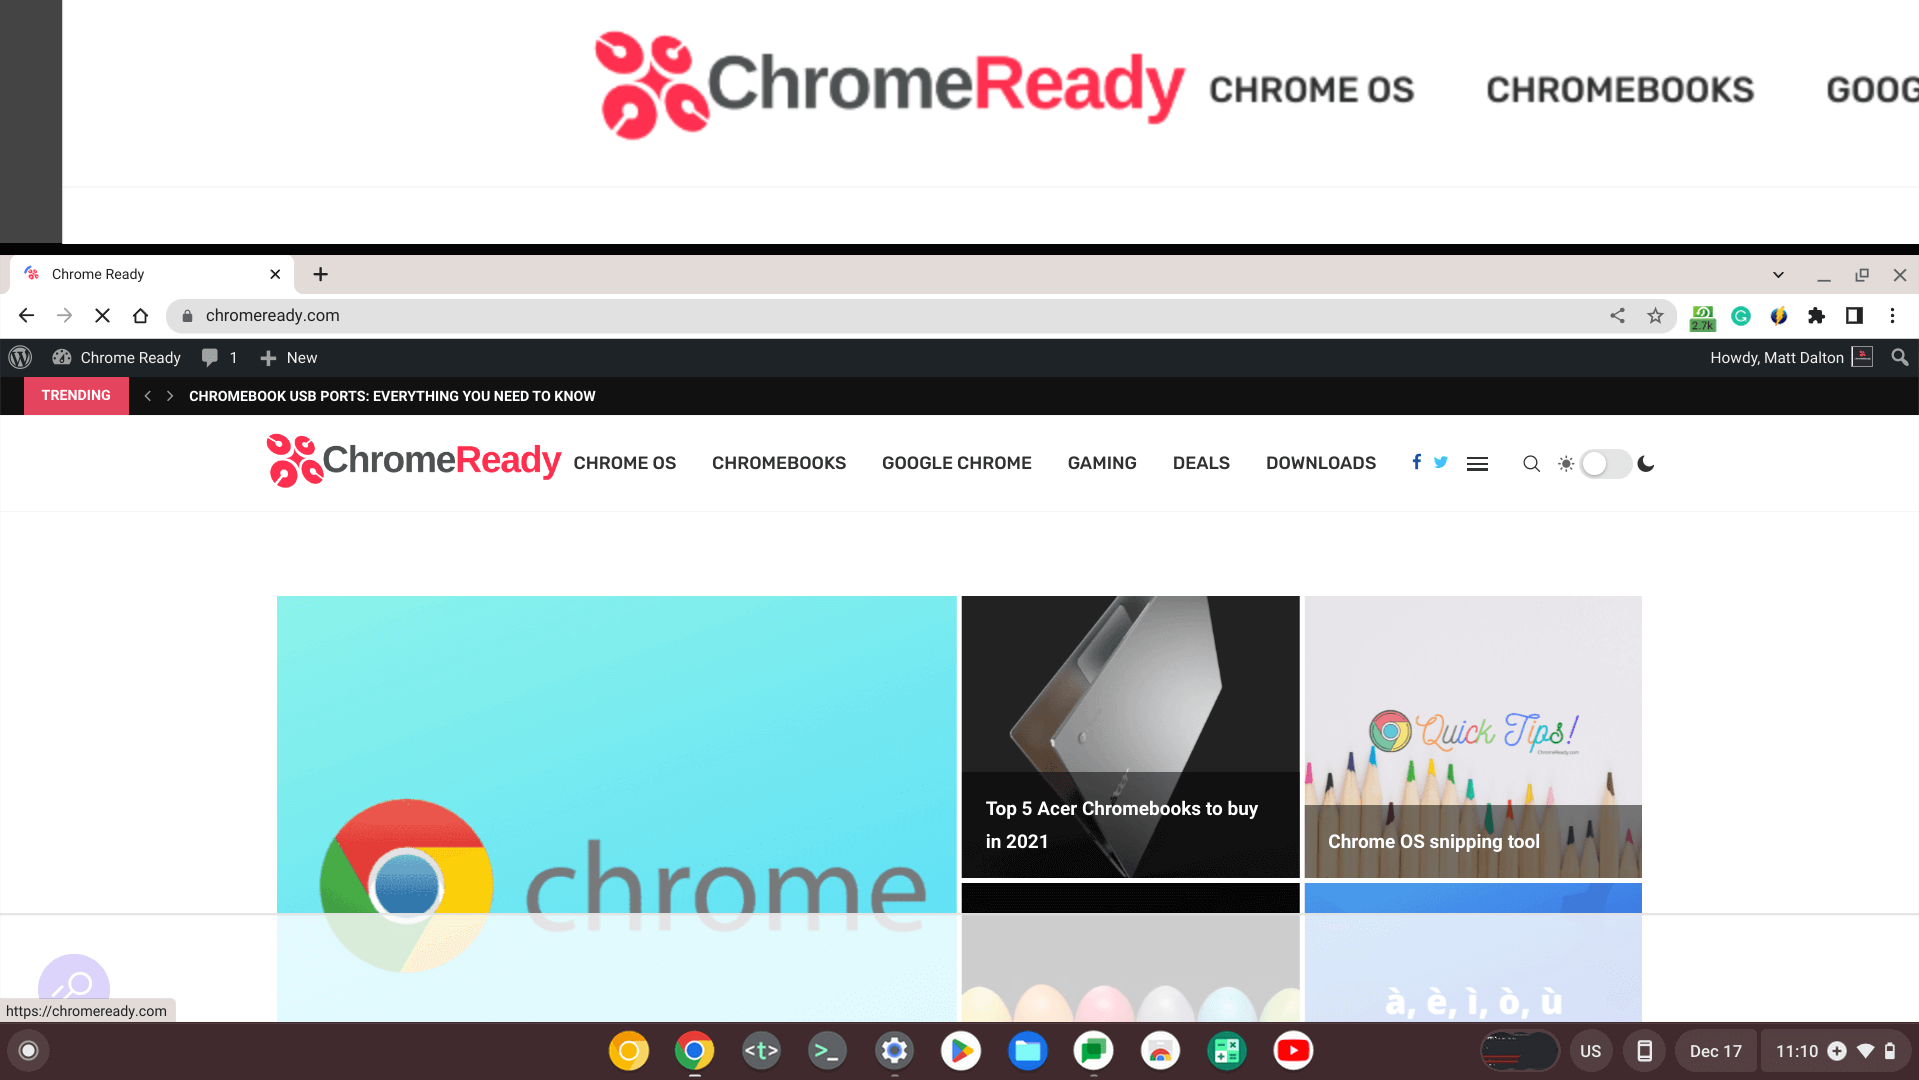
Docked magnifier in action on ChromeOS
ChromeOS boasts some of the best magnification features in town, and we couldn’t be more content with them. If you’ve got a visual impairment that hinders your vision in some form, check out what both docked magnification and full-screen magnification can do for you. Access these features by selecting “Display and magnification” in the “Accessibility” settings.
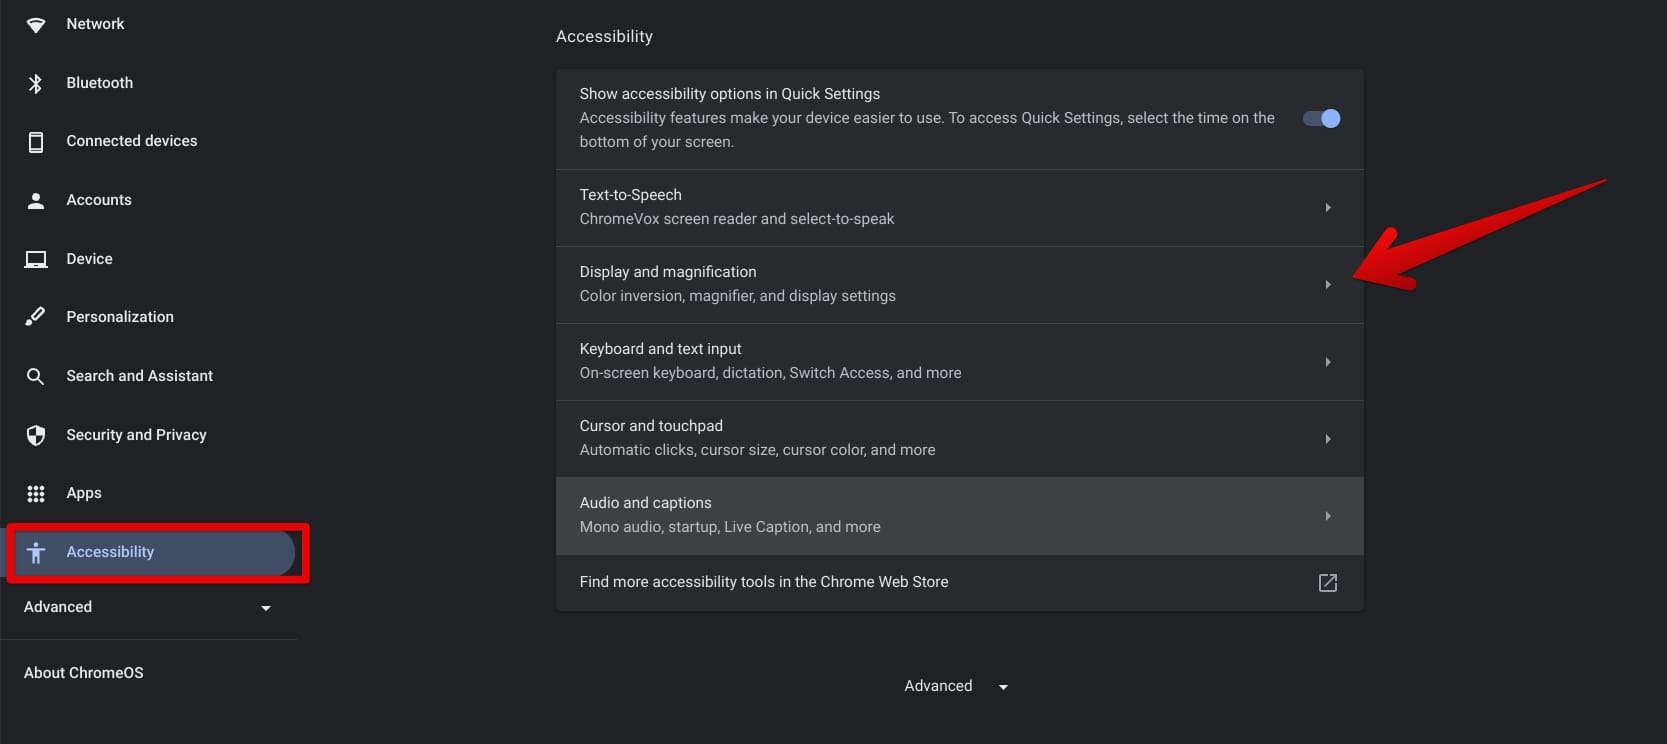
Choosing “Display and magnification”
Once done, you should be able to visualize both the “Full-screen magnifier” and “Docked magnifier” on your end. Both of these tools offer their own spin on magnification, so we suggest trying out each of them. Full-screen magnifier enlarges the whole screen in a sense, while the other one docks the magnifying portion on the screen’s top half.

The two magnifier features on ChromeOS
Talk about never having to squint your eyes again on a Chromebook to see better.
8. Type with an on-screen keyboard
Not in the mood to hit the keys on your Chromebook’s physical keyboard? No worries. Simply head to the “Settings” app, followed by selecting the “Keyboard and text input” option, and you should be taken straight to the relevant area that’ll let you enable an on-screen keyboard. The latter suits tablet Chromebooks more than it does standard ones.
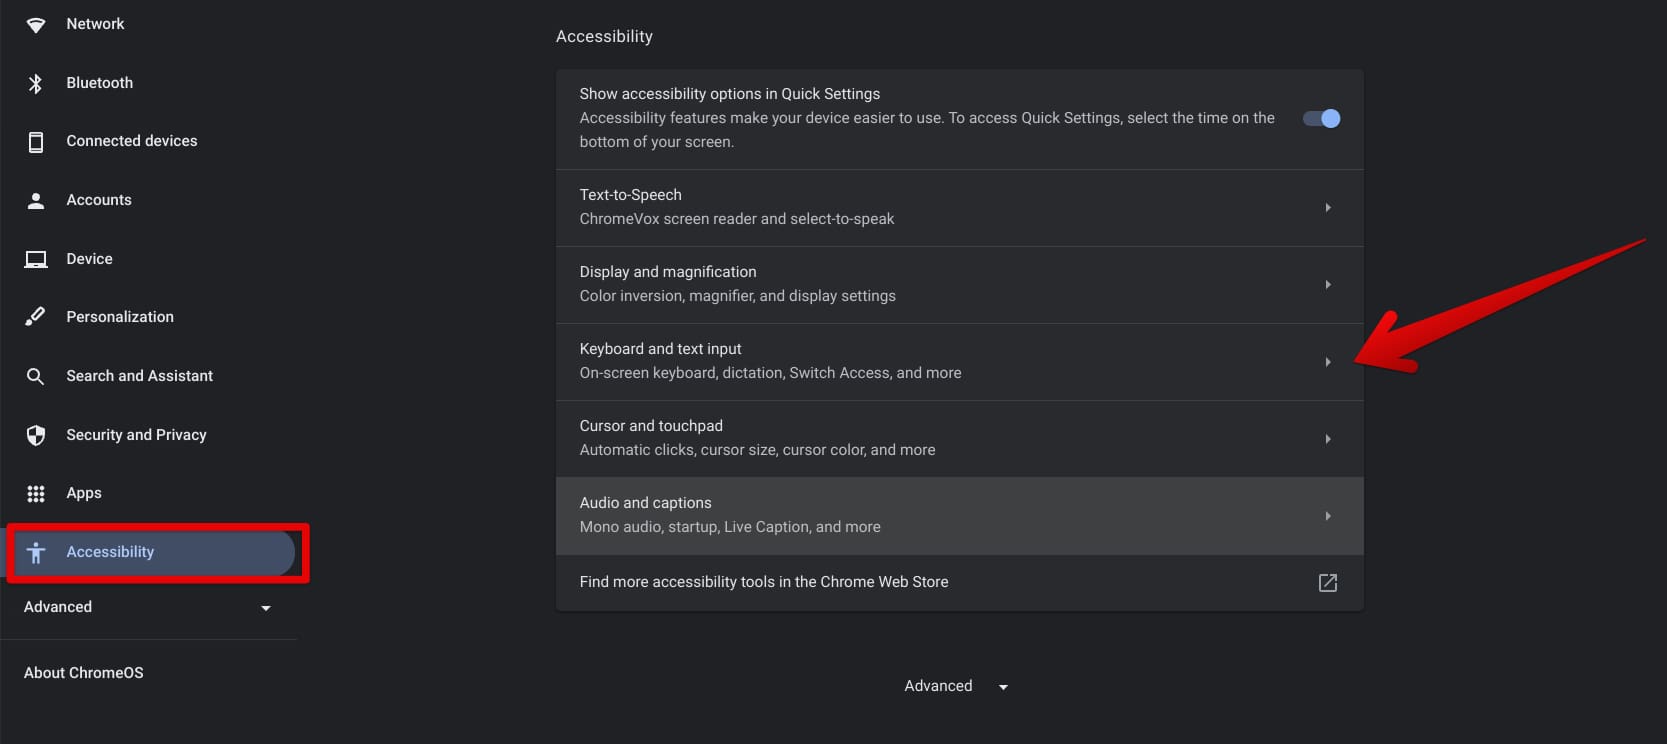
Entering the “Keyboard and text input” area
Toggle the option beside “On-screen keyboard,” and you’ll find a dedicated icon appearing for the functionality right beside the Status Tray area on your Chromebook. You can now add different languages to the keyboard and type with its help undemandingly.

Toggling the on-screen keyboard
9. Enjoy the diverse offerings of the Google Play Store
The Google Play Store is home to the best Android apps in town, and we’re happy to report glad tidings on this front. Google Play is one of the major constituents of your Chromebook’s overall functionality. Ever since it integrated with the operating system back in 2016 and made life a lot easier for millions across the globe, ChromeOS has never been more diverse.
If you’re looking to experiment with different applications on your Chromebook, now’s the best time to get started. Here are the links to some of the best app recommendations that we’ve covered at Chrome Ready using our experience.
- Top 10 apps for maximum productivity on Chromebook
- Top 10 writing apps on Chromebook
- Top 10 fitness apps for Chromebook
- Top 10 entertainment apps for Chromebook
Outside of these listicles, ChromeOS has no shortage of high-quality Google Play Store apps, so we advise you to check out the popular entries on the world-famous Android storefront. In case you require a helping hand, here’s our Google Play Store beginner’s guide for viable results.
10. Keep your Chromebook up-to-date
As an elderly, you would likely want to avoid technical issues with ChromeOS as much as possible, although the chances for that are slim in the first place. To ensure maximum stability, though you need to be wary of system updates coming your way and whether you’re installing them on time or not.
Although Chromebooks download updates in the background without bugging the user, they still ask for permission before they can reboot the device and install the update. Don’t ignore that prompt when your Chromebook is telling you to apply the latest update—simply save your work and get right down to the update completion.
To check for updates manually, head to the “Settings” app, followed by clicking on “About ChromeOS” on the side panel to the left. Once done, you should be able to click the “Check for updates” button.
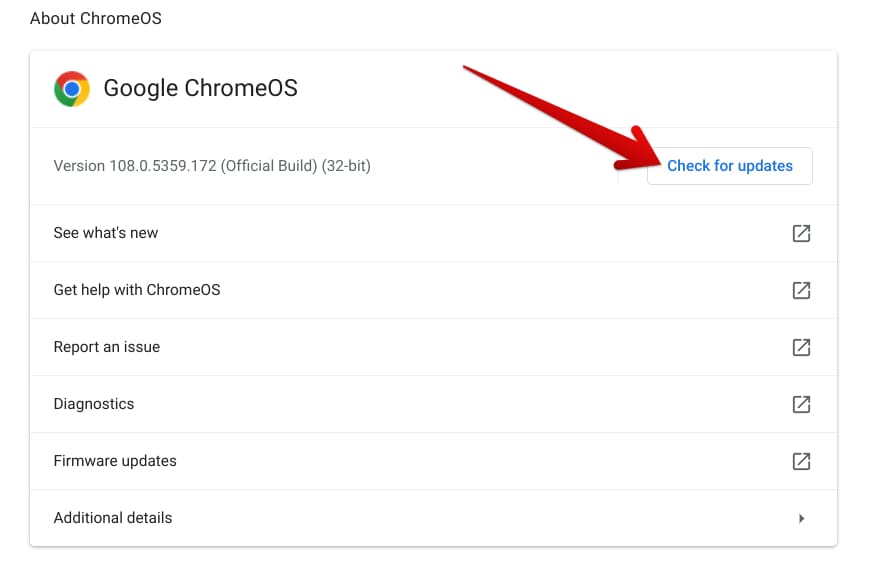
Checking ChromeOS for updates
- Related read: How to update apps on a Chromebook.
11. Use Nearby Share for effortless shareability
One of the quickest ways of sharing your data on a Chromebook online pertains to using Nearby Share—an Android-centric feature that asks for Wi-Fi, Bluetooth, and a stable internet connection for the transfer process to carry over. You no longer have to seek alternate measures for transferring files on a Chromebook now that Nearby Share is here.
Toggle on the functionality from the Status Tray area and follow the on-screen instructions to further the process. As a helping hand, we recommend checking out our detailed guide on using Nearby Share on ChromeOS for step-by-step instructions.
12. Employ keyboard shortcuts
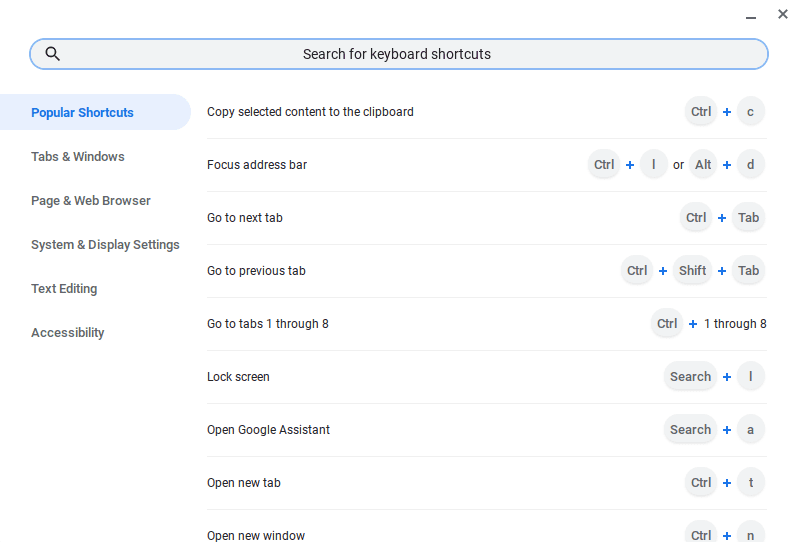
Keyboard shortcuts on ChromeOS
Using your Chromebook the plain and simple way gets the job done, but if you ever wish to speed things up and be able enough to utilize the operating system’s diverse offerings in a much faster manner, you have to look into keyboard shortcuts.
There are plenty of these around, but if we’re to narrow things down to the best available options, we’ll probably end up with the following list. Try using these, day in and day out, and observe how much of a heightened boost you end up receiving in the grand scheme of things.
- Ctrl + N: Open a new window
- Ctrl + T: Open a new Chrome tab
- Ctrl + W: Close a window immediately
- Ctrl + L: Go straight to the URL bar in Google Chrome
- Ctrl + C: Copy text, links, images, etc.
- Ctrl + V: Paste the copied item
- Alt + Enter: Open a selected link in Chrome’s new tab
- Ctrl + (+): Zoom in
- Ctrl + (-): Zoom out
As an elderly, you want to keep things as quick as possible, and with keyboard shortcuts being readily available at your disposal, there is just no slowing things down.
- Recommended read: Top 10 time-saving shortcuts to use on a Chromebook.
13. Use trackpad gestures
Chromebooks are built to offer an incredibly convenient workflow, provided that you know your way around the operating system. Apart from just keyboard shortcuts, you can dive into the best time-saving trackpad gestures to navigate the user interface of Chromebooks better than ever before.
For starters, you can easily switch from one tab to the other by swiping three fingers on your Chromebook’s trackpad in either the left or right direction. To back from a page in Chrome, use two fingers instead of two and swipe them left. For going forward, you will have to swipe the two fingers in the opposite direction.
To bring up the overview menu where you can painlessly observe all the windows concurrently open on your Chromebook, take three fingers and swipe them upward on the trackpad. And lastly, if you want to switch from one virtual desk to the other, use four fingers and swipe them left or right on the trackpad, depending on the desk you wish to transition to.
14. Do quick searches with the launcher
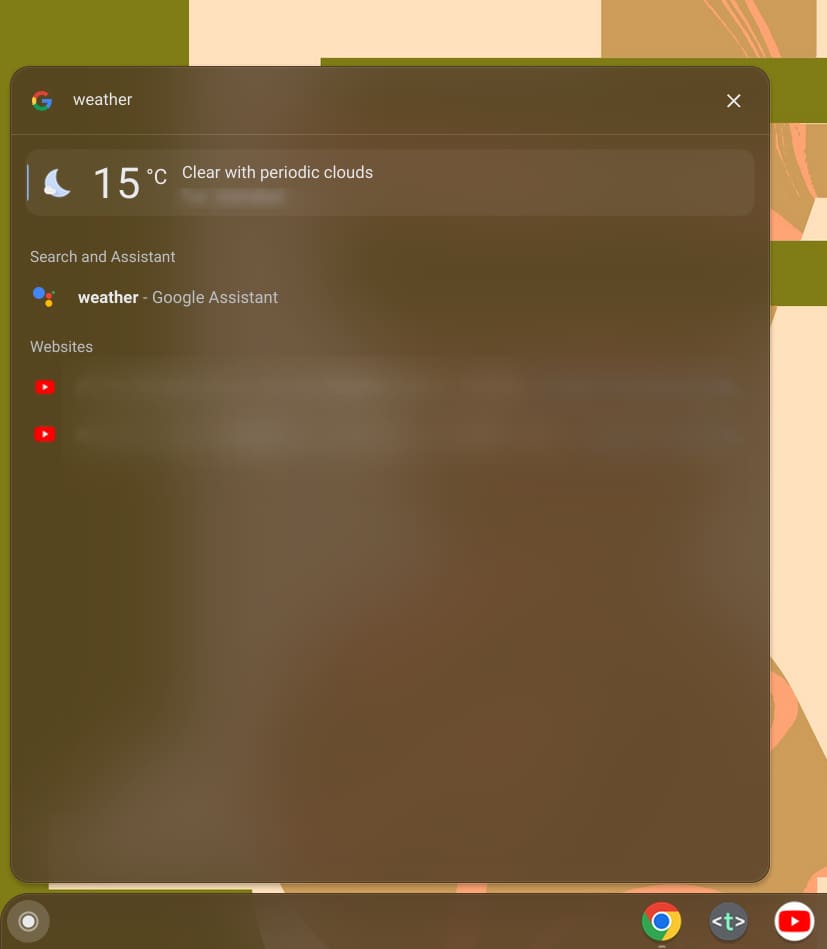
Asking for the weather from the launcher tool
The ChromeOS launcher, alongside facets parts of the operating system, has seen a myriad of improvements over time. Even the relatively recent ChromeOS 110 brought further enhancement to this neat and keen ChromeOS functionality by refining its autocomplete potential. It’s no wonder why the launcher gets readily utilized day in and day out.
The fact of the matter is that the launcher ties in directly with Google Assistant, the well-grounded virtual handyman for Android devices, so you, as an elderly, can conduct quick searches with the tool with just a couple of taps. To begin, press the “Search” key and type in your query.
It’s now possible to get your answers in a jiffy with the launcher tool, given that your searches warrant simple responses as well. For instance, the launcher can solve basic mathematical questions, show you the weather, and pull search results from Google for specific queries. For instance, typing in Robert Downey Jr. prompts Google to fetch the actor’s professional intro.
15. Take screenshots with minimal effort
Whether you found something funny on the internet to share with the family or would just like to keep a copy of any instance on the web to use later, taking screenshots is the way to go. This functionality has become overly commonplace in the day and age we live in today, truly to the point where every device is equipped with a screenshot-taking feature.
Fortunately, the fact of the matter is that taking screenshots on Chromebooks has never been easier. The developers have incorporated a lightning-fast method of capturing your screen on the go, and the added plus here is the ability to record the screen itself as well, should you choose to do that with or without mic input.
To take a screenshot quickly, press the “Ctrl” and “Show Windows” key, which is depicted by a rectangle with two vertical lines beside it and in place of the F5 key on your Chromebook’s keyboard. On the flip side, if you’d like more control over the way you capture your device’s screen, add “Shift” to that shortcut key combo and enjoy the flexibility accordingly.
While this default method does not let you annotate your screenshot, there is your Chromebook’s “Gallery” app for this purpose. To understand the ins and outs of taking screengrabs on ChromeOS, here is our ultimate guide to help you achieve terrific results.
- Do read for more: Top 10 screenshot tools for Chromebook.
Conclusion
Chromebooks are highly approachable machines that come with the advantage of boasting an incredibly friendly user interface. You won’t even find the desktop getting filled up with icons on these sleek devices, simply due to the fact that ChromeOS has been sized down to offer nothing but convenience and simplicity in all of its working facets.
In this guide, we’ve highlighted our community’s senior citizens by enlisting some helpful tips and tricks for them to enjoy on their Chromebooks. If you think we missed something important, comment down below and help contribute to this article.
As always, Chrome Ready wishes you good luck!
