Cutting down procrastination and consistently becoming more productive is no child’s play, but when you have a specific set of techniques to follow, things get easier. In this guide, we’ll go through some of the most practical and effective tips and tricks to help you establish maximum productivity while working on a Chromebook.
These tips are curated to help you speed up your browsing and enable you to get around your trusty device more productively. Some of the techniques laid out ahead also pertain to the Chrome browser, which, in essence, is one of the chief components of ChromeOS.
As we dive into this master guide, check out these top 20 tips for first-time Chromebook users in the meantime, in case you’re relatively new to this speedy operating system.
- Related read: 10 handy LibreOffice tips to get the most out of it
30 of the most incredibly effective productivity Chromebook tips
The following is our cherry-picked selection of all those tips and helpful information that can make you more adept at using your Chromebook day in and day out. Ensure you’re implementing the forthcoming instructions for the most favorable results.
1. Don’t delay system updates
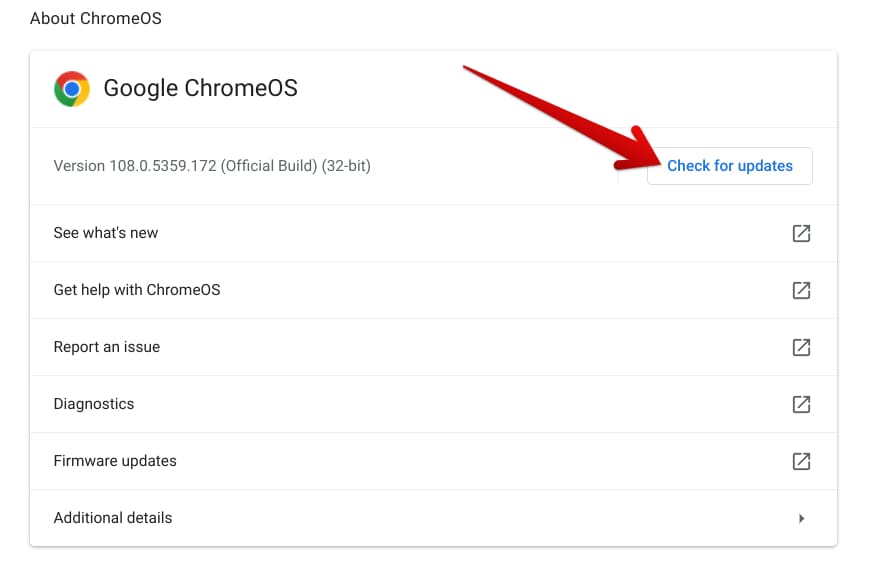
Checking ChromeOS for updates
To be as productive as you can be, you must ensure that your Chromebook runs in its best possible shape. Without an entirely healthy device without security or interface issues, you’re unlikely to get that extra push of productivity that will speed up the way you work.
That is why you should never in a million years delay ChromeOS system updates. The operating system makes it easy for us by automatically downloading updates in the background and notifying us when the update is ready to be applied. However, the system requires your permission to restart the Chromebook and make the final changes.
Without the nod of confirmation from your side, your Chromebook can’t update on its own. Your productivity is bound to get going from here on out, and missing the most primary endeavor in this regard just won’t bode well for your working experience going forward.
- Learn how to update your Chromebook and make sure that you keep tabs on your installed apps as well.
2. Keep your RAM in check
RAM or internal storage is a hefty constituent of a Chromebook’s technical specifications, and just like any other computing device, Chromebooks, too, need adequate RAM for perfect functioning. In a question of RAM vs. storage, it’s always the former that gets picked for higher performance levels instead of storage.
Now, it’s not challenging to convolute your operating system with a hefty bundle of tasks and processes, with some being outright unnecessary. In cases like these, the Task Manager should immediately be brought to the scene. It’s a system utility that gauges the number of active and inactive processes and their system resource consumption.
If your Chromebook is running slow, firing the Task Manager to monitor its performance by visualizing all the running processes and the resources they’re hogging should be your first step. The Task Manager is one of the best ways of checking RAM on ChromeOS, so certainly worth pursuing in that regard.
It’s almost always that, among other reasons, a specific program on the device consumes RAM unusually, leading to bogged-down performance. And at the end of the day, if you find the Chrome browser to be the culprit on that front, do note that Google Chrome can be optimized to use less internal memory on a Chromebook.
- Related read: How to make Google Chrome use less RAM on your PC.
3. Benefit from cloud storage
ChromeOS is a cloud-first operating system that welcomes the best cloud-based storage solutions with a warm embrace. Although the likes of pCloud, Dropbox, and OneDrive are all optimized to run on ChromeOS easily, Google Drive is the platform that integrates with Chromebooks right out of the gate.
This allows users to enjoy seamless access to their Drive accounts since there’s a dedicated section in the “Files” system utility that connects one with Google Drive on the go. Make sure you haven’t disconnected your Google Drive account from the Chromebook, and you’ll be fine.
Drive starts users off with 15 GB of free storage shared across other cloud-oriented Google products, such as Google Photos and Gmail. You can always increase the storage limit and gain access to additional benefits by opting for one of the premium plans of Google Workspace.
4. Turn on Linux
The Crostini Linux terminal is one of the many front-running features of ChromeOS, allowing users to delve into the world of Linux apps and make their work sessions more productive and stand out. With that said, the functionality does not come enabled on Chromebooks by default and has to be toggled first via the “Developers” section in ChromeOS’ “Settings.”
One of the top reasons for running Linux on a Chromebook revolves around tapping into the full potential of ChromeOS. It’s free, open-source, and lets you install highly workable substitutes for incompatible Chromebook apps. For instance, in place of Adobe Photoshop on ChromeOS, you can try GIMP to indulge in photo editing.
- Get started with Linux on the right foot: Top 10 things you can do with Linux on your Chromebook.
5. Employ the convenience of Nearby Share
If you find yourself sharing files quite a few times a day, using Nearby Share can benefit you greatly, given how convenient and easy to use its basic functioning is. With the help of this innate functionality, you can connect to your Android phone or other Chromebooks seamlessly via Bluetooth and make sure both devices are in proximity to each other.
Once done, the file transfer process should be painless to follow through with. Nearby Share lets users transfer files at high speeds, and there’s no limit on when you can send files around. For an in-depth guide on using the tool in question, check out our complete write-up on how to use Nearby Share on a Chromebook.
6. Take it easy on the eyes
If you’re a night owl and like to stay up late, either working or enjoying Netflix or Amazon Prime Video shows, you should enable the “Night Light” feature on your Chromebook. Doing so will filter the blue light rays from your screen, so they do not strain your eyes and potentially give you a headache.
Click on the “System Tray” section, located in the bottom-right corner of the ChromeOS interface, and then select the “Night Light” feature. It’s just a simple two-step process to replicate and nothing complicated.
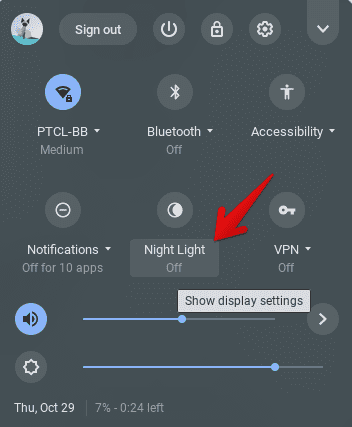
Turning on Night Light on ChromeOS
7. Enable GPU acceleration for your Chromebook’s Linux
The Chrome browser has a functionality called “Hardware acceleration,” often called “GPU acceleration,” which also offloads some tasks meant to be taken up by the CPU. In doing so, the device in question sees an overall boost in performance that may or may not be significant, depending on the offloaded task.
In any case, it’s a nice little push-forward for the Linux terminal that is geared toward making your user experience more smooth and hassle-free. The feature can be enabled by toggling on a particular Chrome flag, Crostini GPU Support. Type in the following in your Chrome’s address bar and press the “Enter” key to proceed.
chrome://flags/#crostini-gpu-support
Enable the flag using the toggle afterward and enjoy enhanced Linux performance on your Chromebook for demanding applications such as OpenShot Video Editor, LibreOffice, Lightworks, and LumaFusion.

Enabling the Crostini GPU Support flag
8. Personalize your Chromebook for a fresh outlook
It’s easy to change the wallpaper and theme of your device on a day-to-day basis, with a “Refresh daily” feature that ensures you never see the same wallpaper the next day. Personalization is always recommended. Having a fresh new screen to visualize regularly is akin to uplifting your mood and making you slightly more productive.
You can change your wallpaper on a Chromebook by double-clicking anywhere on the ChromeOS home screen and choosing the “Set wallpaper and style” option. Once done, myriad options will appear on the screen, allowing you to select the wallpaper of your choice.
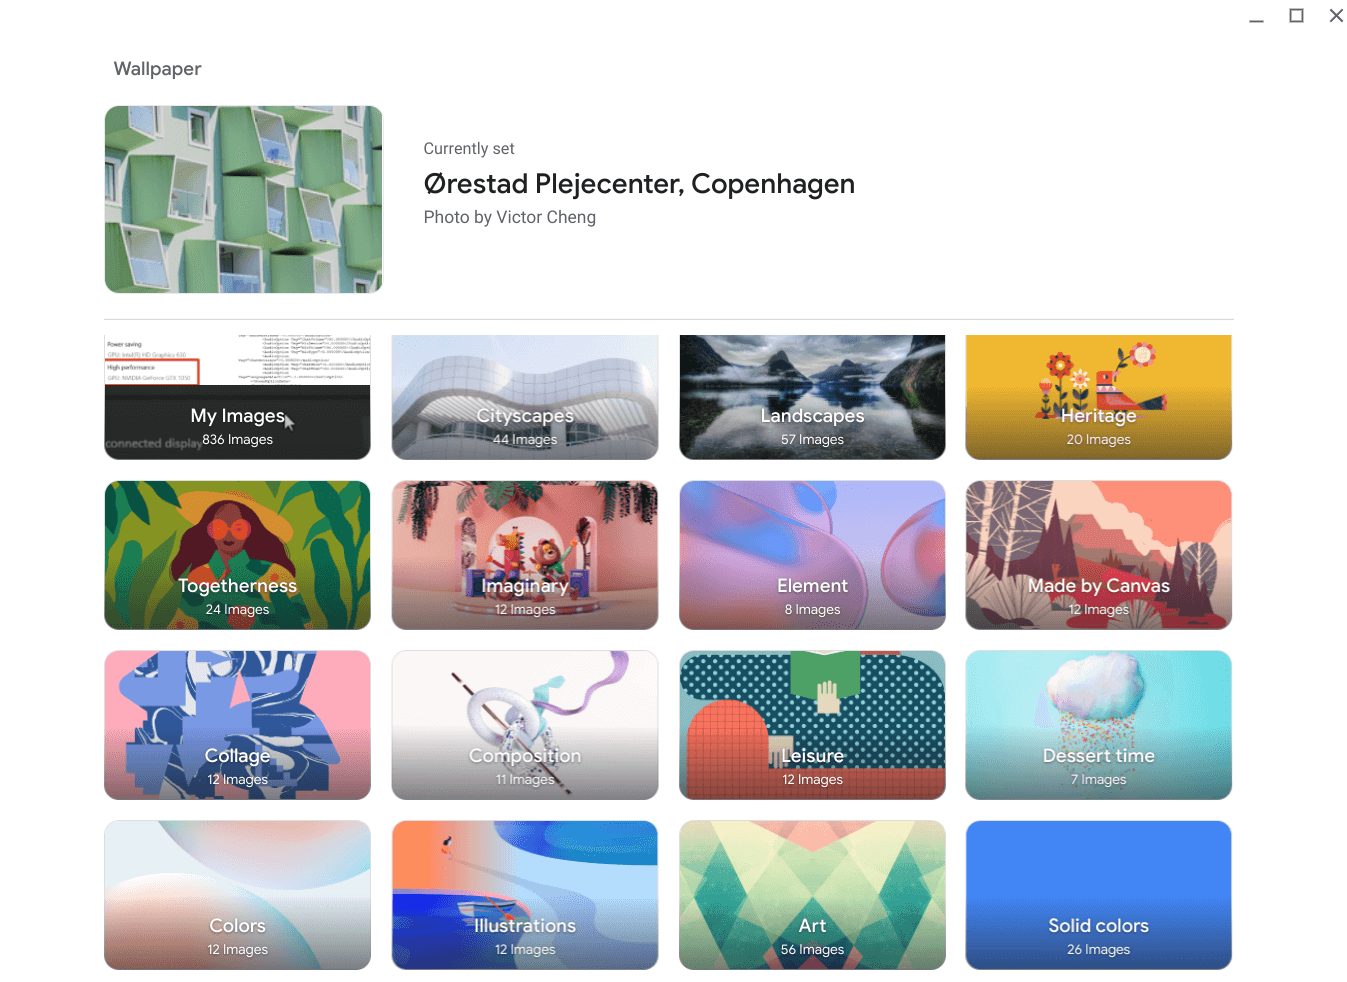
Chrome OS wallpaper picker menu
Google has made further additions to how you can personalize your Chromebook by introducing the system-wide application of light and dark themes. There is a specific category of wallpapers in ChromeOS that change their color by the theme the Chromebook uses, whether light or dark.
9. Learn the best ChromeOS trackpad gestures
The ChromeOS trackpad is nothing to take lightly. It provides one of the major ways of input and can also be employed to navigate the operating system swiftly. For instance, to instantly open a link in a new tab, perform a three-finger tap on the trackpad.
In addition, you can switch between open Chrome tabs by swiping left or right, depending on the tab you wish to go to, with three fingers horizontally. Moreover, swipe up on the trackpad with three fingers to bring up all windows on the screen at once.
10. Split your screen
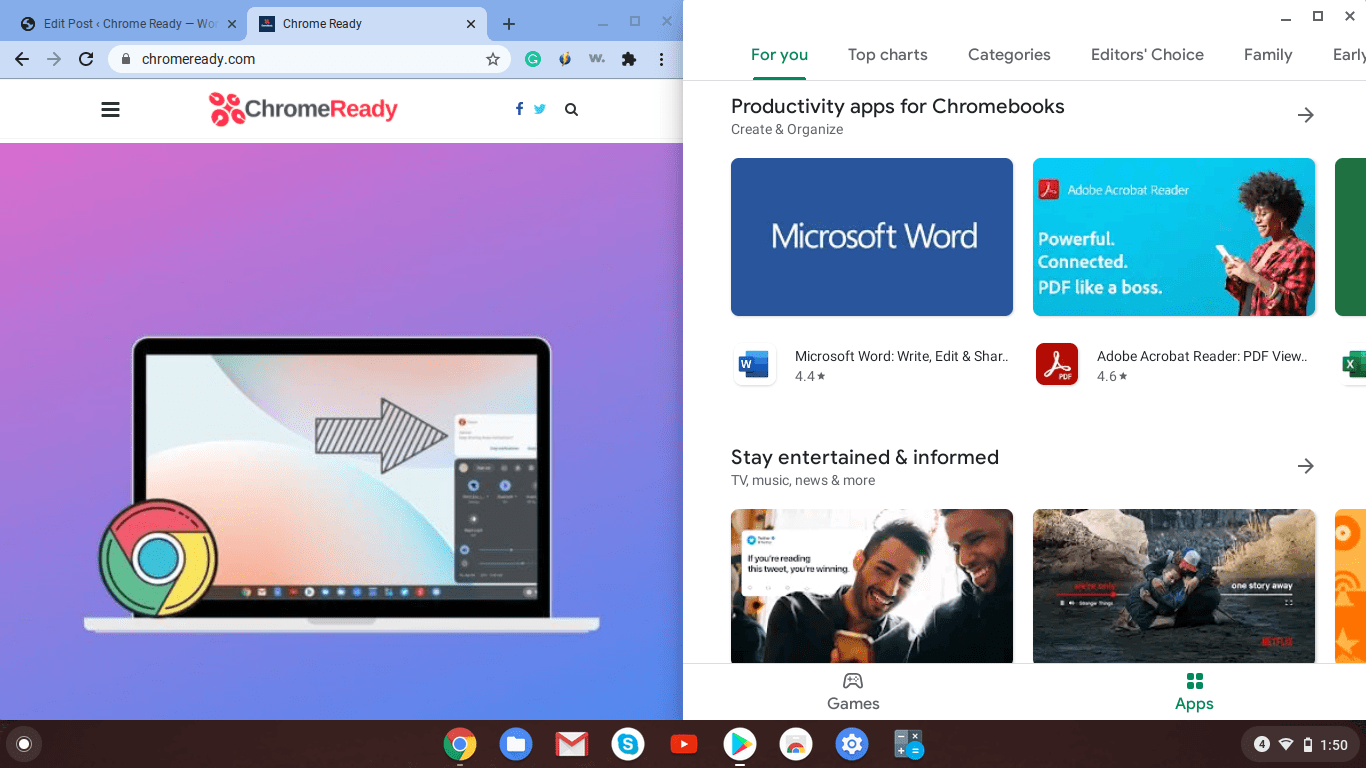
Splitting the screen in two
Those who frequently multi-task are going to love this one. On ChromeOS, you can split your screen into two halves, making it possible to work on two different windows simultaneously. Press the “Alt” key followed by pressing either “[” or “]” to divide the screen in half and take it to either side on your Chromebook.
Once you’ve done it with one window, repeat the process with another, but use the other bracket key this time, so each window appears on different sides of the screen. For more ways to do a split-screen on a Chromebook, you can check out our interlinked guide for favorable results.
11. Try keyboard shortcuts to get around faster
Keyboard shortcuts are quite the rage, and they’ve been proving to be utterly productive for decades now. Thankfully, ChromeOS features a wide assortment of shortcuts that go along with their keyboards, with some speeding up your browsing better than ever before.
Here is a list of some of the best keyboard shortcuts we’ve borrowed from our guide on the top 10 time-saving shortcuts to use on a Chromebook.
- Ctrl + N: Opens a new window.
- Ctrl + T: Opens a new Chrome tab. Works inside the Crostini Linux terminal as well.
- Ctrl + W: Shuts down a window instantly.
- Ctrl + L: Takes the text cursor straight to the Chrome browser’s address bar, allowing one to proceed seamlessly.
- Ctrl + C: The default command for copying text, images, documents, or everything else.
- Ctrl + V: The default command for pasting the copied item.
- Alt + Enter: Opens your link in the address bar in a new tab instead of loading it in the same tab.
- Ctrl + (+): Zooms in on a page.
- Ctrl + (-): Zooms out on a page.
12. Utilize the ChromeOS launcher
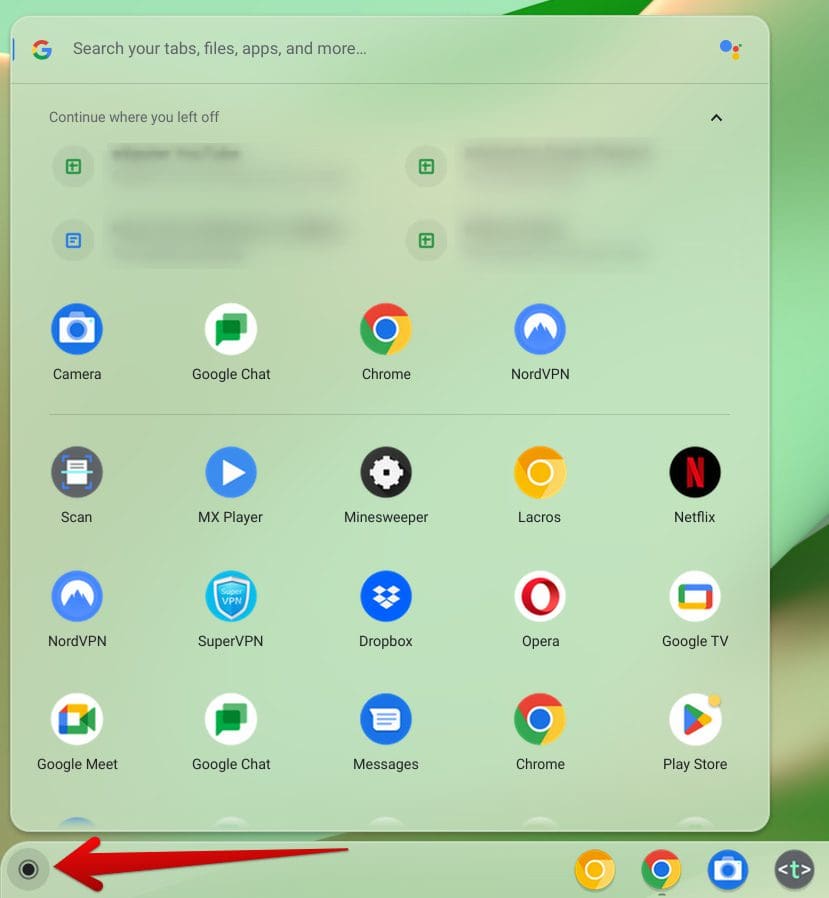
ChromeOS launcher area
The ChromeOS launcher has come a long way from its humble beginnings. Today in 2023, it boasts enhanced features, such as resolving simple queries on the fly, including solving mathematical equations or checking the weather instantly.
To test the ChromeOS launcher, press the “Search” key on your keyboard and type in “What is 982+1109?” The launcher will get back to you with the answer right away. In addition, you may also employ the feature for various other use cases, such as to inquire about the weather or ask a question.
Experiment with different things, and you’ll realize how established the ChromeOS launcher feature is now compared to a decade ago.
13. Restore closed tabs instantly
It’s possible to restore closed tabs or windows on your Chromebook in seconds after you shut them down, either willingly or accidentally. Press “Ctrl,” “Shift,” and “T” together and enjoy your opened windows pop right back.
14. Use the in-built clipboard
In case you didn’t know, Chromebooks feature an in-built clipboard to help users copy and paste entries quickly. The default clipboard can only remember your last 5 copied items, but we could see an improvement down the road in this regard.
To make the clipboard appear on the screen, press the “Search” and “V” keys on your Chromebook’s keyboard. Once done, you can click on any copied entries, and the clipboard will paste the item automatically to the relevant text box.
15. Take screenshots on the fly
To talk about another default ChromeOS feature, things couldn’t get any easier since the arrival of the in-built screenshot tool on Chromebooks. The latter existed in some form a couple of years back, but it indeed wasn’t this advanced as it is now in 2023. You can take various screenshots on your Chromebook using the tool in question.
Press “Ctrl” followed by the “Show Windows” key, which is depicted by a rectangle spaced together with two vertical lines. Doing so will quickly snap a screenshot, but if you’d like more control, add “Shift” to the combo of that shortcut key combination, and a proper control center will surface on the screen.
- Here’s our ultimate write-up on taking screenshots on a Chromebook.
16. Switch between tabs swiftly
ChromeOS lets you employ a neat trackpad shortcut to help you switch between opened Chrome tabs instantly. Use a three-finger horizontal swipe on your trackpad to benefit from the shortcut. Once you get the hang of it, there’s no going back to the regular way of switching to another tab on Chrome.
17. Pin apps to the shelf for easier access
If you use specific apps or programs more than others, feel free to pin them to the shelf for easier access. The shelf is located at the bottom of the ChromeOS GUI by default and can be used to stack up your most-used apps. When you’re in the launcher area, use a two-finger tap on any app to reveal more options on the screen.
You should be able to select the “Pin to shelf” option afterward. Do that, and the app, program, or website shortcut will be pinned to the shelf immediately.
18. Instantly open apps on your shelf
Accompanying the previous tip, there’s a neat trick that you can use to instantly open all of the apps that you’ve pinned to your shelf. Press “Alt” followed by 1, 2, 3, 4, or so forth to open the relevant application on your shelf.
For instance, if you have the Google Play Store on the fifth spot on your shelf, pressing “Alt” and “5” will open up the Play Store app. It’s as simple as that.
19. Erase Google Chrome’s cache from time to time
Your Chromebook can often get bogged down in terms of performance if it suffers from a wholly filled-up Google Chrome cache and other browsing data. If you’ve had your device for a significant amount of time now and haven’t tended to do this before, we highly recommend that you get to work immediately.
Go to the “History” section on your Chromebook via the “Customize and control Google Chrome” button and proceed by clicking on the “Clear browsing data” option on the side panel to the left. As you do that, another page will load and make a dedicated, prompt surface on the screen.
You can tweak the various parameters related to erasing Chrome’s cache and other browsing data. These include cookies, autofill information, and other important metrics. There’s a time frame option to select as well. We recommend using the “All time” option if you haven’t cleared your browser’s cache in a long time.
You may as well delve into the “Advanced” section in the “Clear browsing data” window to further monitor the contents that will be removed from the Chrome browser. Some of the parameters that are involved in that area include “Cookies and other site data,” “Site settings,” “Hosted app data,” and “Passwords and other sign-in data.”
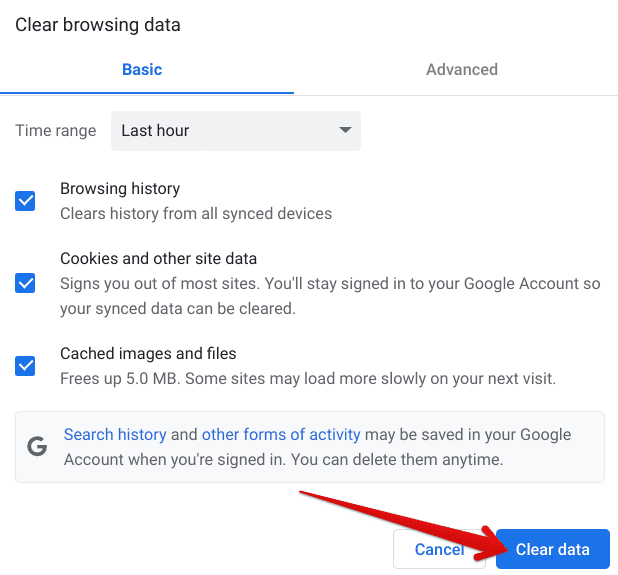
Clearing browsing data on Google Chrome
If you haven’t tended to this feature in a long time, you might as well benefit greatly from clearing your browsing data over time. It’s part of making Google Chrome faster on Windows 10/11, among other listed reasons in the interlinked guide.
20. Multitask like a pro with virtual desks

Virtual desks on a Chromebook
Virtual desks were introduced to the forefront of Chromebooks with the arrival of ChromeOS 78. Think of a virtual desk as a ChromeOS desktop where you can use the device however you like. Virtual desks are screens where you’re categorizing your workspaces into different desktops.
Assume it this way—you have to check your email, work on a Google Docs file, and use a video editing app. For each of these tasks, you can create separate virtual desks and differentiate between the jobs you have to do.
Chromebooks also make it easy to switch from one virtual desk to another. You can swipe four fingers on the device’s trackpad in either the left or right direction, and that’ll do the trick for you seamlessly. Now, the virtual desks feature gets refined all the time, and in the relatively recent ChromeOS 107, another functionality has been added in this domain.
To get started with virtual desks, use an upward three-finger swipe on your Chromebook’s trackpad, and you will be transitioned to the “Overview Mode.” To top things off, you can painlessly click on the “Plus” button above the “New desk” area. A virtual desk will appear next, allowing you to jump into a new Chromebook screen.
- Here’s a guide that goes into more detail about using virtual Chrome desks.
21. Use an external mouse for your Chromebook
It’s no secret that some Chromebooks, such as the Acer Chromebook Spin 713 and the Dell Inspiron Chromebook 14, come with exceptional trackpads, but if you want to maximize your productivity, using an external mouse is the way to go. That way, you will have freedom over your cursor controls simply because of how a mouse is designed to accommodate users.
The ergonomic build of an external mouse tends to deliver a much faster browsing experience than a trackpad, so it’s worth looking into. To nudge you in the right direction, here is a list of some of the best external mouse options that you can purchase to use with your Chromebook.
And once you do happen to get an external mouse for your Chromebook, you can learn how to connect it to your Chromebook next.
22. Enable “Dictation” on ChromeOS
ChromeOS sports some of the best accessibility tools and features, and one of them does writing for you. The function is easy to use and can be toggled on from the “Accessibility” section within your Chromebook’s settings, particularly in the “Keyboard and input” section.

Toggling the “Dictation” feature
After enabling the feature, you can press the “Search” and “D” keys together to fire up the “Dictation” tool. You’ll observe that a small-scale sound wave symbol will appear beside your text cursor, prompting you to speak and get your words written on your Chromebook.
23. Toggle on “Do Not Disturb” for maximum productivity
Like mobile operating systems, ChromeOS has a “Do Not Disturb” mode that stops all notifications from coming through and popping up on the screen. To enable it, click on the Status Tray area in the bottom-right corner of the screen and choose the “Notifications” option.
Once done, a follow-up page will appear, allowing you to click on the “Do not Disturb” option and disable notifications on ChromeOS. It’s a nifty feature for those who want to stay focused on their task without the bother of notification pop-ups.
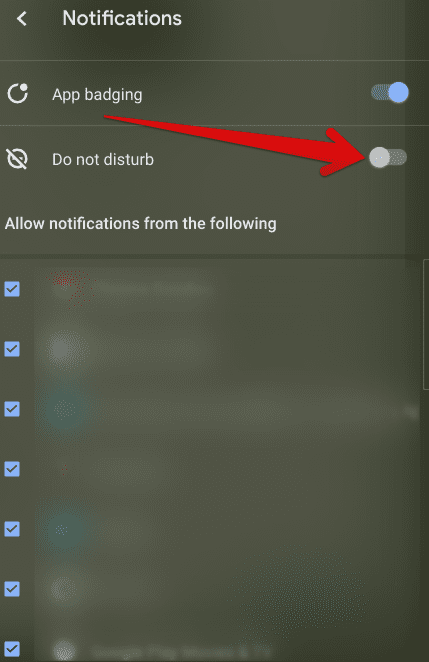
Enabling “Do not disturb” on a Chromebook
24. Use a shortcut for “Caps Lock” on a Chromebook
There is no dedicated key for the “Caps Lock” button on Chromebooks. Instead, the shortcut key combination of “Search” and “Alt” does the trick here. Use these two keys to toggle on the Caps Lock whenever you want on your Chromebook. A dedicated icon for the Caps Lock will also appear in the Status Tray area when the functionality is in use.
25. Change the location of the shelf
If the default location of the ChromeOS shelf does not suit your preferences, you can take it to either the left or right side of your Chromebook. Tap anywhere on the screen with two fingers using your trackpad, and options will surface. From there, hover over “Shelf position” and select the desired location to change the location of the shelf.
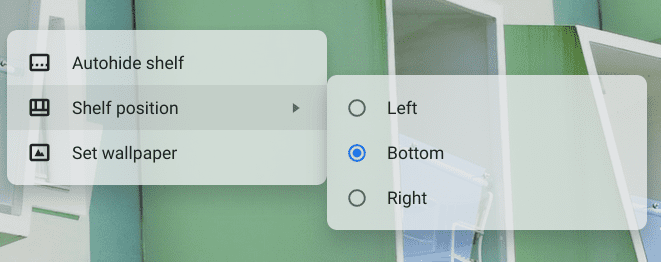
Changing the shelf position
26. Hook up your Chromebook with an external display
ChromeOS lets Chromebook users connect to external monitors for a more defined user experience. Whether you have to attend a Meet conference or are just looking for more flexibility while working with your Chromebook, there are ways to accommodate yourself in this regard quickly.
Learn how to connect an external monitor to a Chromebook and make yourself more productive. The gist is that you use an HDMI connection to set up your Chromebook and the other display. From there on out, you head to the “Settings” app on ChromeOS and follow the on-screen instructions to finalize the procedure.
- Recommended read: Top 5 external monitors for your Chromebook.
27. Get an external keyboard
Similar to getting yourself an external mouse on ChromeOS, an external keyboard can also be hooked up to a Chromebook to make your time spent online more productive. In case you’re not satisfied with your device’s keyboard, here is our hand-picked collection of the most preferable external keyboard options to purchase.
28. Try Google DNS
The Domain Name System in modern-day networking takes up the hefty task of translating human-comprehensible domain names to machine-readable IP addresses. An IP address is how devices on the widely interconnected web identify and communicate with each other, but we humans can’t go around using IP addresses on our internet browsers.
That’s because IP addresses are in a numerical form, similar to 192.144.1.0. It can be painfully difficult to remember these instead of easily approachable website names, such as Chrome Ready. Now, what exactly is Google DNS? The latter is a class apart from your default internet service-provided DNS and boasts heightened security and speed.
This particular DNS system can undoubtedly offer you better productivity levels if employed in place of your default DNS, as many people have reported across the globe. Our detailed guide on what Google DNS is and how to use it will take it from here, walking you through the process step-by-step.
- Related read: How to set custom DNS on a Chromebook.
29. Install apps that make you more productive on ChromeOS
If you were unaware of this, ChromeOS is home to the best Google Play Store apps in town, featuring programs from diverse categories. Although you won’t find every single application optimized to run on Chromebooks, quite a handful get the job done seamlessly.
Over time, Chrome Ready has piled cherry-picked collections of some of the best app bundles that the Play Store has to offer, and one of those bunches of apps is all centered on productivity. For instance, Clipboard History Pro is a clipboard extension that lets you save more than 5,000 entries at once on your Chromebook.
In addition, high-quality video players on ChromeOS can take care of your multi-media requirements. One is MX Player, featuring a highly polished user interface that performs up to the mark on every Chromebook, whether it’s a budget one or something high-end.
You should undoubtedly check out our beginner’s guide on the Google Play Store for a full-scale tutorial on the famous Android storefront. That way, you’ll learn how to navigate the user interface of the platform but also how to download and install top-tier Android apps on your Chromebook.
30. Know how to Powerwash your Chromebook

The Powerwash feature on a Chromebook
The “Powerwash” feature has been incorporated into Chromebooks as a failsafe technique. Think of it as a hard reset that wipes all existing local data on your Chromebook, including your saved Google accounts. The function is employed when a device starts acting up and crashing quite often, not to mention giving rise to a mountain of other issues.
Therefore, the Powerwash functionality is employed as a last-resort sort of tool that resets the Chromebook and restores its innards to their default settings. In case a persistent issue starts bothering your workflow on ChromeOS, which is highly unlikely in the first place, you should know how to Powerwash your Chromebook to maintain your productivity.
The gist of it is that you head to the “Reset” settings area on your Chromebook and select “Powerwash” from there. You have to follow the on-screen instructions, and you’ll be golden.
Conclusion
Chromebooks are some of the most productive machines you’ll ever use on planet earth. They feature a minimalistic operating system that does not complicate its working interface and loves to keep things simple. The cherry on top is that Chromebooks are highly secure, sport robust security features, and have a clean track record of zero ransomware afflictions.
This comprehensive guide has looked at some of the best tricks and hacks for being more productive on a Chromebook. Please let us know in the comments section if you have another tip. As always, Chrome Ready wishes you good luck!
- Trending on Chrome Ready: 30 must-play browser games to keep you entertained.
