Have you been meaning to learn how to turn on the Automatic Clicks feature on your Chromebook? You’ve certainly landed on the right web page. We’ll be walking you through exactly what needs to be done to toggle on this convenient functionality for the coming days. Keep on reading for a highly detailed guide.
Chromebooks have come a long way from where they once began their journey. Today, the operating system that these sleek devices run is packed with accessibility features and tools to facilitate users and make handicapped individuals capable enough to use ChromeOS without a struggle.
Let’s now look at Automatic Clicks and how they can be used on a modern-day Chromebook.
- In the meantime, check out: How to turn ON Caps Lock on Chromebook.
What is the Automatic Clicks feature in ChromeOS?

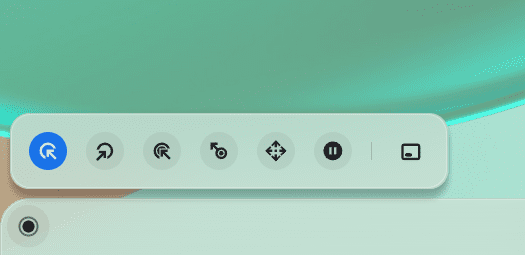
The Automatic Clicks console in ChromeOS
The functionality “Automatic Clicks” resides on a Chromebook as an accessibility tool. The latter is a dedicated section in Chromebooks that’s chock-full of different features geared toward enhancing the default ChromeOS experience.
Some of the handy add-ons in this space are suitable and preferred for handicapped individuals who may have difficulty tackling one specific aspect of using a Chromebook. A fitting example would be someone unable to visualize all the contents on a Chromebook’s screen properly.
To help this person use the device better, there’s an accessibility feature called “Fullscreen magnifier” or “Docked magnifier,” both zoom in on the screen and enlarge its various elements. That is just a straightforward instance out of a multitude of others.
“Automatic Clicks” is another feature that can help you use your Chromebook more easily, should you intend to have things that way. Just as the name of the tool suggests, enabling this functionality will allow you to make clicks with your on-screen cursor automatically without having to tap or click on the trackpad.
- The functionality can come in handy when your trackpad is partially broken and not allowing you to register clicks.
It’s feature-rich and comprises several options for you to tweak and use the tool accordingly. What happens is that once you turn on Automatic Clicks, there’s a delay period that will kick in before the click occurs. You can set this delay time yourself, and the available options range from 0.6 seconds to 4 seconds.
It’s easy to use and can be turned on more effortlessly from your Chromebook’s “Settings” app. Next, we’ll show you how to do that in no more than a moment. Continue reading from the following section to proceed.
Turning on Automatic Clicks on a Chromebook
As iterated earlier, turning on the Automatic Clicks feature on ChromeOS is a straightforward process. All you need to do is head over to the “Accessibility” section within your Chromebook’s “Settings” app, enter the main accessibility area, and then scroll down until you find the “Turn on automatic clicks” option. It’s just as painless as that.
But, of course, we’re not here to state just that and then skedaddle. The following steps will descriptively guide how you’ll get this done. Try to replicate them to the best of your ability for desirable results.
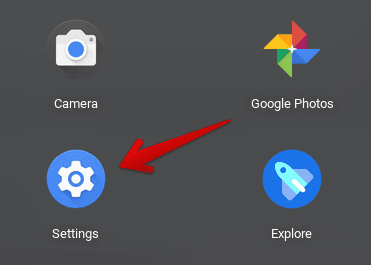
1. The first step is to open the “Settings” app on your Chromebook. You can do this easily by searching for it using the ChromeOS “Search” bar. The app in question might also be present on the shelf section if you have it pinned there.

Opening “Settings”
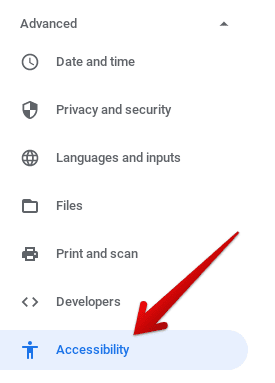
2. As soon as the “Settings” app opens up, click on the “Advanced” option in the sidebar. Once done, multiple options will appear in that area. You will then need to select “Accessibility” to proceed. Check out the screenshot below for a visual explanation of how to get this done.

Viewing the “Accessibility” options
3. After completing the previous step, click on the arrow beside “Manage accessibility features.” Doing that should take you to the next step.

Managing accessibility features
4. The moment you step inside the “Accessibility” section, you will need to scroll down to the “Mouse and touchpad” space. The first option you can enable will be “Automatically click when the cursor stops.” Select the toggle beside it, and you will finally have enabled the functionality in question.

Turning on the Automatic Clicks feature
That’s all there is to toggle on the Automatic Clicks feature on your Chromebook! Let’s dig a little deeper and gauge how much you can benefit from this added functionality.
Using the Automatic Clicks feature on a Chromebook
The developers have decided to make the Automatic Clicks feature somewhat advanced. That is why you’ll find multiple facilitating options within the functionality to help you get the best out of the feature. However, before we can get to that, it’s important to look at some of the settings associated with Automatic Clicks.

Automatic Clicks’ settings
Here are the main options that can alter the functioning of the Automatic Clicks functionality. Tweaking them by your preferences will bring you the best results, so let’s do that right away.
- Delay before click
- Stabilize click location
- Revert to left click after action
- Movement threshold
First off, the “Delay before click” feature is pretty self-explanatory. This option is the amount of time the cursor will take to click on something. Note that you must leave your cursor stationary at a given point for the click to begin registering. Your available options in this regard range are 0.6, 0.8, 1, 2, and 4 seconds.
Next up, we’ve got “Stabilize click location” to turn to. This feature will prevent the cursor from repeatedly clicking on the same element consecutively and give you some breathing room to decide where to click next.
The second-last feature is called “Revert to left click after action,” and it’s one of the lesser essential options to tweak. It’s just for making the cursor automatically perform a left-click after you set the functionality of the cursor to right-click from the Automatic Clicks console. We’ll shed more light on this later.
At long last, we’ve got the “Movement threshold” to talk about: the circle that appears around the cursor when a click is about to register. Depending on your preference, you can set it anywhere from Extra Small, Small, and Default to Large and Extra Large.
That’s all the basic settings of the Automatic Clicks feature covered. Let’s now move on to the console on your Chromebook’s display. We’ll be discussing the features of this hub in an order that begins from the left and continues to the far right.

Automatic Clicks feature hub
Here are all of the available options in the Automatic Clicks feature hub.
- Left click: The cursor performs a left click.
- Right click: The cursor performs a right click.
- Double click: The cursor performs a double click
- Click and drag: The cursor will allow you to click and drag clickable elements on the screen with this option.
- Scroll: This option will help you scroll pages up and down.
- No action (pause): This option will make the cursor pause its functionality.
- Toggle menu position: This option will allow you to switch the location of the Automatic Clicks console. You can move the feature hub to four different corners of the screen.
How to turn Automatic Clicks off
If you ever wish to turn the Automatic Clicks feature off, head to the “Manage accessibility features” section, similar to how you did in the previous section, scroll down until you find the “Mouse and touchpad” space, and finally click on the toggle beside “Automatically click when the cursor stops.”

Turning off Automatic Clicks
Once done, a prompt will appear on the screen, asking you to confirm your selection. Click on “Yes,” and you’ll be done in no time.

Confirming the decision
That’s about it! After clicking on “Yes,” the Automatic Clicks feature will be turned off for good. However, you can always turn the feature on again whenever you want now that you’re aware of how to do so.
Conclusion
Chromebooks are some of the most popular devices on the planet, coming across as cost-effective and feature-rich. However, that is not to say that ChromeOS doesn’t come slapped on with premium-grade devices. We’ve got high-end Chromebooks to turn our attention to when it comes down to it.
In this guide, we’ve looked at one of the most effective accessibility tools on ChromeOS, “Automatic Clicks.” This functionality takes away the need for a trackpad to be able to register a click appropriately. Do let us know in the comments section ahead whether you found this guide helpful for your cause.
As always, Chrome Ready wishes you good luck!
