Have you tried to discover how to inspect an element on a Chromebook? You’ve landed on the right web page. This guide will cover all that you need to know about element inspection for web pages viewed in Chrome, so you can discover what using this tool means, in essence. Continue reading ahead for an in-depth guide.
Chromebooks don’t come without their fair share of accessibility tools and features, allowing millions of people worldwide to delve into this convenient operating system without breaking a sweat. After all, ChromeOS is defined by its simplicity, security, and speed, which all come together to hit the perfect trifecta for Chromebooks.
Keep reading to learn the “Inspect” tool in ChromeOS and how you can benefit from it the most.
- Trending on Chrome Ready: How to enable JavaScript on Google Chrome.
What is the “Inspect” tool in Google Chrome?
The “Inspect” tool is in-built into most internet browsers, including Mozilla Firefox, Opera, Microsoft Edge, and even Brave Browser, so it’s not a Chromebook-only thing to get that out of the way. Every Chromebook running the Google Chrome browser can inspect the element of web pages, no matter what website type.
Now, the quickest way to learn what the “Inspect” tool is about is to understand that this nifty little feature right here is one of the best features that the Google Chrome browser can ever get. You got that right. However, the question does arise, “If the tool in question is so great, how come it’s not that popular?”
It is popular, but not on the side of end-users. Developers and those who write code and indulge in programming can’t simply get enough of the convenience posed by just using “Inspect” on their end. That is to say, one of the major advantages of inspecting web pages is that individuals can incorporate changes to see how those tweaks would look in the end.
This, of course, takes away a ton of inconvenience just like that. Instead of having to put all the work into changing a certain layout of a website for the sake of experiment, the “Inspect” tool lets you make temporary changes on the fly to a site, so you can access how the web page would look if a certain improvement were made to it.
Inspecting an element is excellent for when you need something to view the source code of various sites, not to mention the literal inspection of a particular web page’s HTML and CSS. Moreover, the “Inspect” tool can allow you to change a website’s text at will. Whether you do that for a few giggles or to test something genuine, we leave that up to you.
For instance, people go around pulling pranks on their friends and family by editing the prices of expensive Amazon products. For example, look at this gorgeous Samsung 85-inch Neo QLED 8K TV. Note how its price is slated for $4.497. With the power of the “Inspect” tool, watch what can happen to its price tag.
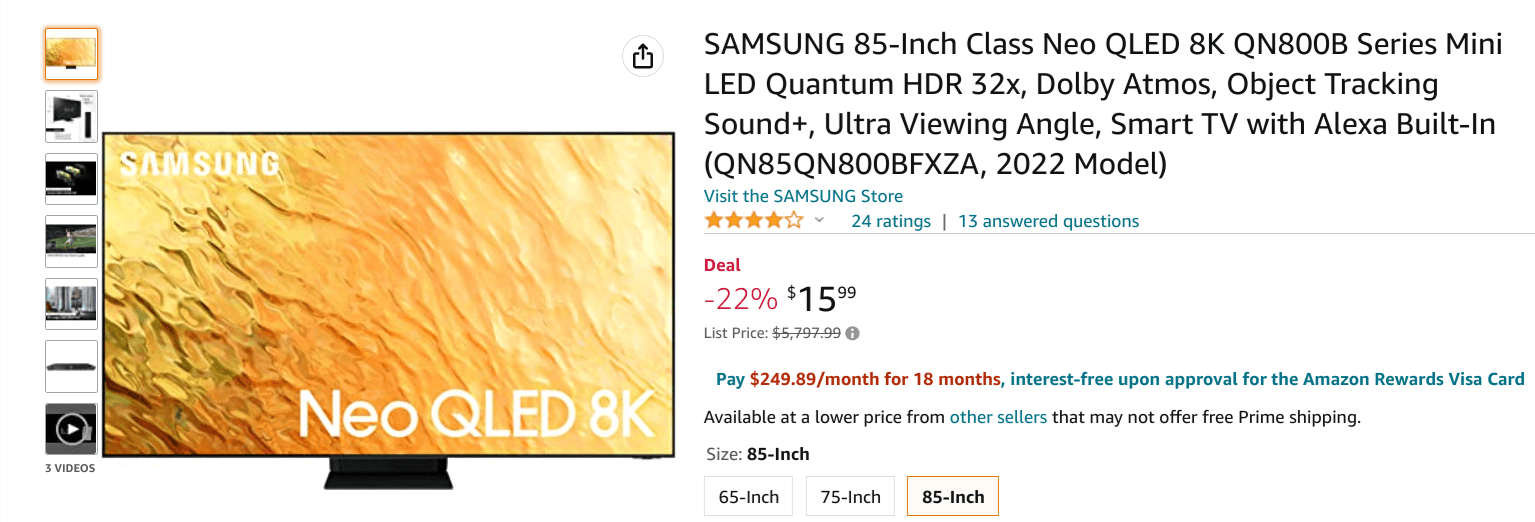
The “Inspect” tool in action
If only that were true, though. Before you get your hopes up, that $6,000 Samsung TV hasn’t gone on sale for $16. We employed one of the many abilities of the “Inspect” tool to get our way with the tech product’s price tag. Developers do the same, but only for a more productive and well-grounded reason which usually revolves around website testing.
Now that you have a fair idea of what the “Inspect” tool is and what it can do let’s take a look at the next section to summarize some of this functionality’s best features. Reading through it will clear you of any former doubts about the tool at hand.
Best features of the “Inspect” tool
While the feature in question boasts multiple working capacities, we thought it fit to summarize some of the “Inspect” tool’s most important benefits in the following bullet point list.
- The “Inspect” tool lets you view and edit the HTML of any web page belonging to any website.
- It lets you increase your work rate if you’re a developer by previewing changes without having to finish the product first.
- You can view the CSS code of any web page using “Inspect.”
- Inspecting an element allows viewing, editing, and even adding to the CSS code of any web page and website.
- Remove undesired content from a web page if you want to take a screenshot of it.
- Analyze your competitors by heading to their websites and inspecting the keywords they’re employing to boost their traffic and growth.
- Experiment with a website’s different designs, colors, and layouts using the “Inspect” tool.
- The “Emulation” feature within “Inspect” makes it possible to emulate a web page as if it was appearing on a mobile phone. Of course, all this would take place on your desktop browser, so the ease of use is commendable.
- The “Search” feature brought forward by the “Inspect” tool is far higher in its effective capability than any other way to search for something specific on a website.
- Another significant benefit of the “Inspect” tool relates to website maintenance. Developers can ascertain whether there are any present broken links, errors, or other hiccups prevalent on a site with the help of this functionality.
These were some of the most prominent “Inspect” features off the top of our heads. By having read through them all, you should now have a fair understanding of how powerful this tool truly is and in what ways it can make someone’s life a whole lot easier. Let’s come down to the practicality of it all and step away from the theoretical part.
The following section will explain how to use the “Inspect” tool on your Chromebook. Let’s get started without any further delay.
Inspecting an element on ChromeOS
Getting started with element inspection on your Chromebook is a reasonably straightforward process, but best believe that this is something that will take up a chunk of your life if you go and try to master it. With that said, things don’t have to take off that aggressively.
You can start by learning a few nifty tricks and then increase your knowledge and grip of the “Inspect” tool as time goes on. For now, though, let’s begin by understanding how the “Inspect” tool can be fired up in the first place. There’s nothing complicated about this; we can assure you of that.
Right-click anywhere on the screen using a mouse or tap with two fingers on your Chromebook’s trackpad to bring up the context menu. Once done, click on the “Inspect” button to get started. Check out the screenshot ahead for a visual illustration of this step. Alternatively, you can also press “Ctrl,” “Shift,” and “I” together to open the “Inspect” menu.
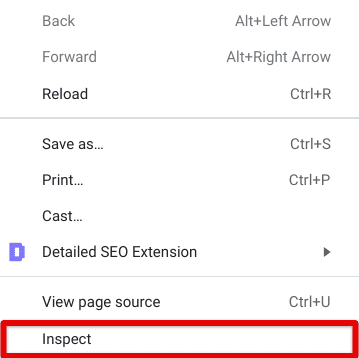
Clicking on the “Inspect” button
After clicking on “Inspect,” your screen will be split into two parts, and the “Inspect” section will manifest on the right-hand side of your display. You can enjoy many of the “Inspect” tools features from here on out. Take a look at the screenshot below to understand how the functionality appears to look on your end.
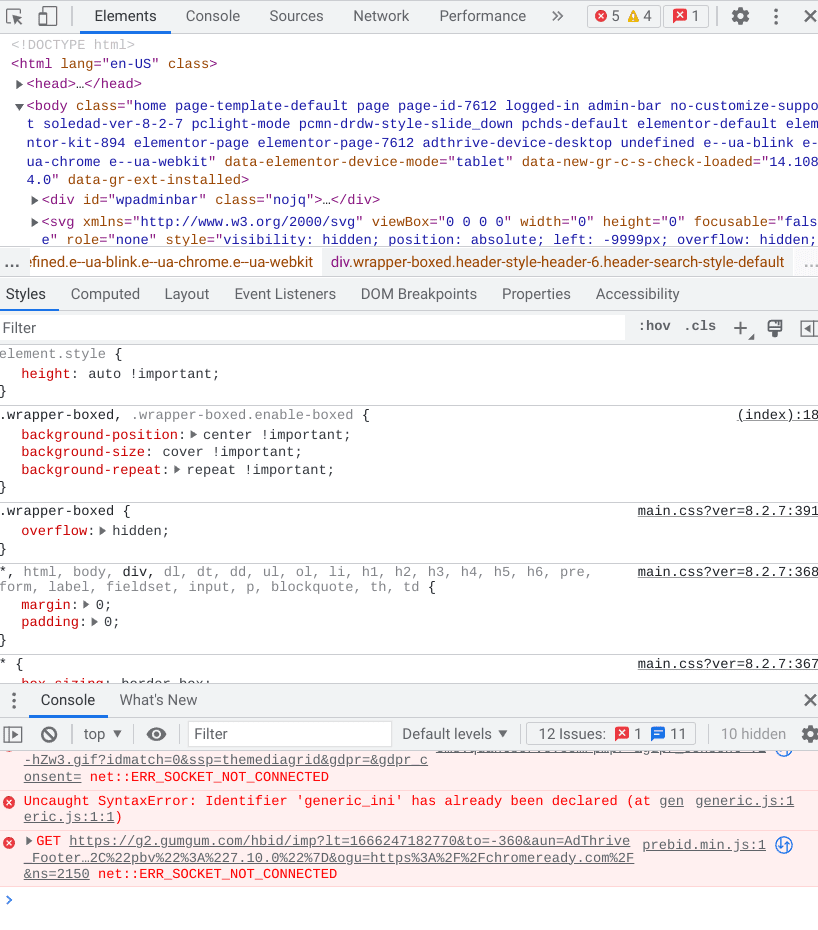
The Inspect tool in full flight
First-time users will find it challenging to wrap their heads around this seemingly perplexing section of the Chrome browser, but things will mitigate soon. One of the first things you can get started with to understand better the various roles of the “Inspect” tool is to edit the HTML of the web page you’re visiting.
Begin with the operation by clicking on the “Select an element in the page to inspect it” button. The shortcut key combination of “Ctrl,” “Alt,” and “C” is another way of proceeding in the right direction here. The cursor button should look similar to the contents of the screenshot below.
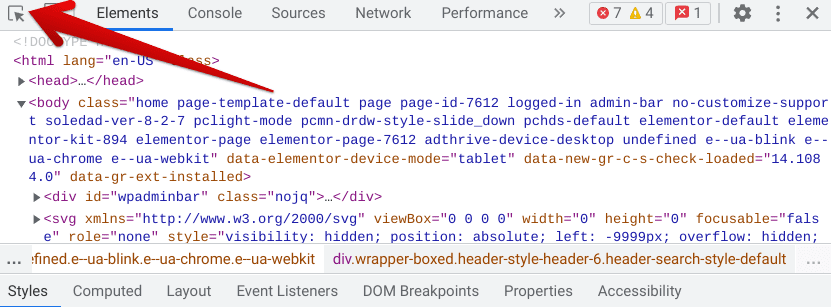
Clicking on the “Select an element on the page to inspect it” button
After clicking on the specified button, you need to turn to the web page you have opened on your Chrome browser. Now, to understand the idea of editing HTML, you can click on any text visible on the web page. Click on the text once to get to the next step.
In the following screenshot, you can painlessly observe how we’ve selected the “Google Workspace” text. On your end, you may choose any element you can perceive on the screen. It’s typically as easy as that.

Selecting a random element on the web page
After you click on a selectable element, the next step is to head back to the “Inspect” section on the right-hand side. From there, you will need to click on the dropdown arrow apparent right beside the element that you just selected. You’ll already see the relevant entry highlighted after completing the previous step, so this won’t be difficult.
Expanding the area will expand the section and make it possible for you to edit HTML. We’ll shed more light on that in the next step.

Expanding the right entry
As soon as you’ve expanded the relevant entry, you will be met with several options on your end. Please hover over the element you selected in one of the earlier steps, Google Workspace in our case, and right-click on it. The “Edit as HTML” option should appear on your end. Click on it to proceed to the next step.
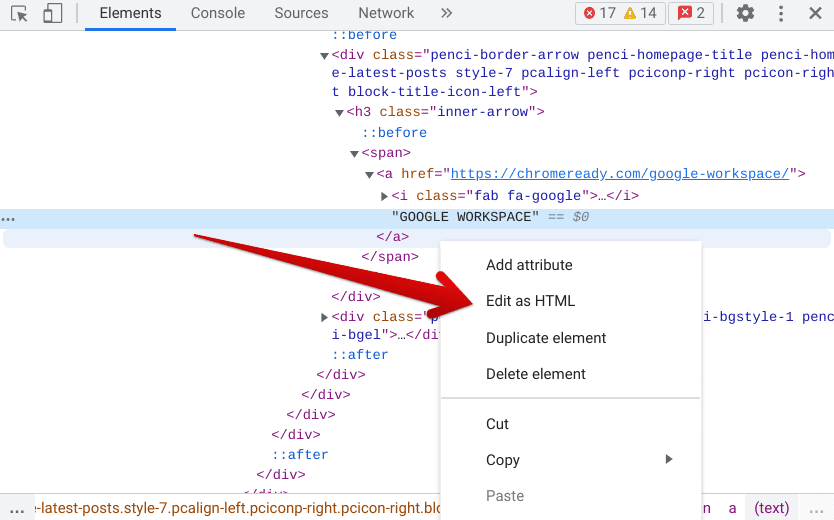
Editing the HTML for the element in question
After clicking on “Edit as HTML,” the next step is utterly simple. Spot the text you wish to customize and replace it per your preference. To clear this step with the help of an example, we’ve removed the “Google Workspace” element and replaced it with “Custom Text.”
Once done, you’ll observe that pressing the “Enter” key will do nothing commendable for you. Instead, to confirm your applied changes, you will need to press “Ctrl” and “Enter” together. That should do the trick. The following image should nudge you in the right direction regarding what text you’ll need to edit.
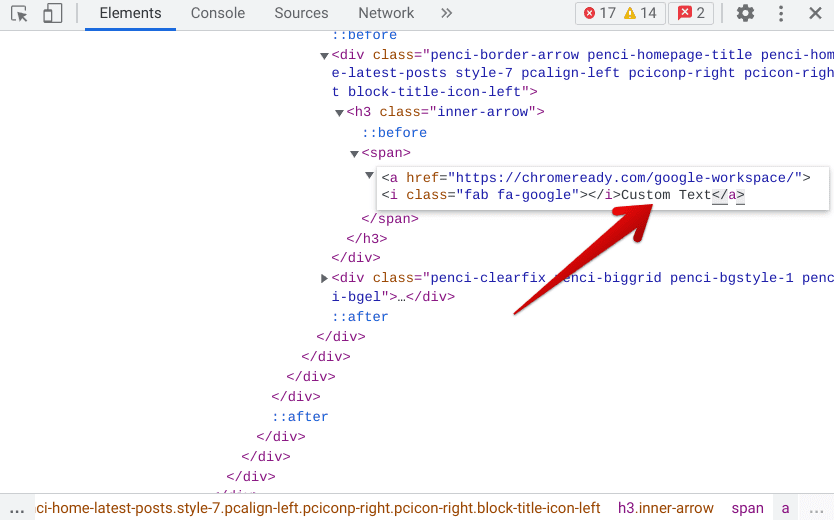
Making the desired edit to the HTML
As soon as you confirm the changes made with the help of “Ctrl” and “Enter,” feel free to observe how the selected text on the web page that you’re on switches up with what you change it to. If you recall correctly, the text beside the “Google” logo in the screenshot below initially said “Google Workspace.”
However, it has been changed to what we just did using the “Inspect” tool. It does bear noticing, however, that any changes made with the help of the “Inspect” tool will only be temporary. As soon as you refresh the page with the “Ctrl” and “R” shortcut key combo, all new additions will be reversed.

HTML edited with the Inspect tool
That’s all there is to this introductory article! You’ve now learned one of the essential functions that the “Inspect” tool is capable of on ChromeOS. Feel free to research other sources and read up on additional knowledge in inspecting an element on a web page. For now, though, it’s high time to conclude this write-up.
Conclusion
Chromebooks have arrived at the forefront of the tech world with a lot to offer. These devices have never been hit with ransomware, so the overall security that these devices uphold is nice and tight, and there’s just no doubt about that. Apart from this facet, ChromeOS benefits greatly from consistent optimizations from the developers’ side.
The latter ensures all the latest updates flow toward Google Chrome and ChromeOS, attributing to a picture-perfect browsing experience. The “Inspect element” tool has also been improved over time, and Chromebooks have always remained the first to get the latest releases on board.
Do let us know whether you found this article interesting for your cause. The “Inspect” tool is nothing but fantastic in the grand scheme of things, so here’s hoping that you’ll have a good time working with it in the future. Chrome Ready wishes you good luck!
- Recommended read: Chromebooks for students – The ultimate guide.
