Chromebooks initially started with Android 6.0. A user could only run the Android applications on full-screen mode or relatively small static sizes during this time. For most users, this is not what they opted for as the layout limited them to sizes they are not interested in. however, with newer Chromebooks, this is not the case anymore since the updated Chromebooks run Android 7.1.1 and above, which provides users the ability to resize the application.
The most notable point about resizing Android applications on Chromebooks is it is not direct; hence one has to perform some tweaks to enable the resizing feature. Don’t freak out, as those tweaks will be covered in this article guide.
Resizing Android Apps on your Chromebook
Follow the methods provided herein to get the Android resizing feature on your Chromebook up and running:
Step one: Verifying the Android version running on your Chromebook
Before trying out any of the methods highlighted in this guide, you should first confirm and ascertain that your Chromebook is running an Android version that supports resizable applications such as Android 7.1.1 and above.
To check the Android version your Chromebook is running on, follow the simple steps provided below:
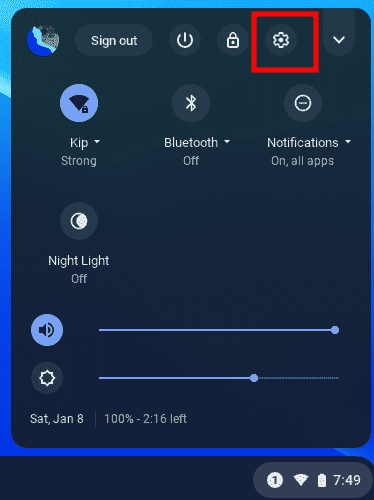
- Click on the “Settings” gear on your Chromebook

Select settings
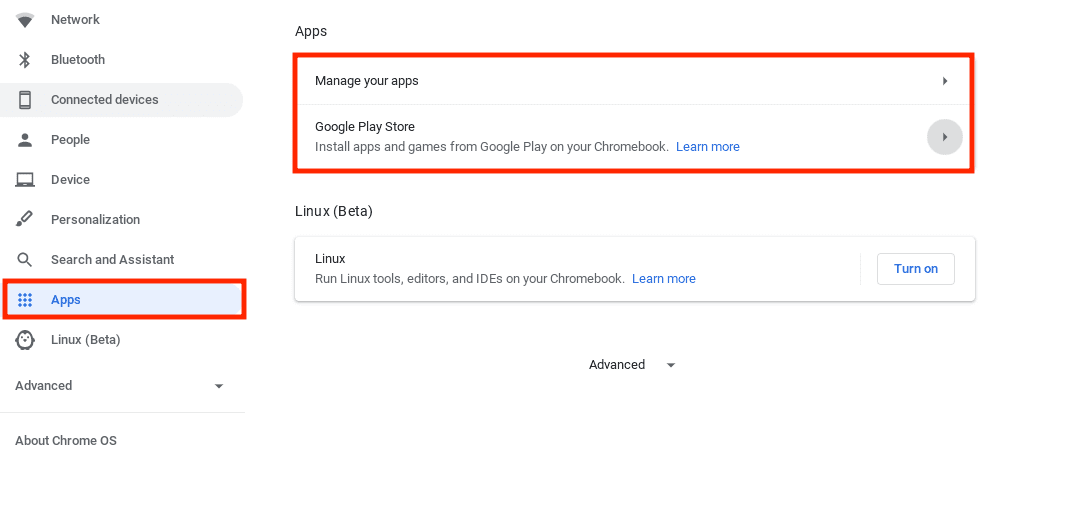
- Scroll through the Settings screen, click on “Apps,” and locate “Google Play Store,” and click on it

Click on apps and select Google Play Store
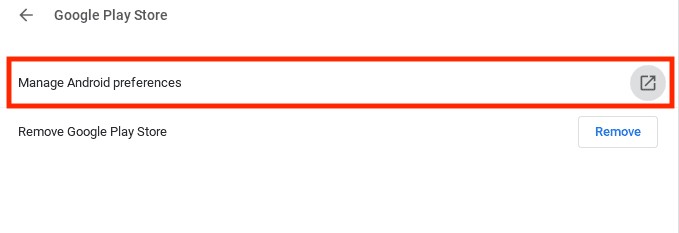
- Select the “Manage Android preferences” option

Click on manage Android preferences
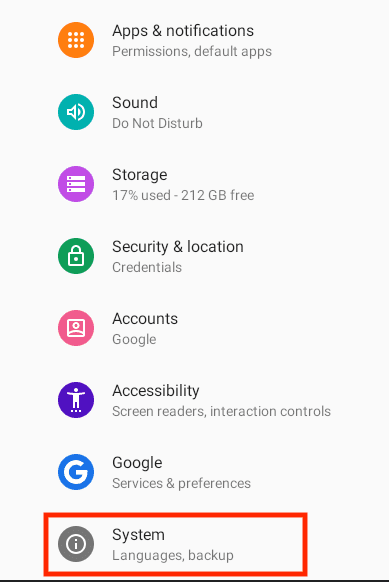
- An “Android settings menu” will pop-up
- Click on “System”

System Settings
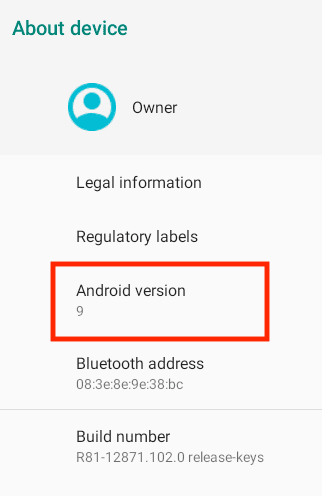
- On the “System settings menu” screen, scroll down and locate the “About Device section.”

About Device
- Now check the Android version your Chromebook is running. For instance, my Chromebook is running Android 9.0
Note: We don’t have a solution for you if you run Android 6.0 and below. However, if you are running Android 7.1.1 and above, stick to this article for more tips on resizing your Android applications.
Step two: Enabling Developer options
After confirming that you are running Android 7.1.1 or above, go ahead and enable the Developer options. This step is vital for resizing Android applications on your Chromebook.
To enable Developer Mode, do the following:
- Open the “Settings” application
- Scroll down and locate “Google Play Store,” then click on it
- Now select the “Manage Android preferences” option
- An “Android settings” screen will display
- Scroll through the displayed “Android settings” screen and select the “About Device” menu
- Scroll through “About Device” and click on “Build number” severally. On most occasions, you need to click on the “Build number” seven times. After clicking, you will see a toast notification displayed at the bottom of your Chromebook, letting you know that you are now a developer.

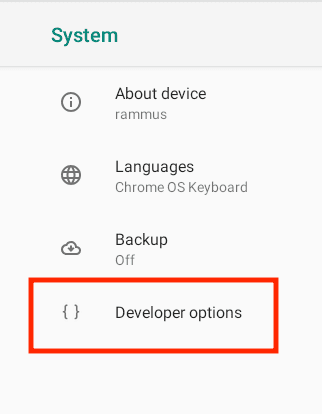
Developer Options
Once developer mode has been enabled, you can proceed to step three below:
Step three: Enabling the Window Resizing feature
While still in the “Android Settings” screen, click on the back button on the top left side of your screen to return to the main settings menu. From the options available on the main settings menu, you will now see “Developer options.” Click on it
Note: this section is susceptible as any unnecessary tweak could result in significant problems. Therefore, to be safe since we are in developer mode, stick to only the provided instructions. If you try out any tweak without consent, then that’s up to you.
Scroll through the “Developer options” screen. You will notice a setting named “Allow free window resizing by dragging the border.” Enable this option by clicking on the slider icon next to it.
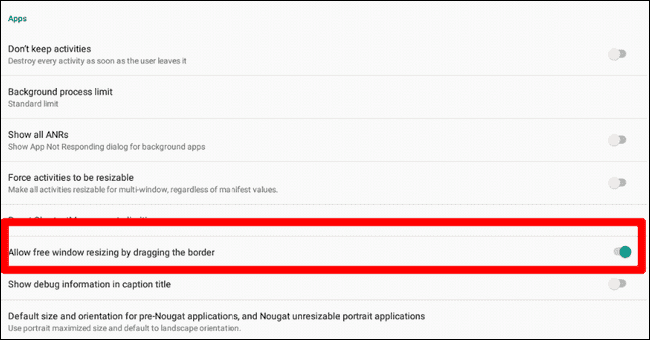
Allow Windows resizing tweak.
Note: Enabling this feature does not, therefore, guarantee that it will work with all other applications. Some applications are not updated. Hence, they may fail to work with this method. Also, applications that have not been updated over time might fail to dance to this tune.
However, that ought not to be a concern since most modern applications have this feature. With this feature enabled, you can now go ahead and try resizing Android applications on your Chromebook.
Bonus tip: Setting Default size for Android 7.1.1 and above applications
This is an additional tip; hence you can decide to try it out or not. However, we recommend that you check out this tip as it will aid you to determine the default size for applications not meant for Android 7.1.1
Like we did previously while enabling the “Android app resizing feature,” do the same but this time around, focusing on this tweak “Default size and orientation of pre-Nougat applications, and unresizable portrait applications.” Click on it. Once you click on it, you will realize several features such as:
- Use phone-sized window and default portrait orientation
- Use phone-sized window and default to portrait orientation and allow portrait only applications to maximize
- Use portrait maximized size and default to portrait orientation
- Use portrait maximized size and default to landscape orientation
- Use heuristic
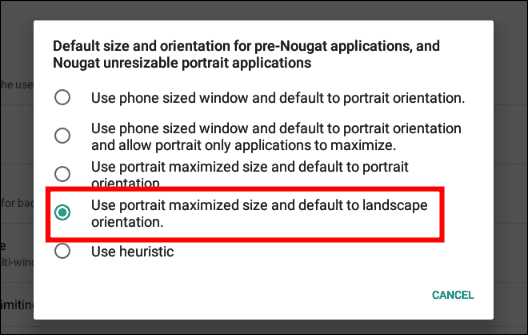
Pre-nougat application preferences
The features mentioned above allow you to figure out the best and suitable ways to use Android applications on your Chromebook. Depending on your preference, you can choose any provided options above. But, remember, one man’s meat is another man’s poison. Therefore, I won’t give you a chance but would instead advise you to stick to that which brings the best feel and look.
We hope and desire that responsive resizable Android applications will be out soon since Google hinted at releasing responsive Android apps shortly.
Note: If you are done using the Developer options, it is recommended to opt out since messing with a single tweak can cause lots of unthought-of damages. Therefore, to be safe, disable developer options after enabling the Windows resizing feature.
Since not all applications are ready for the Nougat resizing feature, don’t be upset if your favorite application fails to resize. From time to time, we noticed some users cursing down applications only because this feature is not supported. However, we believe Android developers are working tirelessly behind the scenes to ensure responsive resizable features are enabled for Android apps on Chromebooks.
We have tried and ascertained that this feature works flawlessly: the “Gmail and Play Music” apps are some that we have already tried. The ability to resize these applications improves the look and feel of our Chromebook. Besides, the resizing feature gives us the opportunity of multitasking and work side by side with two or more applications at a go. You can try out any application of your choice and let us know via the comments section if it does respond positively to this feature or not. Remember, your voice matters, hence the primary reason we are here.
Conclusion
This short guide has captured all the steps and methods one can follow to resize Android applications on their Chromebooks. Despite the process not being as straightforward as many thought, it is still not complex and is doable. Therefore, you can try it out on your Chromebook and tell us the method that worked flawlessly for you via the comments section.

1 comment
I followed step by step but once I get developer options, I don’t have the one you are talking about. I only have linx and powerwash I have this really to just do Cricut which only has an app, it won’t allow me to use the webpage and it only shows up as a small app in the middle of a big screen, any suggestions?