If you’ve been meaning to discover a legitimate way of installing Windows applications on a Chromebook, you need to know what Wine has cooked up for its user base. What entails ahead is a detail-rich guide covering all the do’s and don’t’s of installing WIne on ChromeOS, so keep on reading and learn how to mimic Windows software on these sleek devices.
Chromebooks are adept machines that have broken through the constraints that formerly defined them and have today evolved into full-fledged devices. For instance, Google has made an effort to bring Steam to ChromeOS. While the project is still in its initial stages, it’s doing reasonably well. Please take a look at our guide on the installation of Steam alpha for more.
For now, though, let’s get started with this in-depth guide on Wine, what it is, and what it can do for aspiring users on ChromeOS.
- Trending on Chrome Ready: How to install APKs on your Chromebook without the developer mode.
What is Wine?
If you head to WineHQ, you’ll instantly understand all there is to this project. With that said, let us dumb it down for you and explain what Wine is, including how you can benefit from the functionality on your Chromebook. First, Wine was intended to be an acronym from the developers’ side, thereby standing for “Wine is not an emulator.”
As shady as that sounds, Wine is a work of art. It boasts a novel concept of instant Window API conversions, so instead of using a virtual machine like VirtualBox to run Windows apps, all you’d need is one parent application, which would do the trick.
Due to its technicality, Wine is deemed a “compatibility layer,” and it runs ideally on Unix-compatible operating systems. One of the latter includes Linux — the Crostini Linux terminal — to be exact, and this is the same in-built Linux sub-operating system that comes alongside Chromebooks.
- If you haven’t been around that section lately, feel free to learn how to install and configure Linux apps on ChromeOS.
Moreover, Wine is free-to-use and will always stay that way, according to what the developers claim on the official website. The program was developed in 1993 with the same intentions, but only for an earlier version of Windows to accommodate its apps on Linux machines.
The developer says that as time progressed, Windows welcomed more and more features and complex APIs. This happened to cater to the growth of technology, so the operating system at hand wouldn’t be left behind in any way. Whatever technological advancement came, Wine was never made to fall behind.
Instead, it improved its fundamentals, and the developers relentlessly worked to make Wine stand out among the competition. That is one of the primary reasons why the software has still managed to stick around today, even though it first came out to the world almost two decades ago.
The fact that Wine became incredibly popular, especially at the time of its release, is no wonder. After all, this tool allows various people to run Windows applications on their operating systems, which amounts to nothing but utter convenience. Feel free to read about Wine at the software’s official website, including its history.
Now that you’re all caught up on what Wine is let’s get into the business end of this article and talk about why you’re ever going to need something like this application on a Chromebook.
Why should you install Wine on ChromeOS?
The question, “Why should you install Wine on ChromeOS?” is nothing but genuine. After all, the thought does spark a debate in the community. Some believe that Wine is unneeded in the grand scheme of things, while others think that the application is an utter tool of convenience.
While we will let you form your own decision, later on, let us get down to the actual reason why someone would ever prefer getting the likes of Wine on a Chromebook. For starters, and this is an essential facet you should know all about, it’s often desirable for a ChromeOS owner to use Windows applications compared to a regular PC.
As it turns out, therefore, you should try Wine on your Chromebook to tap into your device’s full potential to see how well it would perform when up against foreign soil. Chromebooks do not come with dedicated media codecs or other relevant drivers to run Windows applications right out of the box.
Instead, you have to seek potential workarounds, such as opting for the web-based versions of popular Windows software like Microsoft Office or perhaps getting yourself PWAs of applications, such as how Reddit is installed on ChromeOS. That is the only way you can experience dedicated Windows apps on a Chromebook unless you decide to get Wine.
Wine does not emulate a virtual machine to manipulate the working mechanism of software and get it to run on a Chromebook. Rather than doing that, it acts as a compatibility layer so Windows applications can continue running within the operating system as their relevant APIs are integrated with the device in continuous succession.
This is one of the significant reasons. Therefore, one can opt for the genius of Wine on ChromeOS. With no further ado, let’s install the program on your Chromebook. The following section is going to take it from here.
Installing Wine on a Chromebook
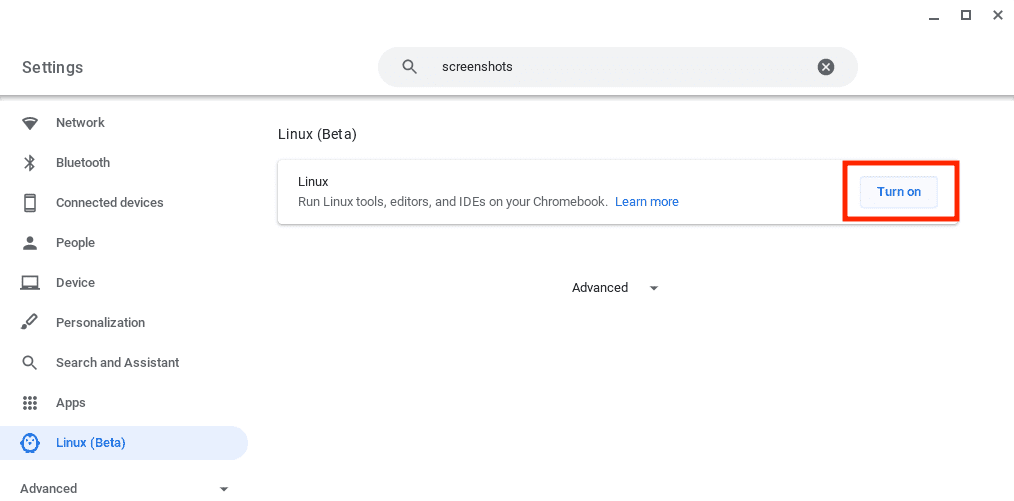
To continue with the installation of Wine on a Chromebook, you need to be well aware of the Linux terminal on Chromebooks. In case you do not have the functionality set up already, you will need to venture into your “Settings” section, followed by clicking on the “Developers” tab in the side panel, and then proceeding to “Turn on” Linux.

Enabling Linux on ChromeOS
After having your way with the Linux terminal on ChromeOS, you will need to enter quite a few commands within the command-line terminal to promptly do away with the installation of Wine on your Chromebook. Don’t fret just yet—we will be walking you through the guidelines step-by-step, so you’ll find them easier to implement on your end.
In the unlikely case that you’re using a Chromebook made before 2018 and have not tried out Linux on your end, it’s worth checking out our guide on those devices that run Linux apps. That way, you can ascertain whether your particular Chromebook has what it takes to sport the in-built Linux container.
Since the precursor is set, carry forward with the steps ahead and replicate them on your end for the best results. All the guidelines have been laid out in an easy-to-understand format.
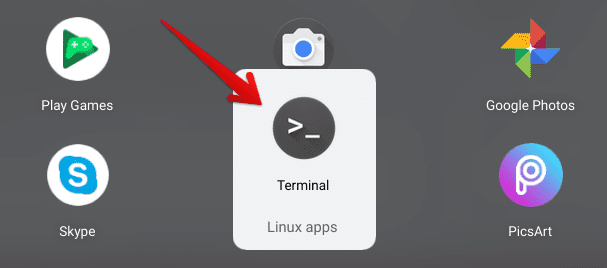
1. The first step is seemingly opening the Linux terminal on your end. This can be done by clicking on the “Terminal” app within the “Linux apps” folder in your Chromebook’s launcher section.

Opening the Linux Terminal
2. Once done, the first facet we must ensure is upgrading and updating Linux. Doing so will help us eliminate unwanted problems immediately and ensure a smooth installation process. Type in the following and press the “Enter” key to finalize this step.
sudo apt-get update

Updating the Linux Terminal
3. When you’re done here, the next step will be installing the right architecture for Wine. This will allow the software to work efficiently without any optimization issues. Check out the following command and use it within the Linux terminal to proceed to the next step.
Do note that entering this command will not do anything substantial within the Linux terminal. Think of it as a switch that we’ll flip on. The command will make your Linux username appear again on the screen.
sudo dpkg --add-architecture i386

Adding the right architecture to Linux
4. Completing the last step will nudge you toward installing the Wine program. To do this, all you have to do is enter the following command. Notice how the first few strings of text resemble the installation of other Linux software, such as OpenShot Video Editor.
You will be required to confirm your selection not long after pressing the “Enter” key. Make sure you read through the data storage requirements and then press the “Enter” key accordingly.
sudo apt install wine

Installing Wine
5. We’re not done just yet. There are still multiple different steps that you have to go through here. Continue the procedure by typing the following into the command-line interface of the Linux terminal. You’ll notice that by now, no Wine app icon has appeared in your Chromebook’s “Linux apps” folder.
To proceed, you will need to tend to the 32-bit architecture form of Wine. The command ahead will help you from here on out. Press the “Enter” key as soon as you’re done, and the process should begin on its own. Again, you will be asked to confirm your selection. Press “Enter” one more time to move forward. This step will take a while.
sudo apt install wine32

Furthering the process
6. After finishing the previous step, the following command will step in, furthering the procedure for you. Type in the text and press the “Enter” key to move ahead. Doing so will add a security key to the Linux terminal and, subsequently, the whole operating system for Wine’s optimal functioning.
wget -nc https://dl.winehq.org/wine-builds/winehq.key

Adding the security key
7. Adding the security key is a two-part process. After the previous step, continue to the next task using the following command. Copy it from below and paste it on your end in the terminal to move forward.
sudo apt-key add winehq.key

Finalizing the security key addition
8. After you’ve added the security key to Linux, the next step will revolve around creating the Wine repository on your end. Use the command in the following preformatted text to continue ahead.
echo "deb https://dl.winehq.org/wine-builds/debian/ bullseye main" | sudo tee /etc/apt/sources.list.d/wine_chrome_os_made_simple.list

Creating a Wine repository
9. Once you’re done with the previous operation, you’ll observe that your username will instantly pop back up in the command-line interface. If that happens to you, understand that it’s perfectly normal.
It seems reasonable to check the terminal for upcoming updates since we’ve added several packages to Linux now. Use the following command, the same as you did before, and you’ll be done updating your Linux terminal in no time.
sudo apt update

Updating the Linux Terminal
10. Next up arrives the installation of the Wine software itself, finally. Use the command given ahead to begin the download. The process can take up to 5 minutes, depending on your internet connection, so sit tight until the operation concludes.
sudo apt install --install-recommends winehq-stable winbind

Commencing the installation of Wine
11. We’re far from done yet, however. Continue by inputting the following command on your end.
winecfg

Furthering the installation of Wine
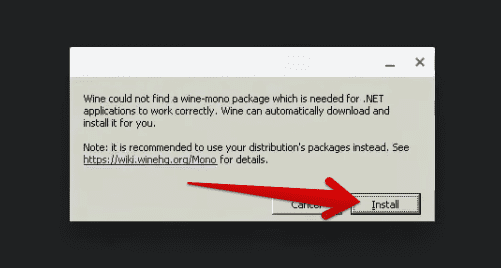
12. As soon as you enter the previous command in Linux, a Wine app window should pop up on the screen. Click on the “Install” button to proceed. Check out the screenshot below for further clarification. Please note that you will be required to click the “Install” button multiple times from here on out, so keep a good eye out.

Installing Wine through the prompt window
13. Although the Wine app will be installed on your Chromebook by this stage, we won’t be calling it quits just yet. Please also install a dedicated file manager system to accommodate your working capacity with Wine. Ad hoc, use the command given below to get it done. Nemo is just the software we’re looking for here.
sudo apt install nemo

Installing Nemo on ChromeOS
That’s it! You’ve finally installed Wine on your Chromebook. Time to get into the art of running Windows apps on ChromeOS, so you can finally have a dedicated program to rely on in this regard. We suggest starting with software like Audacity or perhaps the Wine variant of Steam to set things in motion.

Wine on ChromeOS
Conclusion
Chromebooks have always been highly flexible and versatile devices. However, people seem to want more out of a particular product, especially regarding Windows PCs. Thankfully, the creative developers of a specific software have managed to work out a solution for concerned Chromebook users.
That solution comes with the name WineHQ, and it’s genuinely out there mimicking the functionality of Windows-grade PCs just so ChromeOS users can taste the forbidden fruit. It’s easy to install, does not include any hassle registration process, and sets one up for novel experiences.
Do let us know in the comments section ahead whether you think Wine is the next-level game-changer for Chromebooks. As always, Chrome Ready wishes you good luck!
- Before you leave: How to use multiple profiles simultaneously on Google Chrome.

1 comment
Thank you sooo much. This was by far the easiest and most explanatory process i found.
Works 100%