If you’re using a Chromebook that does not have enough punch in its volume, or you’re simply looking to up the ante with the current volume level, this guide is definitely for you. We’ll be walking you through an in-depth tutorial on how to boost volume on a Chromebook beyond maximum volume, so you can enjoy your multimedia just like you want to.
In other cases, it’s just a bare necessity to have the volume north of 100%, so you can hear the sound coming from the other end. Whatever the motivation, we’ll make sure to enlist several ways to help you get what you’re looking for on your Chromebook. With no further ado then, let’s get started right away.
- Related read: How to control mic input volume on Chromebook.
Boosting the Chromebook volume more than the maximum limit
From what we can collect after personal experience and thorough research, there is more than one way of increasing your Chromebook’s volume beyond the maximum limit. We’ll make sure to go through each of them below, so you can grasp the techniques better and replicate them on your end effortlessly.
Option #1. Using VLC media player to boost Chromebook volume
One of the first options for boosting your Chromebook’s standard volume beyond maximum is installing a high-quality multimedia player called VLC. The latter is free to download and use, and the cherry on top is its open-source nature, allowing potential developers to contribute to the source code.
We could go on and on about how excellent and feature-rich VLC is, but we’ve reserved the extras in a separate article called how to install the VLC Media Player on a Chromebook, so you should refer to that one for more details. For now, though, we’ll walk you through installing VLC’s Linux variant to boost the device’s max volume.
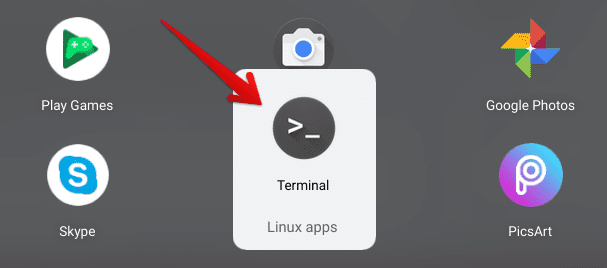
1. The first step is to launch the Linux container on your Chromebook. This initial prerequisite requires you to have the terminal set up and configured already, but if you haven’t tended to it before, look at the interlinked guide for helpful guidelines. The terminal can be found in your Chromebook launcher’s “Linux apps” folder.

Opening the Linux Terminal
2. As soon as the terminal is up and running, the next step is to update it to the latest version for the best results. This can be done effortlessly with the help of the following command. Press the “Enter” key when you’ve entered it to start the update process. Confirm any prompts that you might get during the procedure.
sudo apt-get update

Updating the Linux terminal
3. The next step is to use the following command in the terminal and press the “Enter” key once you’re done. Doing so should commence the installation of the VLC Media Player on your Chromebook.
sudo apt install vlc

Installing VLC via Linux
4. You will be asked for confirmation a moment into the installation. Press the “Enter” key again to begin the actual download and proceed with the subsequent installation.

Confirming the installation
5. As soon as you’re finished. You see your Linux username pop up in the terminal again, that’s your cue to head into the “Linux apps” folder in the launcher section and dig out the “VLC media player” app icon, similar to the one you see in the screenshot below right beside balenaEtcher.

That’s all there is to installing VLC on your Chromebook. Double-tap on the app to launch it straight away. The multimedia tool’s user interface is simple, and you should be able to navigate it without too much effort. Now, the easiest part is boosting the volume beyond 100%.
First, click the “Media’ button in the toolbar and select “Open File.” Alternatively, you can press “Ctrl” and “O” together on your keyboard to open the file manager window and select a multimedia file to play.
Since this is the Linux variant of the application we’re working with, you will need to move your playable media to the “Linux files” folder on your Chromebook. The latter can be found in the main “Files” system utility. Once done, VLC’s file picker can detect your stored files.
To continue, pick any file, so it plays within the VLC user interface. As soon as you have any form of media content running within VLC, focus on the bottom-right corner of VLC’s window to detect the volume section.
Take your cursor over it and pump it up to 125% of the total volume output. Check out the following screenshot for a visual explanation.

Boosting the Chromebook’s volume beyond maximum in VLC
That’s all for using VLC Media Player to maximize your Chromebook’s volume beyond the 100% limit. Let us now delve further into the article and dig out other ways of doing the same thing.
Option #2. Using the Volume Booster Chrome extension
There’s another method to boost your Chromebook’s volume, and it revolves around the installation of a high-quality Chrome extension. You may as well ditch the VLC Media Player option if you find Volume Booster — the Chrome extension in question — making the cut for you.
It’s currently a “Featured’ extension on the Chrome Web Store with more than 1,400 global ratings and overall one million users. As for the total number of installations, over 10 million people have tried out the diverse offerings of Volume Booster, and they have not been disappointed. It’s free to use and doesn’t contain malware or even advertisements.
Follow the steps outlined ahead to learn how to install Volume Booster on the device that you have. In the meantime, check out these other top 15 Google Chrome extensions for your Chromebook just as well.
1. The first step is nothing but simple. Click on this direct link and head straight to the official Volume Booster extension page on the Chrome Web Store. Click on the “Add to Chrome” button to move forward.

Adding Volume Booster to Chrome
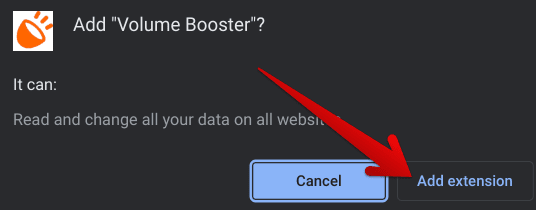
2. As soon as you click “Add to Chrome,” you will receive a confirmation prompt. Click on “Add extension” again to get to the next step.

Confirming the installation
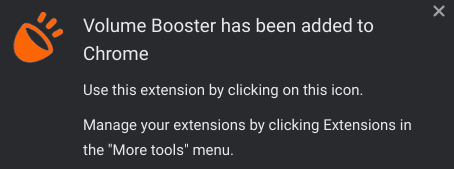
3. The installation will finalize in a moment, and when it does, you will receive a notification in the top-right corner of the screen.

Volume Booster added to Chrome.
Now that you have the extension installed on your Chrome browser click on it within the extension toolbar to make the add-on active. You will soon observe a volume bar that can be taken to the maximum level just by swiping it to the right side. Tweak the volume following your preference, and you’ll be done for the most part.

Maximizing the Chromebook volume with Volume Booster
There you go! You’ve just learned how to maximize your Chromebook’s volume with the Volume Booster extension. Keep reading for the final method that can help you in this regard.
Option #3. Get a speaker for your Chromebook
As for the third and final option on the list, we have a somewhat different solution to the problem at hand, but it is technically noteworthy.
If the standard maximum Chromebook volume does not do the trick for you, or VLC Media Player and the Volume Booster Chrome extension end up ruining the audio quality, you may as well pursue an entirely different approach. It’s possible to hook up your device with a first-rate Bluetooth speaker and enjoy a rich sound quality like never before.
While you’ll find a swath of options to purchase across various retailers and marketplaces online, we see the ANKER Soundcore Bluetooth Speaker as a highly viable option. It comes for a pocket-friendly price of $22, which is $8 off its MSRP at the time of writing and offers a bang-for-your-buck deal for days on end. The Anker Soundcore Bluetooth Speaker claims to blow its users away with its sound quality. It fills space with the right amount of clarity, has appreciable bass, and has an excellent Bluetooth connectivity range. It’s the whole package; you should not sleep on it for your Chromebook. On the other hand, if you want to go high-end with no limits, Bose SoundLink Mini II’s sound quality is simply the best, considering the form factor.
Conclusion
Chromebooks have always been exceptionally accessible machines, allowing users to get a lot done while they rely on the Chrome browser. The developers have made this operating system capable of many things now, not to mention the installation of WordPress, Kali Linux, and other high-quality Linux apps such as OpenShot Video Editor.
In this guide, we’ve taken a look at some of the best ways you can use to maximize your Chromebook’s volume beyond 100%. Our favorite is the VLC Media Player method, which lets you go beyond the ordinary volume limit and get more out of your device frequently.

3 comments
sup bro
BEST EVER!!!!!!!!!! #1
Very Nice Info…….