One of the troubles people face is the notorious Google Chrome profile error, and this article will tell you how to fix it. Not just one but six different approachable methods will be discussed in the sections to come, so keep on reading for the best results.
What is the Google Chrome profile error?
The Google Chrome profile error hampers the ability of the user to use the software effectively and prompts the user to fix the Chrome browser. You visualize this issue due to one of many reasons. Either there’s a corruption in the configuration of Google Chrome, incompatibility issues with some of the programs installed on your specific device, or an old browser version that’s not supported anymore.
In addition to that, your Google account might have been bugged temporarily, which would render your working on the Chrome browser useless. Lastly, some antivirus software on your Windows PC can prevent Google Chrome from running optimally, causing the profile error in question. It’s worth keeping a good lookout for updates, so you’re always on the latest version of the famous internet surfer.
We recommend you to follow the instructions provided in the subtitle ahead diligently to get the better of the Google Chrome profile error substantially. It’s advisable to try each listed potential fix, so you do not leave any stone unturned and can cater to each possible source of the issue accordingly.
The best ways to resolve the Google Chrome profile error
The following is our cherry-picked collection of all those measures that can be taken to resolve the Google Chrome profile error in no time.
Try uninstalling your antivirus software
By researching community forums and user posts, we’ve gathered that the antivirus software installed on your device might be interfering with this famed internet surfer and thereby causing the Google Chrome profile error. This is not desirable, and the antivirus you have installed on Windows PC or Chromebook is there for a dedicated reason.
However, it’s worth taking the time to uninstall your antivirus program for a moment to ensure that the root cause of the Chrome profile error isn’t your defense mechanism. That is why you need to assess the type of antivirus you have and get rid of it temporarily. For this purpose, search for the “Add or remove programs” sections on your Windows PC and delete whatever antivirus software you’ve installed on the device.
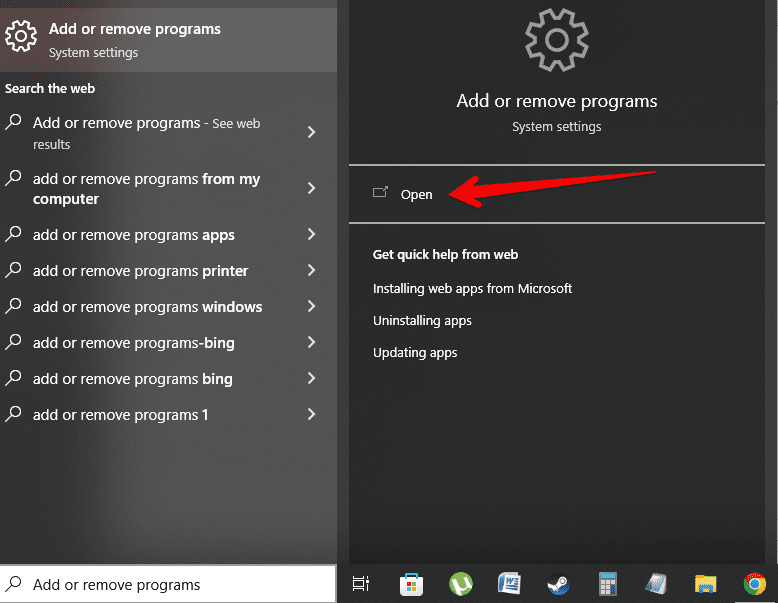
Opening the “Add or remove programs” section
No matter if you have Avast Antivirus or some of the other top antivirus programs for your Windows laptop, it’s worth giving this potential solution a shot if there are chances of resolving the Chrome profile error. However, if you’ve done this already and no positive result could come forward, keep reading to try other fixes.
Shut Chrome down from the Task Manager
The next step after removing your antivirus software from your Windows PC is to check and confirm whether the Chrome browser is running on the device or not. We aim to launch the Task Manager and shut the browser entirely down. Doing so will help us relaunch it from scratch, and there’s a good chance that the Google Chrome profile error will go away just like that afterward.
Therefore, get started with this measure and fire up the Task Manager on your Windows PC by pressing the “Shift,” “Esc,” and “Ctrl” keys together. Once done, this hefty system utility should pop up in a moment, and it would then be easy to scroll down the list of processes and dig out Google Chrome. The latter should be at the top, given how graphically demanding it is.
As soon as you find it, select it once and then click on the “End task” button in the bottom-right corner of the screen. You should be able to get going quickly from there on out.
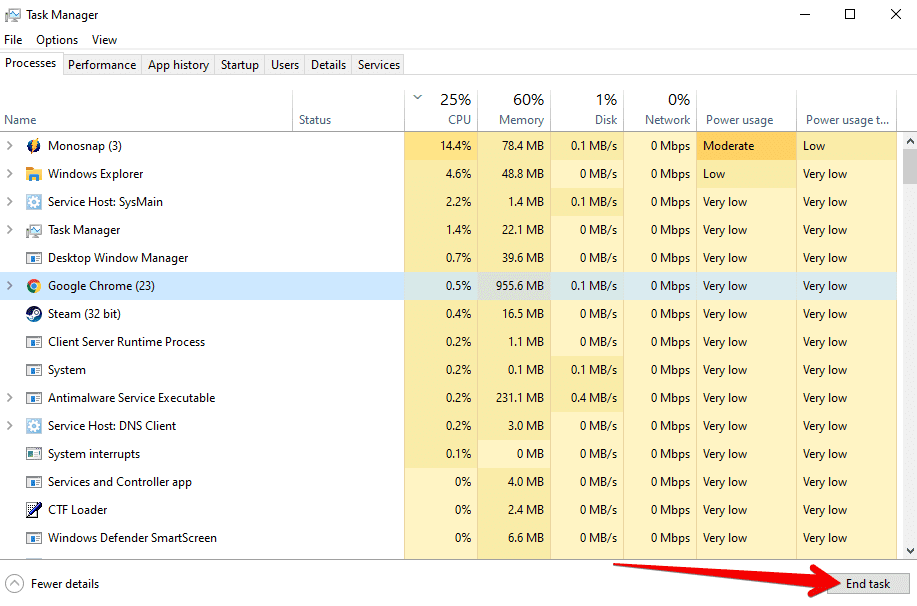
Shutting Chrome down
After successfully shutting down Google Chrome, we suggest relaunching the browser to see if the pertinent profile error continues to be a bother. If it indeed does, it’s highly recommended to try out this next subtitle that we have curated for you.
Reinstate your Google profile
One of the most definitive fixes available on the internet for the Google Chrome profile error pertains to reinstating the actual cause of the issue. Thankfully, the browser makes removing and adding your main profile easy, so we’ll be getting to just that to resolve the problem at hand. From what we can gather after rigorous research in online forums, removing and then adding your profile again tends to fix the issue in most cases.
Here’s hoping you can say the same as well by the time you’re done implementing this potential solution. As always, the following steps are going to take it from here.
1. The first step is to click on the “Profile” icon in the top-right corner of the Chrome browser’s interface. Check out the following screenshot to learn what icon we are talking about.
Clicking on the “Profile” icon
2. After doing that, you will be shown a distinct section on the same screen. Here, click on the small-scale gear-shaped icon that represents the “Settings” section. The screenshot given ahead should be able to help you out profoundly in this regard.
Clicking on the “Settings” icon
3. Clicking on the “Settings” icon will lead you to the following page on Chrome. Your job now is to click on the options button that looks like three vertical dots. Doing so will reveal plenty of options on the screen for you. Click on “Delete” to remove your profile as annotated in the screenshot below.
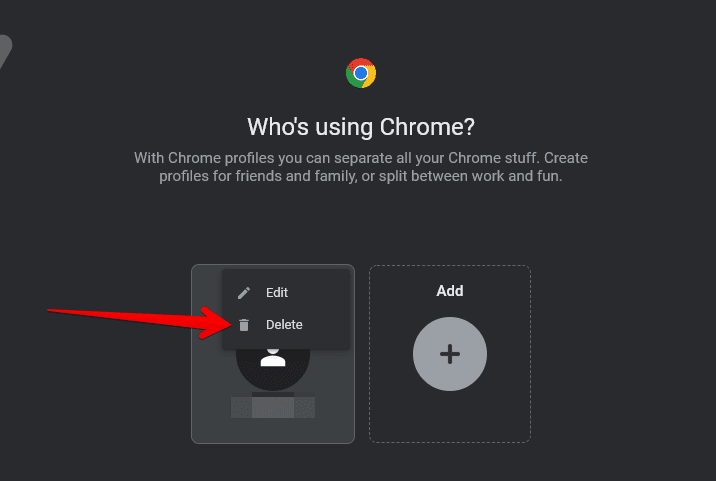
Deleting the added Chrome profile
Great going so far! All you have to do now is add your profile to the Google Chrome browser again. This should be a reasonably straightforward process since the “Add” button is located right next to the area where you remove your profile. Follow through with the required process, add your credentials, and try logging into Chrome once more to see if you’ve finally managed to crack the case. If the issue persists for some ugly reason, keep reading to try other potential fixes.
Evaluate your extensions
The Chrome Web Store features the best Google Chrome extensions that you can download and get started with today. However, this doesn’t mean that these mere add-ons can be left free and not be gone under supervision. Over time, you’re likely to install several browser extensions to try their functionality out and see whether they make the cut. It can get pretty easy to forget what extensions you’ve installed on your device that way.
Somewhere along those lines, an extension might go rogue and become faulty. This add-on doesn’t have to be old, but older ones can also become outdated and faulty. You should know how to manage your Chrome extensions and control their permissions, but you should also know what extensions should be kept and which ones should be erased from the face of your Chromebook.
That is to say, having a wealthy abundance of these add-ons, especially ones that serve no valuable purpose, should be taken off your device. We say this because the Google Chrome profile error can often result from defective or damaged extensions no longer supported by their respective developers. Please click on the extensions toolbar in the top-right corner of the screen or access them from the “Customize and control Google Chrome” section.
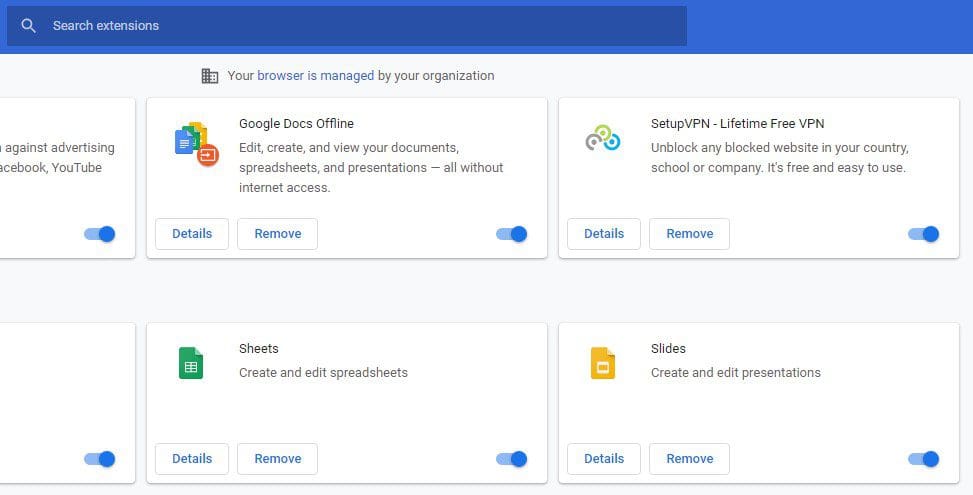
Extensions page
That way, you can determine what extensions have become stale and possibly need removal. As a word of advice, you should only install some extensions on your Windows PC that are useful to you daily. We advise against overdoing things in this particular scenario if you want your browsing experience never to be slowed down.
Check for updates
Whenever Google Chrome is putting you up with trouble, always make sure that you’re on the latest version of it. You automatically minimize many potential troubles by updating Chrome to its latest version. Try seeing if that is the case for the profile error issue. Our detailed guide on checking Google Chrome and updating it will show you how to get this done.
Even after updating your Chrome browser didn’t do the trick correctly, we have to nudge you toward clearing up your browsing history and cache. Let’s take a look at how you’ll get this done.
Erase browsing history and cache
If you’ve been using the Chrome browser for a long time, you’ve amassed a lot of cached data. Sometimes, all this junk can cause discrepancies in the working mechanism of the browser and therefore prevent it from running in full flight. This is also one of the known causes of the Google Chrome profile error, so let’s dive right into the matter without any further ado and show you how to get rid of your age-old browsing history and cache.
The following steps will take it from here.
1. The first step is to open the Google Chrome browser on your Chromebook or Windows PC.
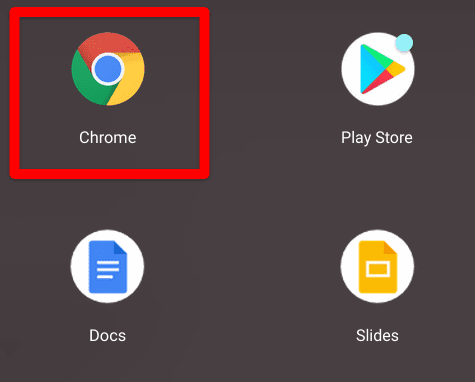
Opening the Google Chrome browser
2. Once done, you now have to click on the three vertical dots present in the top-right corner of the Chrome browser window. The button symbolizes “Customize and control Google Chrome” beside the extensions toolbar. This should reveal several options on the screen for you.

Customizing Google Chrome
3. Out of the options that appear after the last step, hover over the “History” area to expand the section. You’ll see “History” one more time. Click on it to continue. Alternatively, you can press “Ctrl” and “H” together to open your browser’s history tab.

Clicking on the “History” button
4. When you’re at the “History” page on Google Chrome, you can painlessly clear your browsing history in just not one but two different ways. However, we will only concern ourselves with the second method, which is more geared toward resolving the Google Chrome profile error.
Click on the “Clear browsing data” option on the left column of the “History” page to get to the next step. Doing so should launch another Google Chrome tab.
- However, if you’re after a full tutorial, check out our guide on checking and clearing your browsing history on Google Chrome.
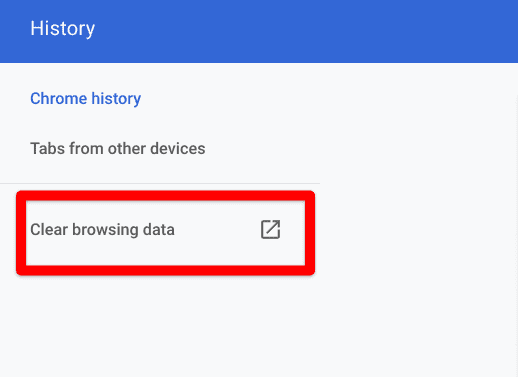
Clicking on “Clear browsing data”
5. You have now arrived at the section where you can delete your browsing history and tweak several advanced parameters collectively. First, we must select the “Time range” to clear up the browsing data. The options present in this regard are “Last hour,” “Last 24 hours,” “Last 7 days,” “Last 4 weeks,” and “All time.”
Choose the latter and continue toward the rest of the settings. You will also visualize multiple options under this opened area’s “Basic” section. Select the entries that say “Cookies and other site data” along with “Cached images and files.” Once you’ve done this and double-checked everything, click on “Clear data” to complete this procedure.
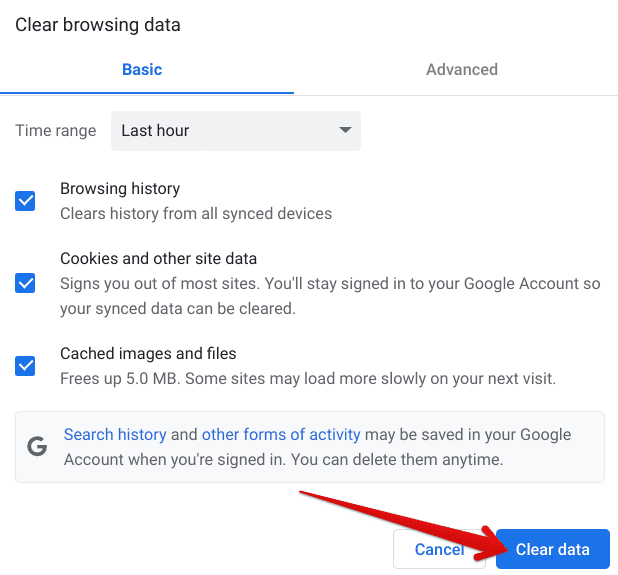
Clearing browsing data
That’s about clearing your browser history on Google Chrome to hopefully resolve the profile error on the otherwise reliable internet browser. The process detailed above boasts a strong chance of getting you back on track. However, if clearing up your browsing history doesn’t work, keep reading to the final trick we have for you.
Delete the “Web Data journal” file on your Windows PC
The final potential fix on this list pertains to a specific file stored on your Windows PC. Please note that if you’re facing the Chrome profile error on a platform other than Microsoft Windows, you won’t be able to replicate the forthcoming guidelines. That is because we need to tend to a file on this operating system known as neck and neck with the Google Chrome profile error.
After deleting this specific data, the Chrome browser starts behaving normally again, just like someone would expect when starting the software for the first time. Therefore, we’re not going to waste further time in illustrating how to delete this distinct “Web Data journal” file on your Windows PC so you can finally get back into surfing the internet. The following steps are going to take it from here. Be sure to follow them diligently for the best results.
1. The first step is to open up the “Run” system utility on your Windows PC. This can be done by pressing the “Windows” and “R” keys together. After the program is up and running on your PC, use the following command and enter it into the “Run” utility.
%localappdata%
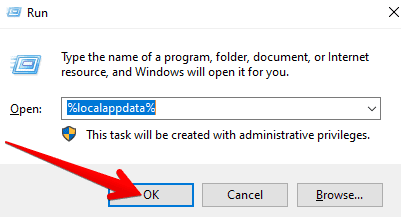
Using the Run system utility
2. Completing the previous step will take you straight to the “Local app data” section in your Windows File explorer application. Here, many folders will be available at your disposal. To continue, you must scroll down and find the “Google” folder, as shown in the screenshot below.
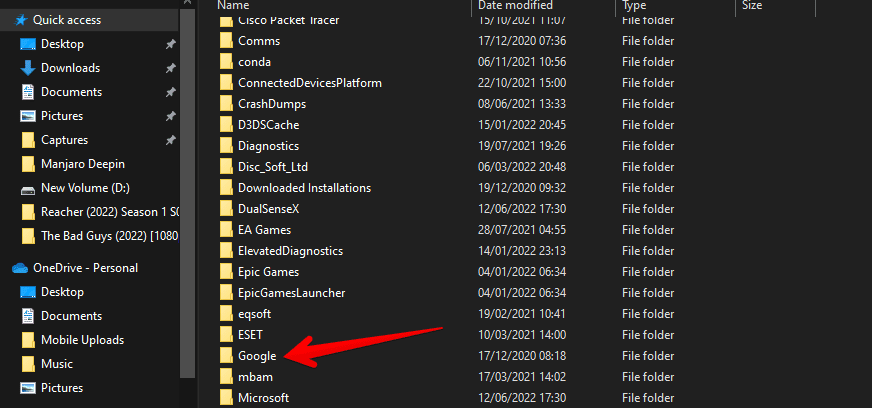
Clicking on the “Google” folder
3. After clicking on the “Google” file folder, you will be taken to a different page on the File Explorer application. Here, click on “Chrome” to get to the next step.

Clicking on “Chrome”
4. Clicking on “Chrome” will lead you to click on another folder called “User Data.” Follow the screenshot given below to learn how to proceed forward.

Selecting the “User Data” folder
5. The second-last step is to scroll down after entering the “User Data” directory and select the “Default” folder.

Clicking on the “Default” folder
6. This step is the last of your ventures. Scroll down until you find the “Web Data-journal” file. Double-tap on it with the help of your trackpad to bring up the “Options” section. Delete it, and you should be done with the Google Chrome profile error.

Deleting the “Web Data journal” file
After completing the process, try relaunching Chrome to see if the issue persists. There’s a strong likelihood of you fixing the issue as soon as you’re done since this has been one of the most robust fixes to the Google Chrome profile error. It is now time to start using your internet browser like before!
Conclusion
This speedy internet browser is known to get wound up in its fair share of errors, and the Google Chrome profile error is proof of that. This vexing issue results due to a wide array of reasons, including a faulty extension or an outdated browser version. Whatever the case, we’ve managed to list down the six best ways you can use to fix the Google Chrome profile error in no time, so here’s hoping that the guide above will prove to be helpful for your cause.
- Level up with how to turn off Google Chrome notifications
