Not so long ago, YouTube Music was rebranded as an official replacement for Google Play Music. When Google discontinued its support for Play Music, the focus expectedly shifted to this relatively new platform. It now acts as the leading music streaming service across Google. With YouTube Music, you get immediate access to a massive sounds library from worldwide. Apart from just listening to what is already present there, users can also upload their favorite tunes and songs to the music collection.
Managing YouTube’s music library is similar to handling other online collections. It not only keeps songs and music files over the cloud for you but also provides several different support features. They enable you to transform the music streaming experience across multiple devices completely. In the following article, we will see how to upload music to the YouTube Music collection and then manage it afterward.
What is YouTube Music? How does it work?
After being launched in 2018, YouTube Music has been able to substitute Google Play Music completely. It is used for listening to songs, recently released albums, customized playlists, funky remixes, music videos, and live music performances. It has a free plan, but it comes with ads like regular YouTube videos. To get rid of this promotional content, you will have to purchase the YouTube Music Premium package. Other than removing ads, it also enables background audio and offline playback.
YouTube Music has a discovery feature that can be browsed for getting hit with new songs and music videos every day. It hosts so many tools that let you explore the world of music in different ways. Based on your listening habits and personalized playlists, the service offers recommendations for similar songs and artists. Users are even given the option to like or dislike songs and albums. That helps YouTube Music tune the explore section based on your distinct taste. Besides all of that, it has everything you expect from a standard music player. Learn how to download YouTube videos on Chromebook.
Uploading music to the YouTube Music collection
As described earlier, YouTube Music allows you to upload favorite songs and new albums to the music collection. They are then stored in your private library, which can be accessed just like all other content on YouTube Music. Keep in mind that you can only upload private files to YouTube Music through the desktop. There is no such support for it in its mobile applications on either Android or iOS.
Step 1: Open the preferred internet browser and go to YouTube Music. Log in with your Google account.
Step 2: Click on your profile picture in the top right corner of the YouTube Music homepage. It will open a drop-down menu. Click on “Upload music.”
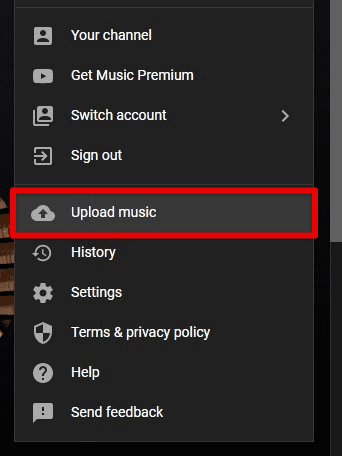
Upload music
Step 3: Doing so will open a new window for picking music files stored locally on your device. Browse to the respective location, select all files to be uploaded and then click on “Open.”
Note: If it is your first time uploading to YouTube Music, a prompt will request for reviewing and accepting the use policy.
A small banner will pop up in the bottom left corner. It indicates that the file upload has started. Once done, the files are processed to be used in the YouTube Music library.
Step 4: Click on “Go to the library” to confirm whether the uploaded songs are now displayed in “Uploads.”
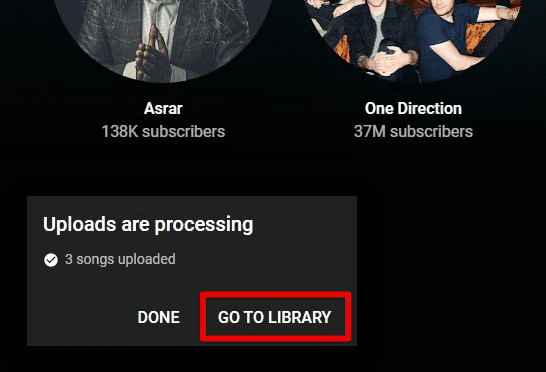
Go to library
Before uploading music files to YouTube Music, make sure that they are converted into one of the supported formats. These include MP3, M4A, FLAC, OGG, and WMA. There is no inherent file conversion, and any other format will have to be converted manually through a third-party application.
YouTube Music allows uploading files by dragging and dropping them into the platform interface. However, that is only best suited if all files are present in a single folder on your computer.
Managing the uploaded music on desktop
Now that you have read about how to upload music to the YouTube Music collection, the following steps involve accessing, viewing, and managing it. All uploads are automatically stored in the default YouTube Music library. You need to filter out library results to display them on the list.
Step 1: Open the preferred internet browser and go to YouTube Music. Log in with your Google account.
Step 2: At the very top, there are five different tabs. Click on “Library” to open your YouTube Music collection.

Library tab
Step 3: On the “Library” page, all content is divided into playlists, albums, songs, artists, and subscriptions. To access the uploaded music files, click on “Songs.”

Songs section
Step 4: In the top left corner, click on the down arrow next to “YouTube Music.” Select “Uploads” from the drop-down menu. All uploaded songs will then be displayed on your screen.
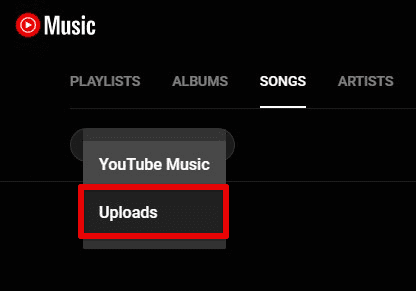
Uploads filter
If you uploaded an entire collection or a playlist, go to “Albums” and repeat this process.
Step 4: Hover your mouse over a particular song. You will see four new options. These include the play button, like, dislike, and three-dot icon. Click on it to open more actions.
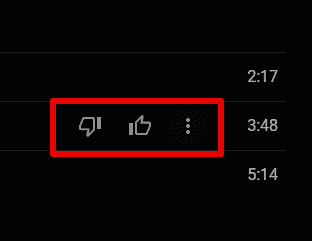
More options
Step 5: You can add that song to a playing queue, add it to a specific playlist, or delete it from YouTube Music uploads.
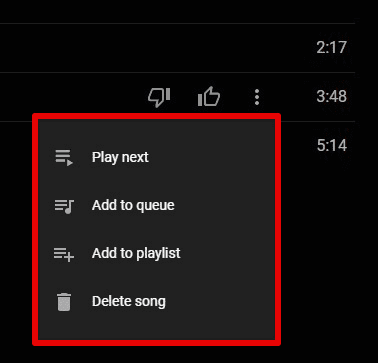
More options menu
Managing the uploaded music on mobile devices
The option to manage the uploaded music on mobile devices is quite similar to those on the desktop. However, the navigation is much smoother. Unlike the differences you usually see, the YouTube Music apps for both Android and iOS are somewhat identical. You will not notice any changes other than the navigation buttons, usually hosted by the operating system. On Android, the app will come preinstalled on your phone, while that will not be the case with iOS.
Step 1: Open the “YouTube Music” application on your mobile device. Log in with a Google account.
Step 2: You will see five different tabs on the first page. Tap on the “Songs” tab to proceed.
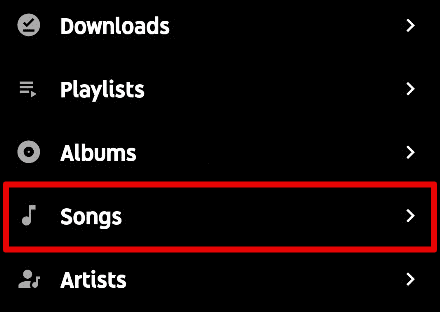
Opening songs tab
Note: If it is your first time using the YouTube Music app, you will be asked to allow YouTube Music to access and play music files from your phone.
Step 3: There are two tabs at the top. Make sure that you are on “Uploads.” It will list down all songs that you uploaded through the desktop.
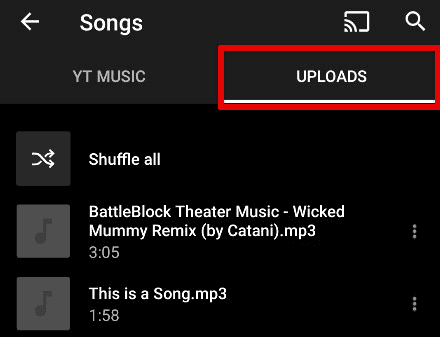
Uploads tab
If you uploaded an entire collection or a playlist, go to “Albums” instead of “Songs” in Step 2.
Step 4: Tap on the three-dot icon in front of a particular song. That will slide up a menu of new options from the bottom. You can add that song to a playing queue, add it to a specific playlist, download it to your mobile, or delete it from YouTube Music uploads.
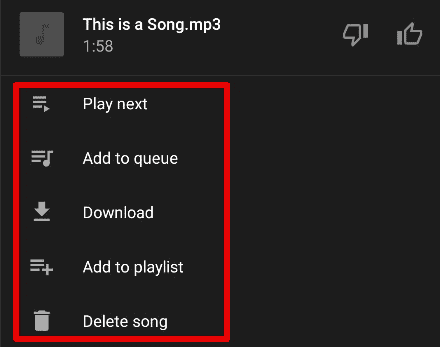
Options panel
Making the most out of YouTube Music playlists
When you go into the YouTube Music Library, the playlist tab is displayed by default. It contains any playlists you might have created on YouTube and YouTube Music. There can be a lot of playlists present on this page. Besides, each one of those may contain hundreds of different music files. Therefore, knowing how to sort these albums can be helpful at times.
Step 1: Open the preferred internet browser and go to YouTube Music. Log in with your Google account.
Step 2: At the very top, there are five different tabs. Click on “Library” to open your YouTube Music collection.

Opening library tab
Step 3: On the “Library” page, all content is divided into playlists, albums, songs, artists, and subscriptions. Make sure that you are on the “Playlists” tab.
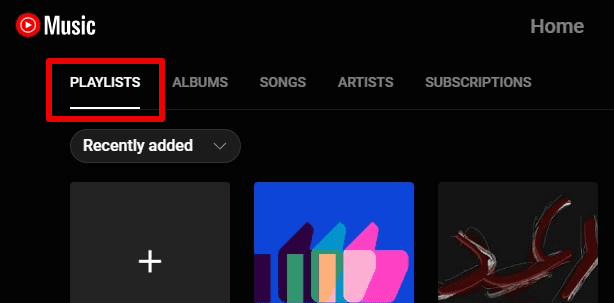
Playlists section
Step 4: In the top left corner, click on the down arrow located right next to “Recently added.” By default, all folders will be present in reverse chronological order. Select “A to Z” or “Z to A” for sorting them alphabetically.
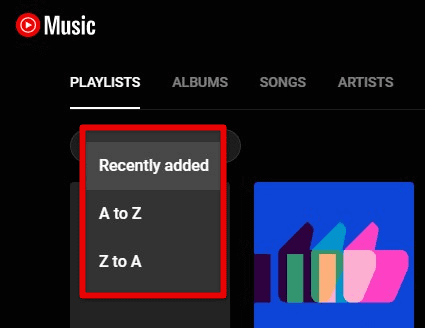
Sorting options
When a specific playlist is opened, YouTube Music shows the total minutes of audio (music) stored. You can click on “Edit playlist” to change the title, description, or privacy. It can be set to public, unlisted, or private. For any playlist created for yourself, keep it private so that no one else can view its contents on YouTube.
The three-dot icon on the playlist page opens a range of other options. You can add the entire playlist to an existing queue or share it with others using a link. Moreover, by starting radio, YouTube Music will automatically push new songs to your line similar to the ones present in your collection.
Conclusion
YouTube Music is nothing short of an extensive media player which lets you listen to your favorite music. Apart from just delivering new and exciting content, it enables users to upload files and songs from their devices. It can even be used to sync the Windows playlist. Once uploaded to YouTube Music, those songs become readily available on all devices sharing that Google account. Are you interested in YouTube TV? Read on how to watch it on your Chromebook.
