Google Play Store is probably one of the most widely used platforms and services on Android devices worldwide. It serves as the primary store, which houses a vast library of Android applications, games, and media content. Some items on Google Play Store are free, while others are paid. Play Store provides several different payment methods for making purchases on the store and doing so from within specific apps.
However, you might see a typical error when making a payment in some cases. That is the “Transaction cannot be completed” error. As the error message itself does not state the underlying cause, there can be several reasons for it. Therefore, you might have to try multiple fixes to eliminate this issue.
“Transaction cannot be completed” error in Google Play
The following article will detail the top 5 fixes for whenever you see the “Transaction cannot be completed” error in your Google Play Store account. The tutorial is shown on an Android smartphone, but the procedure is the same on Chromebooks.
1. Clearing Google Play cache
Sometimes the “Transaction cannot be completed” error arises because of the Google Play Store cache. Cached files for any Android application might contain elements that inhibit it from functioning seamlessly. Like the apps you download from it, Google Play Store is an Android application. Therefore, your mobile stores its cache and data files intermittently.
These files are prone to get corrupt. Thus, it is always recommended to keep clearing them for all applications regularly. Nevertheless, now that you are facing a critical issue, your first step should be to try and remove all such corrupted files from your phone. Clearing the Google Play Store cache is like refreshing the entire store and giving it a new start.
Step 1: Long press the “Google Play Store” application on your mobile device. A menu will pop up right next to the app icon. Tap on “App info.”
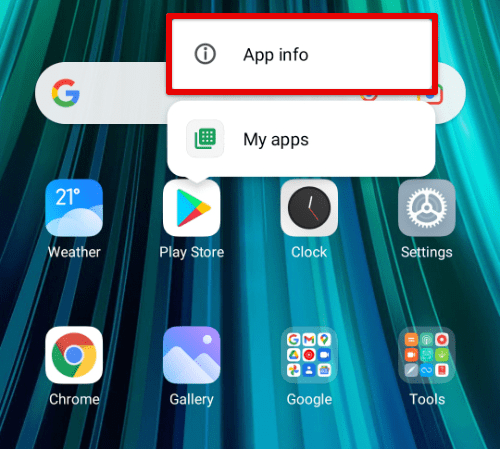
App info
Step 2: On the “App info” page, tap on the “Storage” tab.
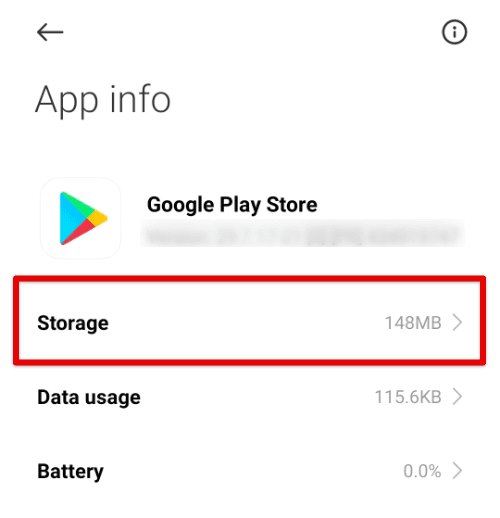
Google Play Store storage
Step 3: The total storage occupied by the Google Play Store is divided into three different sections. These include app size, user data, and cache. Tap on “Clear data” to clear cached files.
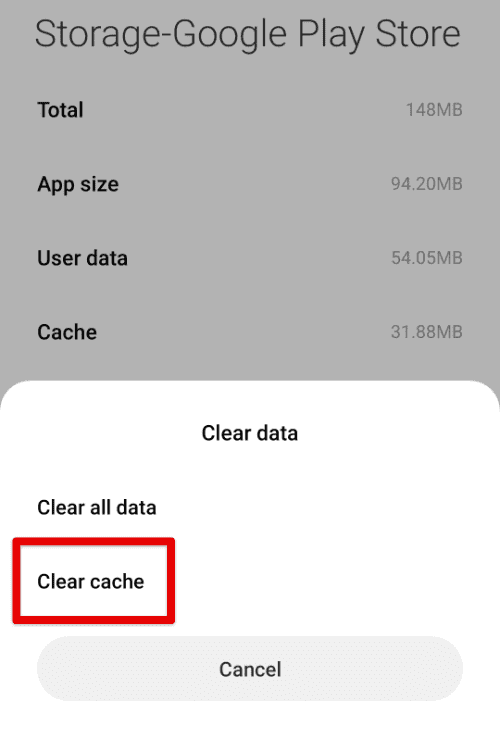
Clearing the Google Play Store cache
Note: The exact method to clear the Play Store cache might vary slightly from one phone to another. However, the general flow of steps will be the same.
Sometimes, the error in question might be caused by the Google Play Services instead. After clearing the Play Store cache, please open it and try making the same transaction again. If you are still facing the issue before, go over to clear cache for Google Play Services. The steps for doing that are precisely similar to those listed above.
2. Deleting the payment method and adding it again
If clearing the cache didn’t do the trick for you, the next option is to try deleting the respective payment method and adding it once again. When adding a new payment method, you can even use a different card or digital wallet to confirm that the problem is not with the funding source. When setting up the payment method for the second time, ensure that all details are filled in correctly. Learn all about how to change Google Play Store country.
Please note that the following method will only work if you have never purchased that payment method before. If it was working fine previously, then most likely, the “Transaction cannot be completed” error has nothing to do with it. Therefore, this fix is recommended when you employ that payment method for the first time.
Step 1: Open the “Google Play Store” application on your mobile device and log in to your account.
Step 2: Tap on your profile picture in the top right corner of the Google Play homepage. It will open a new window with a list of options. Go to “Payments & subscriptions.”
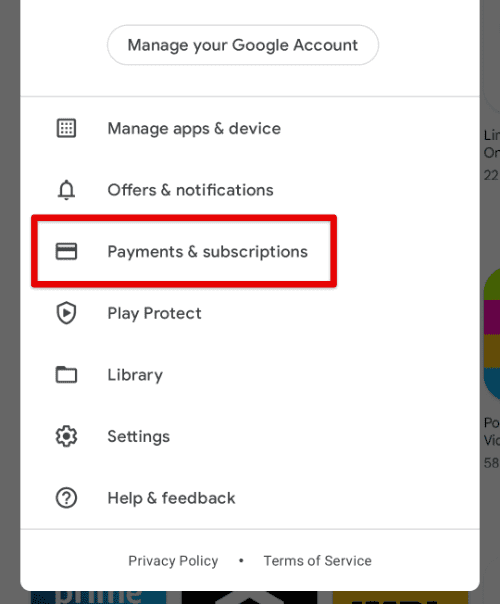
Payments and subscriptions tab
Step 3: You will see four tabs on the “Payments & subscriptions” page. Tap on “Payment methods.”
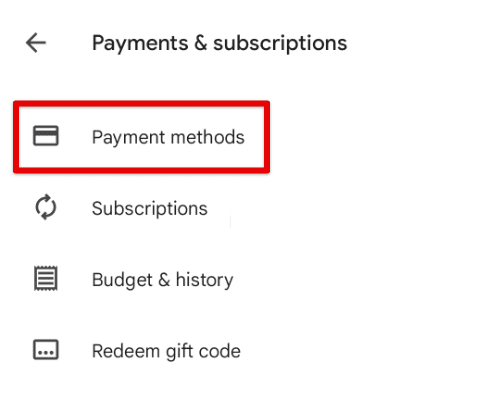
Payment methods tab
Step 4: On the “Payment methods” page, tap on “More payment settings” at the bottom. The “Google Payments Center” will be opened on your default internet browser.
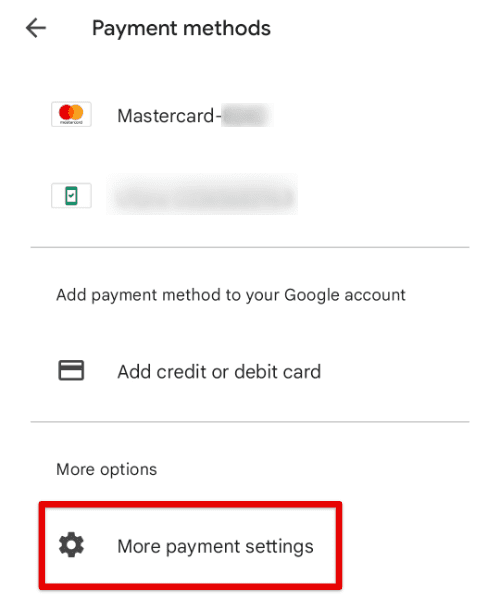
More payment settings
Step 5: Scroll to find the respective method and tap on “Remove.”
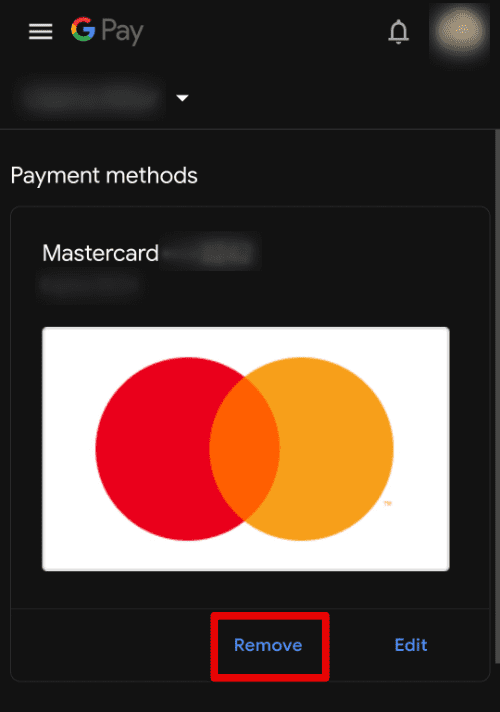
Removing payment method
Step 6: After removing the payment method, go back to the “Payment methods” page in Google Play Store. Tap on your preferred choice from the “Add payment method” section and set it as default.
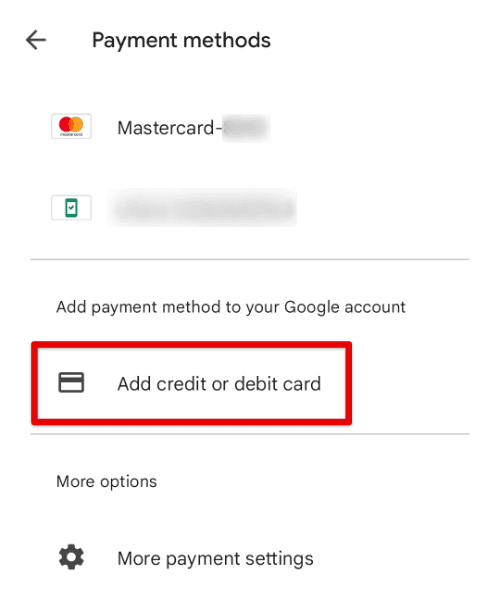
Adding payment method
Note: Relaunch Google Play Store after removing the payment method and adding it again. Doing so will ensure that no cached files are left behind in the process.
3. Logging out of the Google account and signing in again
It is entirely possible that the “Transaction cannot be completed” error might be caused by some issue in your Google account. If that is the case, you will have to log out of that account and sign in again. Every time a user signs in to a Google account on any Android device, the settings are adjusted. That might resolve your issues with any Google service, including the Play Store. Fully discover Google Play Store with our guide for beginners.
Step 1: Go to “Settings” on your phone.
Step 2: Scroll down to find the “Accounts & sync” tab. Tap on it to access all accounts currently signed in from your mobile.
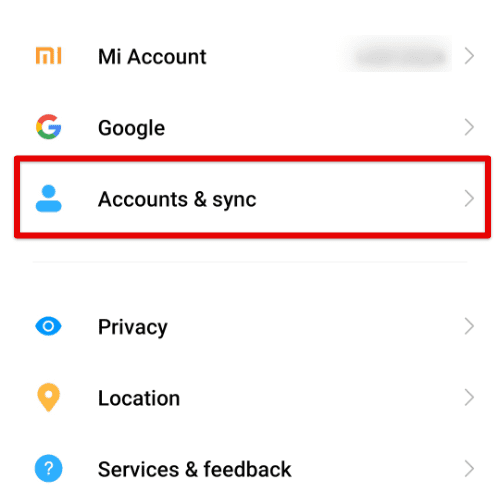
Accounts & sync tab
Step 3: Find “Google” from the list of services.
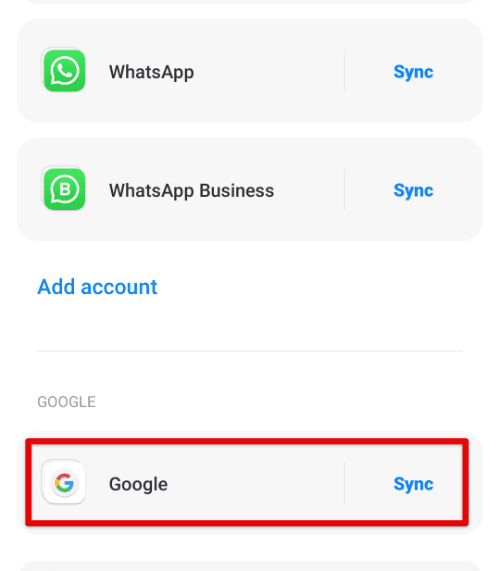
Google tab
Step 4: A new page will open up displaying all Google accounts signed in.
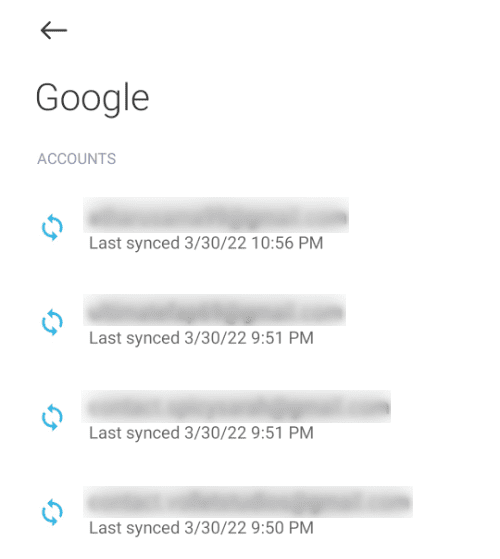
Signed in Google accounts
Step 5: Tap on the account linked with Google Play Store. Go to “More” from the bottom and select “Remove account.”
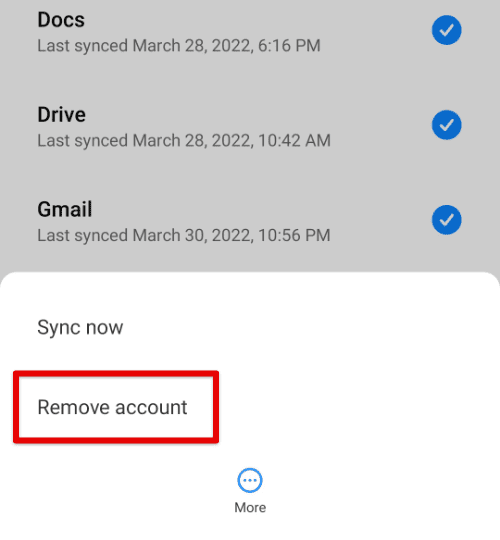
Remove account
Step 6: Go back to the previous page and tap on “Add account” to link the removed Google account.
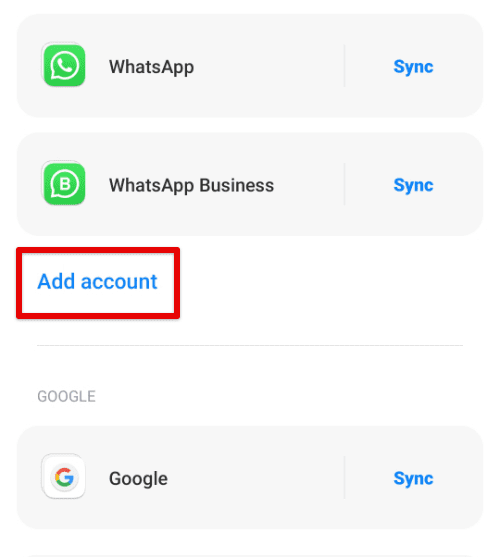
Add account
Once this process has been completed, try making the same transaction on the Play Store one more time. If the issue persists, move on to the following method.
4. Reinstalling the concerned application
Now that you have seen three general fixes let us look at some specific cases. Firstly, we will consider a situation where you are trying to make an in-app purchase. In that scenario, another fix might be to uninstall the application and download it from the Play Store one more time.
Sometimes, apps are corrupted or infected with malware when downloaded. It may lead to you having problems with Google Play Store transactions. Keep in mind that you should still try out the first three methods before moving on to this one. Reinstalling the application becomes even more relevant and appropriate if you only face the “Transaction cannot be completed” error in a particular application.
Note: Reboot your device after uninstalling the app and downloading it again from Google Play Store. Doing so will ensure that no cached files are left behind in the process.
5. Checking Google Play Store balance and other sources
All Google Play Store transactions can be generally divided into two categories. You will either be trying to purchase with an external funding source or purchasing a Play Store balance. It is recommended to check twice if the issue lies with the payment method itself instead of the Play Store.
There can be several different reasons for a payment method not working correctly. You might not have enough balance or credit in your wallet required for making that purchase. Besides, it is also possible that there has been some unrelated restriction placed on the card or wallet. There are a variety of time-based and amount-based limits on most online payment services. Ensure that your payment method currently does not fall into any limitations. To check the Google Play Store balance, you will have to observe the following steps,
Step 1: Open the “Google Play Store” application on your mobile device and log in to your account.
Step 2: Tap on your profile picture in the top right corner of the Google Play homepage. It will open a new window with a list of options. Go to “Payments & subscriptions.”
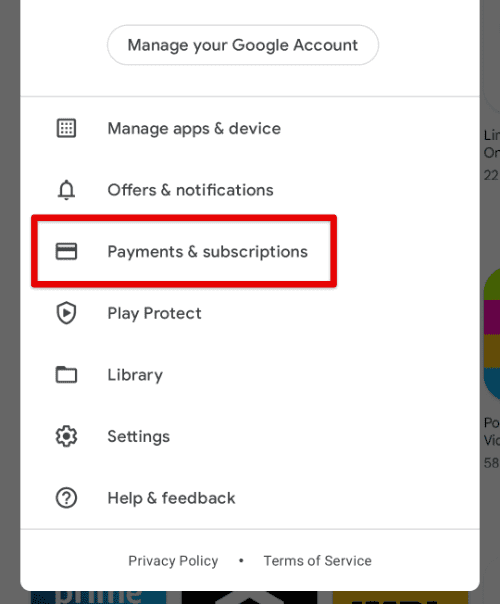
Payments and subscriptions option
Step 3: You will see four tabs on the “Payments & subscriptions” page. Tap on “Payment methods.”
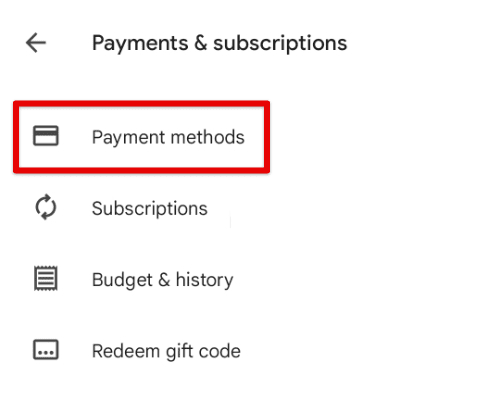
Opening payment methods
The “Payment methods” page displays the Google Play Store balance at the very top. Certify that the current balance is more than what is required for the transaction.
Moreover, before making any transaction through Google Play Store, verify that the payment method is acceptable to Google. There is a list of payment methods not recognized on the Google Play Store. These include virtual credit cards, escrow payments, Western Union, and transit cards.
Conclusion
Transactions for paid items on Google Play Store are pretty straightforward. Still, there have been numerous reports of users facing abrupt errors such as “Transaction cannot be completed.” Unable to pinpoint the cause, you will have to try out various fixes. Start from clearing cached files and then keep moving on to the following methods until the issue is resolved. If you experience many Play Store issues on Chromebook, here is a detailed guide on fixing the most common ones.

1 comment
Nope. It doesn’t work. The same issue arises even after the factory reset.