Chromebooks are Google’s modern-day solution for stable and secure networking at unrivaled speeds. Chrome OS, which is the software that these sleek devices run, has never been hit with ransomware and is slowly starting to dominate the education space with its tip-top reliability. However, like all other laptops, Chromebooks, too, can run into a certain set of issues that would otherwise go on to disrupt their whole working mechanism.
This is where a Google-developed tool comes in, called Chromebook Recovery Utility. This program makes it possible to troubleshoot Chrome OS by reverting it to its working state. This thorough guide will use Chromebook Recovery Utility and get to grips with it effortlessly.
- Recommended from Chrome Ready: How to flash ISO image using balenaEtcher on Chromebook.
What is Chromebook Recovery Utility?
At its very core, the Chromebook Recovery Utility is a Chrome extension that can be downloaded from the Chrome Web Store. However, like most Google Chrome extensions, it doesn’t function within the browser and has no prominent link. Instead, as soon as you launch Chromebook Recovery Utility, it surfaces on your desktop with a window of its own. Coming to its basic functionality now, this tool serves the purpose of creating recovery media for Chromebooks.
Suppose you want to reinstall Chrome OS because your device isn’t working correctly anymore, and no troubleshooting measure has worked. In that case, the Chromebook Recovery Utility software can do the trick for you. It has a fairly easy-to-use interface that gives you step-by-step instructions on using it.
Moreover, you can also use this utility to create recovery media for Chrome OS on not just Chromebooks but Windows PCs and Macs, although the end goal is to fix a Chromebook. Again, therefore, the widespread availability aspect of the tool bears acknowledging.
A faulty update, malware, and other reasons can stop Chrome OS from functioning normally. In cases like these, your best bet is to recover the operating system from top to bottom with the help of none other than Chromebook Recovery Utility.
However, there is one more advanced functionality to this tool’s name than what meets the eye. We’ll be going over that in the following section, so keep reading for more information.
Using Chromebook Recovery Utility
Chrome OS recovery is simpler than you think, and the Chromebook Recovery Utility tool is out here, proving just that. As we have stressed multiple times in this guide already, the software at hand is used to create Chrome OS recovery media, but recent developments have uplifted the functions of this tool even more.
The next entry in this operating system’s ecosystem belongs to Chrome OS Flex—a high-end panacea for worn-out devices that breathes new life and reinvigorates their functionality. Find out all you need to know about it here if this is something that would interest you.
Chromebook Recovery Utility can install Chrome OS Flex on Windows PCs and macOS devices using its simple-to-operate user interface. But, first, it’s time to go over the two-fold features of the tool at hand with detailed instructions below.
Option #1. Using Chromebook Recovery Utility to create Chrome OS recovery media
The primary purpose of Chromebook Recovery Utility is to create a recovery image for Chrome OS so that the operating system can be reinstalled right from the get-go.
This makes Chromebooks work like new again, similar to how they were shipped when you first bought them, minus the possible hardware issues.
Now, using this tool is simple and easy. You will need a working USB drive with 8 GB of minimum space to use Chromebook Recovery Utility, though, so make sure you have that.
- Please note that the flash drive you’ll use with Chromebook Recovery Utility will be wiped from its data, so do back up anything important beforehand.
With that said, the following steps will take it from here.
1. To use the Chromebook Recovery Utility, we need to get it on our preferred device first. This can be quickly dealt with by heading over to the app’s official page on the Chrome Web Store. When you’re there, click on the “Add to Chrome” button to proceed. Again, creating the Chrome OS recovery image can be done on Windows and Macs, not just Chromebooks.

Installing the Chromebook Recovery Utility extension
2. After clicking on “Add to Chrome,” a prompt will appear from the top of the screen, asking you to confirm the installation. Click on “Add app” to get to the next step.

Confirming the installation
3. Successfully installing Chromebook Recovery Utility means that you can launch the software directly from your extensions bar. Do that using the dedicated “Extensions” button in the top-right corner of the Chrome browser’s interface to continue.
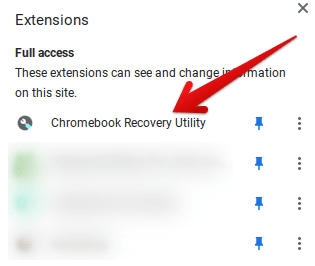
Chromebook Recovery Utility added to Chrome OS
4. The rest of the process will occur within the Recovery Utility tool. As soon as you fire it up and the GUI of the software tells you to “Create a recovery media for your Chromebook,” click on “Get started.”
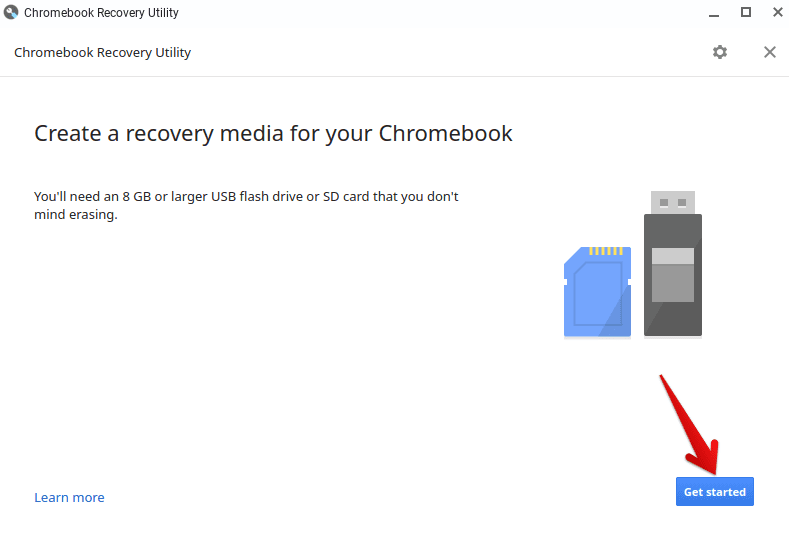
Getting started with Chromebook Recovery Utility
5. The next step is to enter the model number of your Chromebook into the Recovery Utility tool. If using a Chromebook, click on the provided model number below. The software can automatically recognize the Chromebook’s model. Still, if you’re using a Windows laptop or a Macbook, you will have to look for your Chromebook’s model number yourself and manually enter it into Chromebook Recovery Utility. Once done, click on “Continue” to get to the next step.
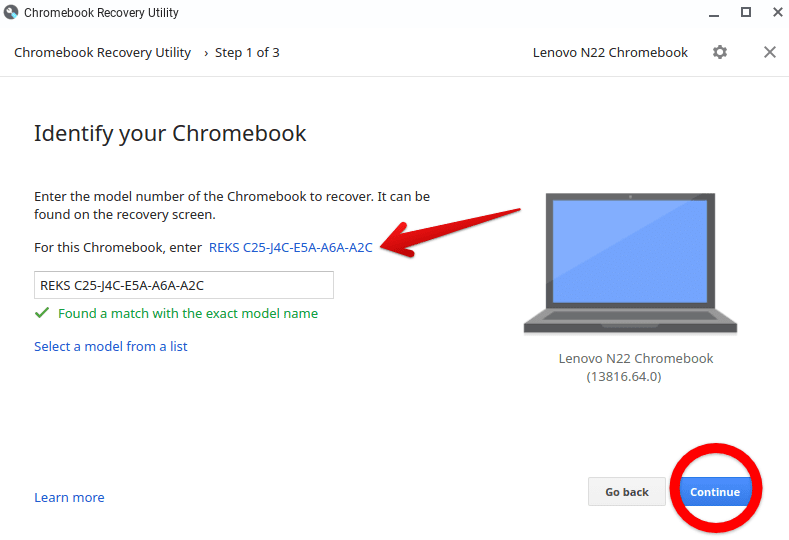
Entering the model number of Chromebook
6. In the sixth step, you now have to insert a USB drive into your device so that the Recovery Utility tool can detect and use it from here on out. Click on “Continue” when you’re done with this step.
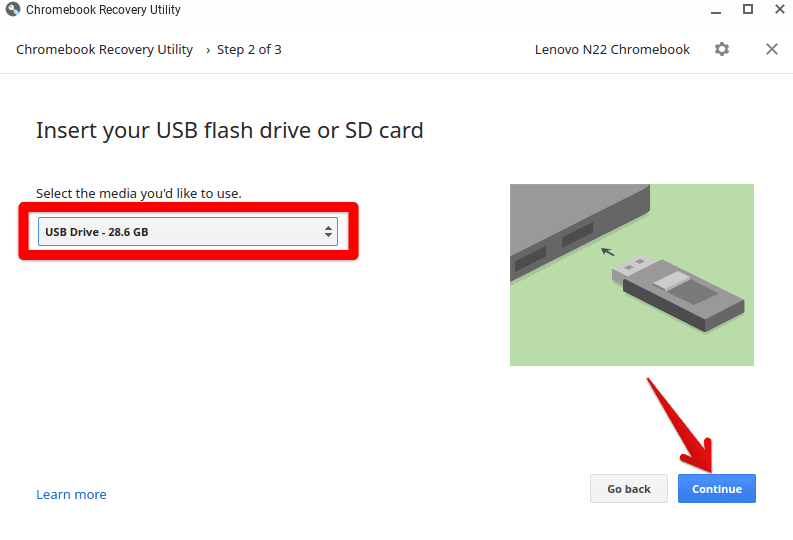
Inserting the USB drive
7. You’ve now arrived at the second last step of this process. Click on “Create now,” as the tool warns you about deleting the contents of your USB drive. This will prompt Chromebook Recovery Utility to begin the process.
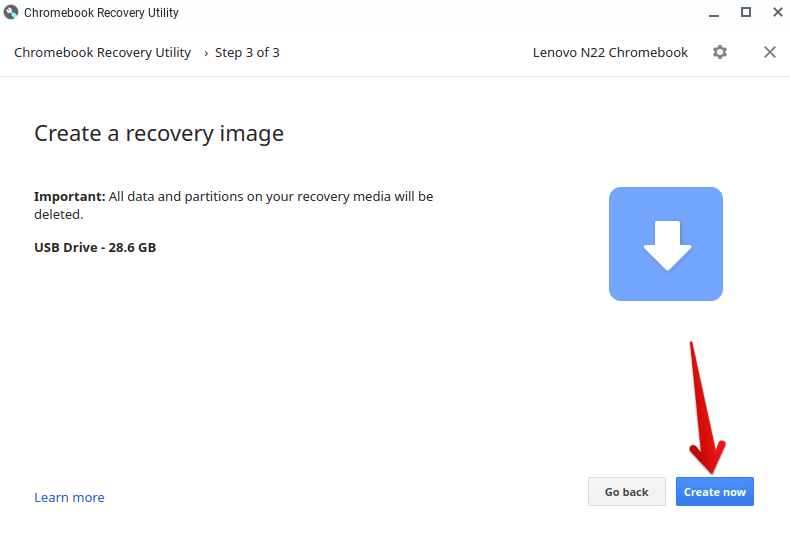
Creating the recovery image
8. You now have to wait out the process until it concludes. When prompted that your recovery media is ready, click on “Done” to finalize and safely take out the USB drive.
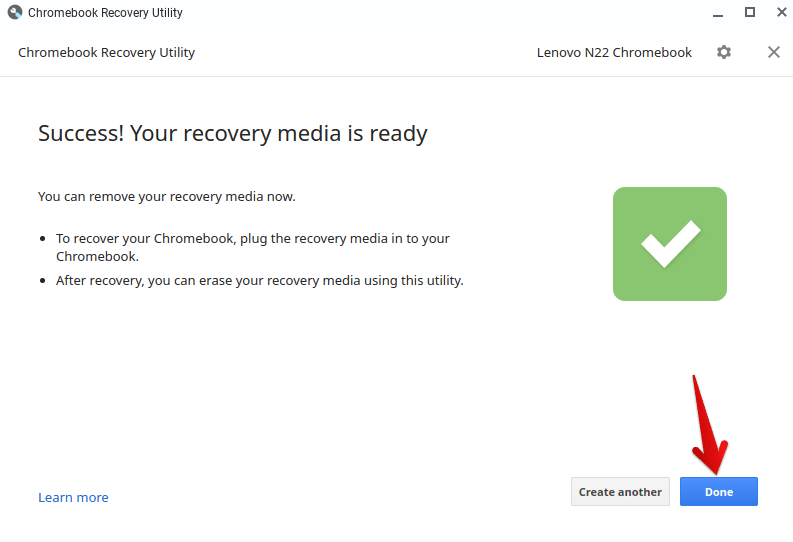
Recovery Media creation complete
That’s about it for the central working mechanism of Chromebook Recovery Media. You should now be fully aware of how this tool is operated on modern-day devices, including Chromebooks. Let us talk about the second role that this practical tool plays for users and experts alike.
Option #2. Using Chromebook Recovery Utility to install Chrome OS Flex on a PC or Mac
Chromebook Recovery Utility is straightforward for installing Chrome OS Flex on a PC or Mac. Google has claimed that using this software is the most legitimate way of trying out the new operating system on your once-glorious devices. Chrome OS Flex is an upgraded iteration of CloudReady.
The company that created CloudReady was bought by Google back in 2020. Since then, work had started to impart the latter’s features and invest them into a more innovative approach toward powering up laptops and PCs. We see a logical idea in Chrome OS Flex as it caters to done and dusted machines and allows users to renew them again.
Now, using Chromebook Recovery Utility to install Chrome OS Flex on a PC or Mac is too long to add here, so we’ll have to refer you to our exclusively allocated write-up that discusses the topic in-depth.
Conclusion
Despite boasting industry-grade security and extra layers of protection that enwreathe this slick operating system, Chrome OS isn’t 100% immune to software issues and other pertinent causes of a total system failure. You’re most likely to run your devices like a dream for the most part, but if any persistent anomaly surfaces and you’re unable to make it go away, let the Chromebook Recovery Utility tool shine in the spotlight.
This hefty software’s job is to create a recovery image for Chrome OS and set it up for a fresh reinstall. Doing so resets the operating system, essentially Powerwashing it, making it work like new again. Of course, if your device suffers from a hardware issue, there’s not much that the Recovery Utility tool will do in that regard. Other than that, however, you’re looking at a genuinely convenient software program from the perspective of a Chromebook owner.
Do let us know down in the comments section if you found this guide helpful. Chrome Ready wishes you good luck!
- Before you go, though, find out how the Chromebook Recovery Utility tool can be utilized to create a Ubuntu live USB drive.
