Chrome OS Flex has just launched in its early access state and is measuring up to be quite the game-changer. It’s essentially CloudReady 2.0, where the developers have somehow managed to blend in the functionality of two great operating systems—Chrome OS and CloudReady—and merged them into one brilliant formula for Microsoft Windows laptops and Macbooks.
As a result, we have software that can power up your long-forgotten devices and breathe life into them again afresh. Don’t know how to get started, however? Don’t fret just yet. In this guide, we’ll be talking about how to install Chrome OS Flex on your PC, Mac, or Linux device using step-by-step instructions.
- If you’re still unaware of Chrome OS Flex and how it differs from the original Chrome OS, check out this in-depth introductory article.
Installing Chrome OS Flex
Some important information before getting started
There are a couple of things to acknowledge regarding installing Chrome OS Flex before you dive right in. First off, it’s worth noting that the operating system is still in its “early access” phase technically. This means that while the experience will come pretty close to the standard Chrome OS operation, some hiccups here and there should be expected. In addition, Google has created a list of certified models that states the working status of different devices for Chrome OS Flex.
For instance, only the Apple Macbook Pro 9.2 out of all the other Macbooks sports the “Verified to work” status. This is slightly different from the Microsoft Surface Laptop SE, which is deemed “Minor issues expected.” Lastly, the final status type that we have for Chrome OS Flex-ready models is “Major issues expected.” Devices like the HP ProBook 640 G1 and the Dell Inspiron N5010 fall in this category.
You can also install Chrome OS Flex on devices, not on the list of Google’s certified devices. With that said, we cannot say for sure whether the operating system will properly work on these unsupported models or not. Google has stated that no guarantee will come for such devices as they’re not tested for stability or performance at all. However, given the build of Chrome OS Flex and how well it can handle low-end PCs, you might as well give it a shot nonetheless.
Consolidating this scenario is that unsupported models will also get updates from Google. In the long run, this will play out similar to Chrome OS in the sense that Chrome OS Flex-installed devices are going to have an end-of-life date. Google has stated that there is a possibility of models receiving updates even after they’ve reached their end period, but you shouldn’t get your hopes up for this. The whole point of Chrome OS Flex is to squeeze out every drop of functionality from old PCs.
In addition, you need to understand that while Chrome OS Flex is a potential life-saver for most devices, it cannot run on models with inferior hardware. Google has come out with a list of minimum requirements for your PC for Chrome OS Flex to be correctly installed. Catch a glance at these below.
- Architecture: Intel or AMD x86-64-bit compatible device
- RAM: 4 GB
- Storage: 16 GB
- Able to live boot from a USB
- CPU and GPU: Any processor manufactured before 2010 is not recommended
One final point worth noting is that all of the devices present on Google’s list of certified Macbooks and PCs will become readily usable once Chrome OS Flex rolls out of its early access phase. Furthermore, more details are to be expected concerning how these devices would function from there on out and whether they comprise any extra steps for installing Chrome OS Flex.
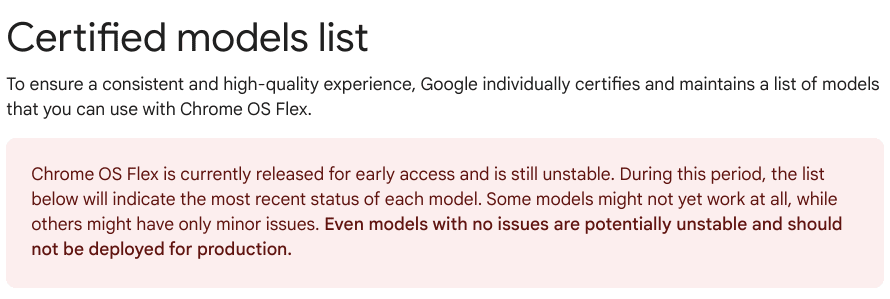
Google’s fair warning to users
How to install Chrome OS Flex on your PC or Mac
To install Chrome OS Flex on your PC or Mac that you no longer use on a consistent level, you will need two essential things to be readily available at your disposal:
- A USB drive with at least 8 GB capacity. The device will be formatted during the process!
- Any device, such as a desktop PC, Chromebook, or Macbook that can flash the USB drive with Chrome OS Flex
- A recent version of Google Chrome that can run without issues, preferably the latest
We will be breaking the process down into multiple sections, so you’ll find them easier to follow and understand.
Step 1. Install the Chromebook Recovery Utility extension
The first step is to download a specific program that will help us get the Chrome OS Flex operating system on the device of our choice. If it were any other software here, we’d have to get a little more involved. Since it’s Google’s very own front-running product, we have the ease and convenience of the Chromebook Recovery Utility at our disposal.
This Chrome Web Store extension makes Chrome OS recovery an effortless possibility and now enables users to install Chrome OS Flex on other devices.
1. Get started by using this direct link and getting straight to the official app page of Chromebook Recovery Utility. Once you’re there, click on the “Add to Chrome” button.

Installing the Chromebook Recovery Utility extension
2. You’ll be notified with a prompt from the top of the screen, asking you to confirm the installation of Chromebook Recovery Utility. Click on “Add app” to begin the download.

Adding the Chromebook Recovery Utility
3. When done, check out the extension toolbar for the Chromebook Recovery Utility app. You will be able to launch the tool from there.
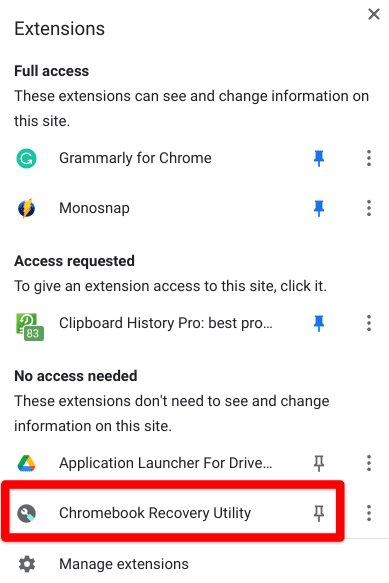
Chromebook Recovery Utility installed
Now that you have the Chromebook Recovery Utility installed, we can run and use it to flash our USB drive.
Step 2. Ready your external USB drive
1. Plug in the USB flash drive.
2. Launch the Chromebook Recovery Utility extension with the help of the extensions toolbar within the Google Chrome browser. Click on “Get started” to continue to the next step.
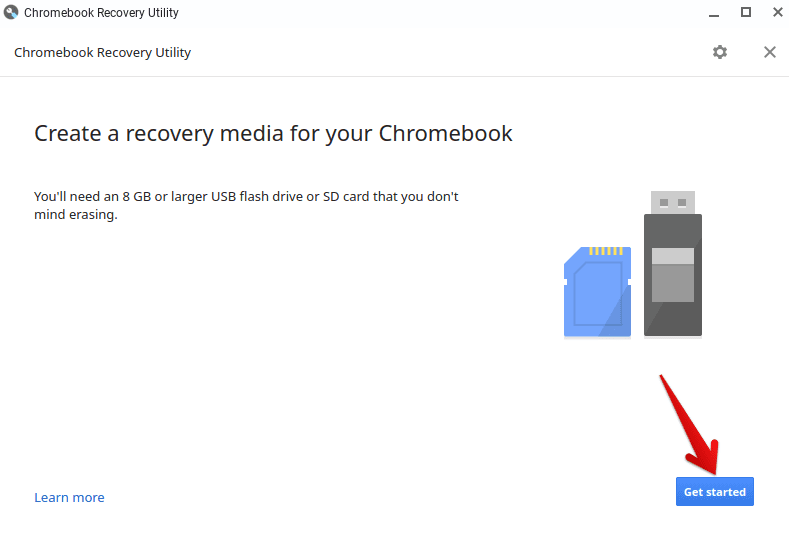
Getting started with Chromebook Recovery Utility
3. Since we’re not going for Chrome OS recovery here, we will need to click on “Select a model from a list” to opt for the installation of Chrome OS Flex and that for a different kind of device.
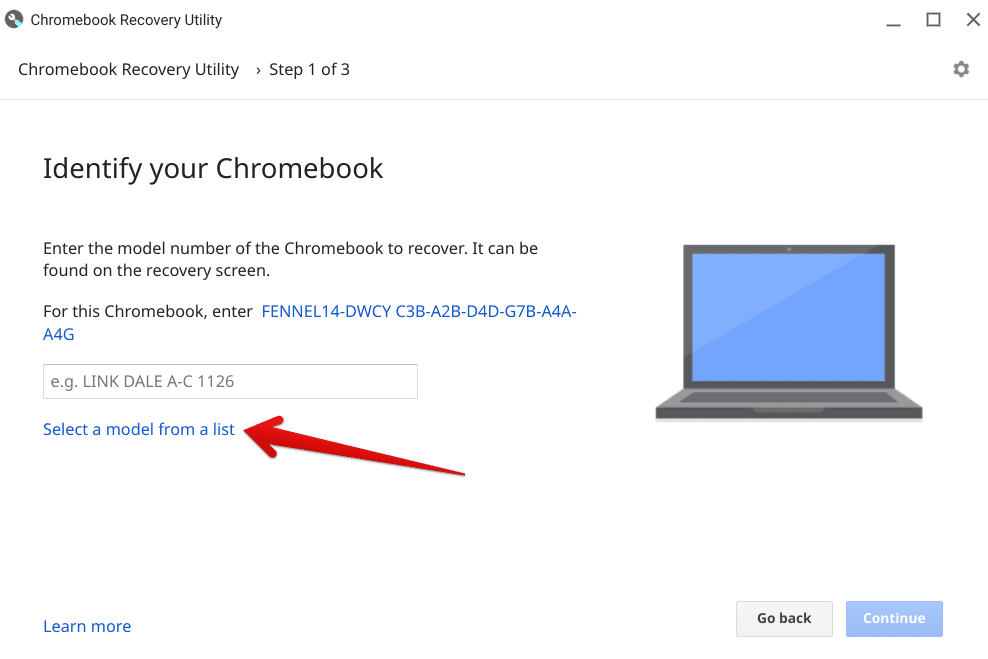
Clicking on “Select a model from the list”
4. Next, set the manufacturer as “Chrome OS Flex” and the product as “Chrome OS Flex (Developer-Unstable).” Click on “Continue.”
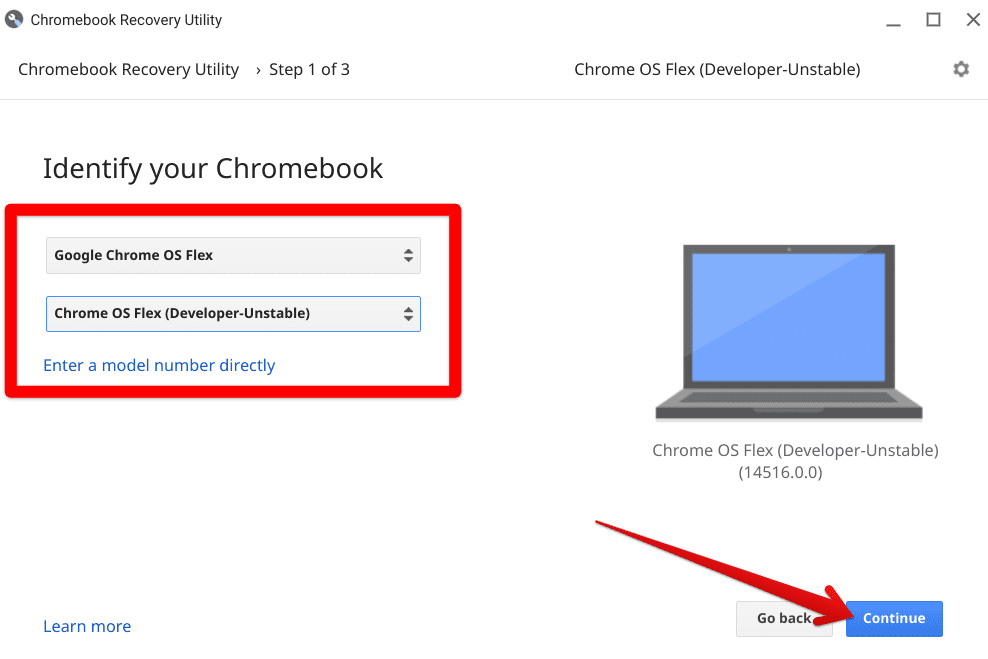
Selecting the manufacturer and product
5. In the next step, choose the USB drive you inserted in step 1 of this section. When done, click on “Continue.”
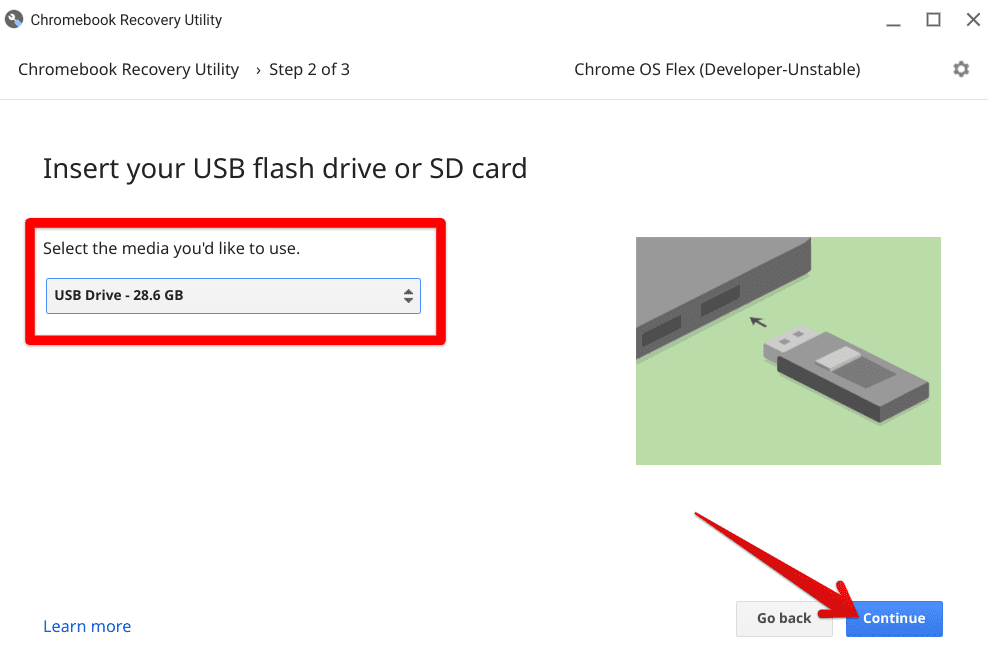
Selecting the USB drive
6. This is the last step to take care of before you can finally start flashing your USB drive with Chrome OS Flex. To continue, click on “Create now,” as shown in the screenshot below.
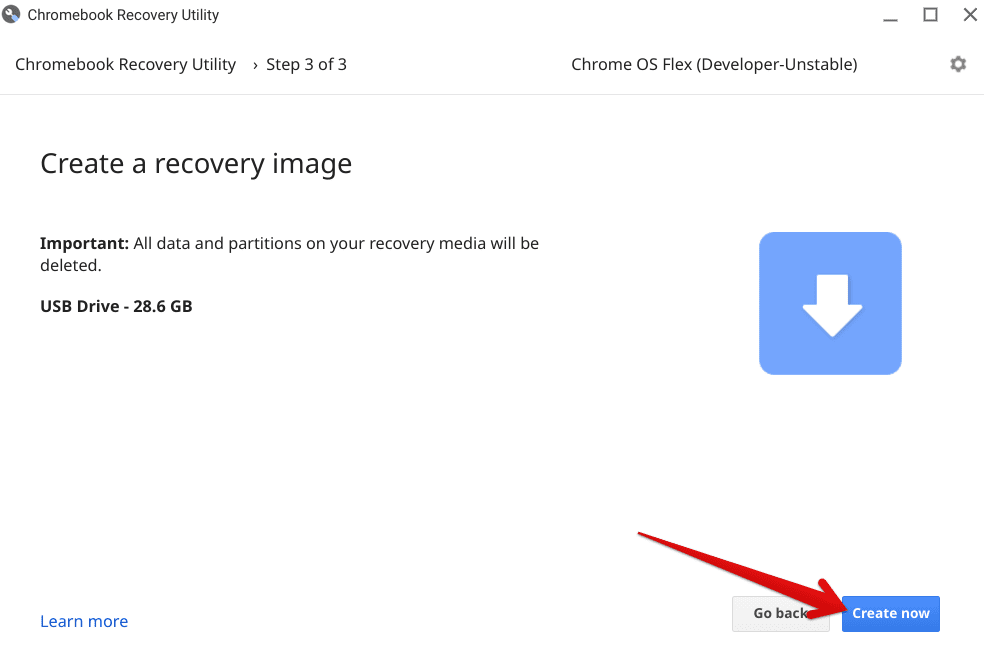
Clicking on “Create now”
7. The process now will probably take a while, considering that you’re downloading a full-fledged operating system. Once you’ve been notified that the procedure has been completed, click on “Done,” as you can see in the screenshot below, and take out your external drive from the device.
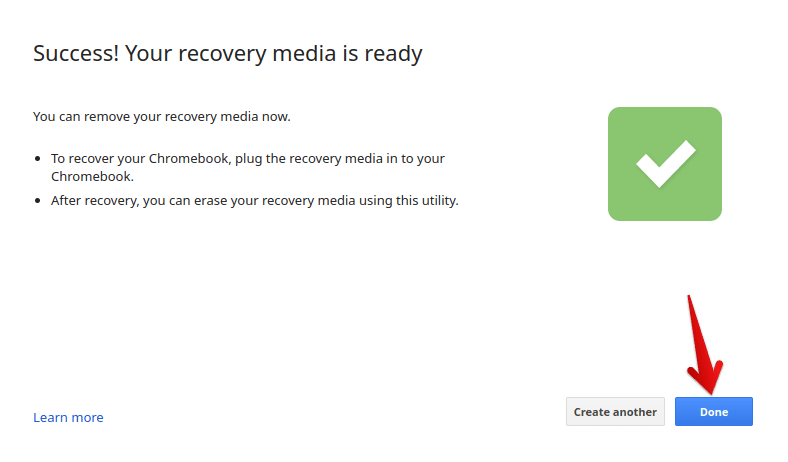
Clicking on “Done”
You have now reached the end of the second step. Safely eject the USB flash drive. Time to get into the last portion of installing Chrome OS Flex on your PC or Mac and further this guide toward the end.
Step 3. Live boot the device with the prepared USB drive
You don’t have a lot left to go now. In the third and final step, we will be live booting the device that you want to install Chrome OS Flex on with the help of the prepared USB drive. After performing a successful live boot, you will be met with an option to completely install Chrome OS Flex on your device or only use it from the flashed USB drive without affecting your computer’s OS. The choice is yours.
To get started, please make sure that the device that needs to be reinvigorated with Chrome OS Flex is entirely shut down. That means no sleep, hibernate, or rest mode at all. Double-check that the device is off before continuing. Once done, insert the USB drive while the device is off and then press the power key to switch it on. Now, you have to have a keen eye out here and look for any subsequently appearing boot options on the screen for you.
- We also recommend connecting the device to a legitimate power source, so its battery doesn’t give in halfway through the process.
You have to select the Chrome OS Flex-containing USB device as the main boot device. Depending on the make and model of the PC you’re using, there will be different ways of doing this. On some devices, a proper boot menu appears that you can navigate with the help of your keyboard’s arrow keys and select the boot device yourself.
On other PCs, you have to find your way around a BIOS menu, unearth startup or boot-related options, and select your boot device successfully for a working live boot function. If neither of these two options is making sense to your device and something else appears, choose whatever sounds the closest to the instructions provided above. There are certain BIOS settings that you can tweak to change your device’s boot order.
Therefore, the laptop will boot into your preferred operating system whenever it’s turned on. Somewhere along these lines, you also need to be aware of the relevant boot keys you might be needing to make the boot menu appear on the device’s start-up screen. It’s worth taking the time out and looking for your manufacturer’s specific boot key implemented for the model, but here are some common ones just in case.
- Acer: F2
- Lenovo: F12
- Apple: Hold key
- HP: F9
- Asus: Del
Step 4. Install Chrome OS Flex
All right, so as soon as you boot the device using the Chrome OS Flex USB installer, you’ll see the familiar Chrome OS screen that’ll soon transition into “Welcome to CloudReady 2.0,” which is basically what they’re calling Flex at the moment before the stable release. Click on “Get started,” as shown in the screenshot below, to continue.
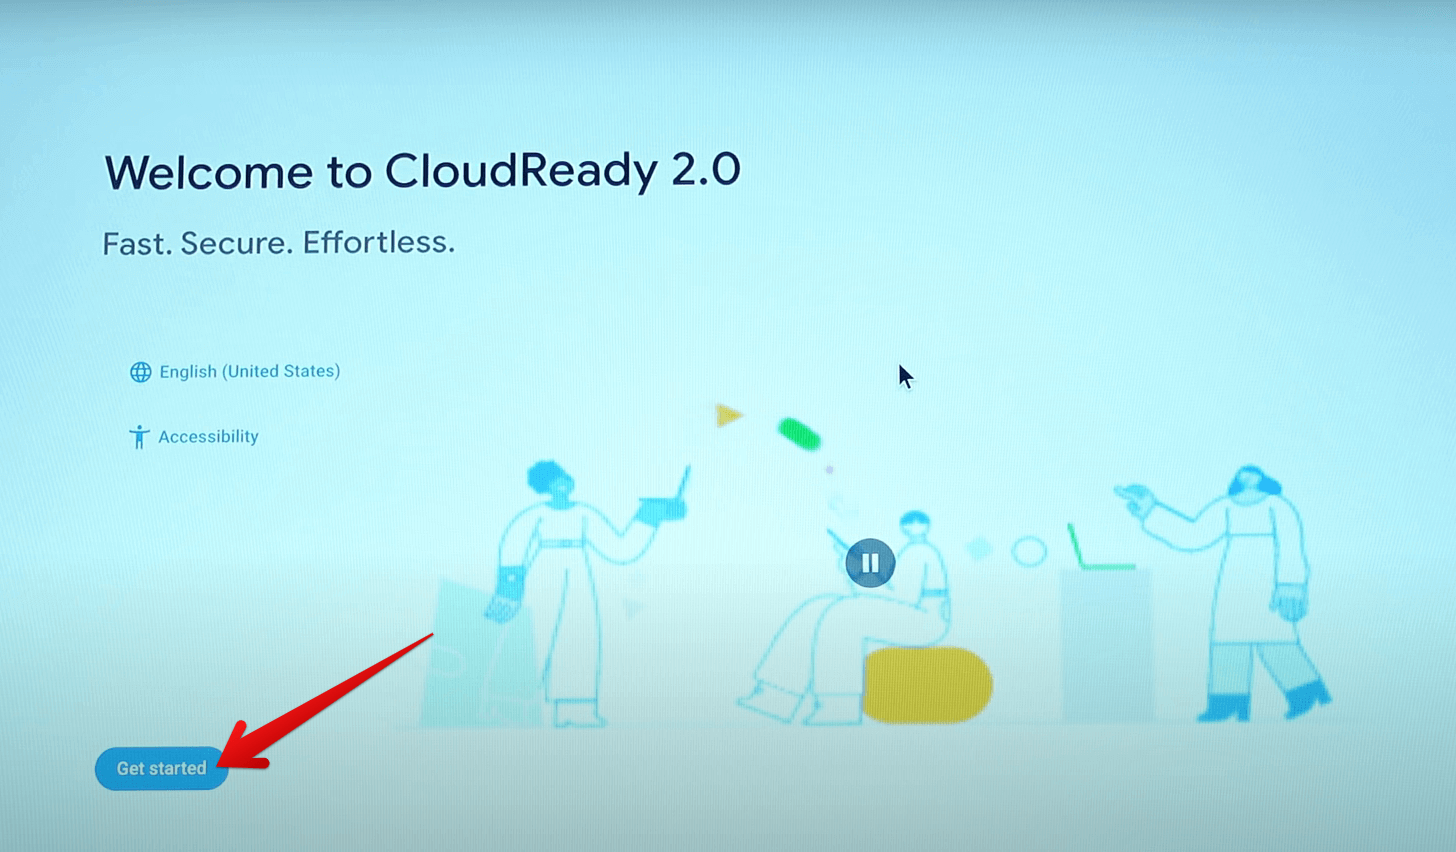
Welcome screen of Chrome OS Flex
It’s going to be a piece of cake from here on out. Clicking on “Get started” will take you to the following page. This is where you’re met with an interesting choice. You can either try Chrome OS Flex on your Windows laptop or Macbook right now without opting for a complete install. Or you can erase all existing content on your device’s hard drive and shoot for a full Chrome OS Flex installation. It’s solely your call here.
We recommend going for a complete install simply because of its advantageous factors. Otherwise, you will be limited to a certain extent by selecting “Try it first.” However, the latter isn’t a bad idea if you’re only looking to explore Chrome OS Flex before diving in completely. However, if you’re after a thorough installation, click on “Install CloudReady 2.0” and follow it up by selecting “Next.”
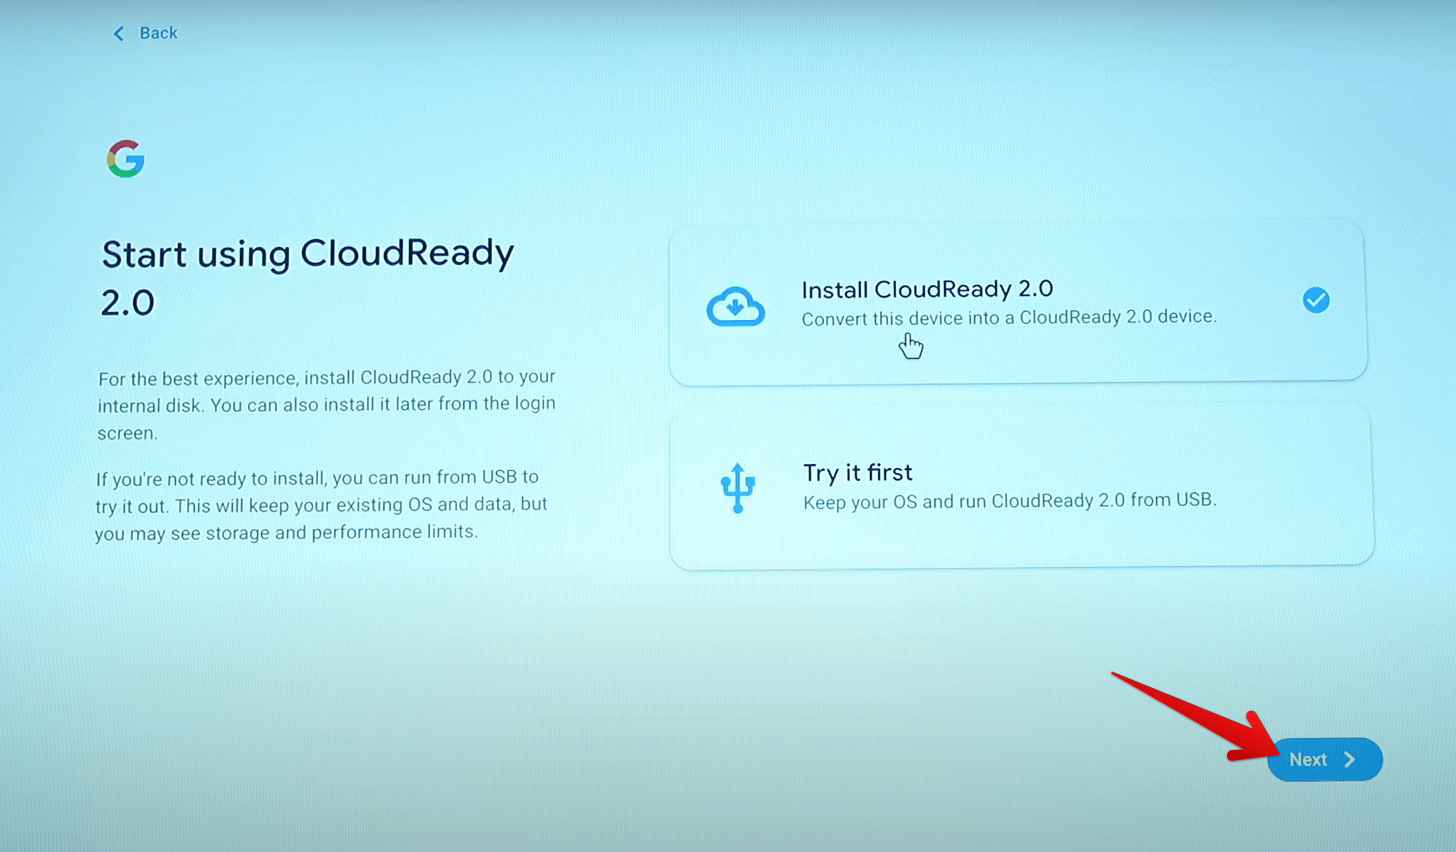
Installing Chrome OS Flex
After clicking on “Install CloudReady 2.0,” you will be shown a screen that will comprise important information. Give it a thorough read and understand the changes that will be made. First off, the current operating system of your laptop will be removed, no matter if it was Microsoft Windows, macOS, or any other distro of Linux. Then, proceed by clicking on “Install CloudReady 2.0.” A prompt will appear subsequently. Confirm your selection there and get to the next step.
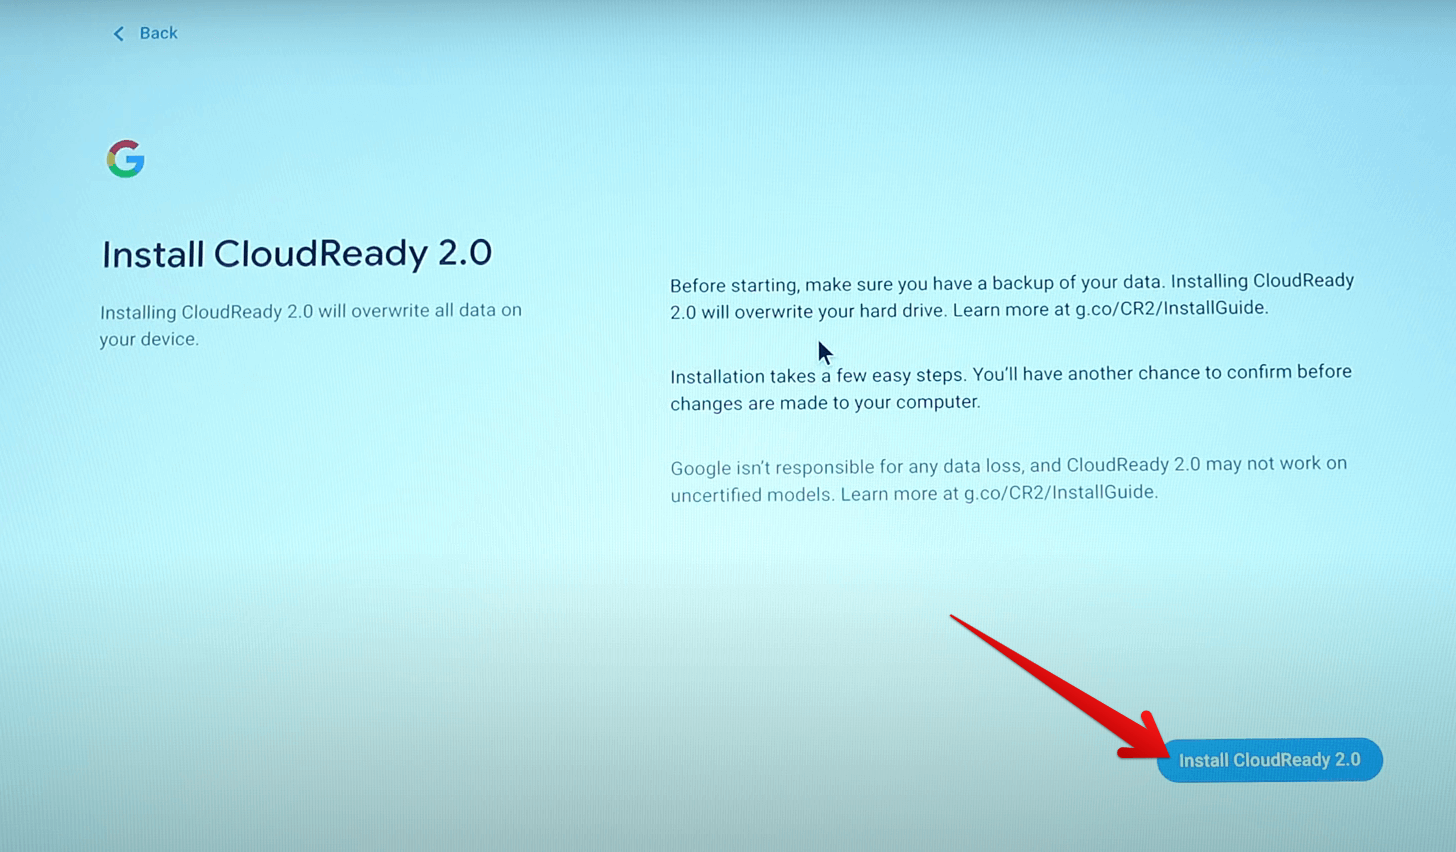
Confirming the installation
The process of installation will now begin in this step. Depending on the device you’re installing Chrome OS Flex on, you might have to wait somewhere around 20 minutes. The following is what you will be seeing on your screen during the procedure.
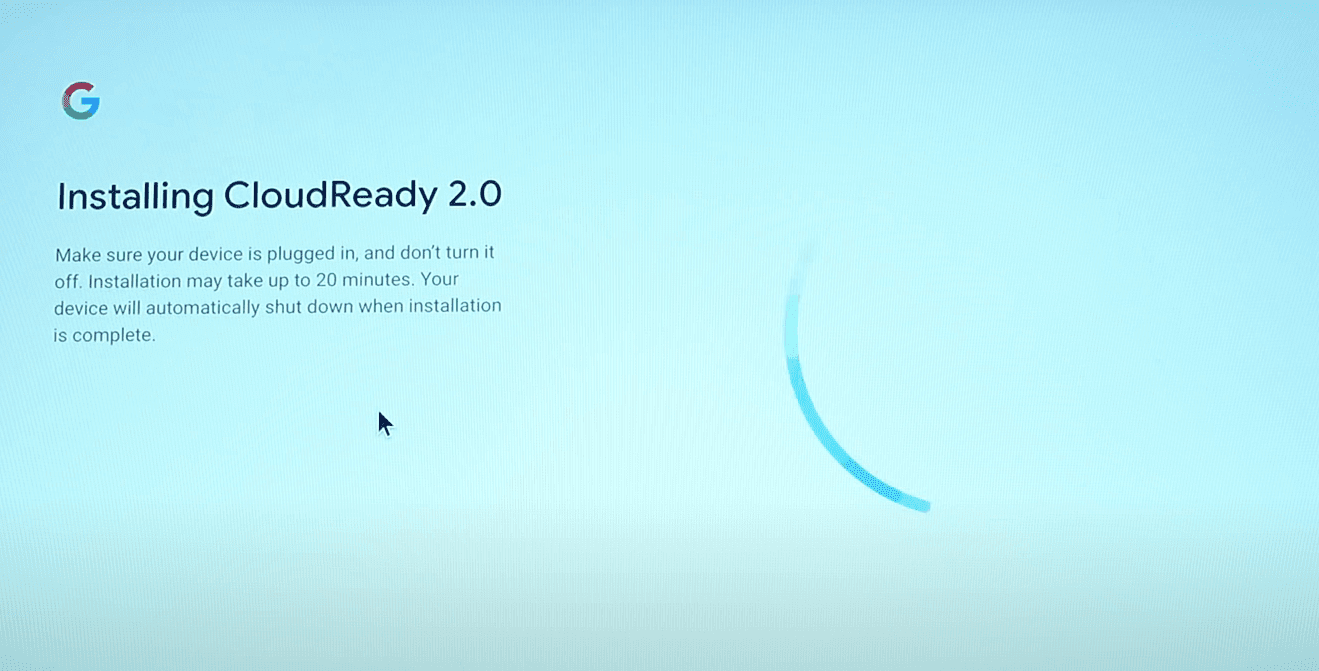
Chrome OS Flex under installation
After the USB installer has finally installed Chrome OS Flex on your device, you’re going to be notified accordingly. The screen will now change and say, “Installation complete.” After one minute, the device will shut down. This is so you can remove the USB installer device and turn on the laptop without it since Chrome OS Flex has been properly installed.
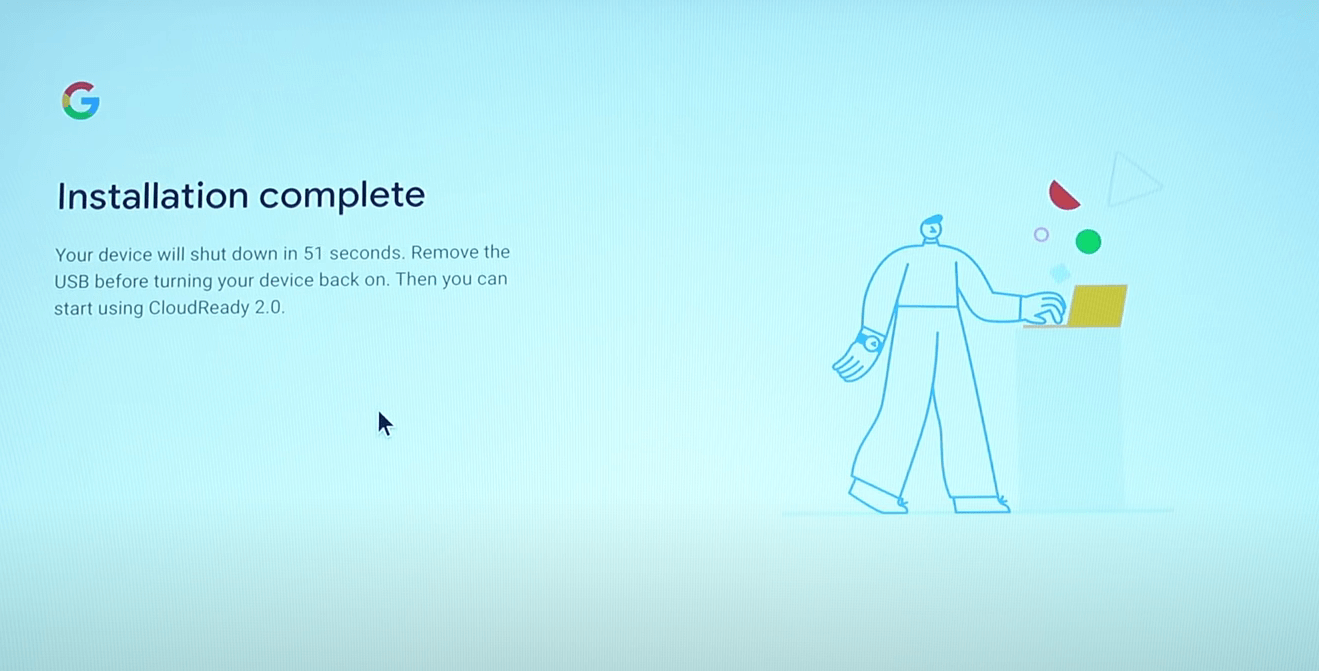
Chrome OS Flex installed
Once your PC boots back on, you’ll be greeted with the welcome screen of this tip-top operating system. It’ll be identical to the one shown above stating “Welcome to CloudReady 2.0,” but this time, upon clicking on “Get started,” you will be able to go through the normal setup of Chrome OS Flex. We will leave that up to you since the procedure entailed from there on out is nothing but effortless.
You’ll have to set up your Wi-Fi, sign in with your Gmail address, sync your account, and cover a couple of extra steps. Congratulations on making it this far! You’ve successfully learned how to install Chrome OS Flex on your PC or Mac. The following is the main user interface of Chrome OS Flex that you’ll see as soon as you complete the initial setup. Note how it strikes such a close resemblance with the original Chrome OS.
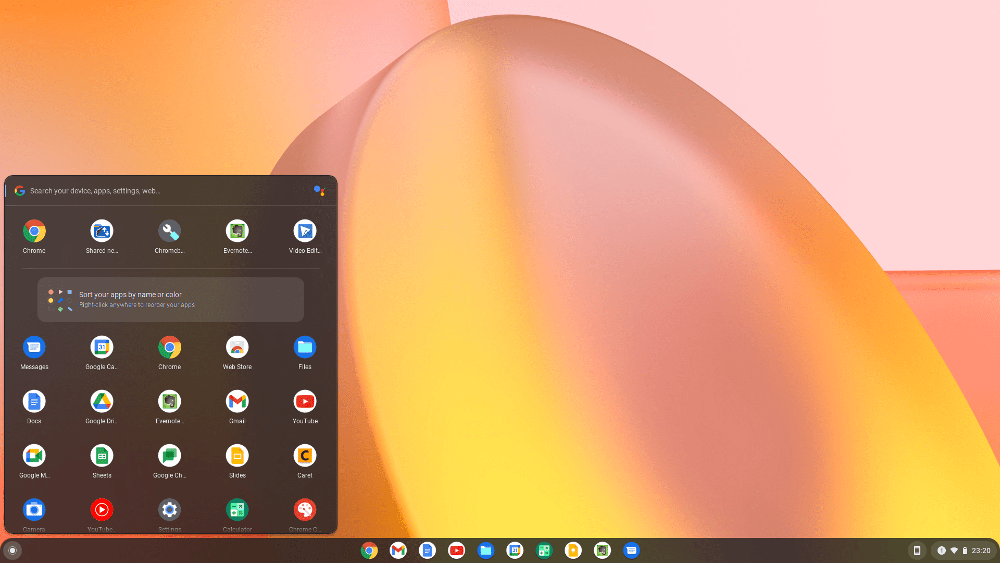
Chrome OS Flex user interface
Conclusion
Chrome OS measures to expand itself and now has a whole new proprietary operating system to brag about—Chrome OS Flex. This top-class software strives to reincarnate your once-dormant Windows PCs and Macbooks and make them whole again. There’s a lot that Chrome OS Flex is offering right off the bat, including high-end sandboxing-style security, effortless mobility, easy deployment, and a clutter-free user experience.
If you’ve been thinking of throwing your old devices out, give Chrome OS Flex a shot and see how the tables turn. The acquisition of Neverware by Google has finally bore fruit as Cloud Ready is getting replaced actively with this speed-centric operating system. In this descriptive article, we have gone over how to install Chrome OS Flex on your PC or Mac using step-by-step instructions. Here’s hoping that you’ve found this helpful article for your cause.
Chrome Ready wishes you good luck!

1 comment
I get this message from the chrome recovery utility: “Linux is currently unsupported”
You say In this guide, we’ll be talking about how to install Chrome OS Flex on your PC, Mac, or Linux device using step-by-step instructions. So where are the linux instructions?