Was everything going great on your device, but you were abruptly interrupted by the “Google Play Services keeps stopping” error? Fret not, since we’re going to show you all the possible ways of fixing this vexing issue. The Google Play Store is one of the best features that has ever arrived on the face of Chrome OS, unlocking a world of Android applications and colossal potential simultaneously. Haters of this sleek operating system have been finding it quite hard to call a Chromebook a “mere web browser” ever since, and it’s easy to see why.
The best Play Store applications in the business power up Chrome OS with extra functionality, allowing users to experience more features and revamp their lives with the fruits of technology. Therefore, you cannot just have it out of service and do nothing about it.
Thankfully, the fixes involved for the “Google Play Services Keeps Stopping” error are nothing but straightforward, so you hopefully won’t be needing a degree in computer science to blast the issue into oblivion. Now that we’ve said enough let’s dive right into this issue, diagnose it, and learn how to fix it.
What is the “Google Play Services Keeps Stopping” error?
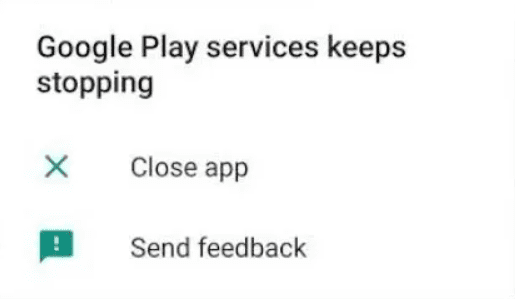
“Google Play services Keeps Stopping” error
To brush up on some basics first, Google Play Services is an integral Play Store proprietary application that keeps things under check and due management. It makes sure that your applications are receiving updates and are staying up to date, or at least you’re being notified about them if you’ve disabled automatic updates.
However, its functionality extends way beyond the mere update procedures. Google Play Services is responsible for signing you in whenever you’re using a Google product or service. It also lets you access your privacy settings and even syncs your contacts for you. In addition, the service makes it possible for both third-party and first-party apps to communicate with the main software, which is Google.
Google Play Services is a lot more involved than you think. It even plays a role when you’re looking up directions on Google Maps, doing a search through the Google search engine, and making the Android experience run smooth. The best part is that the service is a background API that you do not have to launch or do anything like to get to work. Without it, you’re going to feel your Android device’s lackluster and inadequate performance.
Now on to the cause of concern related to this whole API, what could potentially cause the “Google Play Services Keeps Stopping” issue? Well, the answer to this can’t be put out here accurately. Many things could be causing you to run into this issue, ranging from unverified device certification and outdated software to lack of recent Google Play Services updates and overflowing app cache.
We’ll be going through all potential fixes that this issue warrants. So let’s dive right in without any further ado.
How to fix the “Google Play Services Keeps Stopping” error
The following is a host of ways you can fix the “Google Play Services Keeps Stopping” error. We’re going to start simple and then gradually increase the difficulty regarding how easy or hard the fixes will be to implement.
1. Check Play Protect verification on your device
Google instills a special Play Protect feature on all Android devices. This is done to make them run through several compatibility tests and have proprietary Google software. It’s a necessary feature that paves the way for users to have an authentic Android experience. Without appropriate verification, a bevy of issues could potentially arise, including the “Google Play Services Keeps Stopping” error.
This is why you need to check if your Chromebook or Android mobile device is Play Protect verified. We’ll outline how to do this in the following steps to simplify the process. While the tutorial ahead will comprise screenshots for a Chromebook, the methodology isn’t too different if you’re on a mobile and will still work for the latter.
1. The first step is to launch the Google Play Store on your device. That can be done through the Chromebook Launcher or from the shelf if the application is pinned there.
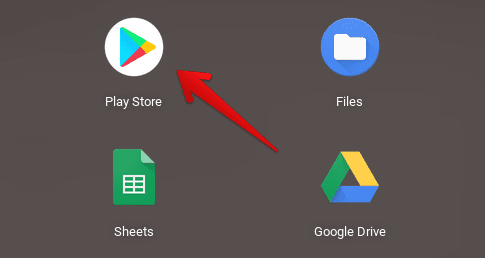
Opening the “Google Play Store”
2. Once done, click on your profile icon in the top-right corner of the Play Store interface. That should reveal a set of options right below the photo for you.
Clicking on the profile icon
3. You’ll find “Play Protect” too out of all the different options that appear in that area. Click on it to get to the next step.
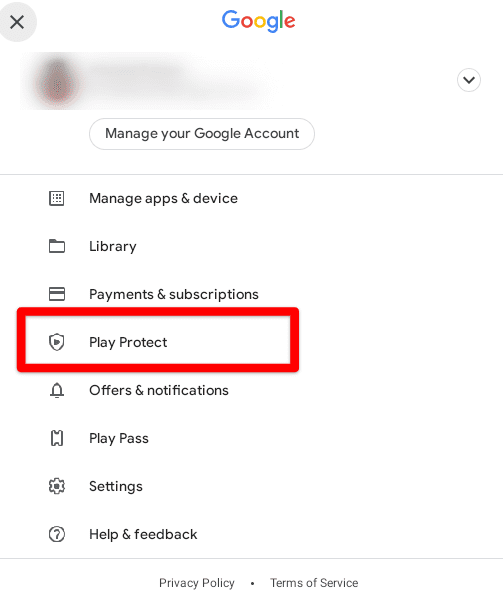
Clicking on “Play Protect”
4. After clicking on “Play Protect,” you see the following screen, then it means that this feature is already enabled on your device and is operating to the full. You do not have to worry about Play Protect anymore, but if you see something along the lines of “Play Protect” disabled, you probably need to take some measures now.
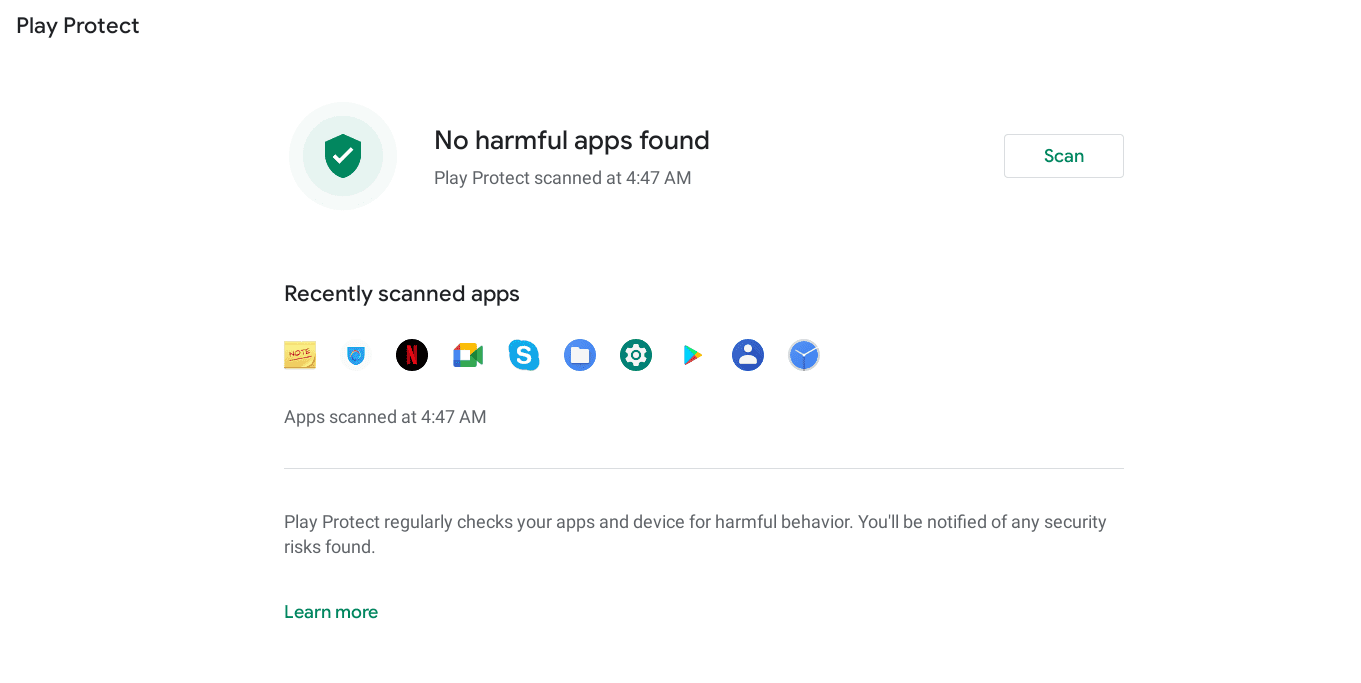
Play Protect working
Having the “Play Protect” feature disabled on your device means that it’s neither secure nor fully operational. In that case, Google says that it wouldn’t have a track record of this specific device’s compatibility tests, so there would be no authorization for it to work correctly. You also may not be able to get system updates or application updates, not to mention apps, features, and Play Store services that fail to operate optimally.
The best way of getting Play Protect verification on your device is to get in touch with the manufacturer of your device. You may or may not need your warranty to claim a replacement. You will have to inform them that the specific device shipped to you isn’t Play Protect verified. The manufacturer should be replying warmly to you.
However, if your device already has Play Protect certification, but the “Google Play Services Keeps Stopping” error is still running rampant, you need to try other fixes. Keep on reading and apply more fixes for the best results.
2. Update your device
An outdated application, software, or operating system can never bode well for a Chromebook or an Android mobile device. You would just be missing out on God knows what type of security and developmental features, which could be eliminating half the problems you’re facing on your machine right from the get-go. Updating a Chromebook is nothing but a painless experience.
You go into the “Settings” system app, find “About Chrome OS” in the column on the left-hand side, click on it, select “Check for updates” subsequently, and confirm if anything was waiting for us.

Checking Chrome OS for updates
As you can see in the screenshot below, our device is entirely up to date. Just so you know, the latest Chrome OS build for the stable release that’s out right now is 97.0.4692.77, so do make sure that you have the same version on your Chromebook.

Chrome OS fully updated
If you’re on mobile, the process of updating your device doesn’t stray far from what we’ve shown to you for Chrome OS. First, you have to go to your “Settings” and find the update option.
Continue reading for more applicable solutions if updating your device didn’t do the trick. It’s time to get into the heavy-hitting fixes of this annoying problem now.
3. Update Google Play Services
The fourth fix on the list is in continuation of the previous one. Apart from having an up-to-date device, it’s necessary to have the latest available version of Google Play Services installed to ensure its optimal functioning. The “Google Play Services Keeps Stopping” error could be arising from using an older version of this system API that cannot keep up anymore.
We’ve laid out the tutorial in some easy-to-understand steps below. The ideology will stay the same for both Chromebooks and Android mobile devices, so you should be all set either way.
1. The first step is to open the Google Play Store on your Chromebook. Use the Chromebook Launcher or the shelf area to do that easily.
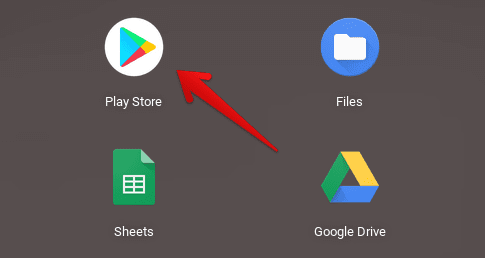
Opening the Play Store
2. Once done, use this direct link to open the Google Play Services app page on the Play Store. Surprisingly, the application doesn’t appear in any search results when looking for it on a Chromebook. Therefore, using this link will automatically allow us to open the app within Play Store’s interface. Once done, you’ll find the option to update it. Click on the “Update” button and wait until the process finalizes.

Updating Google Play Services
After having the Google Play Services API fully updated, you should ideally be breathing easier without the “Google Play Services Keeps Stopping” error message appearing anymore. However, you never genuinely know machines, do you? If the issue persists even with the app updated, keep reading for more solutions.
4. Optimize application preferences
An uncommon fix to the issue in question pertains to resetting the app preferences of your device. This can be done on both Chromebooks and mobile devices and somehow fix the “Google Play Services Keeps Stopping” issue. There isn’t much explanation here that can elaborate more on this fix, but there’s nothing to lose if implementing it solves our problem.
The following steps will show you how to reset app preferences on your Chromebook, although the concept can be understood to do the same on an Android mobile device.
1. The first step is to open your Chromebook’s “Settings.” You can do this effortlessly by clicking on the app icon on the shelf if you have it pinned there or asking your Google Assistant to open it for you.
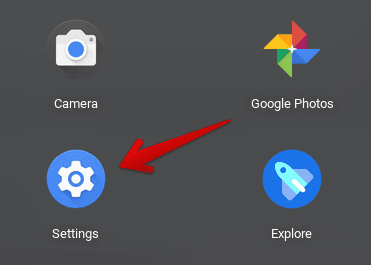
Opening “Settings”
2. Once done, select the “Apps” section present on the column to the left of the screen. Complete this to get to the next step.
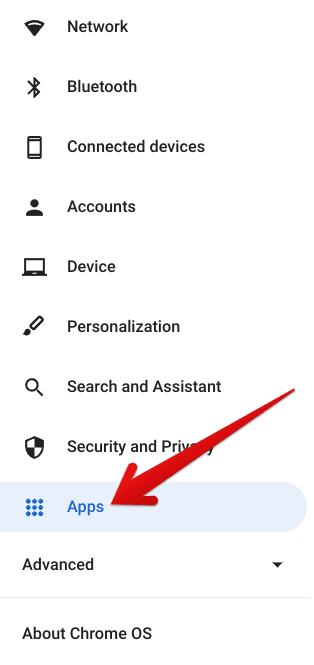
Clicking on the “Apps” button
3. Good work so far. Doing so will directly take you to the “Apps” portion of your settings. You now have to click on the arrow beside “Google Play Store” to get to the next step.
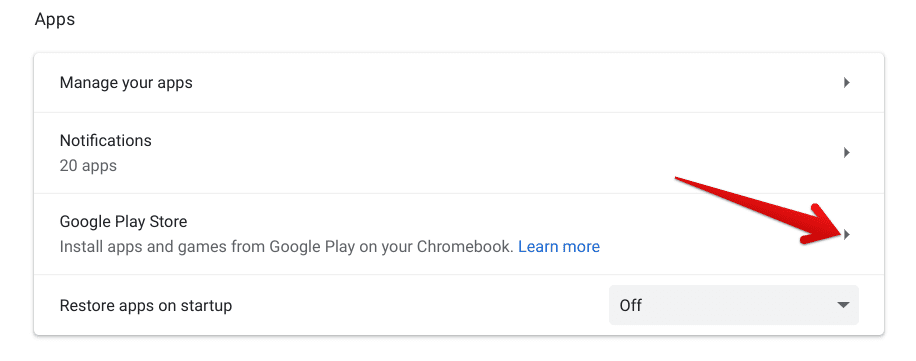
Clicking on the “Google Play Store” button
4. Completing the last step will take you to another page dedicated to managing the Google Play Store. Here, you will have to select “Manage Android preferences” to get to the next step. Doing so should launch a new window for you.

Clicking on “Manage Android preferences”
5. The newly launched window on your Chromebook’s screen can be classified as Google Play Store’s “Settings.” Here, you can tweak multiple options and make adjustments to the Play Store. For now, we’ll be clicking on “Apps and notifications.” If you’re on an Android mobile device, you need to venture into your device’s settings and find the apps section, similar to how we did for Chrome OS.
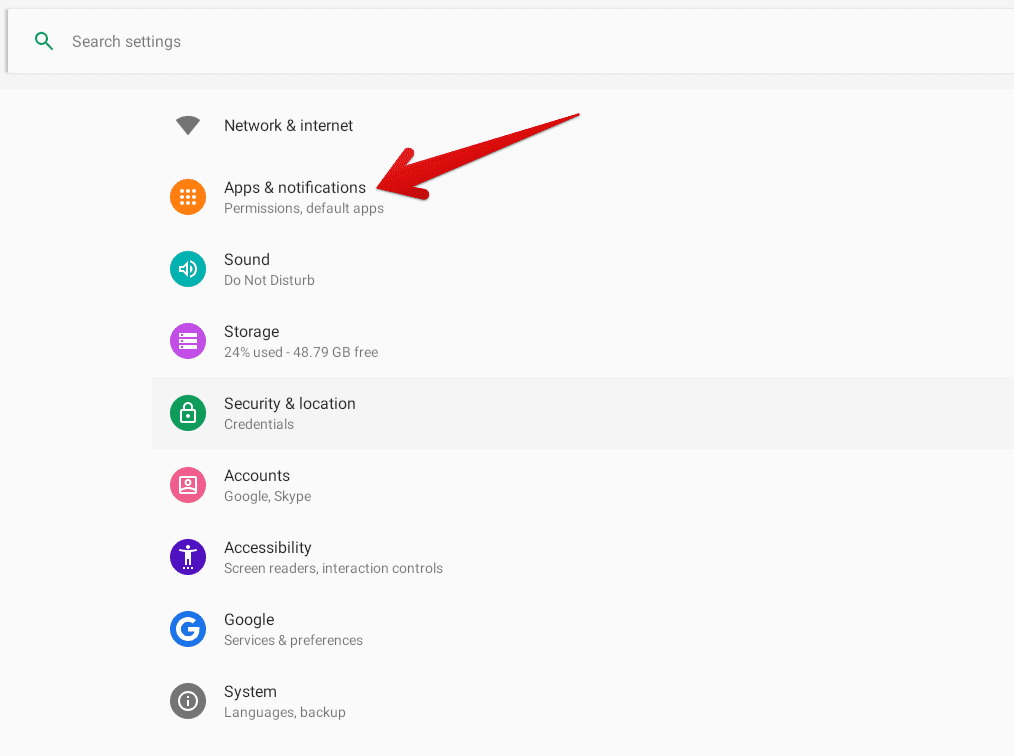
Selecting “Apps and notifications”
6. After clicking on “Apps and notifications,” you’ll get a reasonably non-descript page. From here, click on “See all apps” and continue to the next step.
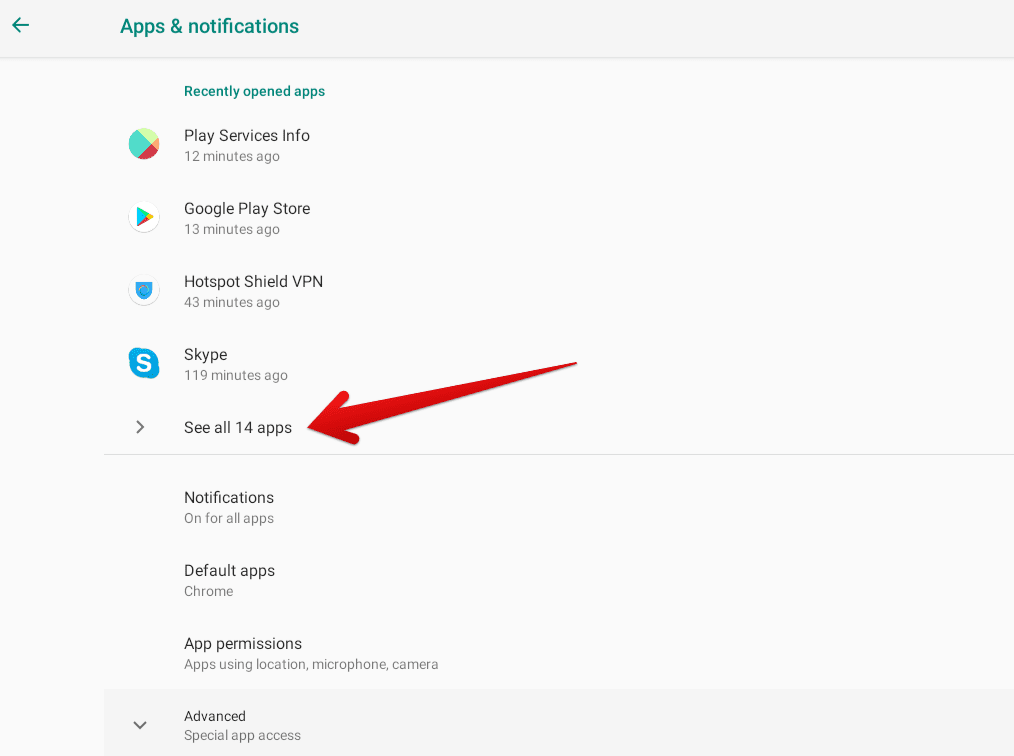
Expanding the options
7. You’ve finally arrived at the main part now. You’ll find three vertical dots placed on the app info screen at the top-right corner. Click on it to reveal the “Reset app preferences” option. Click on it and confirm your selection.

Resetting app preferences
8. The final step of this whole procedure is to verify the subsequently appearing confirmation prompt. A small-scale window will pop up and ask you to confirm your selection one more time. Click on “Reset apps,” and you should be good to go now, ideally.
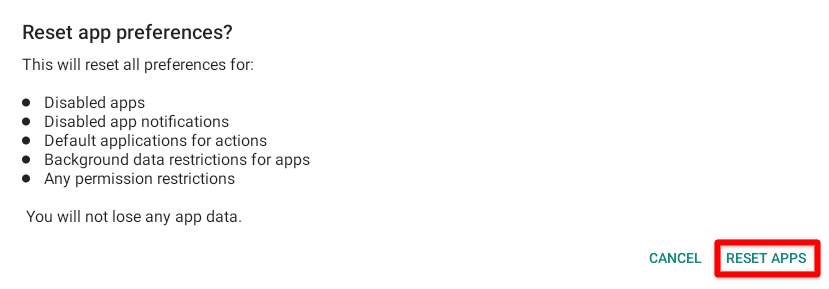
Resetting all apps
That’s about it for resetting your app preferences. The “Google Play Services Keeps Stopping” issue should gladly be biting the dust at the moment, but if the nasty bother continues to be a pain, you have to try other solutions.
5. Clear Google Play Services’ data and cache
This is one of the most critical fixes for the “Google Play Services Keeps Stopping” error. We thought it didn’t need to come to this as there’s a slight chance of you losing some of your app data during the procedure. However, you have to do what you have to do sometimes.
The following instructions are going to take it from here.
1. Please repeat Steps 1-6 in the section above to get to the “Apps” area on your Chromebook Google Play Store. Once done, scroll down until you find the “Google Play Services” app listed. Click on it to get to the next step.
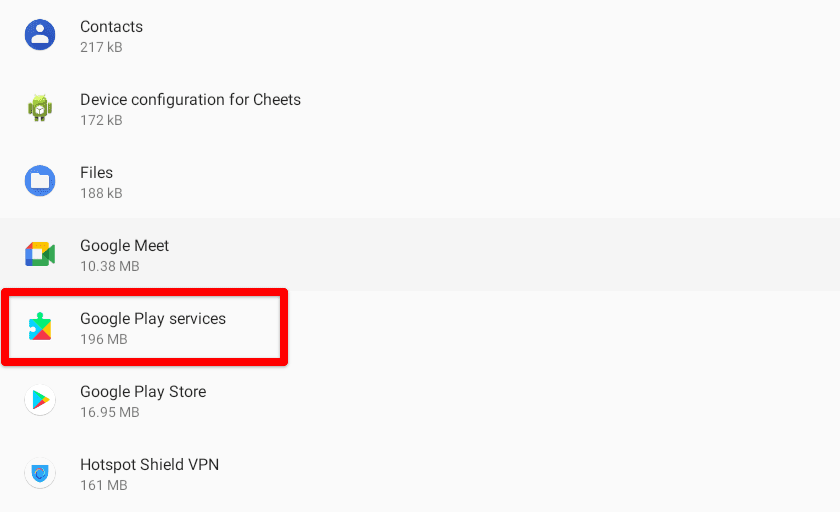
Selecting Google Play Services
2. Completing the last step will take you to the Google Play Services app page. This is where you can choose to adjust your applications in many ways. For now, we’ll click on “Storage,” as shown in the screenshot below.

Selecting Google Play Services’ “Storage”
3. It’ll be in the “Storage” section that you can clear both the cache and the storage of Google Play Services in an attempt to make the system API brand new again. We recommend first clicking on “Clear cache” and then following it up by selecting “Clear storage.” As soon as you’re done with doing both, close the “Settings” window to finalize the process.

Clearing the storage and cache
As iterated earlier, this definite fix truly holds the potential to eliminate the “Google Play Services Keeps Stopping” error. First, try downloading a Play Store application to see if the error has taken the easy way out. If not, try the following fix as we’re quite not there yet.
6. Clear the data and cache of Google Play
In one of the previous potential fixes, we’ve cleared the data and cache of Google Play Services, and it’s only right that we do the same for the parent application, which is Google Play. This hopeful solution has eliminated the “Google Play Services Keeps Stopping” issue for a vast number of users, so it’s worth a shot on your end as well.
You already know how to clear the data and cache of Google Play Services, as we’ve shown above, so repeating the process for Google Play shouldn’t be difficult. Let’s quickly review the procedure using the following steps.
1. Repeat Steps 1-6 of the 5th solution above to get to the “Apps” section of the Google Play Store. Once done, scroll down until you find the listed app of the Google Play Store itself. Select it to get to the next step.
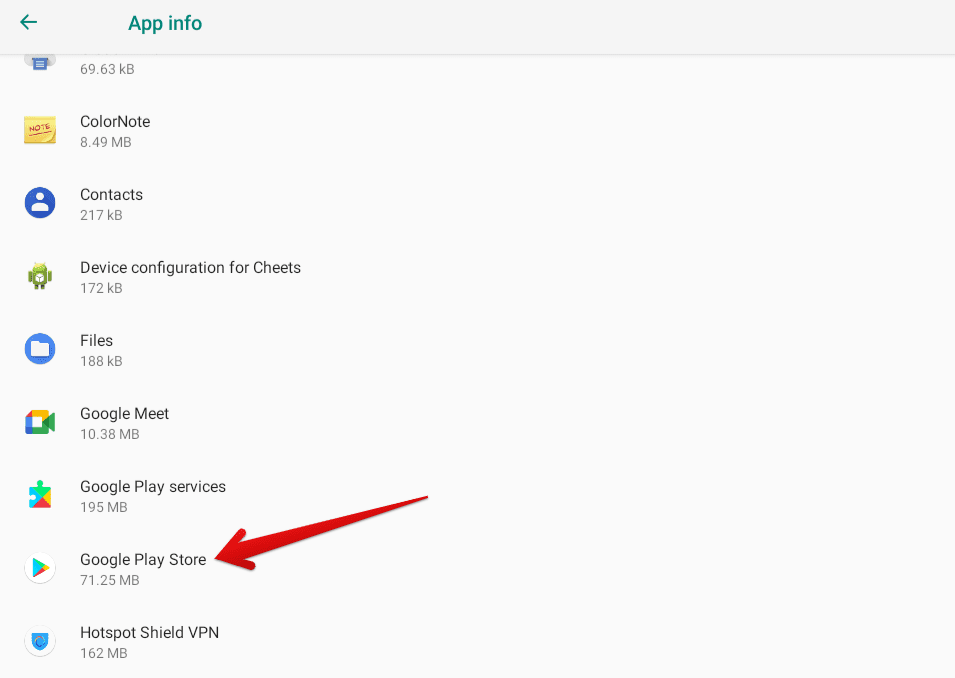
Selecting Google Play Store
2. The next step is to click on the “Storage” option. The screenshot below depicts where to click.
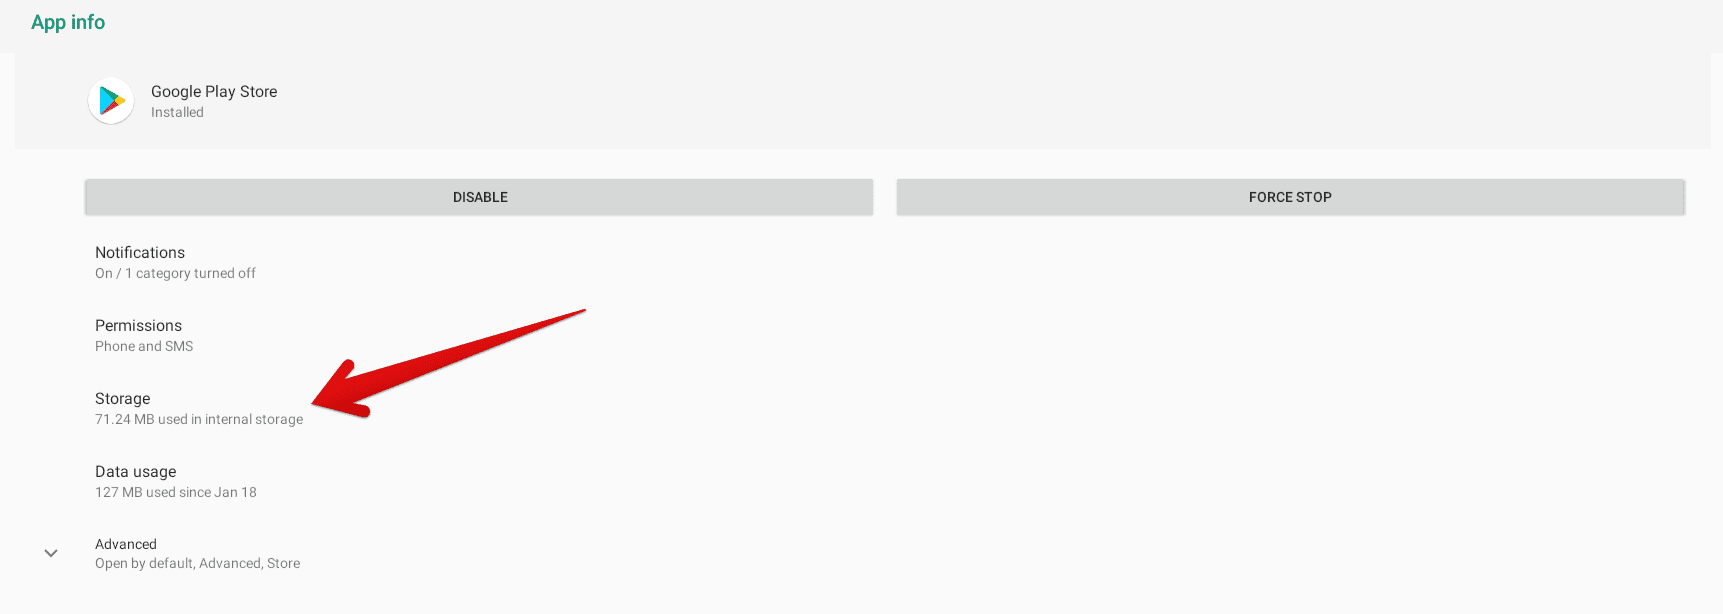
Clicking on “Storage”
3. You’re now at the page where it’s possible to clear the data and cache of Google Play. Click on the relevant buttons shown in the screenshot below to finalize the process.
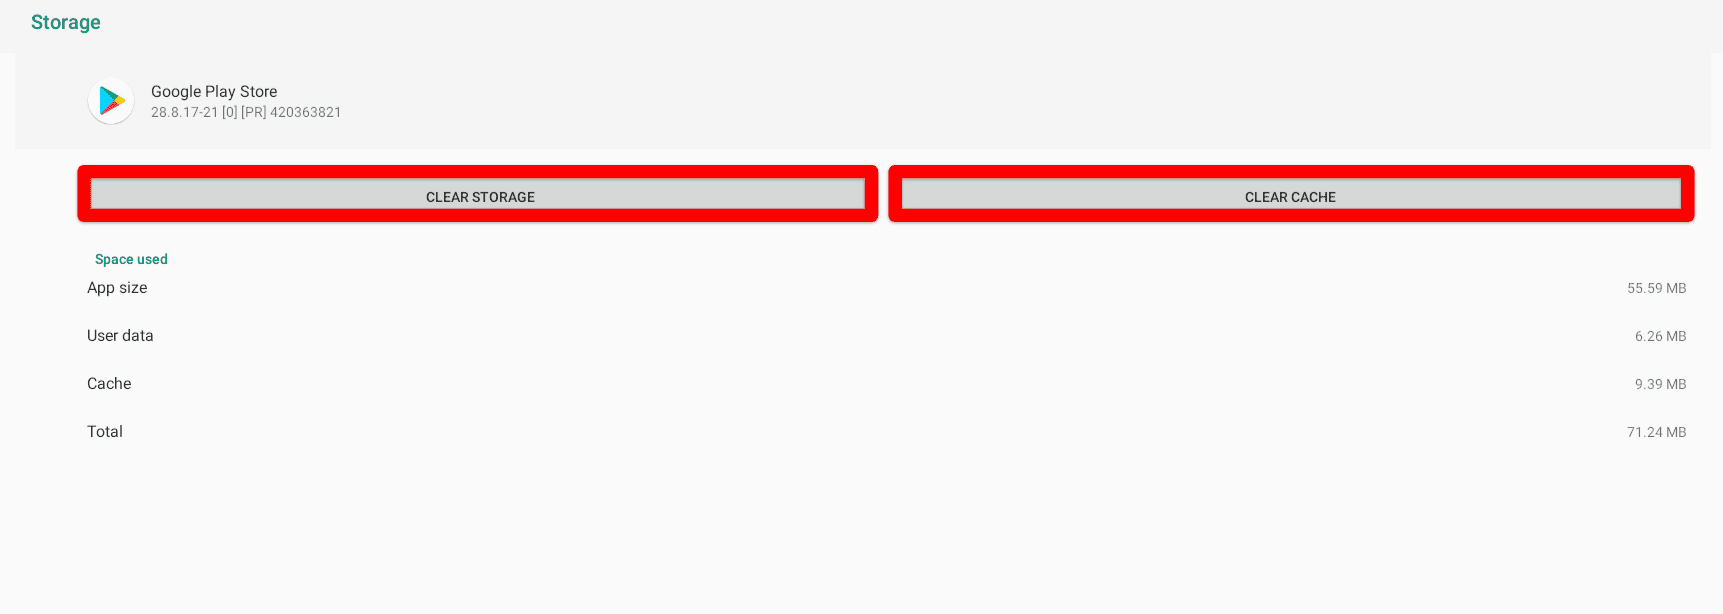
Clearing the storage and cache of Google Play
That was all about tending to the Play Store for fixing the “Google Play Services Keeps Stopping” issue. If this potential fix hasn’t worked for you, then we’re afraid it’s time to look into the final fix that we’ve got for you in this write-up.
7. Powerwash or reset your device
It appears that you only have one final option left in your arsenal if absolutely nothing has worked so far to fix the “Google Play Services Keeps Stopping” error. You need to perform a Powerwash on your Chromebook, or a factory reset if you’re using a smartphone. This is a definite fix most of the time for the majority of problems as doing so refreshes the whole device, prompts the system to install updates all over again, and makes your machine work like new.
We’ve laid out a complete step-by-step guide for the matter at hand, should you want to take a look at it here. But, for now, we’ll iterate that you need to go to your device’s “Settings” and find “Reset settings” beneath the “Advanced” section. There, click on “Reset” beside “Powerwash,” as shown in the screenshot below, and let the device do its thing.

Reset Settings
It’ll be a while until your Chromebook turns back on and walks you through the initial set-up again. So go past everything, fill in whatever you need to, and try using the Google Play Store again when you’re all done to see if the “Google Play Services” issue has been eliminated. With some luck spell, you should now be using your device error-free.
- Factory resetting a mobile phone is equally easy. All you have to do is go into your device’s settings, search for this option, and select it to begin the process.
Conclusion
Having the Google Play Store ready at full tilt is always good for Chromebooks. You’re free to download the best Google Play applications that way and pump your Chrome OS entire with functionality. However, sometimes, it doesn’t take much to go south and render your device partially functional. We have the “Google Play Services Keeps Stopping” error as a glaring example of that.
That said, there are multiple ways you can fix the issue and restore the functioning of the Google Play Store. In this article, we’ve outlined the best methods for how to fix the “Google Play Services Keeps Stopping” issue, so you should be all set now. However, do let us know in the comments below if any of the listed solutions worked for you or not.
Chrome Ready wishes you good luck!
