Chromebooks are Google’s solution for speedy, comfortable, and secure browsing on the internet. They come in all sorts today, with the Pixelbook Go proving how elegant Chrome OS truly is to its core, while the HP Elite c1030 Chromebook showing off terrific horsepower under the hood. This sleek operating system didn’t pack all this pizzazz the first time it came out. Consistent, steady, and carefully curated updates have been coming Chromebook’s way for a considerable period of time, and the level where it’s at today is nothing less than the product of all that.
It wasn’t long ago when these devices couldn’t figure out the cause behind any emerging system issue. Still, ever since Chrome OS 90 came out, a slew of new features has been integrated into the interface, and along with them, a brand-spanking-new diagnostics tool. Being given the simple name of “Diagnostics,” Chrome OS laptop owners can now scan their devices for statistics and important information related to the device’s health. Let’s now get into more of the Diagnostics application on Chrome OS, including how to get it running.
What is the Chrome OS Diagnostics app?
The Chrome OS Diagnostics application was rumored to be in the pipeline since October last year. However, it was finally added to the official stable channel with the arrival of Chrome OS 90.
- Want to catch up to the latest regarding the upcoming Chrome OS version? Check out this article.
Now, the Diagnostics application might not show up on your Chromebook Launcher area but will be easily accessible when you search for it specifically. If you’re confused about what it actually is, think of Diagnostics as a tool that analyzes three major components of your Chromebook: Battery, CPU, and Memory. There are separate tests for each of these core components, all within the Diagnostics application. We recommend frequently running tests on your Chrome OS laptop to ensure its optimal performance and working condition. In instances where your Chromebook is utilizing an exorbitant amount of battery in a short time, running the discharge battery test would pinpoint the root cause and go on to fix it. You also have the added convenience of recording your test sessions and send them to Google’s customer support service team if the situation demands it.
Scanning Chrome OS Using the Diagnostics app
As mentioned earlier, there is a total of three tests that you can perform on your Chromebook using the diagnostics tool. Let’s get into each of them below.
Running the Battery diagnostic scan.
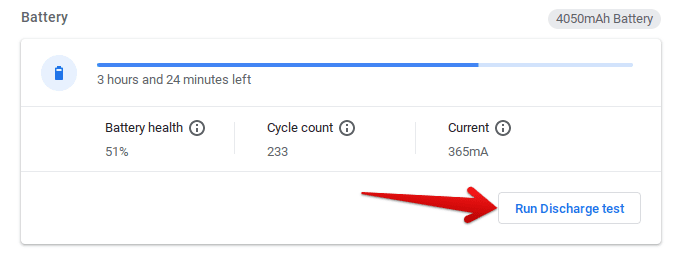
The first scan that you can perform on your Chromebook is dedicated to the battery. Under the specified area, you can view your Battery health, which is a percentage showing you the capacity left to be utilized of your battery. You can also check out the Cycle count, which is the number of times you’ve fully charged your Chromebook. Lastly, the Current area shows you the rate at which your device charges or discharges.
To run a Battery diagnostic scan, you will have to open up the said application. Then, press the “Search” key on your keyboard to bring the Launcher up. Once done, type in “Diagnostics,” and the system will automatically show the application to you, where clicking on it would launch the effective tool right away.

Launching the Diagnostics tool
When you’re there, the first available diagnostic scan will be the battery one. Click on “Run Discharge test” to commence the diagnosis and identify what’s been bothering your operating system.

Running the discharge test
If everything goes well, you’ll see a green text that’ll show you the percentage of the amount of battery discharged.
Running the CPU diagnostic scan
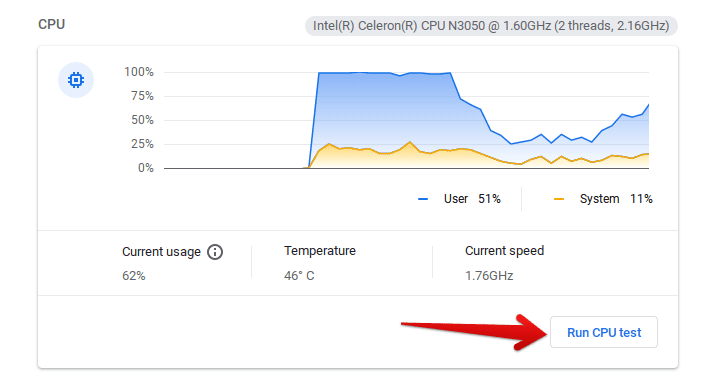
The next diagnostic scan to run relates to the CPU. Under the relevant section, you can view your CPU usage, which is the amount of power your processor dishes out in percentage. Next, you can check out the device’s current temperature, along with the current speed your CPU is currently performing at.
To run the CPU diagnostic scan, click on “Run CPU test” to begin right away. However, note that your computer will sometimes slow down deliberately to get accurate test results during the scan. In addition, the whole process can take a few minutes.

Running the CPU test
Running the Memory diagnostic scan
The last of the bunch is the Memory test, and it’ll tell you if there are any problems with your RAM that are possibly causing slow system performance. In the “Memory” area, you’ll only be able to see how much of your memory is available, along with the total amount of RAM as well that your device sports.
To run the Memory diagnostic scan, click on “Run Memory test” inside the app and wait for the scan to conclude. This can be the most time-consuming of the three scans depending on how full your internal memory presently is.

Running the Memory test
After you’re done with each test, you can take a second to save the whole session locally on your Chromebook in case you have to send it to Google’s customer support center at a later time. To do that, click on “Save session log” at the very bottom of the Diagnostics application’s interface and download the file anywhere you want on your device.

Saving Diagnostics session log on Chromebook
Conclusion
Chromebooks are embellished with more and more utilitarian features as the days go by. So naturally, new versions of Chrome OS are the most exciting to look out for since they are the ones that bring the most goodies to our beloved Chrome-powered operating system. In this article, we’ve cast a lens on a relatively recent feature added by the developers to Chromebooks, and that is the Diagnostics application.
Using this service, Chrome OS now has a sure-fire method of analyzing itself for issues and system problems, so the person using it knows what they are up against. The Diagnostics application follows three major tests: Battery, CPU, and Memory, all of which are important in their own ways. We truly hope that you’ve learned a thing or three using this article. Chrome Ready wishes you good luck!
