Privacy is an alarming concern for everyone who hops on a keyboard these days. We’re currently at a point where PC manufacturers have even started incorporating a webcam privacy shutter on some of their products, just like HP has done with its Pro C640. Thankfully for Chromebooks, these minimalistic devices come branded with an extra sense of security that allows them to be super secure.
- Check this article out to read about all the ways Chrome OS keeps you safe in a secure browsing environment.
While it’s quite rare for this operating system to allow a virus to latch onto it because of its extensive layers of protection, there are instances where a user accidentally falls into a scam, either by downloading malicious content from the Google Play Store or by clicking on shady websites that are built for phishing. For cases like these, Google came out with a Safe Browsing mode all the way back in 2007. This browser feature allows you to steer clear of security threats in Chrome and other applications by analyzing the web and adding potentially dangerous websites to its blocklist.
However, as time progressed, malware has evolved and found a breakthrough for Safe Browsing. Google noticed this and thereby came out with something called Enhanced Safe Browsing, which is simply ten steps above its predecessor. Therefore, in this article, we’ll show you how to enable this feature on your Chrome browser and start browsing much more securely. Let’s begin with an overview of Enhanced Safe Browsing.
What is Enhanced Safe Browsing?
Enhanced Safe Browsing was launched by Google as an additional layer of security to tackle all those threats that could bypass the browser’s original Safe Browsing mode. What the latter typically did was to add all those websites that could pose a risk to a blocklist every 30 minutes or so. Issues started to emerge when some of these websites got enhanced and started to change their domain under the 30-minute window.
Enhanced Safe Browsing, therefore, brings a haymaker to the table for all those cunning websites. This feature checks the URL of each website in real-time and links your URL data to your Google account temporarily. This will then be used to recognize phishing scams, viruses, and everything of the like. This had led to a significant increase in protection on desktops all across the spectrum.
There are several actions that Enhanced Safe Browsing performs consistently. Some of them are given below.
- Gives out warnings for potential password breaches.
- Improves overall security.
- Predicts malware-filled events that may take place beforehand.
Now that we have a basic idea of what Enhanced Safe Browsing actually is let’s get down to how we enable it on your Chromebook effortlessly.
Enabling Enhanced Safe Browsing on Google Chrome
The following steps are going to take it from here.
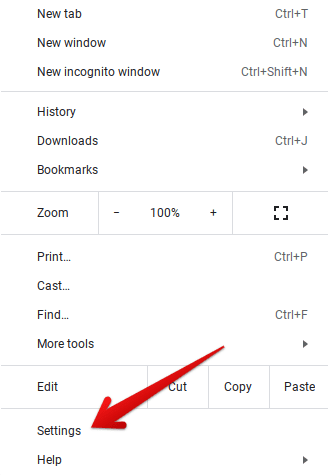
1) Click on the “Customize and control Google Chrome” button in the top-right corner of the screen on your Chrome browser.

Customizing Google Chrome
2) Several options are going to be revealed now. Find “Settings” and click on it to continue.

Clicking on Google Chrome’s “Settings”
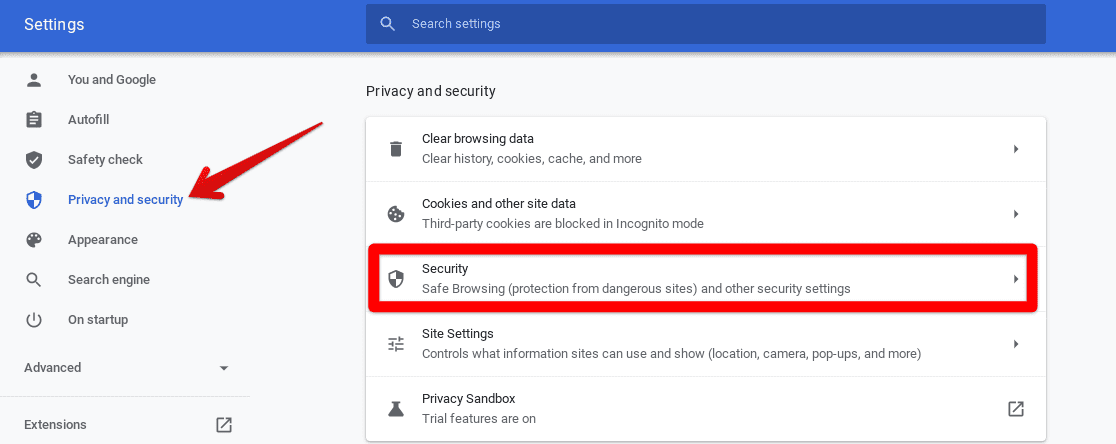
3) Clicking on “Settings” will open up a new tab for you. Here, you’ll have to click on “Privacy and security” in the left column, followed by clicking on “Security” on the page that you’re directed to. The screenshot below helps explain this step better.

Accessing Security Settings
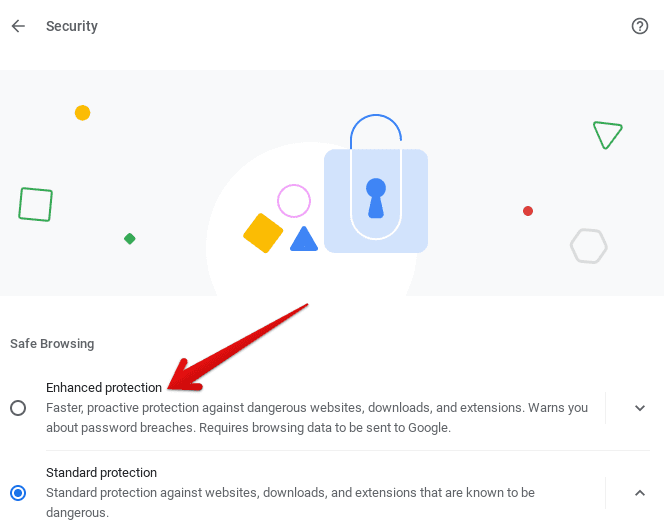
4) You’re almost done now. All that’s left is clicking on “Enhanced protection” on the page that appears after clicking on “Security,” as shown above. Your browser will be set to “Standard protection” by default.

Enabling Enhanced Protection
After clicking on “Enhanced protection,” your browser’s security settings will automatically update themselves. You’ll now be given proactive protection and will be able to breathe a little easier when surfing the internet.
We hope that this guide has been useful to you. Chrome Ready wishes you good luck!
