The Chromebook has the realm of the Google Play Store and Linux to download and install applications from, but the Chrome Web Store is no slowpoke when it comes to having an exhaustive variety of extensions and web apps. As a matter of fact, the handy marketplace boasts more than 180,000 extensions, though not all of them may be entirely up to the task.
Nevertheless, those figures give you an idea of the enormity of the Chrome Web Store and raise concerns regarding your device’s safety and how secure these web apps truly are.
Thankfully, it’s now possible to control how Chrome extensions behave, and it’s quite easy to keep them under check. Google came out with a post on their Chromium blog that gave details on this then-coming feature. It was launched back in 2018 and is now actively used to regulate the permissions of extensions.
In this article, we’ll show you a simple but effective method you can use to make sure extensions don’t get too out of hand. Let’s jump right in.
Controlling Chrome Extensions’ Permissions
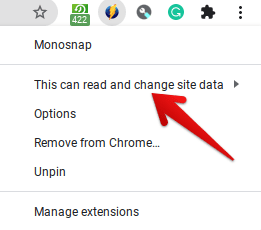
You can change how your extensions behave instead of uninstalling them due to potential privacy issues. To get a glimpse of how this can be done, go ahead and perform a right-click on the extension icon of your choice by double-tapping your Chromebook trackpad.

Accessing Extensions’ Permissions
This will reveal three options for the extension. An overview of them is given below.
- When you click the extension: Choosing this option will only give access to the permissions an extension requires whenever you click on it in your Chrome browser. If you use an extension that works on its own, it won’t be operable until you click on it.
- On the current site: As the description depicts, this setting allows your extension to be gain access to any website you’re currently on.
- On all sites: Pretty self-explanatory since choosing this option will make your extension read and write data on all websites regardless of whether you click on it or not.
There’s another option that you can use to manage your extensions and their permissions. You’ll have to click on “Manage extensions” after double-tapping on an extension to do that. Alternatively, you can copy and paste the following link in your Chrome browser to get to your extensions.
chrome://extensions/
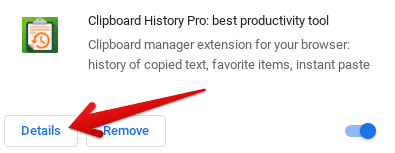
When you’re there, click on “Details” on an extension to continue. Let’s take Clipboard History Pro as an example to show you what to do in this step.

Clicking on Extension’s Details
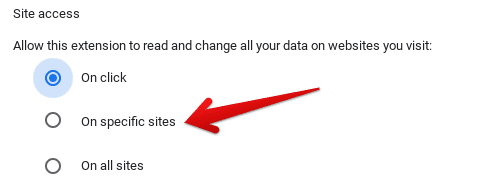
After you click on “Details,” scroll down a bit to find the “Site access” section. There, you’ll find an option to add specific sites that would automatically allow your extension to start working. This is a good way to manage your extensions and keep tabs on them.

Clicking on Specific Sites
When you make the click, you’ll be asked to enter the website URL you’d like to give access to your extensions. You can add as many as you want and also remove them if you change your mind.
That’s all about controlling your extensions’ permissions on a Chromebook! We hope that this guide has been helpful to you.
