Chromebooks are inherently secure devices thanks to the minimalistic and sleek operating system that they come pre-loaded with. The developers claim that Chrome OS’s major selling points are speed, simplicity, and security with their own isolated sandbox environment for every Chrome tab, app, or extension, as well as a highly capable self-check that wipes the operating system clean from any anomalies or malware after a restart. Features like these make Chromebooks impervious to viruses to a good extent, but there is another emerging concern that still raises many eyebrows: privacy.
Privacy is something that we all want to do our own thing, especially online. It’s just downright uncomfortable to have someone looking at your personal information, not knowing what could happen thereafter. To address privacy concerns such as these, HP has even incorporated a privacy shutter in their Pro C640 Chromebook that can render your camera useless whenever you want. As manufacturers start to take steps towards keeping the Chrome OS experience as secure as possible, nothing should hold us back from doing the same.
Setting your Chromebook for maximum privacy
Therefore, this article will be a descriptive guide casting a lens on all the ways you can set and adjust your Chromebook for maximum privacy. Keep on reading until the end of the tutorial.
Secure your account first
Before you set out to embolden your Chromebook, it’s a great thing to have your personal Google account tightly secure as a fundamental. An easy way to do this is to change your password and pick a stronger one. Not only will this log you out of every other device you’re signed in on, but it will also consolidate your password, apparently. Furthermore, you will have to enable two-factor authentication, so every time someone tries to log in with your account, a text gets sent swiftly over to your mobile phone, making the process so much more secure and under your supervision.
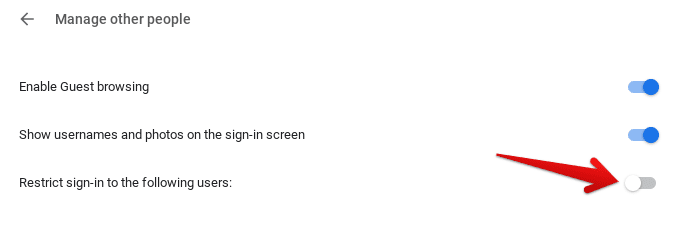
Another measure to enhance your Chromebook’s security is to prevent others from signing in. This would ensure that your account is the only one that gets logged on to your Chrome OS. Go to your Chromebook “Settings” and click on “Security and Privacy” in the left column to enable this function. Next, click on “Manage other people” to get to this setting. Finally, click on the toggle beside “Restrict sign-in to the following users” and then select the accounts you want to prohibit access to.

Restricting Signing In to Other Users
This will undeniably make your Chromebook more hard-to-reach. The only person who’ll have access to the device will be you, and that is something we’re trying to achieve here. Let’s now get into processes, features, and settings that’ll make your browsing experience more secure and hidden from the eyes of others.
While you’re in the “Privacy and Security” section of your Chromebook’s settings, also disable the “Help improve Chrome OS features and performance” feature, as this makes it possible for Google to read your diagnostic and usage data. Right below that setting is another one called “Suggest new content to explore.” The aim here is quite identical, as Chrome OS will send statistics to increase the accuracy of the suggestions you get.
Enable Enhanced Safe Browsing
Enhanced Safe Browsing was launched by Google as an additional layer of security to tackle all those threats that could bypass the browser’s original Safe Browsing mode. What the latter typically did was to add all those websites that could pose a risk to a blocklist every 30 minutes or so. Issues started to emerge when some of these websites got enhanced and started to change their domain under the 30-minute window.
Enhanced Safe Browsing, therefore, brings a haymaker to the table for all those cunning websites. This feature checks the URL of each website in real-time and links your URL data to your Google account temporarily. This will then be used to recognize phishing scams, viruses, and everything of the like. This had led to a significant increase in protection on desktops all across the spectrum.
- Read more about this topic in this article here.
To enable Enhanced Safe Browsing, you can refer to the following steps.
Click on the “Customize and control Google Chrome” button in the top-right corner of the screen on your Chrome browser.

Customizing Google Chrome
2) Several options are going to be revealed now. Find “Settings” and click on it to continue.

Clicking on Google Chrome’s “Settings”
3) Clicking on “Settings” will open up a new tab for you. Here, you’ll have to click on “Privacy and security” in the left column, followed by clicking on “Security” on the page that you’re directed to. The screenshot below helps explain this step better.

Accessing Security Settings
4) You’re almost done now. All that’s left is clicking on “Enhanced protection” on the page that appears after clicking on “Security,” as shown above. Your browser will be set to “Standard protection” by default.

Enabling Enhanced Protection
After clicking on “Enhanced protection,” your browser’s security settings will automatically update themselves. You’ll now be able to surf the internet with much better protection and a sense of reliability in the back of your mind. With that dealt with, let’s move on to the next step.
Enable “Do Not Track” on the Chrome browser
Google Chrome has several settings that can allow you to breathe a little easier whenever hopping online. One such setting is called “Send a ‘Do Not Track’ request with your browsing traffic,” and it is found in the “Cookies and other site data” section of your browser’s “Privacy and security” settings.
The gist of this feature is that once you visit any website, you’re going to get tracked and monitored for your browsing pattern. In this way, the website will uncover essential information, such as what type of pages you prefer to stay on and look for more, what products interest you the most, and everything of the like. This is done most of the time to enhance user experience and show you tailored products to view and potentially purchase. In addition, all of the progress made will be saved, and this will be kept up whenever you return to the website.
The “Do Not Track” request will ask websites not to monitor your behavior. There’s a good chance you won’t get tracked, but there’s still a possibility of you being kept an eye on. This is why we’ve got a bevy of other things for you to do and keep your Chromebook’s security right up to the maximum.

Enabling Do Not Track
Disable Google’s Prediction Service
There’s yet another setting in the Chrome browser that, although it provides you faster speeds when loading up web pages but fetches your information in the process of doing so. The data can include cookies.
The prediction service can pre-load web pages for you, even those that you haven’t even visited. However, the web services used here get your information which is then taken up by Google for proper analysis. In the end, the tech giant gets to see all your browsing patterns. Even if you stop using the Chrome browser or use any other search engine, Google still gets to keep your data.
You can disable the Chrome browser’s prediction service by opening up “Settings” and clicking on the “Privacy and security” in the left column. Then, you’ll click on “Cookies and other site data,” scroll down a bit, and find “Preload pages for faster browsing and searching,” just below the “Do Not Track” option, as we’ve discussed above. Click on the toggle beside the setting to disable it.

Google Prediction Service
Stop using Autofill
While there’s no doubt about how convenient and effective autofill can be, this approach is inherently less secure. For instance, consider an unfortunate case where someone gains access to your Chromebook, or you accidentally forget your device unlocked in a library. Anyone who would happen to get their hands on your device will be effortlessly able to log in everywhere you’ve had your credentials saved for. Autofill is not just for remembering passwords, usernames, and email addresses. Still, it can go much more private than that as well, including your saved addresses, other locations, and even your credit cards.
Therefore, we recommend that you write down important credentials somewhere safe, such as a notepad or a diary. Additionally, if your list of saved passwords isn’t that long, you can also try memorizing them. Not the most painless method, we know, but best believe it’s the safest.
You can go to your Chrome browser’s settings and find the “Autofill” section in the left column. There are “Passwords,” “Payment methods,” and “Addresses and more” to scathe through and remove all important, personal data.
Turn off sync or use sync encryption
Right alongside having your passwords stored in the cloud, sync is another beneficial function that comes in extremely handy when you switch your device or want to shift your saved data over to a new one. From apps, bookmarks, extensions, and history to settings, passwords, addresses, Wi-Fi networks, and even your wallpaper, sync has a part in every facet of the Chromebook and PC experience. You can imagine how much of your information is exposed to Google every time your data syncs.
To maximize your device’s security, we suggest turning off sync. You can do that by opening your browser’s settings and going to the “You and Google” section. There, you’ll click on “Sync and Google services” and finally select “Manage what you sync.” Doing all that will take you to a whole list of services and processes that you can choose to disable the sync function for. Click on “Customize sync” and disable all of the toggles below. When you’re done, you’re free to close the window or go back.

Disabling Sync on Chromebook
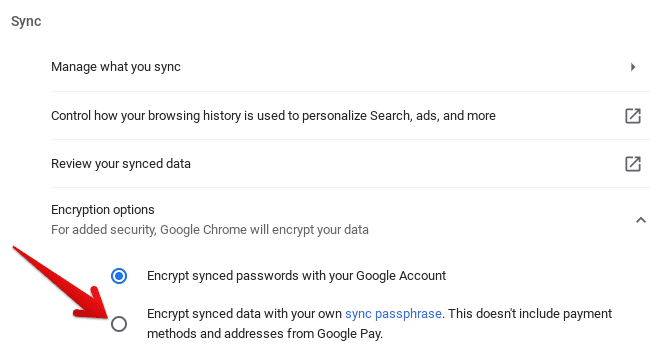
However, if you want to enjoy what sync has to offer and not want Google peeking about as well, there’s a way to pull that off. You can actually encrypt your saved data, just as you would encrypt your memory card on a mobile phone. The only difference is that you’ll be getting to pick a sync passphrase. This type of encryption makes sure that your personal information is not sent to Google. In addition, the passphrase that you set is also your own property and not shared with Google as well. That said, this method does not include payment methods and addresses from Google Pay, as the developer has written itself, so you’ll need to turn those off manually.
You can easily encrypt your syncing by heading over to “Sync and Google services” and then clicking on “Encryption options.” The default option is “Encrypt synced passwords with your Google Account,” but you’ll have to choose the one below that, titled, “Encrypt synced data with your own sync passphrase. This doesn’t include payment methods and addresses from Google Pay.”

Enabling Sync Encryption
Restrict location services
Having your location off is another approach that can contribute towards having a fortress-like secure Chromebook. Many websites, such as BestBuy, will ask you to allow location access, but you can browse the internet and shop for products just fine without enabling this service at all. Your IP address can give you sites an idea of your location, but enabling GPS pinpoints you on the radar accurately.
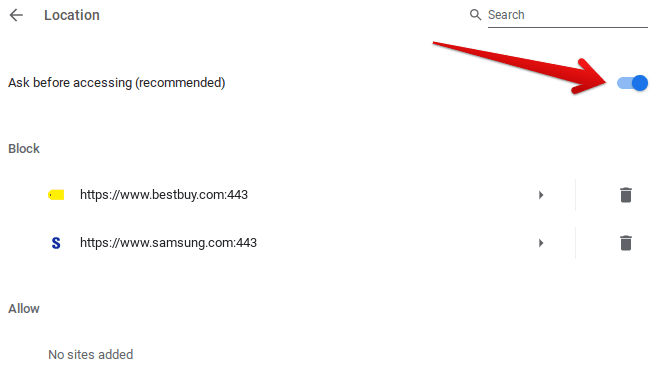
To restrict websites from gaining access to your location, all you have to do is go to the “Site Settings” section in the “Privacy and security” area of your browser’s settings. There, you’ll have to scroll down a little to find “Location,” but when you do, click on it to get the toggle for managing Location services.
Once there, you’ll notice that your Location setting is set to “Ask before recommended” by default. In this case, a pop-up always appears whenever a website demands access to your location, as you may have observed before. However, clicking on the toggle beside the setting will block Location services altogether, which is highly recommended to achieve what we are trying to here.

Blocking Location
Use a VPN
VPN is short for Virtual Private Network, in the bleak case that you didn’t already, and this is something that millions of skeptical consumers all across the spectrum use regularly. A VPN has a multitude of benefits, such as being able to access region-locked content, browsing the internet with through-and-through anonymity, keeping your personal information hidden, and even steering clear of data-throttling.
We recommend using a VPN on your Chromebook if you’re not using one already. There are several premium-grade options out there, from paid ones to free-to-use as well, so do your research before investing your time, effort, and money in a VPN.
One service that we’ve heard a great deal about is TunnelBear. This is a multi-platform VPN that’s totally free and has an overwhelming number of positive reviews online. What makes this an easy recommendation is that TunnelBear is available to download from the Chrome Web Store as well – do that by clicking on this link. This can allow you to comfortably get it on your Chrome OS without breaking a sweat. The plus point here is that you get top-of-the-line security and encryption for all of your browsing traffic. Using a VPN truly consolidates your Chromebook’s security. We suggest you get started with one right away.
Change your search engine
Most of us have problems with Google being at the front end of receiving our private particulars, so not why give our commonly used search engine a break and shoot for a completely different one? It’s quite possible to surf the internet using other search providers, such as Bing, Yahoo, and others that rank high, but your new search engine doesn’t have to be among the exceedingly popular ones. We believe in the unique approach that DuckDuckGo offers, which is not having to worry about being tracked online.
This search engine is one of the firsts ever built to serve a single purpose: protecting users’ privacy on Chrome. DuckDuckGo makes it possible to escape the confines of those who attempt to invade your privacy by blocking hidden trackers present on the websites you visit. The search engine also compels sites to use an encrypted connection whenever it’s possible for them to do so. We highly recommend that you start utilizing DuckDuckGo as your daily driver to negate privacy concerns and browse freely.
Download DuckDuckGo directly from the Chrome Web Store today.
Disable FLoC
Another venue that has recently seen widespread backlash is FLoC, Google’s latest attempt to replace cookies with its own tracking system to respect users’ privacy more. According to the experts, Federated Learning of Cohorts, or FLoC, would attribute to become more of a trouble monger than a problem-solver. One of the major privacy concerns that FLoC raises, according to the Electronic Frontier Foundation (EFF), is that any malware trying to get through someone’s personal data would then only have to overcome anonymized IDs in thousands as compared to the millions in the conventional cookie method.
- Read more about FLoC in this article here.
However, FLoC has rolled out to a small percentage of people and isn’t in its full-blown stage yet. You can make your Chromebook even more secure by opting out of FLoC if you are enrolled in it, that is. We’ve mustered the following steps to show you how to disable FLoC and everything similar that arrives in the future.
1) Click on the “Customize and control Google Chrome” hamburger icon in the top-right corner of your window right beside the extensions bar.

Customizing Google Chrome
2) As several options appear in the drop-down menu, click on “Settings” to get to the next step.

Clicking on Google Chrome’s “Settings”
3) After opening your browser’s “Settings,” click on “Privacy and security” in the left column.

Clicking on Privacy and Security
4) You’ll now have to click on “Privacy Sandbox” in one of the options that appear on the right after you click on “Privacy and security.” Doing so will open a new tab on your browser, and this is where you’ll be disabling FLoC.

Clicking on Privacy Sandbox
5) You’ll now click on the toggle beside “Privacy Sandbox trials.” This is a system that comes out with features like FLoC. Switching it off altogether prevents your browser from being added to any program such as the one in question.

Disabling Privacy Sandbox Trials
That’s it for the major part. If you do not see the option of “Privacy Sandbox” in the “Privacy and security” area, there’s another method to opt out of FLoC using your Chromebook. Let’s dive into that right now.
1) In the “Privacy and security” section of your Chrome browser’s settings, click on “Cookies and other site data.”

Clicking on Cookies and Other Site Data
2) After you’ve moved ahead, it’s now time to finalize the process by clicking on “Block third-party cookies.” This takes away all your worries regarding FLoC.

Blocking Third-Party Cookies on Chrome OS
That’s about it for getting out of Google’s FLoC program. Since you’ve gotten out of the Privacy Sandbox Trials, you’ve subjected yourself to unenroll in everything that follows identical to FLoC.
Conclusion
Chromebooks already come with the promise of state-of-the-line security, but that doesn’t mean you can’t switch up a few things and make your device even more strong when it would boil down to keeping your private data hidden and safe. In this article, we’ve shown you several ways to do that, and we genuinely hope that most of these are going to come off as game-changers for your Chrome OS experience. Therefore, do give each method a go to see if it brings about any apparent changes. As always, Chrome Ready wishes you happy and secure browsing!
