It’s safe to say that Chrome OS has decent options available presently if one seeks to download applications of varying nature on this minimalistic operating system. May it be the Play Store or the highly effective Linux Terminal, there’s something for everyone now on Chromebooks, especially how they are updated consistently. Each time we’re provided with the quality of life features, among other functions.
However, it’s worth noting that Chromebooks are devices on their own and comprise a separate software build. Despite the integration with the Google Play Store and Chrome OS being connected with the world of Android applications, there will be quite a few apps or games out there that you won’t be able to download on your Chromebook using the Play Store. This is exactly where sideloading comes in.
To sideload is to transfer an application, file, or date from one device to another. Sideloading also refers to the downloading of applications from a third-party source. To make sure you get your desired application, we’ve written this article to guide you on sideload applications on a Chromebook.
Sideloading applications on a Chromebook
If you want to sideload apps on your Chromebook, the first step you’ll have to do is to enable the Developer Mode. This specialized mode has several uses, ranging from getting access to root files and modifying Chrome OS’s system files to even installing other operating systems such as Linux. We’re going to briefly explain how you can switch on the Developer Mode on your Chromebook. Do note, however, that this would erase all files present on your local storage, so the time is nigh to back up everything you hold important on your device. With that being said, let’s get into the breadth of this tutorial.
Enabling the Developer Mode
1) Begin by pressing and holding the “ESC” and “Refresh” keys together, followed by pressing the “Power” button. This will take you to Chrome OS’s Recovery Mode.

Booting into Recovery Mode
2) As you do that, you’ll be taken to Chrome OS’s “Recovery Mode.” The display in front of you will say, “Please insert a recovery USB Stick.” However, if you’re currently using a model that came out 3-5 years back, you might see a different screen that’ll say, “Chrome OS is either missing or damaged.” This is perfectly normal, and you should proceed anyway. To continue, press “CTRL + D,” and that should do the trick.

Recovery Mode
3) After that, a new screen will appear that’ll show you, “To turn OS Verification OFF, press ENTER. Your system will reboot, and local data will be cleared.” By OS Verification, the system means that after enabling the Developer Mode, your Chromebook will no longer be able to perform a self-check when booting up. This usually keeps malware and viruses at bay. Anyways, press the “Enter” key to continue.

OS Verification Turned OFF
4) As soon as you do that, your Chromebook will restart. When it boots up, there’s going to be a new screen that’ll say, “OS verification is OFF. Press SPACE to re-enable.” Now, you again have to press “CTRL + D” together to enable the Developer Mode. Note: If the screen remains idle for too long, it’ll start beeping to get your attention.

OS Verification Confirmation
5) You’re almost done now. After pressing “CTRL + D” on the screen above, your system will restart, and when it does, it should be preparing your Chromebook to enter the Developer Mode. This shouldn’t take too long.

Changing to the Developer Mode
6) One more screen will appear that’ll still tell you that it’s going to take a while. You have to wait until there is progress and completion.

Preparing
7) Lastly, when the system is all done with the preparation and transition, it’ll come back to the screen, as shown in Step 4. What you have to do here is press “CTRL + D” one final time, and you’re good to go.

OS Verification Confirmation
8) That’s about it! The device will restart for the last time, and now it’ll just be the usual “Welcome” screen. You can continue with the set-up now that your Chromebook has been fully Powerwashed and sign back in with your Google account to resume functioning normally.

Welcome Screen
Sideloading Applications
Now that you’ve enabled the Developer Mode, it’s going to be painless to sideload applications on Chrome OS. All you have to do is search for the desired application online and download the APK file. Let us take Swordigo—a fun side-scrolling game—as an example to help illustrate the process.
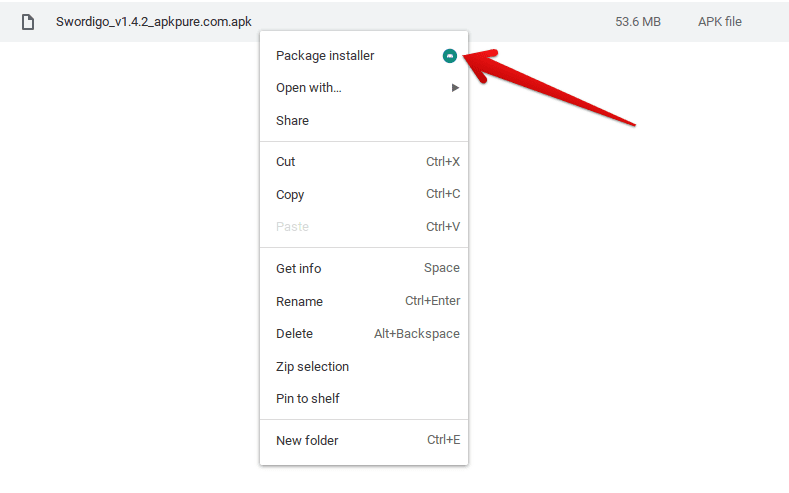
First off, we’ll get the APK file of our desired application (Swordigo, in this case) from the internet. It’s easy to find apk files, so there’s no need to worry here. After downloading it on your Chromebook, head to your “Files,” where it’ll be stored, and perform a right-click. Doing so will reveal more options. Click on “Package installer” to install the APK file on your Chromebook.

Installing the APK File
Congratulations on making it this far! You’ve successfully learned how to sideload apps on a Chromebook.
