If not the ones released in the previous decade, a modern-day Chromebook is equipped to handle all sorts of technical complexities and can accommodate a variety of devices. The Acer Chromebook Spin 514 (2021 AMD), for one, is an absolute workhorse having four USB ports in total, out of which two are USB-C while the rest are A-type USB ports. Decent I/O, far-flung functionality, and great value for money have all made Chrome OS a top contender in the computer industry across the spectrum.
In terms of connecting a wireless mouse to your Chromebook, all you have to do is make a few clicks, and you’re good to go. Keep on reading for the complete process explained and illustrated in detail. Let’s begin.
Connecting a Wireless Mouse to Chromebook
To connect a wireless mouse to your Chromebook, we’ll be using Bluetooth. This, of course, implies that the mouse you intend to connect to is Bluetooth-enabled by default. The following steps will take it from here.
1) Click on the “Status Tray” in the bottom-right corner of your screen where the time is displayed.
Clicking on the “Status Tray”
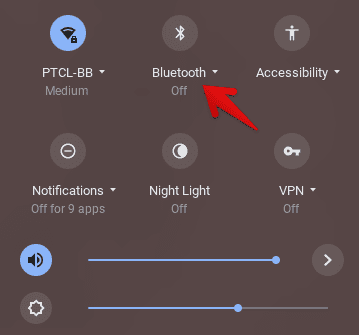
2) Next, click below the Bluetooth icon to turn it on and search for devices that can be connected to your Chromebook.

Clicking on Bluetooth
3) The next step is checking your mouse for a button that will turn it on and allow it to be visible for a Chromebook to connect with. The button is usually located on the bottom of the mouse. Continue to the next step when you’ve found it and turned your mouse on.
4) After turning your mouse on, check your Chromebook’s Bluetooth to connect to it. When you see the name of the device appearing, click on it to merge it with your Chromebook.
- Note: If your mouse does not appear on your Chromebook’s Bluetooth, try turning it off and then on again since the first time set-up can take a couple of attempts.
That’s it! As soon as you form a connection, you’ll notice the cursor moving per the movement of your wireless mouse. The whole process was as easy as that.
Using a Radio Frequency Mouse on Chrome OS
Another type of mouse that falls under the wireless category is a Radio Frequency, or more colloquially known as an RF mouse. It comprises a receiver component that can be plugged inside the USB port of your Chromebook.
After connecting that, your RF mouse will automatically synchronize with your device, and you can start using it right from there on out. However, do make sure that you’ve also turned the RF mouse on. Otherwise, it simply won’t work.
One more thing to confirm here is that you’re using an accessory compatible with Chrome OS. If you’re unsure about that, go to this link and check out the “Works With Chromebook” guide. That is sure to get you started on the right track.

1 comment
Thank you for the information!