For the most part, Chromebooks are hassle-free devices with a simplistic operating system, but now and then, it is possible to run into connection problems on ChromeOS. These could range from Wi-Fi troubles, Bluetooth issues, or an inability to connect to your phone. Whatever the case, we’re here to help.
This guide will review some of the most effective solutions for remedying connectivity-related issues on your Chromebook. It’s only in severe cases that you have to call in an expert or get your hardware fixed. Otherwise, most of these hiccups can be mitigated if you put in some effort.
With no further ado, let’s dive right into the guide.
Resolving network connection problems on ChromeOS
Before we get into the solutions, it’s essential to know what we’re up against, given how your Chromebook encompasses several different avenues of connectivity. We’ll divide the fixes on the basis of connection type, so you can find it easier to pinpoint your particular problem and learn how to sort it out accordingly.
1. How to fix Wi-Fi issues on your Chromebook
Although there are ways to make the best out of your Chromebook offline, there’s no stressing the importance of having your Chromebook connect to Wi-Fi. In the unlikely case that the device you own cannot connect to the internet, there are a few things you can try out luckily. These have worked for the majority of similarly troubled users across the board.
What to do if you can’t connect to Wi-Fi
In case your Chromebook is repeatedly failing to connect to your Wi-Fi connection, the first thing to try is a firm restart of the device. Press and hold the Power key and let the system shut down. Use the Power key again to boot it back on. Try connecting to your Wi-Fi now to see if the issue was resolved.
Remove entries from “Preferred networks”
There’s another measure you can take and see if things work out for you that way. Sometimes, having preferred networks can cause discrepancies in the way your Chromebook recognizes new connections and tries to connect to them, so it’s better to take out entries from that section on your Chromebook and confirm whether doing so makes a difference afterward.
Head over to the “Settings” app, choose “Network” from the left column, click on “Wi-Fi,” and select “Known networks.” Once done, you should be able to see a list of all the networks that take precedence over others on your device. Click the “More actions” button to dismiss these entries one by one.
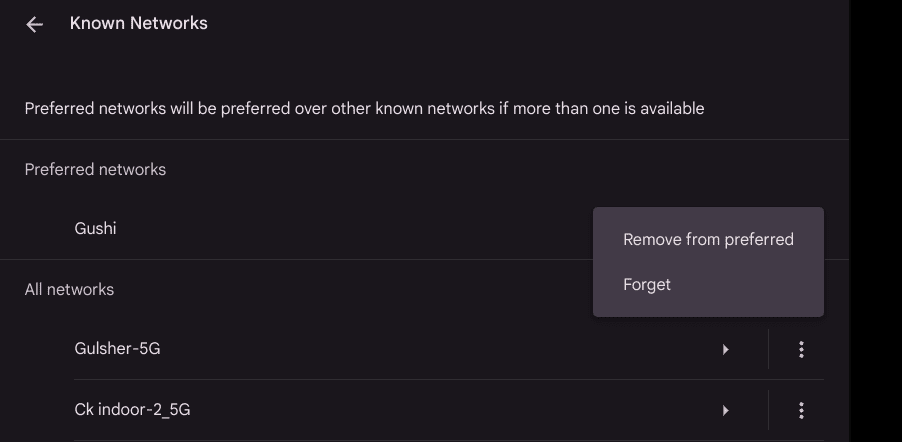
Removing preferred networks
Look for a physical Wi-Fi toggle
Some Chromebooks have a physical switch for turning the Wi-Fi on and off. Carefully examine the sides of your device and check whether this toggle has been disabled. It’s something that is present on higher-end Chromebooks, and very well could be the reason that your device isn’t connecting to Wi-Fi no matter what you do.
Perform a hardware reset
Don’t confuse a factory reset with a hardware reset. While the former wipes your Chromebook’s storage clean, the latter simply refreshes your device’s hardware components, such as the trackpad, wireless network interface controller, and more. To do this, press the “Power” and “Refresh” keys at the same time, and that should do it.
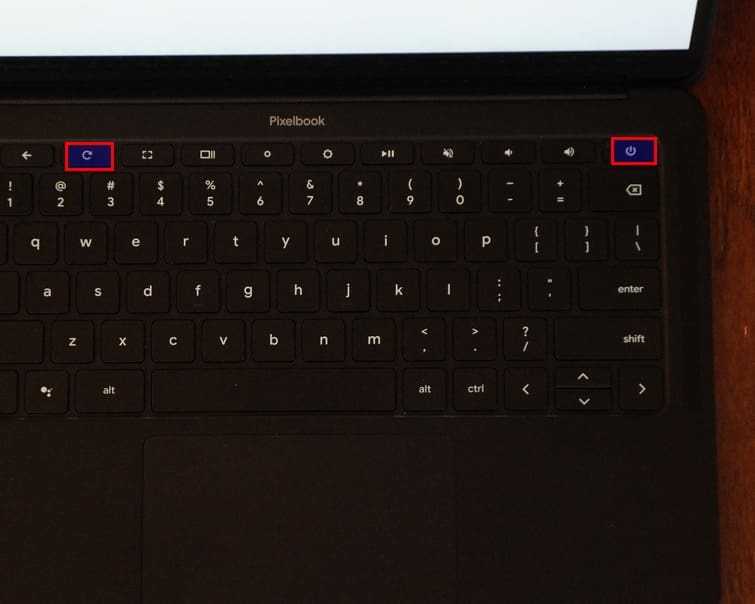
Key combination for a hardware reset
Try connecting to your Wi-Fi now and see if this potential solution did the trick.
What to do if your desired Wi-Fi connection does not appear on the device
I’ve been in this situation before, and I realize how frustrating it is. That said, the thing that worked for me was a combination of restarting both the Chromebook and the home router, with more stress on the latter. Keep rebooting your internet router and that should make the relevant SSID appear on your Chromebook for you to connect to.
Try a wired connection
Another measure you can take in this regard revolves around using a wired connection, but we realize how this isn’t so widely manageable for many. That’s because there are only a handful of devices out there that come with an Ethernet port that can accommodate a wired connection, such as the brilliant Framework Laptop Chromebook Edition.
Use a USB-C hub if you don’t have an Ethernet port-ready Chromebook

AUKEY 8-in-1 USB-C Hub
You got that right. There’s a gadget known as a USB-C hub that can be plugged into any Chromebook to dramatically enhance its I/O capacity. Fret not, though, because you don’t have to go ahead and find this tool for yourself—we’ve already done the work in our curated guide on the best USB-C hubs to buy for your Chromebook. Feel free to refer to that for hand-picked choices.
What to do if your Chromebook keeps dropping your Wi-Fi connection
In the rare case that your Chromebook does connect to a Wi-Fi network, but then drops the signal immediately afterward, restarting your Chromebook can help, followed by carefully inspecting the source of your connection and assessing its strength. You may need to contact your ISP if the problem is server-side, so keep that in mind as well.
Reconnect to a network by using the “Forget” feature
One thing that you can try out that has worked wonders for people across the board pertains to the use of a simple reconnection of your Wi-Fi network. Head to the “Settings” app on your Chromebook, followed by clicking the “Network” section on the left. Once done, choose the “Wi-Fi” button to get to the next step.
You should now be able to visualize the entire list of nearby Wi-Fi connections, including the one that your device is currently connected to. Click on the connection, followed by selecting the “Forget” button. That way, you’ll be disconnected from your Wi-Fi promptly, allowing you to connect to it afresh by entering your password and finalizing afterward.
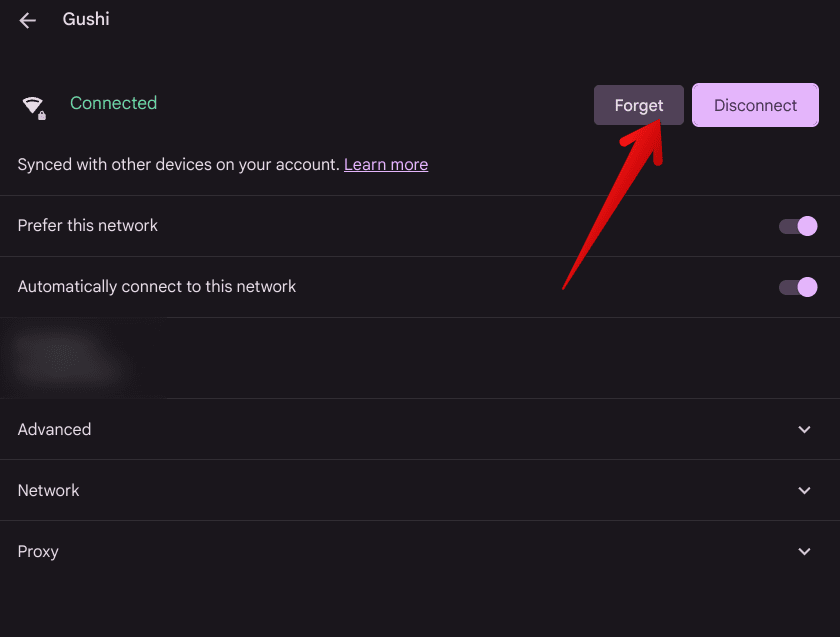
Forgetting a network
That should resolve the issue on your end, as it has for other users. That said, if the issue continues to persist, here’s what you can try next to potentially mitigate the hassle.
Go through the usual troubleshooting techniques
When your Chromebook connects to Wi-Fi but does not keep that connection stable, you might want to try restarting your Chromebook, rebooting your router or modem that acts as the network’s signal source, and checking ChromeOS for updates—all the usual troubleshooting methods that often work like charm.
Try a different connection
Last but not least, one thing that worked for us during our tussle with the Chromebook losing the connection issue is that we tried switching up our Wi-Fi with another connection. That automatically took care of the problem just like that and allowed us to retain our Wi-Fi effortlessly. It’s recommended, therefore, to replicate this potential fix on your end.
2. How to resolve Bluetooth problems
If your Chromebook is struggling to make good work out of its Bluetooth feature, you’re probably missing out. Luckily, we’ve been in the same situation earlier, and have a good grip on how to get the Chromebook’s Bluetooth functionality working again.
Keep toggling the Bluetooth off and on again
First off, you should try turning the Bluetooth feature on your Chromebook off and on again repeatedly at least 4-5 times to see if that doing that resolves the issue. Simply select the Bluetooth button on the Status Tray menu that you can access from the bottom-right corner of your Chromebook’s interface to turn the function off it it was previously turned on.
Once done, turn it back on and try connecting to your device to determine if the issue has now been fixed.
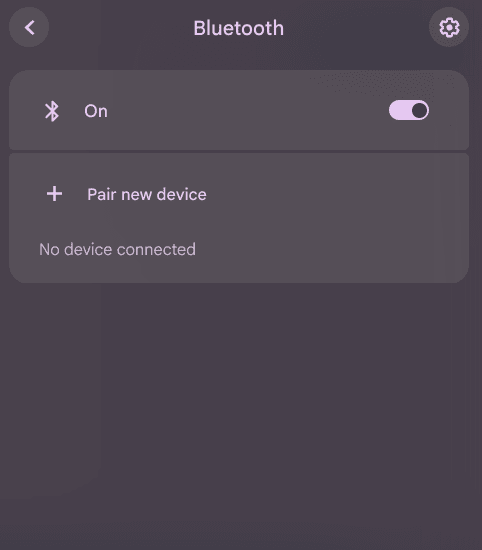
Toggling the Bluetooth off on ChromeOS
Closely inspect your Bluetooth device
It is likely that your Chromebook isn’t to blame fully for Bluetooth discrepancies. At this point, we highly recommend taking a better look at the device you’re wanting your Chromebook to connect to. Check whether it’s on and giving off the Bluetooth signal properly and hasn’t been powered off due to, perhaps, battery insufficiency.
You can also make a solid confirmation here by hooking up your Bluetooth device to something other than your Chromebook to see if a connection is formed there. If you still cannot connect, the issue probably exists within the Bluetooth device and not your Chromebook. Better get that checked or replaced, depending.
Unpair the device you wish to connect to
In case you’re struggling in a situation where the Bluetooth device is already paired to ChromeOS, try unpairing it and pairing it back again to gauge whether that does the trick. Make your way to the “Bluetooth” section in the “Settings” app, find the device that you’ve connected to, and click “Unpair.”
Re-pair it using the on-screen instructions. Hopefully, you will be able to connect and use the device just like you wanted to from now on.
3. How to properly connect to your phone on ChromeOS
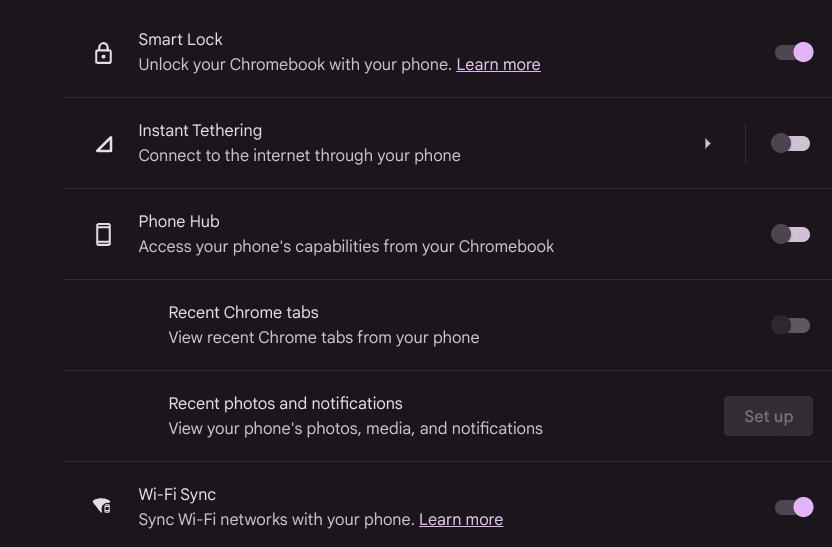
Having a connected phone unlocks many features for ChromeOS
There are a multitude of benefits to having a connected phone on ChromeOS, such as being able to unlock your Chromebook with your Android phone, but all that can quickly go away if the phone stops syncing to the device. To mitigate this, there are a few things that you can try, starting with disconnecting the phone from ChromeOS.
Disconnect the phone from your Chromebook
To do this, open the “Settings” system utility and click the “Connected devices” option on the side column to the left. Immediately afterward, click on your phone’s name in the middle of the screen. Doing so should allow you access to the added swath of features available on your Chromebook with regard to your smartphone.
Here, simply click on the “Disconnect” button at the bottom of this page and that should do the trick. You will now have to link your Chromebook to the phone again in the next step.
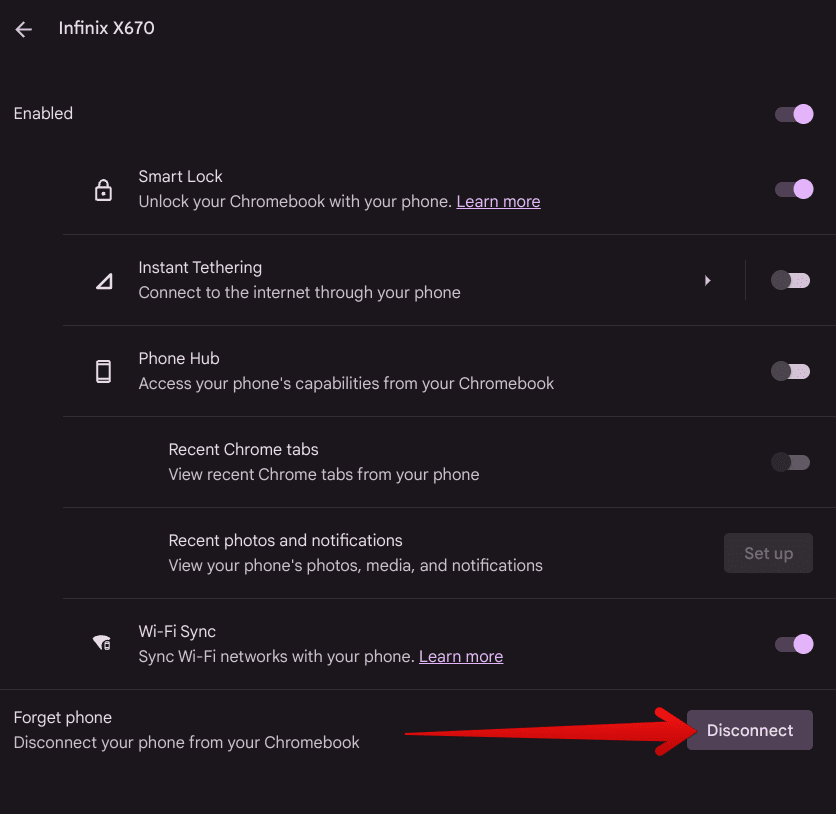
Disconnecting the phone from ChromeOS
Connect your phone to the Chromebook anew
After disconnecting, you will be taken back to the previous page on your screen, making it possible to click the “Set up” button to begin the connection process afresh. From here on out, simply follow the on-screen instructions and you’ll have your phone up and running in no time on your Chromebook.

Clicking the “Set up” button
The gist of it is that you need to have Bluetooth and Wi-Fi enabled on both devices for the process to take flight. You will also need to re-enter your Google password somewhere along the procedure. For more details and step-by-step instructions, here’s how to connect Chromebook to your Android phone wirelessly with ease.
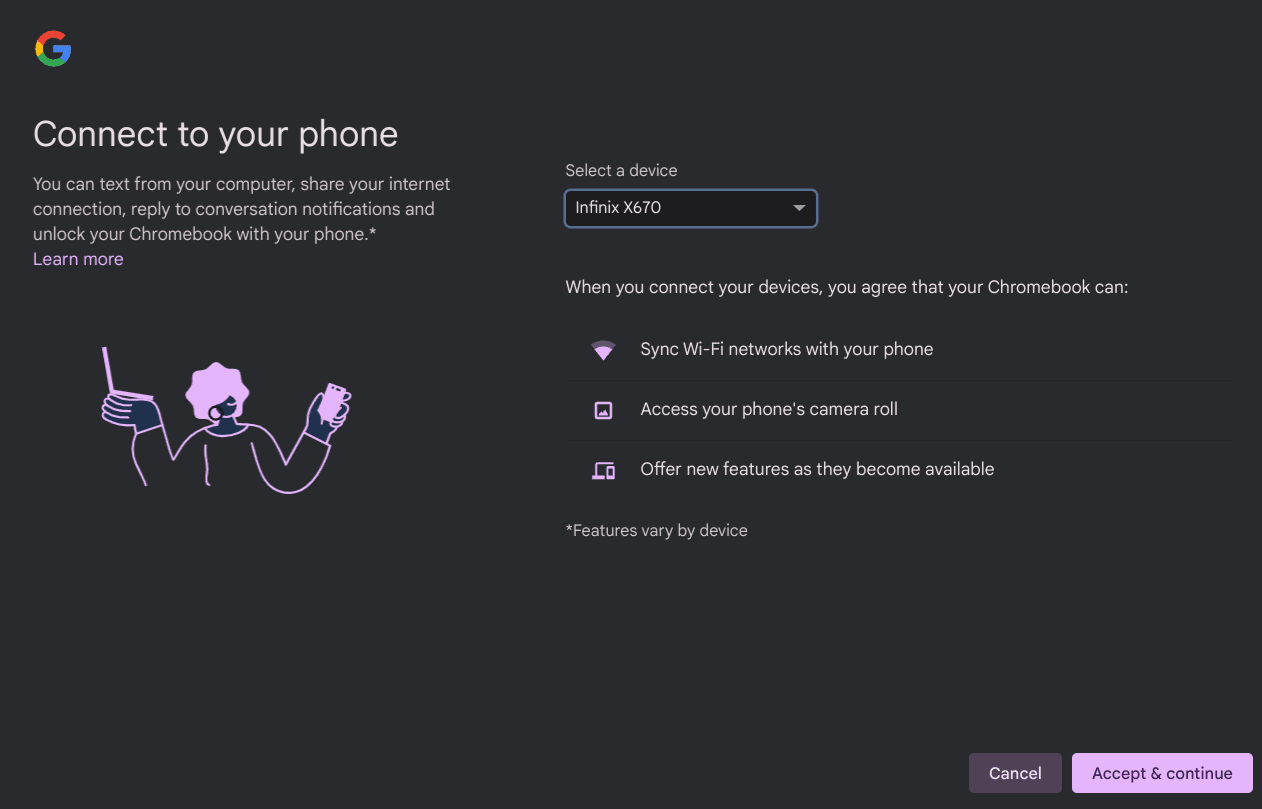
Linking the phone and ChromeOS together
What should you do if nothing works for your Chromebook?
In the extremely unlikely scenario that your Chromebook still cannot connect to the internet even if you’ve tried all these steps, the next step is to pop open the “Diagnostics” app on ChromeOS and see whether this system-installed tool can help you decipher the exact issue on your end. Simply pop open the launcher and type in “Diagnostics.”
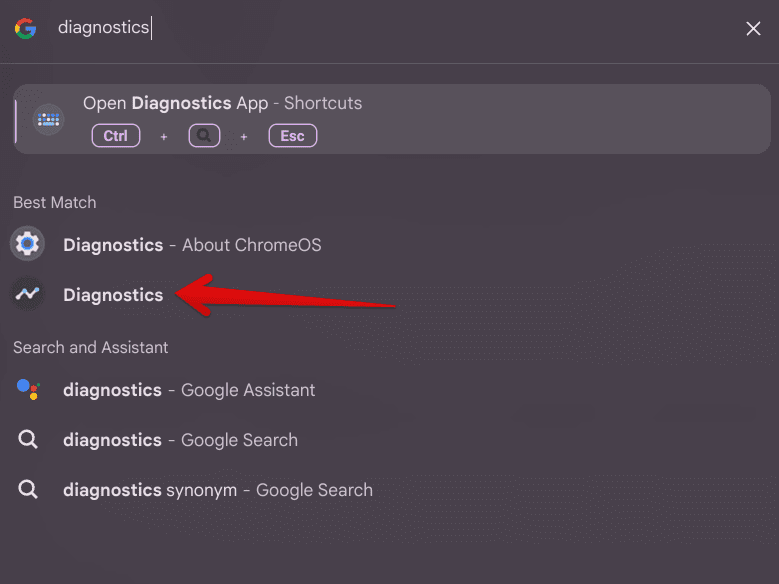
Opening the Diagnostics app
Let the Diagnostics tool run a scan on your Chromebook
Instinctively, the next step is to run a connectivity test on your Chromebook. Click on the relevant section on the side column to the left and and let it run by itself. Soon enough, you’ll be shown the results of the scan, and whether there’s a hardware problem associated with your device in specific. This way, you can acquire clarity on how to proceed.
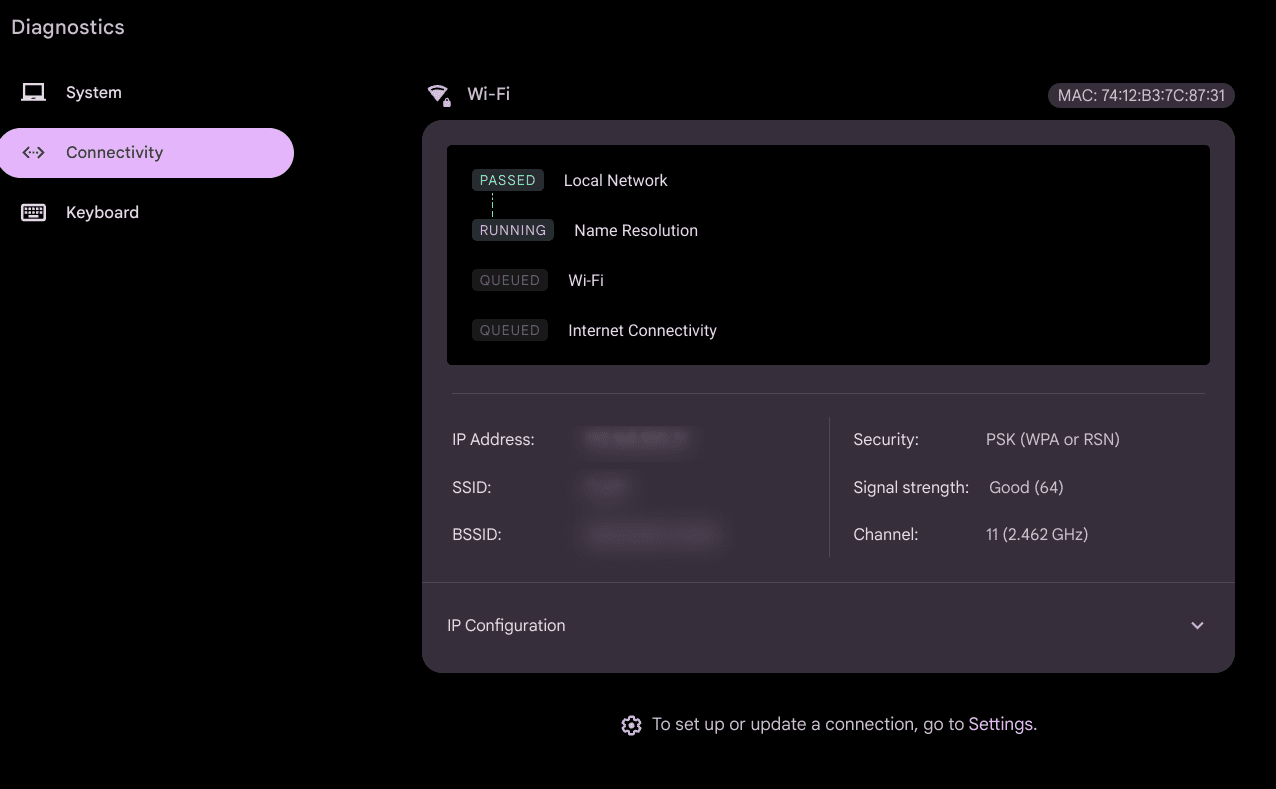
Running a connectivity test in the Diagnostics app
Similarly, it’s worth performing the “System” check while you’re in there. While doing so won’t help you with phone-, internet-, or Bluetooth-related issues, you’ll be able to determine whether there are other problems associated with your Chromebook as well that will impede your usability down the road.
It can, therefore, pay off to perform these checks from time to time. Select the “System” button on the column to the left, followed by taking all three available tests—Battery, CPU, and Memory one by one. Make sure to have enough storage cleared up on your end so the tests can be conducted without pause.
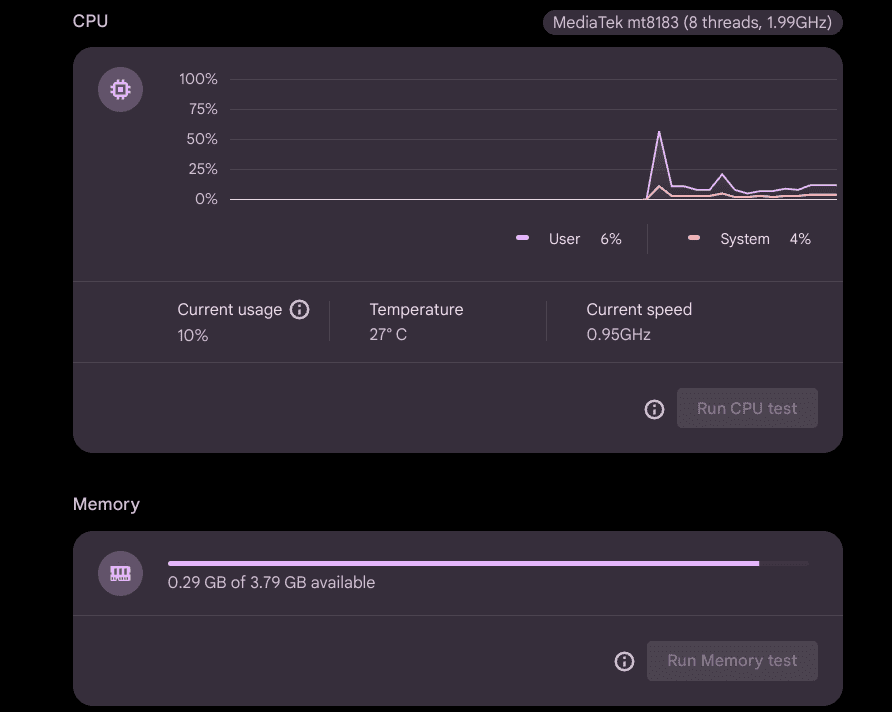
Running the rest of the diagnostics tests on ChromeOS
Powerwash the Chromebook
Before we top things off, it’s worth giving the Powerwash method a go in case there has been no resolution for your troubles so far. For those not in the know, the term “Powerwash” is the equivalent of performing a factory reset, with the only difference being that this term is tailored for Chromebooks specifically.
Performing a Powerwash resolves most ChromeOS issues
Considering how this feature erases everything present on your device locally, which is nothing short of a hassle to deal with if you plan on backing up your important data, a Powerwash should be considered as the last resort type of solution, so it’s important to exhaust other options prior to this one.
That said, factory resetting your device can relieve the vast majority of troubles that one would be facing on their end, including connectivity problems. Powerwashing a Chromebook is a pretty simple process; you simply have to head to the “Reset settings” area in the main “Settings” app. You’ll find those under the “Advanced” submenu.
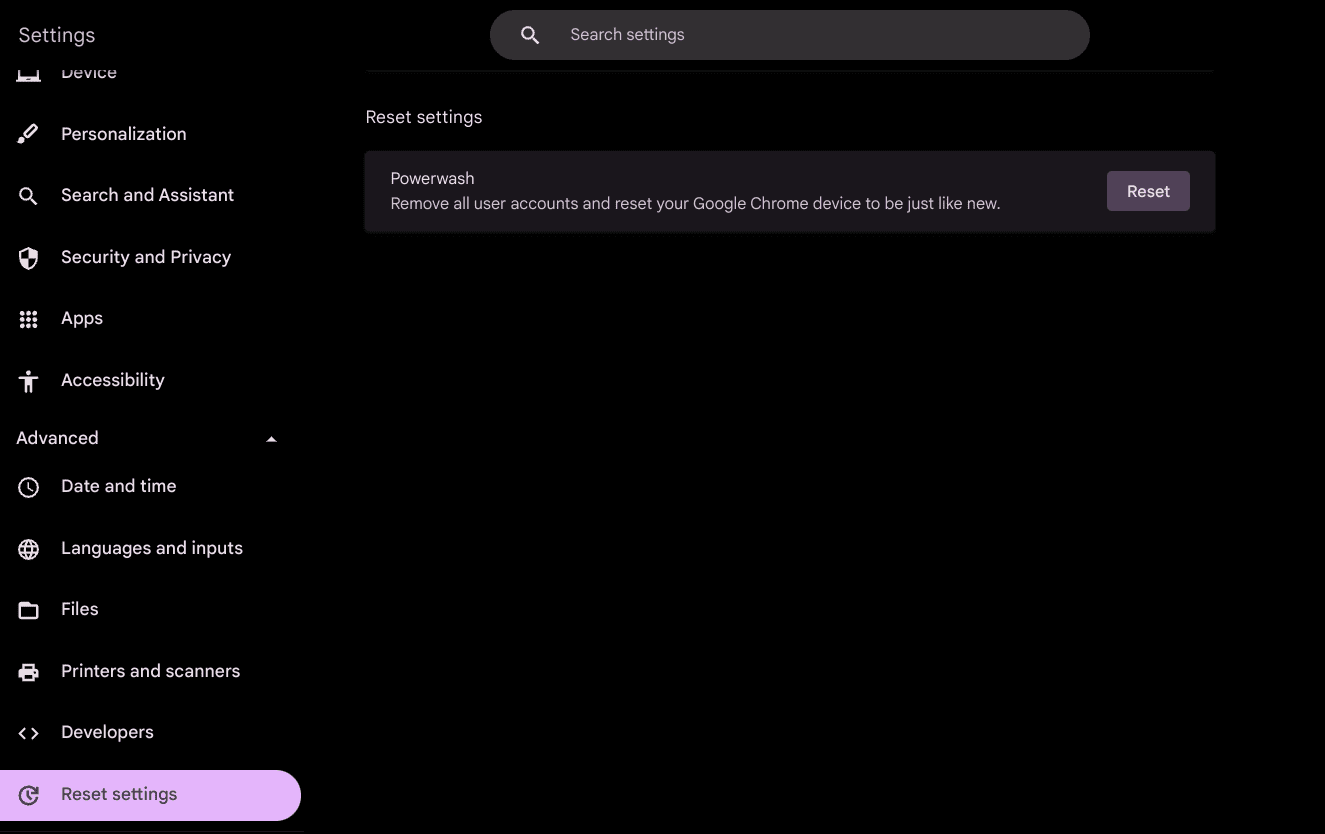
The Powerwash feature
As soon as you’re there, click the “Reset” button under “Powerwash” and the process should begin after the confirmation of a follow-up prompt. Please note that once you confirm to reset your device, there is no going back. Make sure to back up anything important to you before performing this step. Come to think of it, you’ve got some really nice cloud storage options available as well.
Get in touch with the manufacturer
In case the Diagnostics tool is somehow unable to diagnose the device’s connectivity issue and Powerwashing does nothing either, your next step is to contact the manufacturer of your Chromebook since the OG company is the one that can shed more light on the matter. This support page by Google contains links to all the mainstream Chromebook makers. Best refer to them for a better insight into the solution.
And it’s all the better if you’re still under warranty, but in case you’re not, you may need to shell out some bucks to get the problem resolved, depending on whether your device just needs a repair or a part replacement as well.
Conclusion – Keeping your Chromebook in ship-shape condition
Chromebooks are low-maintenance devices that hardly ever require you to put effort into keeping them in good health, outside of the usual preservation methods, of course. However, should things go wrong sometimes, such as if the Google Play Store starts acting up, there are ways to ameliorate the situation in a number of different ways.
In this guide, we’ve learned some of the methods to incorporate if your Chromebook’s connectivity starts faltering, such as disabling the Wi-Fi and then turning it on again, hardware resetting the device, and, as a last resort, performing a Powerwash. Let us know in the comments section if any of the methods outlined ahead did the job for you.
Chrome Ready wishes you good luck!
