In the tech-forward age of today, video conferences and everything of the like has just become the norm. For online classes and business meetings alike, video calling is all the rage these days. This is done using a slick and fast device that ticks all the boxes to provide the best possible user experience. When such quality traits are under question, a Chromebook is the first thing that pops into our digital-centric minds. This is because many latest Chrome OSs offer a great webcam for regular calling, and out of them, the Google Pixelbook Go is one heavy hitter.
However, it’s downright painful to see that your Chromebook’s camera isn’t working properly for some reason. Luckily, a few easy fixes can save you a trip to the shop or a lengthy conversation with your manufacturer. Therefore, this article will talk about three of the best methods you can apply if your Chrome OS camera is giving you trouble. Let’s dive straight in.
Fixing Your Chromebook’s Camera
Before we get into the breadth of the article, make sure there’s no physical damage to your Chromebook’s camera. Check carefully for any cracks or other similar breakages that indicate heavy damage to your device’s hardware. If this is the case, you may want to contact your warranty provider. If not, the following methods will guide you in getting your camera’s functionality back.
Restart Your Device
This may seem like a no-brainer, but restarting your Chromebook can yield a plethora of benefits. For once, each time you reboot your device, the system performs a self-check to ensure that no malware is hindering your Chrome OSs performance. If a virus has somehow seeped its way into your device, this self-check mechanism will get rid of it and restore your Chromebook to its original state.
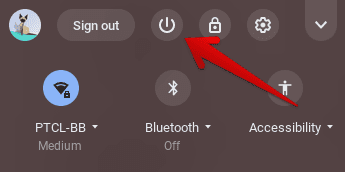
To restart your device, press and hold the “Power” key on your Chromebook’s keyboard. Alternatively, you can also click on the “Status Tray” located in the bottom right corner of your device’s screen and then click on the “Shut Down” button. This will also turn off your Chromebook, and then you’ll have to boot it back up by pressing and holding the same “Power” key.

Shutting Down the System
If that doesn’t solve your issue and the prompt still says, “No camera found,” try this next step below.
Use an External Webcam
The problem might only exist within the hardware of your Chromebook’s camera. However, that doesn’t restrict you from using external webcams for your video calls and conferences. Although this step does not relate to fixing your Chromebook’s camera, it’s still a trusty alternative to pursue in the case of dire emergencies.
Try Another Video Calling App
If, for instance, you’re using Zoom for video conferencing and your camera has stopped working there, try Skype. This would help us tick one more box to figure out why your camera is causing issues. If your camera works on another app that you’ve tried, it means that the problem is related to the first app’s permission requests. You’ve probably allowed it to access the Chromebook’s camera, but it’s not picking that up for some reason.
To fix this, simply uninstall the application and then install it back again. That should do the trick for you. Still, we’ve got one more ace up our sleeve if the issue persists. Continue down below.
Powerwash Your Chromebook
“Powerwash” is like a factory reset that wipes everything off your device and makes it as good as new. However, do note that all your existing data will be erased, except for the stuff that’s stored on cloud-based services like Google Drive. Everything else will be deleted, so make sure you’re backing your personal data somewhere secure.
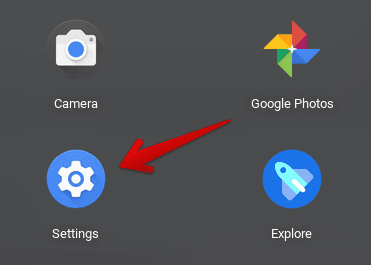
Powerwashing your Chromebook is a last resort that’s recommended only when nothing else works. To do this, go to your Chromebook’s “Settings” by either clicking on the “Status Tray” or by accessing them through your Launcher.

Opening “Settings”
Once that window has opened up, look to the left and click on “Advanced.” This will be just below “Linux (Beta).”

Advanced Settings
Clicking on “Advanced” will reveal a bunch of other settings. Scroll down until you find “Reset settings” and click on it. This will show you an option to “Powerwash” right in front of the screen. Click on it to begin.

Reset Settings and Powerwash
When you do that, you’ll get a prompt asking you to restart your PC. You will have to conform to that and proceed to reboot. The next time your Chromebook starts, your device will be fully reset. Continue by going past the initial setup and logging in with your account. If your camera issue persisted on a certain application, install it again and give it a go. The problem should be fixed by now.
- For more methods to “Powerwash” your Chromebook, give this article a read.
If even a “Powerwash” does not fix your device’s camera, it’s time to contact your manufacturer and talk it out with them.

1 comment
How can you take pictures on Chrome tablet without some type of button to control or to control on the screen. How would you take pictures out side with out Camera on the back side of Tablet, camera only on Keyboard area.