Today, I am particularly excited to share with you my journey and expertise in customizing the ChromeOS shelf. Now, you might wonder why this topic has got me so exhilarated. The reason is simple – by tuning the shelf to suit your personal tastes, not only can you enhance your productivity, but you can also add a dash of your personality to your workspace. So without any further ado, let’s delve into the wonderful world of shelf customization.
Introducing the ChromeOS shelf

ChromeOS Shelf
Before we get our hands dirty, it’s important to understand what the ChromeOS shelf is. Simply put, the shelf is the taskbar of your ChromeOS where you can pin your most frequently used apps, check notifications, and navigate between windows with ease. It sits at the bottom of your screen, although you can move it around, but we will get to that part in a minute. I am a huge fan of having all my favorite apps and tools at my fingertips, and if you are anything like me, then you would love customizing your ChromeOS shelf too!
ChromeOS shelf customization
Step one: Understanding the basics
Before we dive into the more complex customizations, let’s grasp the basics first. This section is especially dedicated to those who have recently started using ChromeOS. It took me a while to get accustomed to the shelf when I first started, but trust me, once you get the hang of it, there’s no looking back.
Pinning your favorite apps
Personalizing your ChromeOS shelf starts with pinning your favorite apps to it. This is something I absolutely adore as it gives me quick access to all my beloved apps. Here’s how you can do it:
- Open the Launcher and find the app you want to pin.
- Right-click on the app icon (if you are using a mouse) or tap and hold (if you are using a touchscreen).
- Select ‘Pin to shelf’.
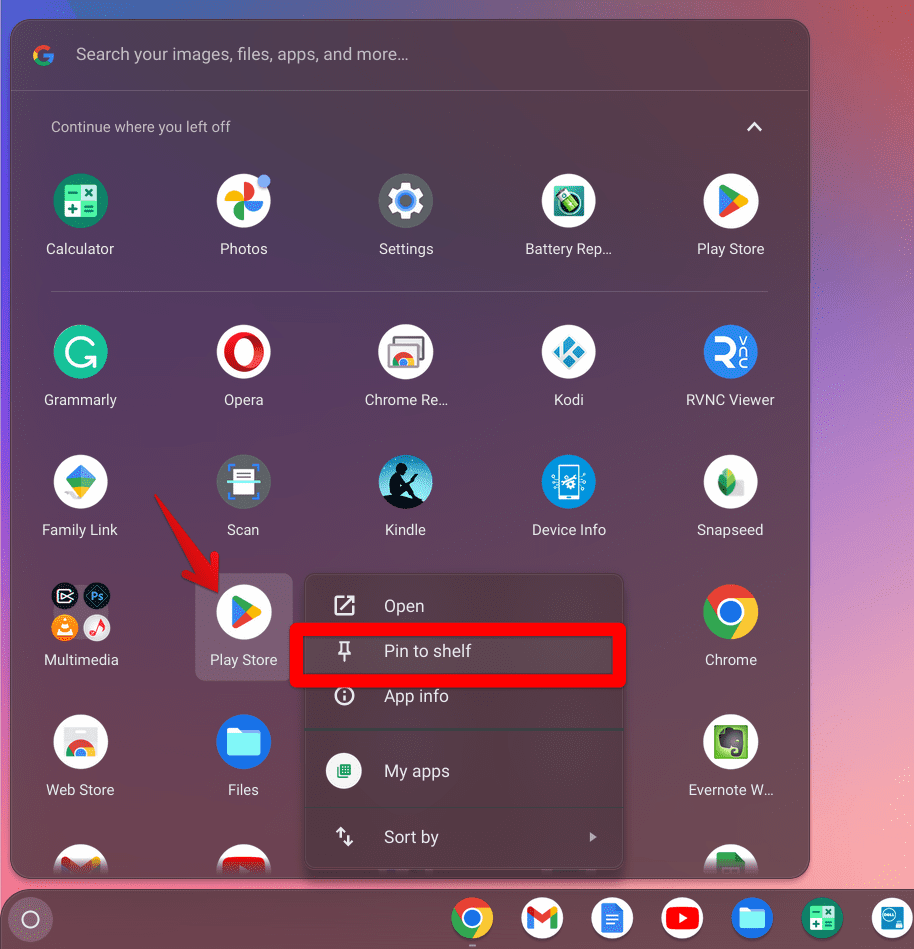
Pinning a app to the shelf
Voila! Your app will now appear on the shelf, giving you speedy access whenever you need it. Unpinning an app is just as simple – just right-click or tap and hold on the icon on the shelf and select ‘Unpin’.

Pinned app on shelf
Resizing the shelf
Unfortunately, you cannot resize the ChromeOS shelf in the traditional sense. The shelf is a fixed width and height, and you cannot drag the edges to make it bigger or smaller. The only way to increase the size of the shelf and icons in ChromeOS 116 is by changing the display resolution, which in turn resizes all other items on the screen.
Step two: Adding a personal touch
Now that we have covered the basics, let’s move onto the more exciting part – adding a personal touch to your shelf.
Changing the shelf position
Believe it or not, but changing the position of the shelf can significantly influence your user experience. I remember the first time I shifted the shelf to the left side of the screen, it was a game-changer for me. Here is how you can do it:
- Right-click on an empty space on the shelf.
- Hover over ‘Shelf position’.
- Choose between ‘Left’, ‘Bottom’, and ‘Right’.
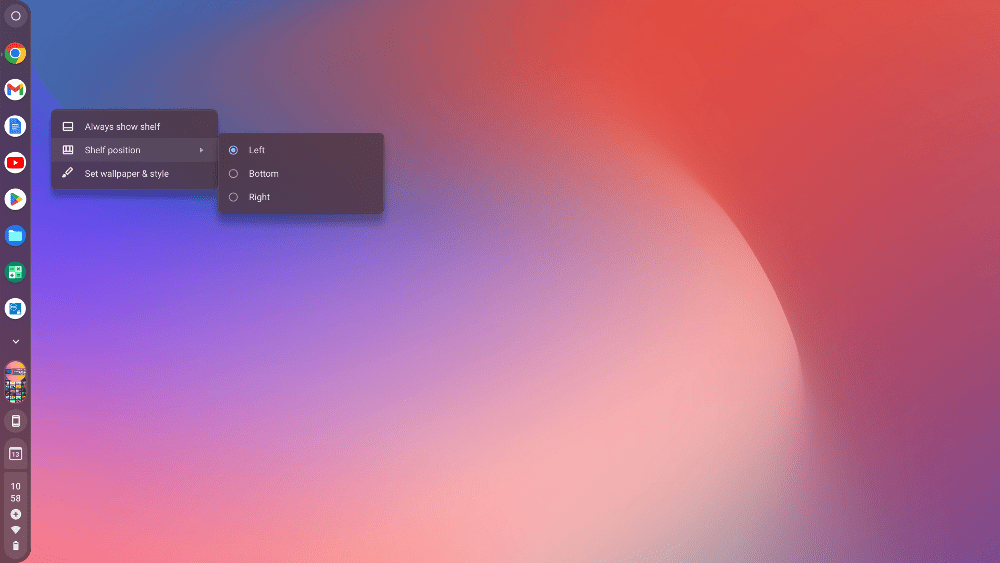
ChromeOS Shelf Position
Try out different positions and see what feels the most natural to you. I have found the left position to be the most comfortable, but that’s just my personal preference.
Adding a splash of color
Adding color to your shelf is another great way to personalize your ChromeOS. Here’s how you can do it:
- Open ‘Settings’.
- Click on ‘Personalization’.
- Choose ‘Set your wallpaper & style’.
- Select your favorite color or upload a personal image.
Step-by-step guide: Personalize your ChromeOS: A guide to changing the wallpaper
I have a soft corner for the mixed color gradient, so I have chosen a calming blue shade blended into orange for my shelf. It gives a soothing effect and brightens up my workspace.
Step three: Advanced customizations
Alright, brace yourselves because we are now stepping into the territory of advanced customizations. These customizations might seem a bit daunting at first, but trust me, they are worth the effort.
Creating app folders
If you are an organization freak like me, then you would love this feature. Creating app folders allows you to group similar apps together, giving a neat and organized look to your shelf. Here’s how you can create app folders:
- Drag an app icon onto another app icon on the shelf.
- A folder will automatically be created.
- To add more apps to the folder, simply drag and drop them onto the folder.
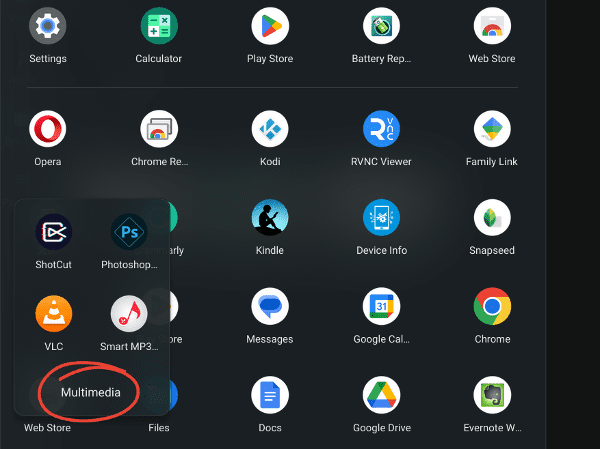
Grouping apps in ChromeOS Launcher
This feature has been a lifesaver for me as it helps me keep my workspace organized and clutter-free.
Step four: Discovering the wonderful world of Tote
I appreciate having quick access to important files and links without having to rummage through numerous folders and tabs. This is where the magic of the Tote feature comes into play. Tote is a relatively new addition to ChromeOS, and I must say, it has quickly become one of my favorite features, allowing me to keep all my important files and links in one place. Let’s delve deeper into how you can make the most out of Tote.
What is Tote?
Before we jump into the nitty-gritty details, let’s first understand what Tote is. Simply put, Tote is a handy tool that resides on your shelf, represented by an icon resembling a shopping bag. It’s designed to be a one-stop destination where you can access your recent downloads, important files, and pinned items. I personally find it immensely useful, especially when working on big projects where I need quick access to various files and links.
How to use Tote effectively
Using Tote is as simple as it is useful. Let’s walk through how to use it effectively, to enhance your workflow.
Accessing recent downloads
One of the most handy features of Tote is the ability to quickly access recent downloads. Here is how you can do it:
- Click on the Tote icon on your shelf.
- You will see a list of your recent downloads.
- Click on any file to open it.
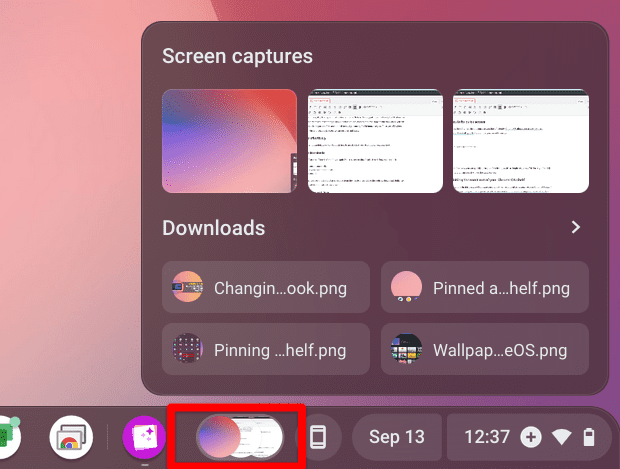
Tote on ChromeOS Shelf
I cannot tell you how many times this feature has saved me from the hassle of searching through my downloads folder to find a recently downloaded file. It’s truly a time-saver!
Unpinning items from Tote
Of course, with time, some files or links might lose their importance, and you might want to unpin them from Tote to avoid clutter. Here is how you can do it:
- Open Tote.
- Find the item you want to unpin.
- Right-click on the item (if using a mouse) or tap and hold (if using a touchscreen).
- Select ‘Remove’.
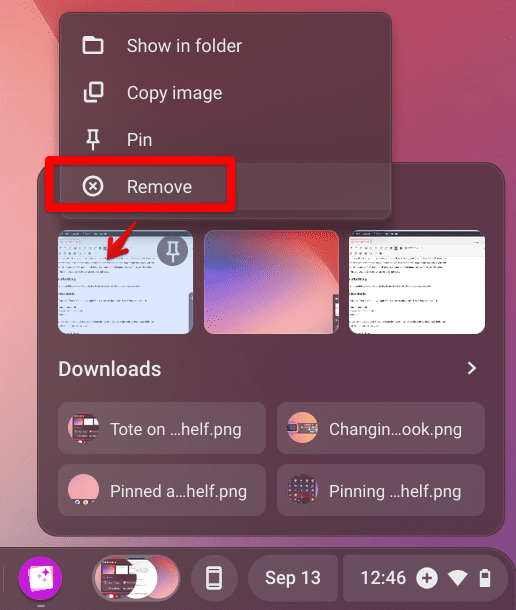
Removing item from Tote
And just like that, your Tote is decluttered. I make it a habit to review the items in my Tote periodically and unpin the ones I no longer need. It helps in keeping my workspace clean and organized.
Hide the Tote
If you don’t want to see the Tote, you can hide it by right-clicking on the Tote and selecting “Hide previews”.
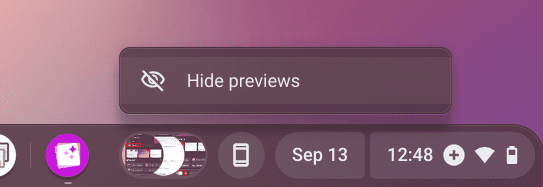
Hiding tote on ChromeOS shelf
Step five: Time format customization on your ChromeOS shelf
Time, as they say, is of the essence. It governs our daily lives, schedules, and even our most meticulous plans. That being said, we all have our personal preferences when it comes to how we like to view time. Some of us are more comfortable with the 24-hour format, a concise and military approach to time-keeping, while others prefer the 12-hour format that distinguishes day from night explicitly.
Venturing into settings
Now, let’s get into the steps of changing the time format on your ChromeOS shelf. The process is simple and straightforward, and here’s how you can do it:
- Click on the time display on your shelf, located typically in the bottom right corner.
- This will open up a window showing various options including settings, battery percentage, and network settings.
- Click on the ‘Settings’ icon to enter the settings menu.
- In the settings menu, click on ‘Advanced’ to explore more options.
- Find and select ‘Date and time’ under the ‘Advanced’ settings.
- Here you will find an option to change the time format. You can choose between a 12-hour and a 24-hour format according to your preference.
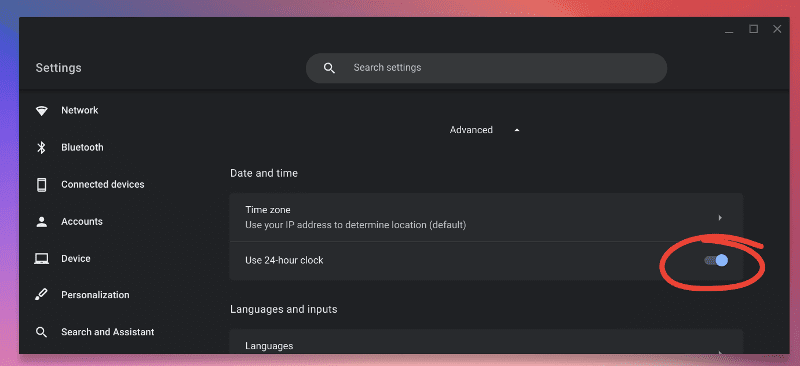
Changing time format to 24-hour clock format on ChromeOS shelf
You can swiftly access the menu mentioned earlier by right-clicking on the Calendar and selecting the gear icon. Nonetheless, Chrome developers have a tendency to rearrange features frequently. Therefore, I provided steps that should be effective for future ChromeOS versions.
Conclusion: Making the most out of your ChromeOS shelf
We have covered a lot of ground in this post, and I am sure you are now well-equipped to personalize your ChromeOS shelf to your liking. Remember, the key to a great user experience is to experiment with different settings and see what works best for you.
I hope you have as much fun customizing your shelf as I did. Don’t be afraid to sprinkle your personality into your workspace – after all, it’s your personal space and it should reflect who you are. Happy customizing!
