Welcome ChromeReady readers to another enlightening journey where I take you step by step, through the seemingly daunting but entirely feasible task of resetting Chrome on your Chromebook. I have always found something immensely satisfying about giving my devices a little ‘refresh’. It is akin to the joy of spring cleaning, where you dust off the old and usher in the new, leaving things feeling fresh and rejuvenated.
Let us embark on this ride, where I shall guide you, as we explore how to reset Chrome on your Chromebook, restoring its vitality and perhaps, rediscovering the joy and efficiency that comes with a clean slate. Before we delve deep, grab a cup of coffee or your favorite beverage and make yourself comfortable, because this is going to be a delightful read.
Understanding the need to reset Chrome
In my personal experience, there have been countless times where my browser seemed to be lagging, acting glitchy or just plain sluggish. Now, as someone who spends a good part of the day surfing the web, be it for work or leisure, a slow browser can be a bit of a party spoiler. If you are like me, a quick, responsive browser is essential for a pleasant online experience.
That’s why it’s imperative to understand when and why you might need to reset Chrome on your Chromebook. The reset process is somewhat like giving your browser a new lease of life, discarding unnecessary baggage and starting afresh. Sometimes, it’s not just about fixing bugs but reclaiming a joyous, hassle-free browsing experience, which, if you ask me, we all deserve!
A hitch in the browsing experience
Often, the glitches begin as tiny hitches that you would overlook. Perhaps a page that takes a fraction of a second longer to load, or a video that doesn’t play as smoothly. These hitches then grow, slowly morphing into annoying disruptions that mar the once smooth browsing experience. It is at this juncture, that I, like many of you, start contemplating the idea of a reset.
When personalizations become a burden
Let’s talk about personalizations and extensions for a moment. While I adore the multitude of extensions that allow me to customize my browser just the way I like it, there comes a time when these very personalizations turn into a burden, slowing down the browser and making the experience less than pleasant. It’s a classic case of too much of a good thing turning bad, and trust me, it happens to the best of us!
What gets reset: Saying goodbye and hello

Reset settings in Chrome
As we venture down this path of renewal, it’s vital to fully grasp what elements will be rejuvenated during this process. Sometimes, understanding what gets reset can be a gentle nudge, nudging us to finally take the plunge. I recall my initial hesitation, mostly stemming from a vague understanding of what actually undergoes a change during the reset. So, let’s dive in and clarify what exactly gets reset in this process, and why, in my humble opinion, it’s a blissful experience more often than not.
A clean slate for settings
First and foremost, your browser settings will revert back to their original, pristine state. This means that all the personal tweaks and adjustments you’ve made over time will be erased, giving you a fresh canvas to work on. Personally, this is my favorite part – I get to reconsider past choices and sometimes discover more efficient or aesthetically pleasing settings that I hadn’t considered before.
The end of the road for extensions and themes
During the reset, all the extensions and themes that you’ve added to Chrome will be removed. While it might seem like you’re losing some of your browser’s personality, this part of the reset always feels like spring cleaning to me. It’s an opportunity to let go of the extensions that have outlived their usefulness and retain only those that truly enhance my browsing experience.
Bidding farewell to cookies and data
In this process, you’ll also be saying goodbye to cookies and temporary data that have accumulated over time. This might mean you’ll need to re-enter passwords and recreate preferences on some websites. Although this might seem like a step back, it’s actually a significant stride forward. It helps in safeguarding your privacy and often speeds up your browsing experience, as too many cookies can slow down your browser – something that has always been a pet peeve of mine.
Resetting the homepage and new tab page
Another notable change is that your homepage and the new tab page will reset to their default settings. I find this as an opportunity to reconsider my choices, maybe choosing a more calming home page or a new tab page that boosts productivity. It’s a bit like rearranging the furniture in your living room for a fresh perspective and renewed energy.
Bookmarks and saved passwords remain untouched
Now, you might be breathing a sigh of relief, as I did when I first found out, that not everything gets wiped clean. Your bookmarks and saved passwords will remain untouched. This is a huge relief because these often contain vital information that would be cumbersome to rebuild from scratch. This element of stability amidst the change is something I genuinely appreciate.
Taking it all in stride
With a clear understanding of what gets reset, you can now approach the process with a sense of confidence and readiness. You know the transformations to expect, the farewells to bid, and the fresh beginnings to embrace.
Preparing for the Chrome reset: A thoughtful approach
I have to admit, the idea of a reset can be a tad intimidating. You’ve got your browser set up just the way you like it, with bookmarks, passwords, and a whole bunch of settings tailored to your liking. The thought of losing all that and starting over can seem like a Herculean task.
But fear not, dear reader, because I have found that a little preparation goes a long way in making the reset process not only painless but actually quite refreshing. Here’s how you can prepare yourself and your Chromebook for a successful reset.
Backup: Your safety net
The first step in any reset process is to create a backup of your important data. I personally find immense peace of mind in knowing that my important data is safely backed up before I venture into the reset territory. Trust me, a backup is like a warm safety blanket that protects you from potential data loss.
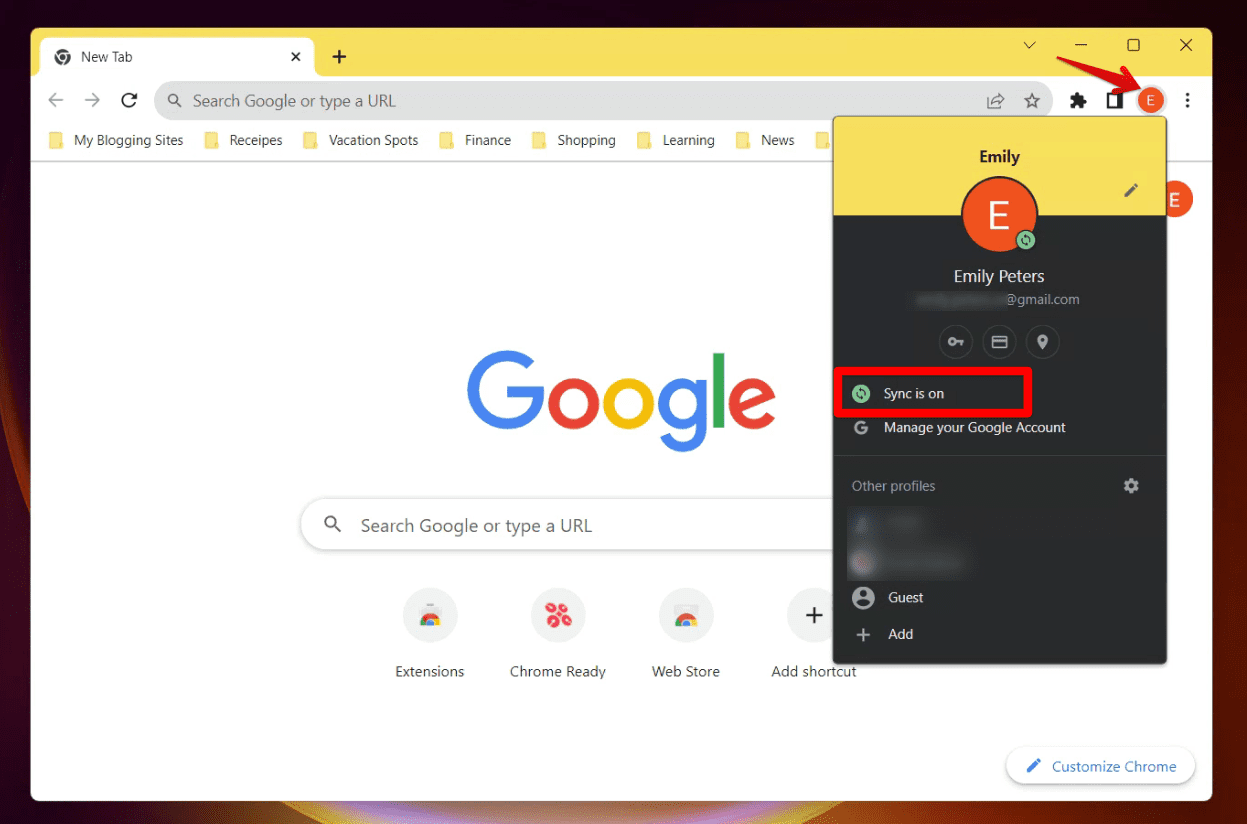
You would want to backup bookmarks, saved passwords, and any other important information. Chrome makes this relatively simple with synchronization features that allow you to save your settings and data to your Google account. So, before you even think about hitting that reset button, ensure that all your data is safely backed up by making sure you are connected to the internet and the profile sync is ON.

Chrome Profile Sync setting
Making a list of essential extensions (optional)
This step is optional and highly recommended if you are not using Chrome’sprofile sync option. As someone who has a penchant for trying out every new extension that catches my eye, I often find myself with a browser cluttered with extensions, many of which I hardly use. Before the reset, take a moment to sift through your extensions and make a list of the ones you truly find essential.
This, my friends, is a golden opportunity to declutter and retain only those extensions that truly add value to your browsing experience. Jot down the names or make a mental note, so you can reinstall these once the reset is done. This step is like separating the wheat from the chaff, ensuring a leaner, meaner browser post-reset.
Venturing into the reset: A step-by-step journey
Now, with preparations out of the way, it is time to venture into the actual reset process. In my experience, it is always best to approach this with a calm and composed mindset. Remember, you are not losing anything; rather, you are setting the stage for a smoother, more enjoyable browsing experience. Here, let’s explore the steps to reset Chrome on your Chromebook.
Step 1: Opening the settings
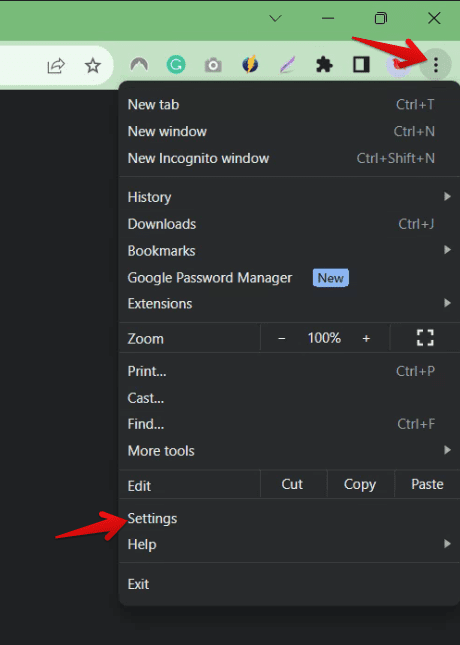
Start by clicking on the three vertical dots or the ‘menu’ icon, located at the top right corner of your browser. This is where your journey begins, as you navigate to “Settings” in the drop-down menu that appears.

Launching Chrome Settings
Step 2: Navigating to advanced settings
Once in the settings menu, scroll down to the bottom of the page to find the ‘Advanced’ option. Clicking on this will reveal a whole new set of options. It’s almost like opening a secret door that leads to the inner workings of your browser.

Reset Chrome Settings
Step 3: Reset and cleanup
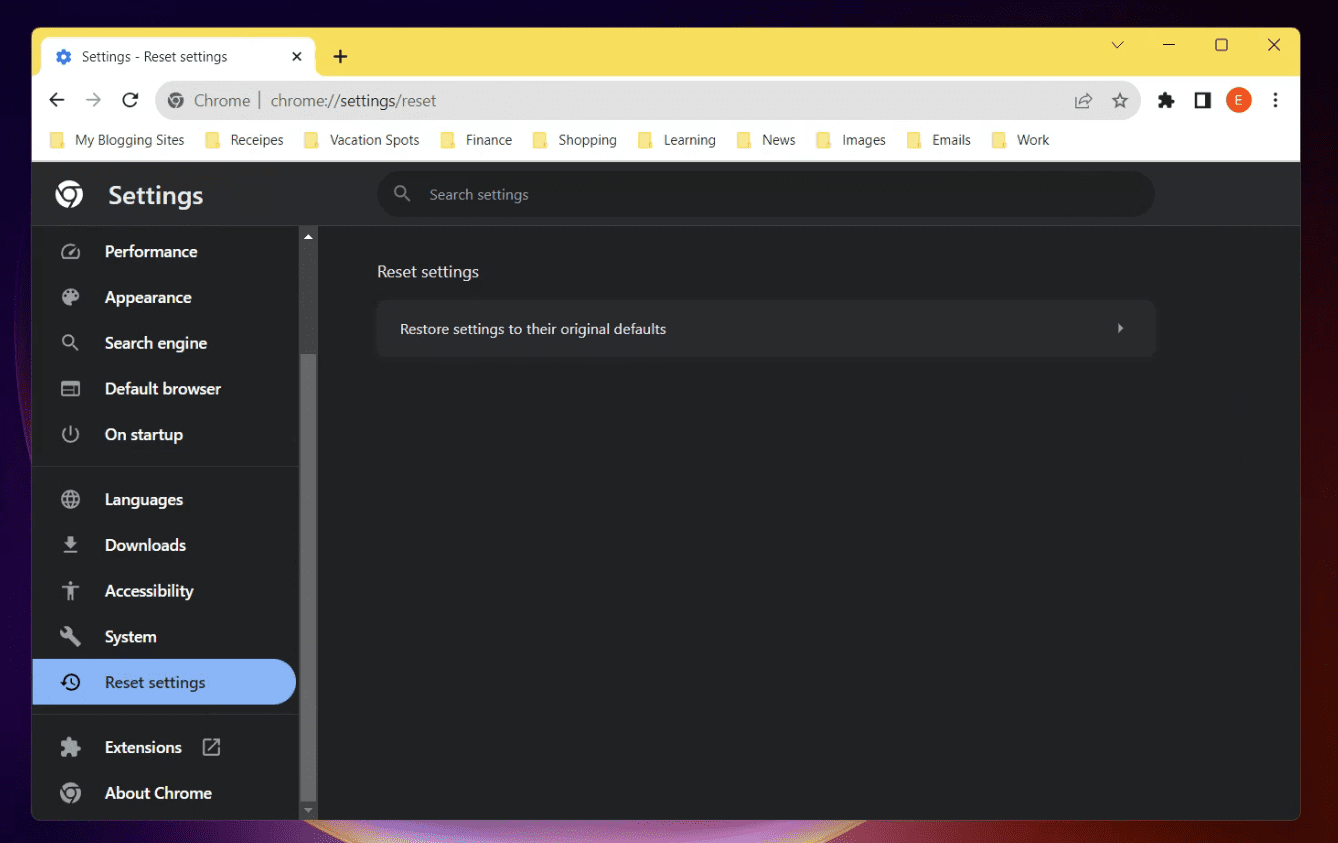
Here, you will find the option to restore settings to their original defaults. This is where the magic happens, where you get to cast away the old and embrace the new. But before you click on that reset button, take a deep breath and remind yourself that you are about to reclaim a vibrant, efficient browsing experience.
Step 4: The final step
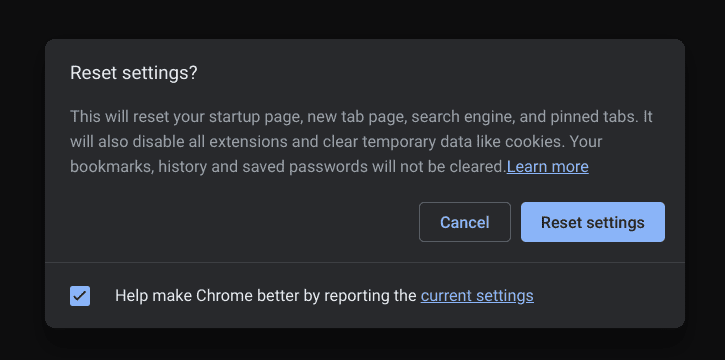
Click on the ‘Reset settings’ option and confirm your choice in the dialog box that appears. This is the moment of truth, the final step in your reset journey. As I often do, take a moment to bid farewell to the old settings, the clutter, and the glitches, as you usher in a fresh start.

Reset settings Chrome
The aftermath: Setting up for success
Once the reset is done, you will find yourself with a clean slate, a browser that is ready to be molded to your liking, yet again. This is where the real fun begins, as you get to set up your browser, installing your favorite extensions, and tweaking the settings just the way you like it.
Restoring essential data
Now, remember the backup we talked about earlier? It’s time to bring it into play. If your profile sync is on, your extensions and bookmarks will reappear within minutes. Just make sure you’re connected to the internet.
Those who didn’t turn ON profile sync: If you opted for a manual way, go ahead and restore your bookmarks, passwords, and other essential data. It’s like meeting an old friend again, familiar yet with a fresh new vibe. Refer to the list of essential extensions you made earlier and start installing them one by one. This time around, you are armed with the knowledge of what truly adds value to your browsing experience, allowing you to create a browser setup that is lean and efficient.
Reset to a clean install: A fresh start
Sometimes, simply resetting the settings might not suffice, especially when you’re aiming for a complete digital detox or a thoroughly fresh start. In such cases, what you’re looking for is a clean install of Chrome on your Chromebook. This process is somewhat like moving into a new home, leaving behind the old walls, and embracing a place that is untouched and full of potential. Let’s take a brief moment to discuss how to proceed with this and why sometimes it becomes my most favored option.
The fresh installation charm
Doing a clean install essentially means that you would be reinstalling the Chrome browser from scratch. It is an absolute refresh, cleansing the browser of all the old data, settings, extensions, and essentially everything that made the browser “yours”. I liken this to a deep spring cleaning, where every nook and cranny is tended to, leaving behind a sparkling new space that breathes freshness and purity.
A brief guide to Chrome’s clean install on Chromebook
You cannot do so directly to uninstall and reinstall Chrome on a Chromebook. However, you can do a powerwash to reset Chrome to its factory default settings. To fully reset Chrome on a Chromebook, you can follow these steps:
- Sign out of your Chromebook.
- Press and hold Ctrl + Alt + Shift + r.
- Select Restart.
- In the box that appears, select Powerwash.
- Continue.
- Follow the steps that appear and sign in with your Google Account.
Detailed step-by-step guide with screenshots: How to Powerwash (Reset) a Chromebook
This will reset your Chromebook to its factory default settings, including Chrome.
Warning: Powerwashing your Chromebook will clear all of your data, including your browsing history, bookmarks, passwords, and extensions. Be sure to back up your data before powerwashing your Chromebook.
Note: You can also powerwash your Chromebook by pressing and holding Esc + Refresh + Power buttons for 10 seconds.
In conclusion: Embracing a new beginning
As I sit back and marvel at my newly reset browser, I cannot help but feel a sense of accomplishment and joy. The process, while seemingly daunting at first, turned out to be a refreshing experience, bringing back the joy and efficiency of browsing.
Resetting Chrome on your Chromebook is not just a technical process, but a journey of rediscovery, a chance to declutter and start afresh, with a browser that is tuned to your liking, offering a smooth, hassle-free browsing experience.
