Over time, ChromeOS has received many improvements in the department of personalization. You’ll discover that Chromebooks now support dedicated wallpapers that change their color schemes whenever dark or light modes are activated, and that’s not all. Another, more proficient way of making your device’s colors glow has been available.
In this guide, we’re going to dive deep into all of the tips and tricks associated with customizing how ChromeOS looks, including a unique set of Chrome flags that seemingly enable the Material You theming on your end. Read until the end of the write-up for the best results.
Personalizing your Chromebook – A step-by-step guide
Unlike Windows and other operating systems, ChromeOS likes to keep it simple with every element of its user interface, even with the personalization department. There are three major ways you can personalize your Chromebook: changing the device’s overall wallpaper and theme and setting a screen saver.
Beyond that arrives the Chrome browser, one of the cornerstones of your Chromebook’s functionality. Google Chrome lets you switch things up by altering its color and theme while presenting various options. Last but not least, the in-built Crostini Linux terminal‘s appearance can also be modified to a certain extent.
We’ll sequentially get into all of these, so it’s hard for you to miss any relevant sections. In the end, a fancy experimental feature relating to the theme of Chromebooks will be discussed, so stick around if you want to learn how to make a novel new change to your Chromebook.
Wallpaper
Setting a wallpaper on a Chromebook is a great way to get things flowing in the right direction by making the device look nice and fresh. Thankfully, it takes a couple of clicks to manage that on ChromeOS. Head to the device’s home page and double-tap on the trackpad anywhere on the screen to reveal additional actions.
An overlay will appear on the screen next, allowing you to click “Set wallpaper & style.” The other two options are also helpful, though from an appearance perspective, including “Shelf position,” which lets you change the location of the ChromeOS shelf on the screen, and “Autohide shelf,” which tucks in the shelf every time you open a new window.

Setting the wallpaper and style
A distinct window should now be popping up on your screen dubbed “Wallpaper and style” after completing the previous step. You’ll change your Chromebook’s wallpaper, theme, and screen saver here. To get started, tap the “Wallpaper” section to get to the next step.
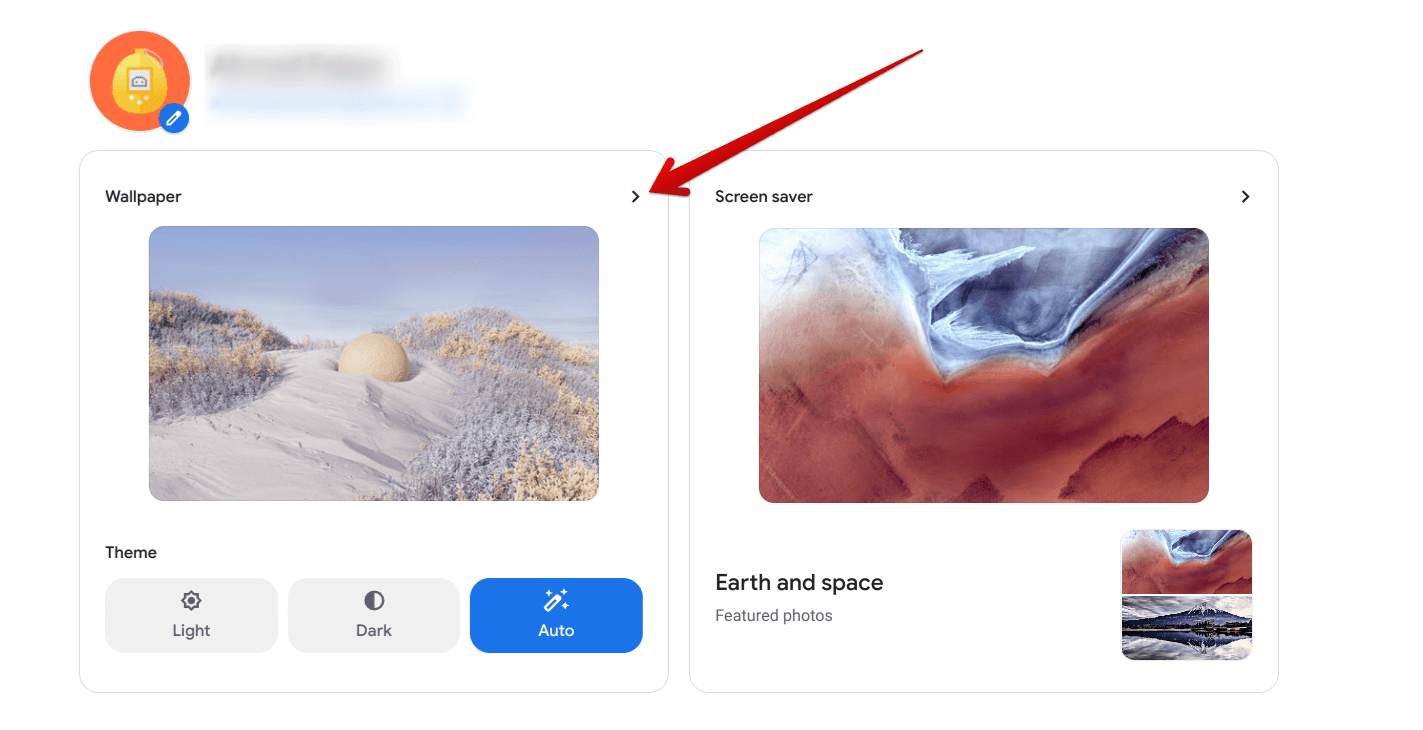
Clicking on the “Wallpaper” section
Tapping into the “Wallpaper” area is going to present you with a myriad of options. The categories of wallpapers available by default span various choices, ranging from Cityscapes, Landscapes, and Heritage to Leisure, Art, Illustration, and Solid colors. Feel free to scour through these pre-selected options to find something that works for you.
On the other hand, you can also use photos in your Chromebook’s local storage and set them as the device’s wallpaper. Tap the “My images” area, and your “Gallery” app will open immediately. Similarly, images that are a part of your Google Photos account can be utilized for the purpose at hand by selecting “Google Photos.”
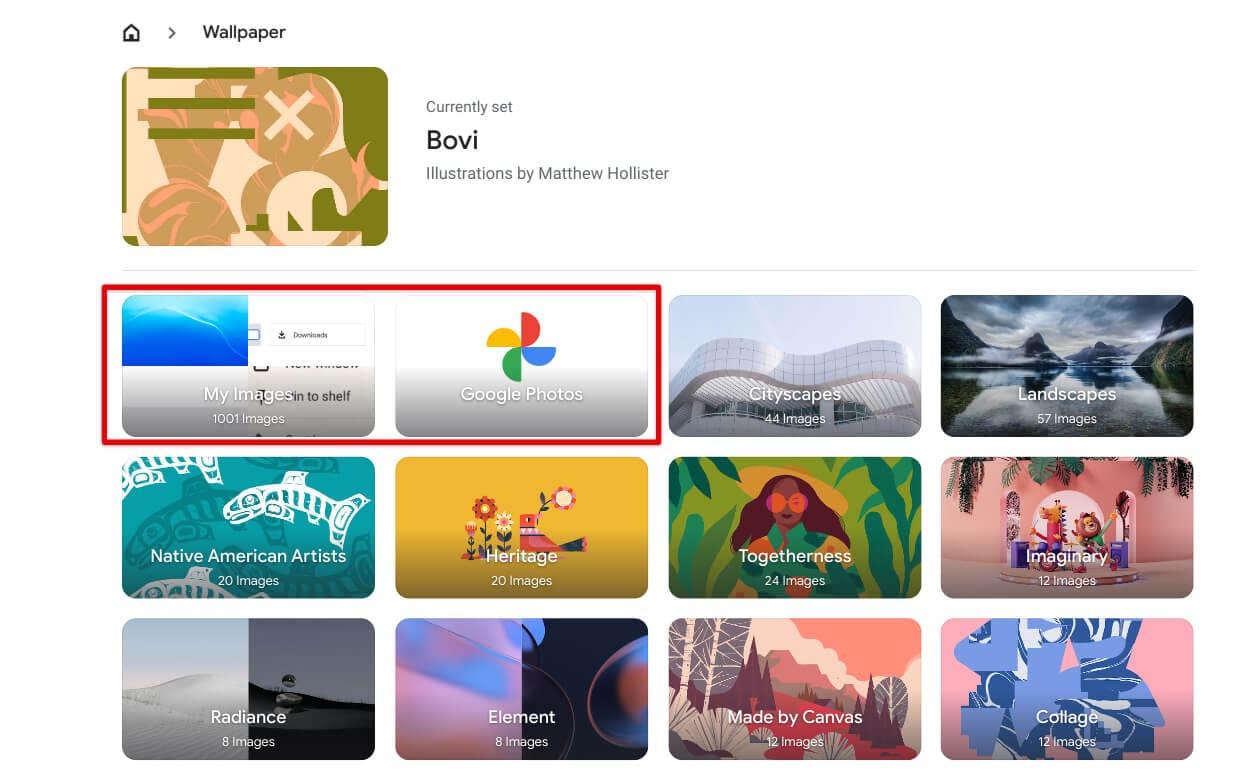
The “My images and Google Photos” sections
It’s also possible to set a wallpaper on your Chromebook that will change daily, so you never have to open your Chromebook on a new day and look at the same wallpaper twice. To do that, tap on the “Change daily” feature inside any wallpaper category to do the trick. Please note that the feature does not work for your images and Google Photos.
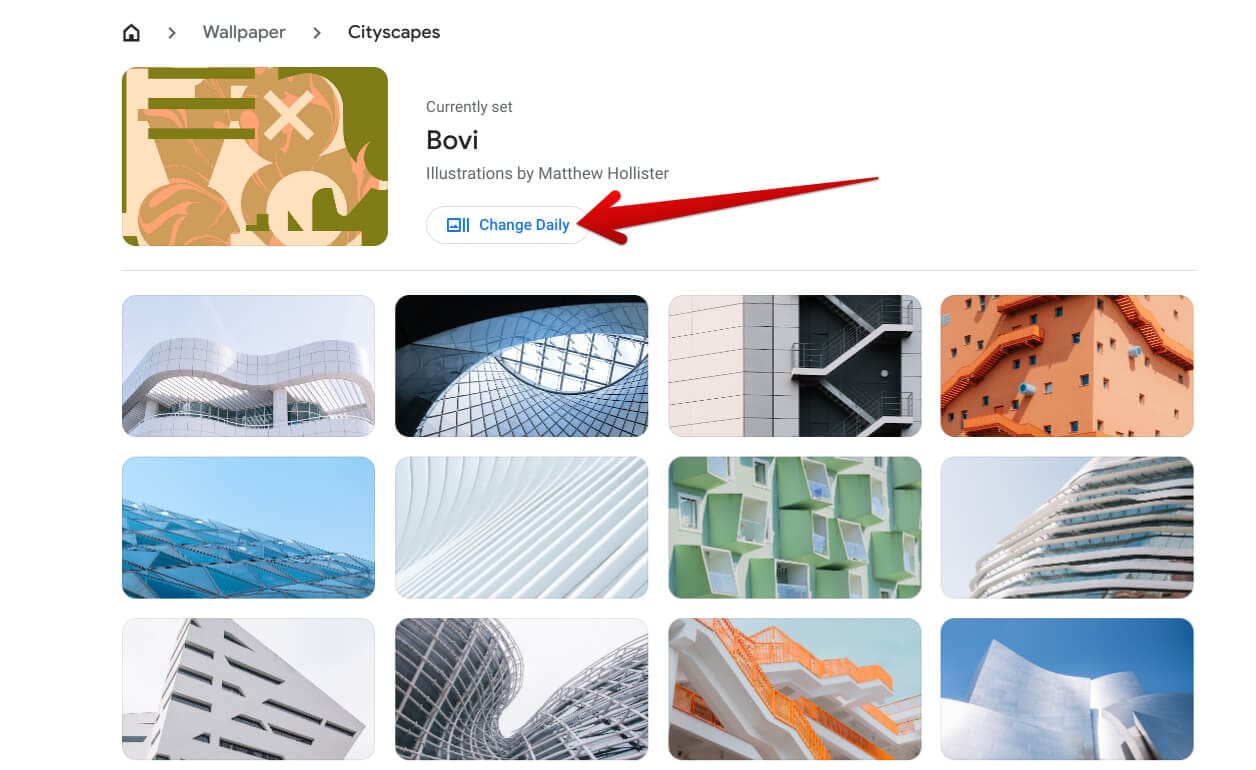
Using the “Change daily” feature
Theme
Onto the overall theme of your Chromebook, this is yet another substantial addition to the overall customization potential of ChromeOS. To alter your Chromebook’s theme, head to the previous page on the “Wallpaper and style” window and look for the “Theme” section right under “Wallpaper.”
You can choose from “Light” and “Dark,” as well as another auto-toggle functionality that will transition the theme between these options depending on the time of the day. Thanks to recent developments, the light and dark themes on ChromeOS stretch throughout the whole user interface and not just a few selective areas.
We highly recommend switching to the dark theme since doing so also lessens battery consumption, mainly if you use your Chromebook at brightness levels near 100%. Even if you don’t, there are chances of enjoying a better battery runtime than donning the light theme.
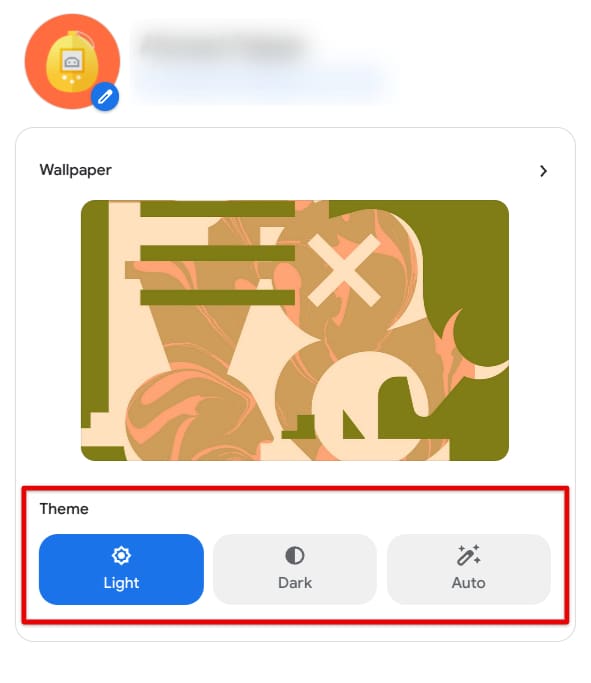
Changing the Chromebook’s theme
Pro tip: There is a dedicated category of wallpapers on your Chromebook that change their color scheme as soon as the theme is changed from light to dark or vice versa. Head to the “Wallpapers” section again and try out any of the items present in “Radiance” and “Element,” and you’ll find out soon enough what makes them unique.
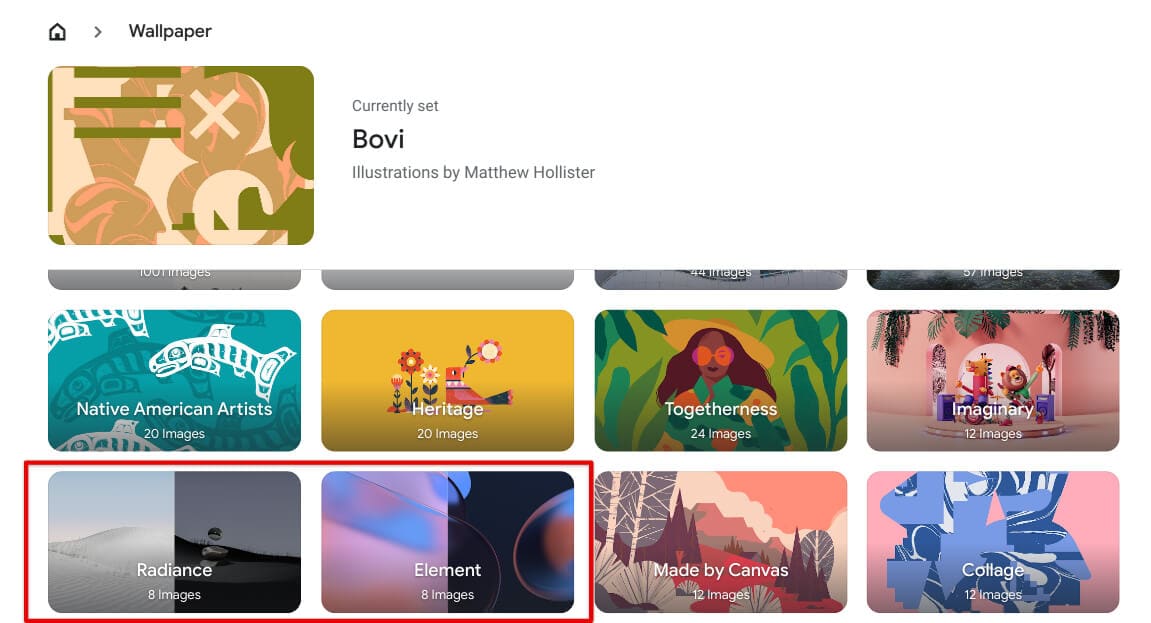
Special wallpapers on ChromeOS
Screen saver
The screen saver is yet another enticing addition to the overall personalization space of ChromeOS. This feature is for when you leave your Chromebook idle, so the device has to sit there. Screen savers do not save battery or anything of the like, as the notorious misconception goes, but they serve another purpose.
They’re geared to prevent others from looking at what’s on your screen in moments when you’re away. Moreover, if you want your Chromebook not to sleep when you leave it idle, enabling the screen saver is also an excellent way to go on that front. Get started by accessing the “Screen saver” section by clicking anywhere in the area on the “Wallpaper and style” window.
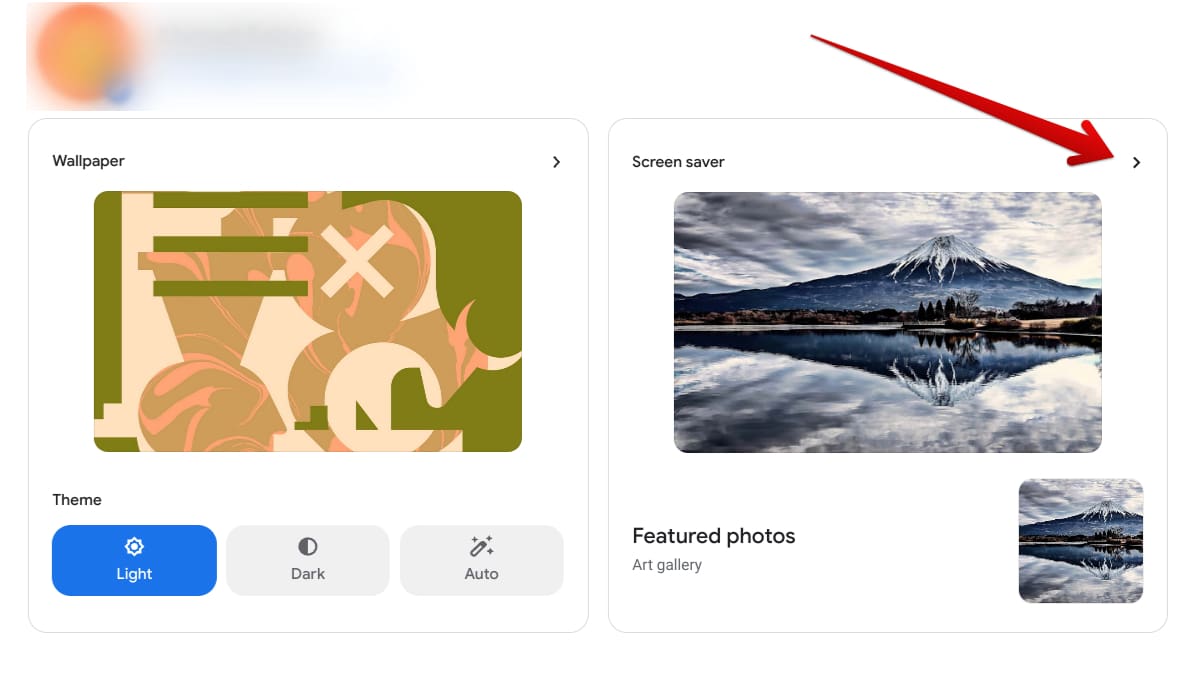
Accessing the “Screen saver” section
Once accessed, the next step is to ensure you have the functionality enabled on your end first. The toggle at the top of the “Screen saver” section will take care of that. After that, scroll down and choose the animation you’d like to select for your screen saver. The available options include “Slide show,” “Feel the breeze,” and “Float on by.”
Your screen saver needs an image on display, and you can decide what photos to put there. Just choose your image source, whether “Google Photos” or “Art gallery,” and that should do the job for you. Your created albums must be accessed in the “Google Photos” section. Make sure you know how to create and fill one up.
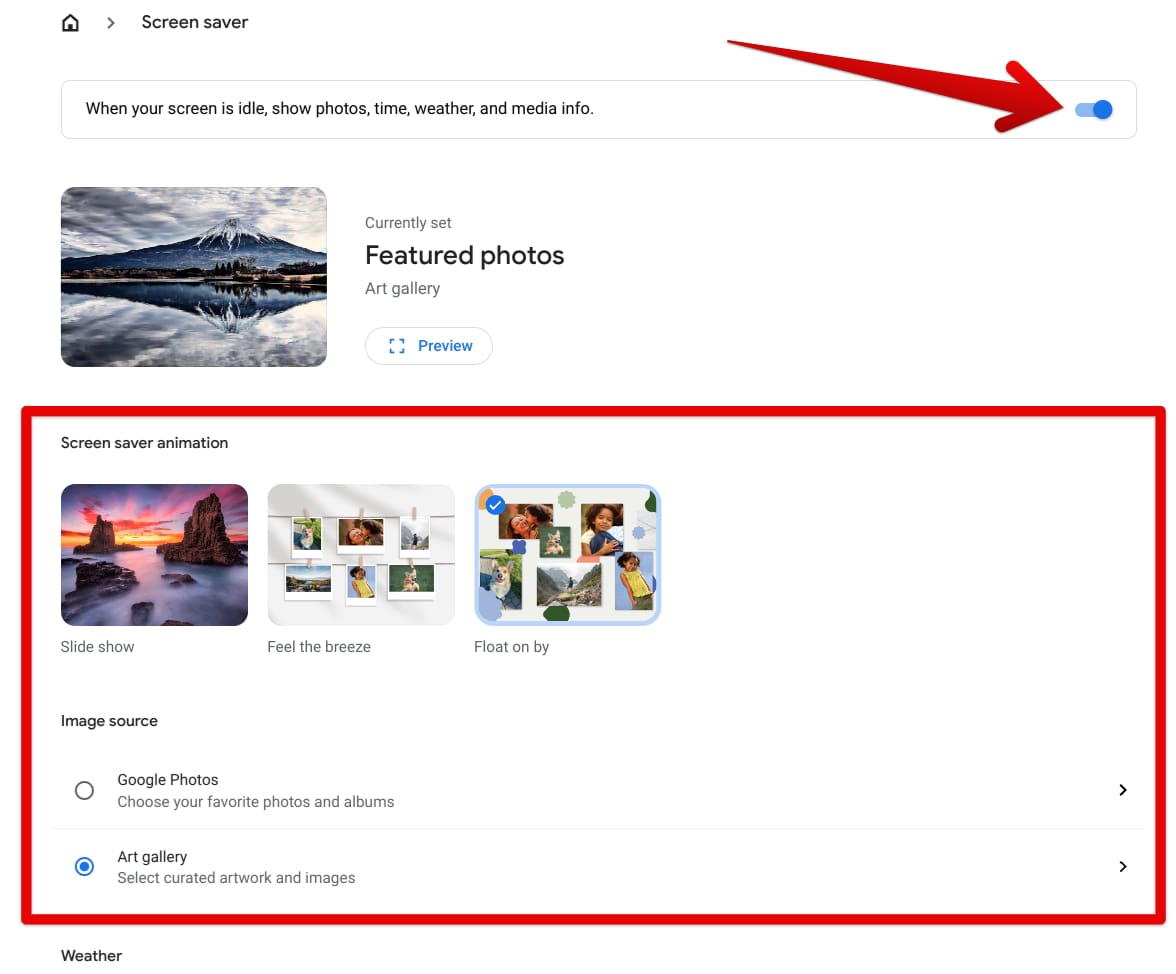
Tweaking the screen saver preferences on ChromeOS
Oh, and the screen saver isn’t entirely impractical as well. You can toggle it to show contents concerning your Chromebook’s mainframe, like the time, weather, and other media-centric information, such as your connected devices. Last, there’s a temperature setting for the screen saver’s weather widget, letting you choose between Celsius and Fahrenheit.
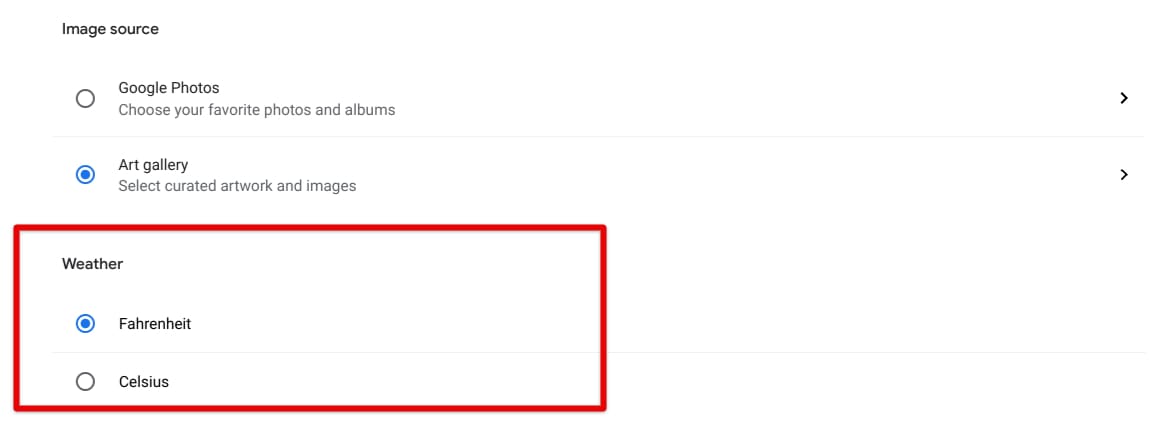
The weather setting for the screen saver
Cursor size and color
Personalization doesn’t pertain to the wallpaper settings of your Chromebook. There are other measures to consider, with your on-screen cursor size being one of them. Tucked away within the “Accessibility” section of ChromeOS, it is possible to change both the size and color of the cursor you use on your Chromebook.
Start by heading to the “Settings” system app on your Chromebook, then click the “Accessibility” tab on the right. You can then quickly get into the “Cursor and touchpad” settings by clicking on the relevant area in the middle of the page.
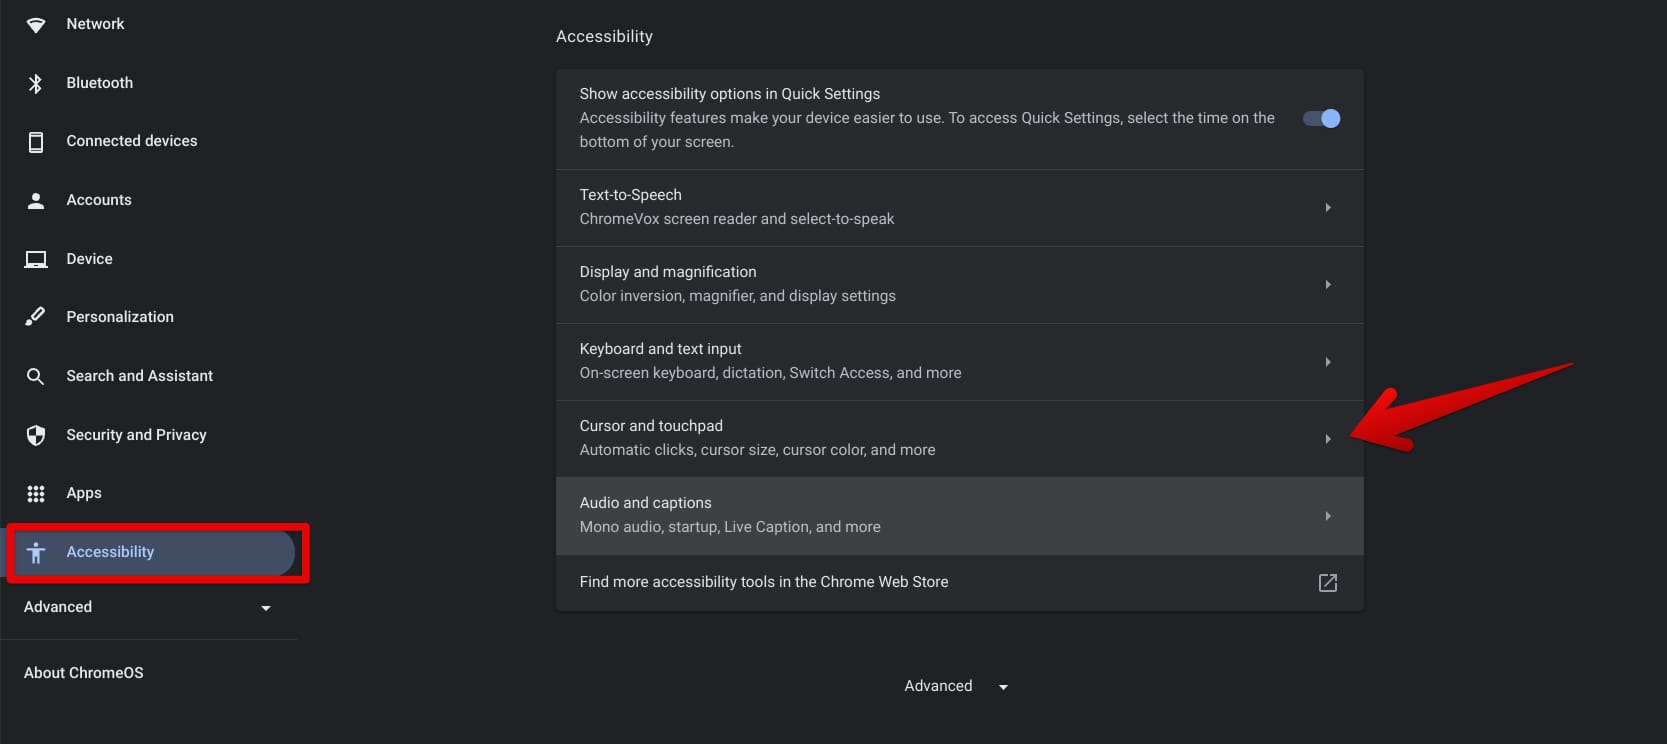
Selecting the “Cursor and touchpad” option
As you get taken to the next page, you can seamlessly adjust the size of your Chromebook’s cursor via the provided option, but make sure to enable the “Show large mouse cursor” before the relevant slider can pop up. Without doing that, you will have to stick to the default cursor size of your Chromebook.
Drag the slider until you come across just the right size. Once you’re done, the next step is to pick a suitable color for the cursor using the options menu beside the “Cursor color” area. Black, Red, Yellow, Green, Cyan, Blue, Magenta, and Pink can be picked.
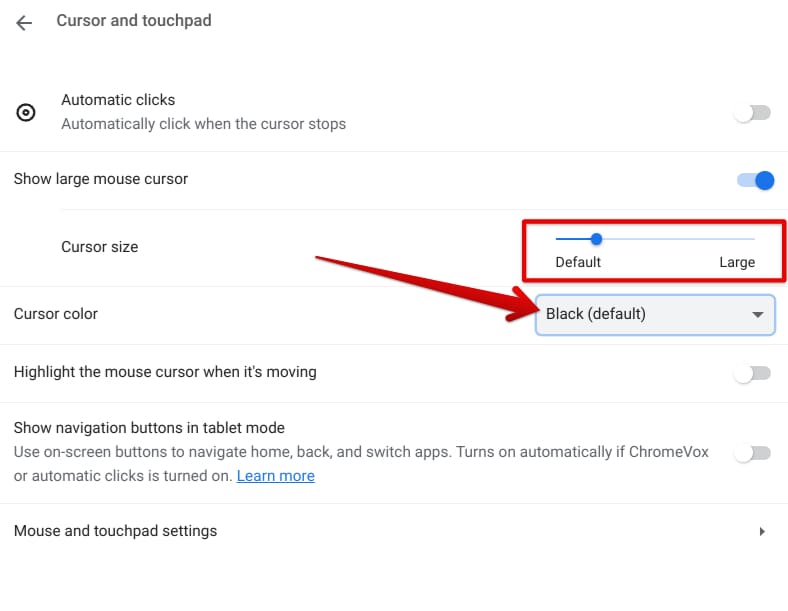
Tweaking the size and color of the ChromeOS cursor
Google Chrome’s wallpaper and theme
The Chrome browser isn’t to be left out when customizing your Chromebook. After all, this world-renowned internet browser is a significant part of ChromeOS, and it’s probably where you spend a lot of time on a Chromebook. Similar to your Chromebook’s interface personalization, customizing Chrome is nowhere near difficult.
Start by opening the Chrome browser and clicking the pencil-shaped “Customize this page” icon in any “New Tab” on Google Chrome. The icon is situated in the bottom-right section of the web crawler’s interface, so it shouldn’t be too hard to find. Once clicked, an overlay will surface, allowing you to change Chrome’s colors and set a fitting background.
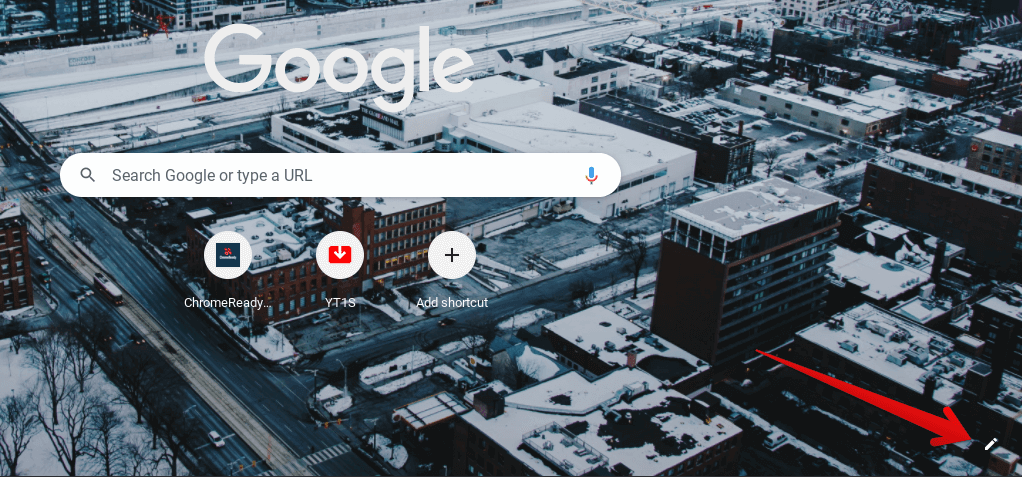
Customizing the Google Chrome browser
A side panel should now appear and allow you to dig further into the customization of the Chrome browser. Starting with the background image, click the “Change theme” button to get to the next step.
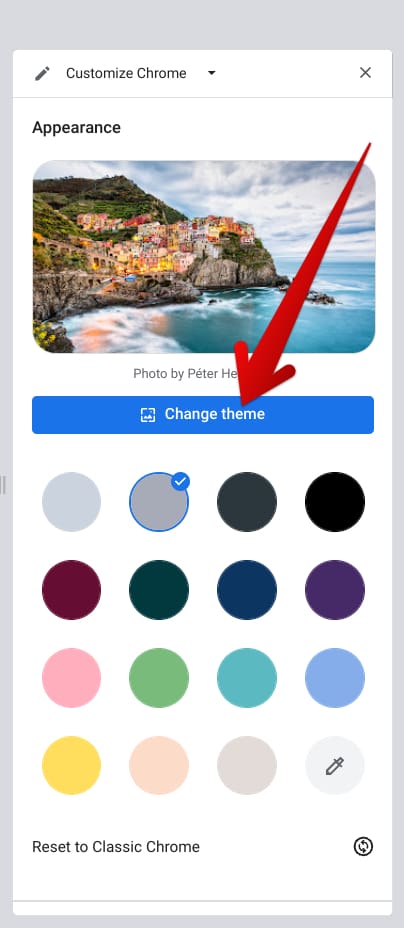
Changing the Chrome browsers theme
You should now be able to get into the sea of different choices available for the Chrome browser in terms of setting a particular background. Like the relevant section in your Chromebook’s “Wallpaper & style window,” multiple wallpapers are present here. Chrome colors, Landscapes, and Asian and Pacific Islander Artists are to name a few.
Go through the choices available to try out Chrome with varying themes. If you have a thing for personalizing your programs in-depth, the Chrome Web Store can also lend an extra helping hand. Check out these 10 best themes for Google Chrome for a fresher perspective.
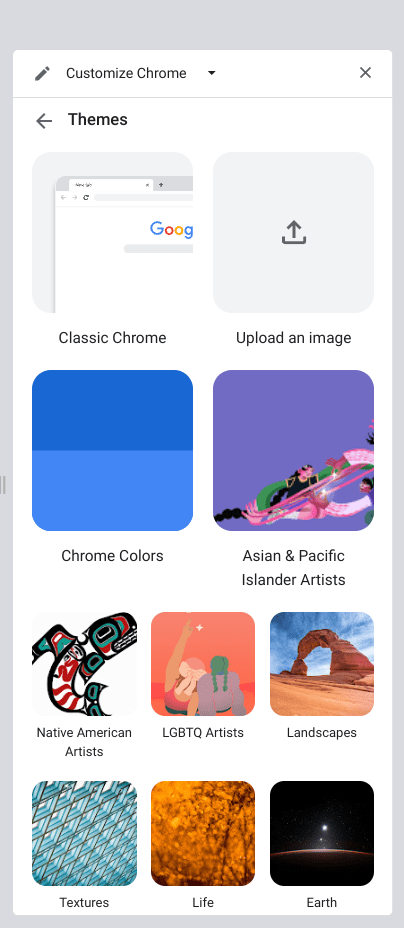
Available themes for Google Chrome
As you finish the theme, it’s time to move on to the color. Return to the previous page while staying within the side panel and pick a color for your Chrome browser under “Change theme.”This color picker area will define how the browser’s tab bar and overall interface will look. Again, take your time to experiment for the best results.
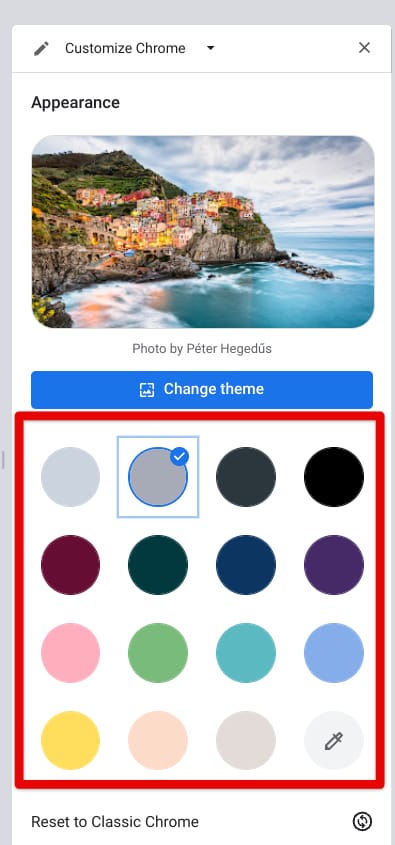
Picking a color for Chrome
Once finished with Chrome’s color, a small addition can be tweaked for the browser’s “New Tab” page and involves shortcut inclusion. Depending on your preferences, you can hide or show them by simply clicking on the toggle beside “Show shortcuts.” If you want them to appear, the next step is to decide their mode of operation.
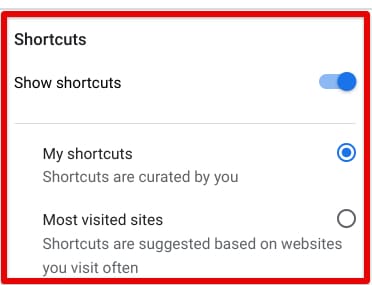
The Shortcut’s feature for Chrome’s “New Tab” page
We’re pretty not done yet with customizing the appearance of the Chrome browser since there are still further measures to take care of. Make your way to the “Settings” page of the Chrome browser by either using the “More actions” button in the top-right corner of the screen or pressing “Alt” and “E” together, followed by tapping on the “S” key.
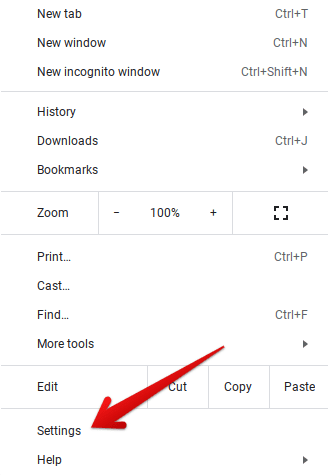
Clicking on Google Chrome’s “Settings”
After opening “Settings,” choose the “Appearance” tab on the side panel to the left side of the window, and you should be able to customize the remaining customization options for Chrome. The first setting here relates to “Browser themes,” but since that is taken care of already, you can next choose to enable or disable the “Home” button.
Right after that, it’s possible to select your “New Tab” page whenever you’re out and about on Google Chrome. You can either set a custom web address so the internet surfer always opens that for you or let it stay at the default “New Tab” setting.
The bookmarks bar can also be toggled to hide or show, either from the available toggle or the shortcut key combination of “Ctrl,” “Shift,” and “B.” The “Side panel” feature in Chrome comprising your reading list can also be optimized to show on the left or right side.
Furthermore, which is important to get into, Chrome’s font size can be adjusted to your liking. The choosable options range from “Very small,” “Small,” and “Medium” to “Large” and “Very large.” The recommended setting here is “Medium.”
Going a bit deeper on that front with the “Customize fonts” subsection, feel free to observe the changes in font size and minimum font size in real-time, along with choosing the font type for different types of text in Google Chrome. There are “Standard,” “Serif,” “Sans-serif,” “Fixed-width,” and “Mathematical” fonts in Chrome, with each being customizable.
Finally, the “Page zoom” option lets users determine the default zoom size, which is usually 100% but can be switched to other choices. The starting size is 25% and goes up to 500% for various scenarios.
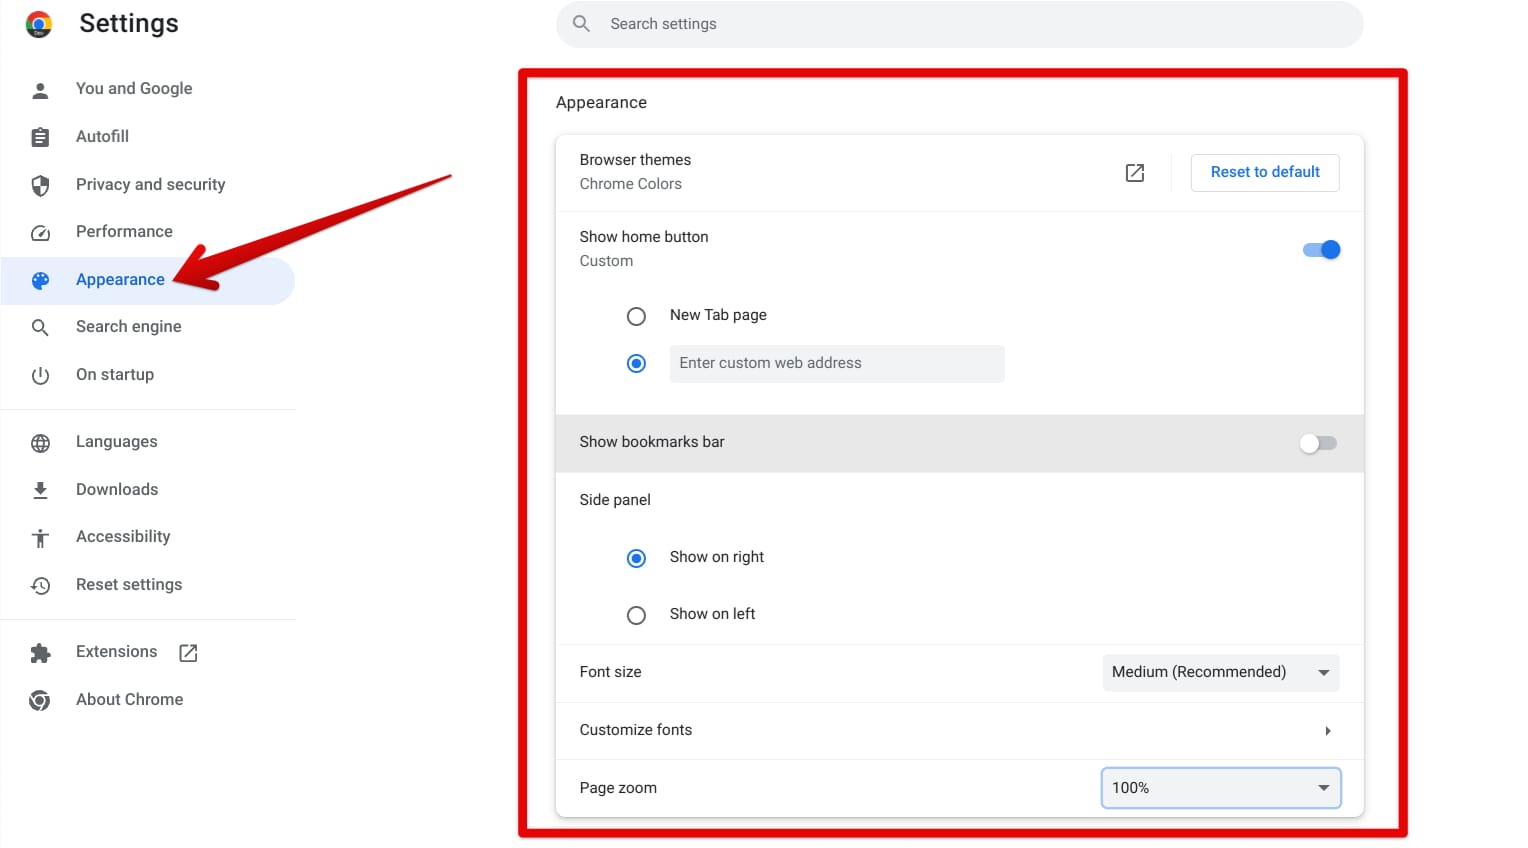
Customizing Chrome’s appearance in depth
Customizing the Linux terminal
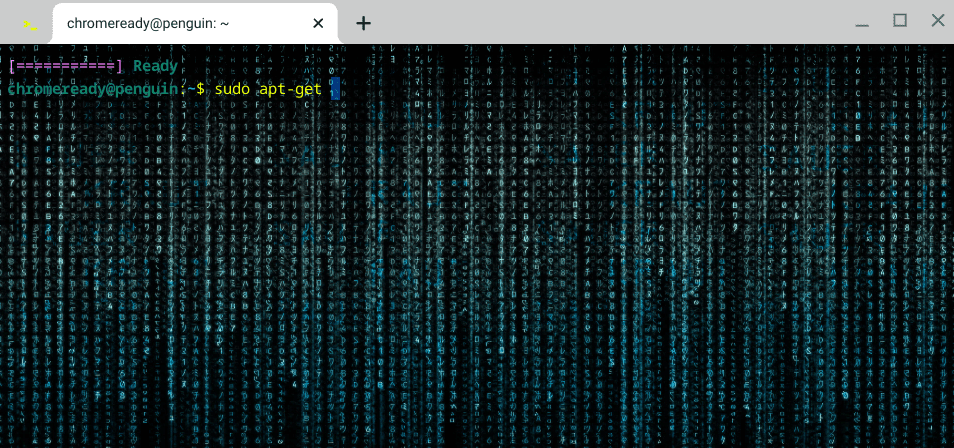
A personalized Linux terminal
Another part of your Chromebook that can be customized is the Linux terminal explicitly built for ChromeOS. If you haven’t been able to set it up, here’s how to install and configure Linux apps on a Chromebook. Linux is a fantastic tool for enhancing the overall range of ChromeOS in terms of being more feature-filled and multi-faceted.
You can personalize the colors of Linux by right-clicking the “Terminal” app and choosing the “Settings” option. The program can be found in the “Linux apps” folder in the launcher area after successfully installing Linux on ChromeOS from the “Settings” menu. Pin the Terminal app to the shelf, similar to how you pin websites, for easier access in the future.
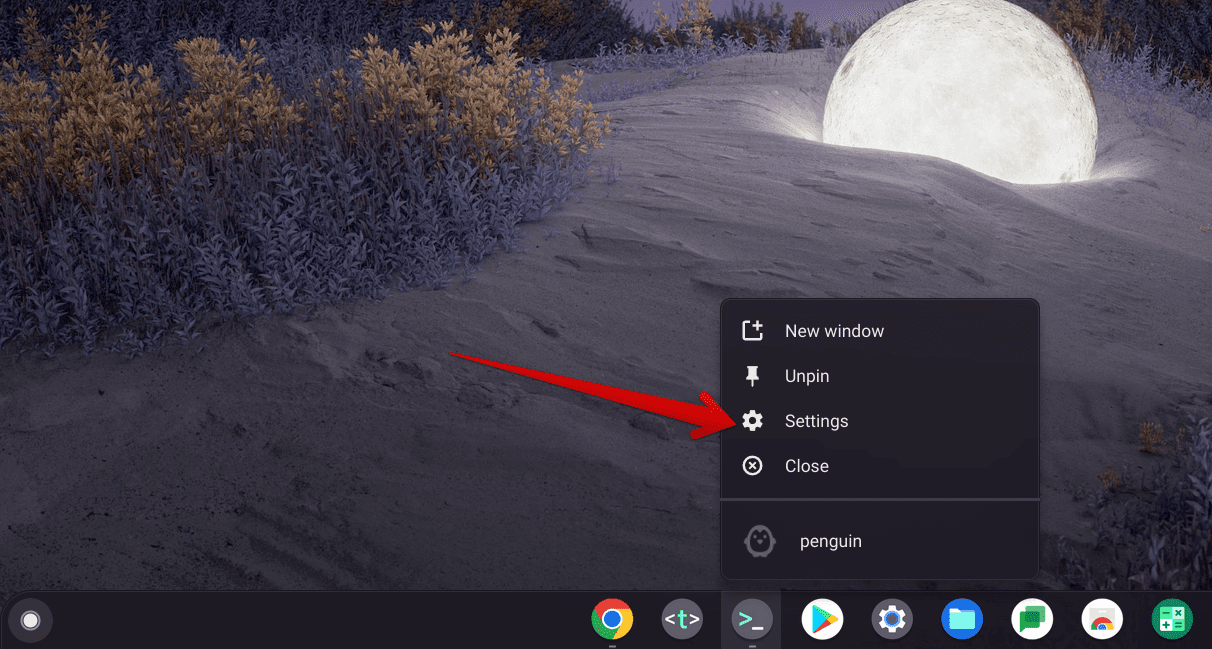
Opening the Terminal’s “Settings”
The following is the “Settings” window of the Linux terminal maximized. At the very top of the page, you’ll observe different themes to choose from, ranging between “Dark,” “Light,” and “Classic” to “Dusk,” “Haze,” and “Forest.” Experiment with different options and move to the following setting when you’re done.
The Terminal app is highly customizable from a looks perspective. It’s seemingly easy to switch up the background of the Linux container, along with choosing a different font, font size, and font color. Even the cursor’s shape and color can be changed when you’re using it on Linux, swapping between “Beem,” “Block,” or “Underline.”
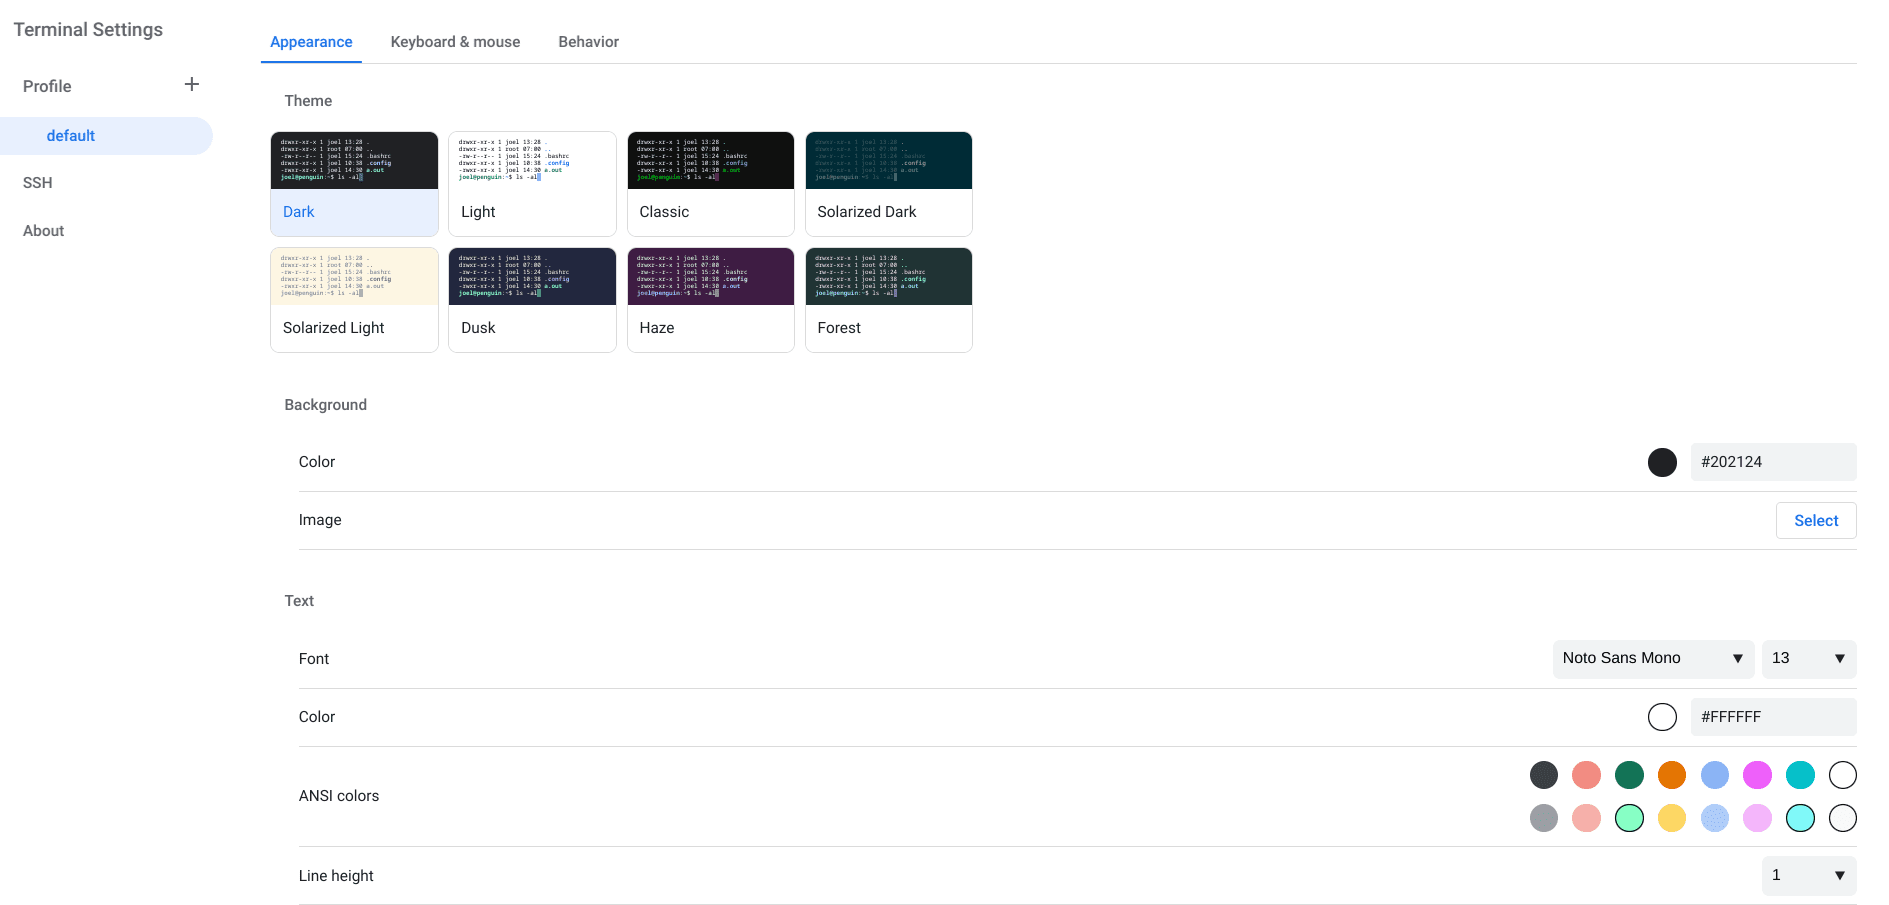
The “Appearance” settings of the Linux terminal
How to get the Material You theme on ChromeOS
Material You by the developer Material Design is a next-level theming mechanism for Android devices. The project mainly revolved around Android phones, but the concept has also protruded to Chromebooks, considering how ChromeOS goes hand in hand with Android.
The theme is considered unique because it structures the colors of your operating system to align with the colors of the wallpaper you’ve set on the device. The innovative idea makes devices look more expressive and full of life. Over time, more devices have become compatible with this interface design.
Furthermore, it’s not just the overall colors that the unique theming framework improves but the overall customization potential. Talk about more defined buttons, rounded app icons, and color-based enhancements to sliders that significantly revamp the core Android experience.
Material You has officially made its way to Android smartphones, but it’s not quite there yet for Chromebooks. However, there is still a working way to approach testing Material You on ChromeOS ahead of time, and it involves looking into some dedicated Chrome flags.
To begin, you have to be on the “Dev” or “Canary” release channel on your Chromebook. For the uninitiated, here’s how to change update channels on your Chromebook. Do note that a Powerwash of the device will be required if you ever wish to transition back to the stable channel.
The next step is to open the Chrome flags window on your Chromebook by entering “chrome://flags” in the browser’s Omnibox. Once done, you must search for three flags and enable them accordingly. After finding a flag, click on the options bar beside their entry and choose “Enabled.”
1. chrome://flags#qs-revamp
2. chrome://flags#jelly-colors
3. chrome://flags#personalization-jelly

Enabling the first flag for Material You theming
After clicking “Enabled” for all three flags, use the prompt at the bottom of the Chrome flags window to restart your Chromebook and apply the changes to the system.

Restarting the device to apply the changes
As soon as the device boots back on, you can observe the effects of Material You all across the user interface. Try switching up the wallpaper to notice the changing effects of the theme. You’ll also note that the Status Tray menu of ChromeOS will be treated to a redesign following the application of Material You.
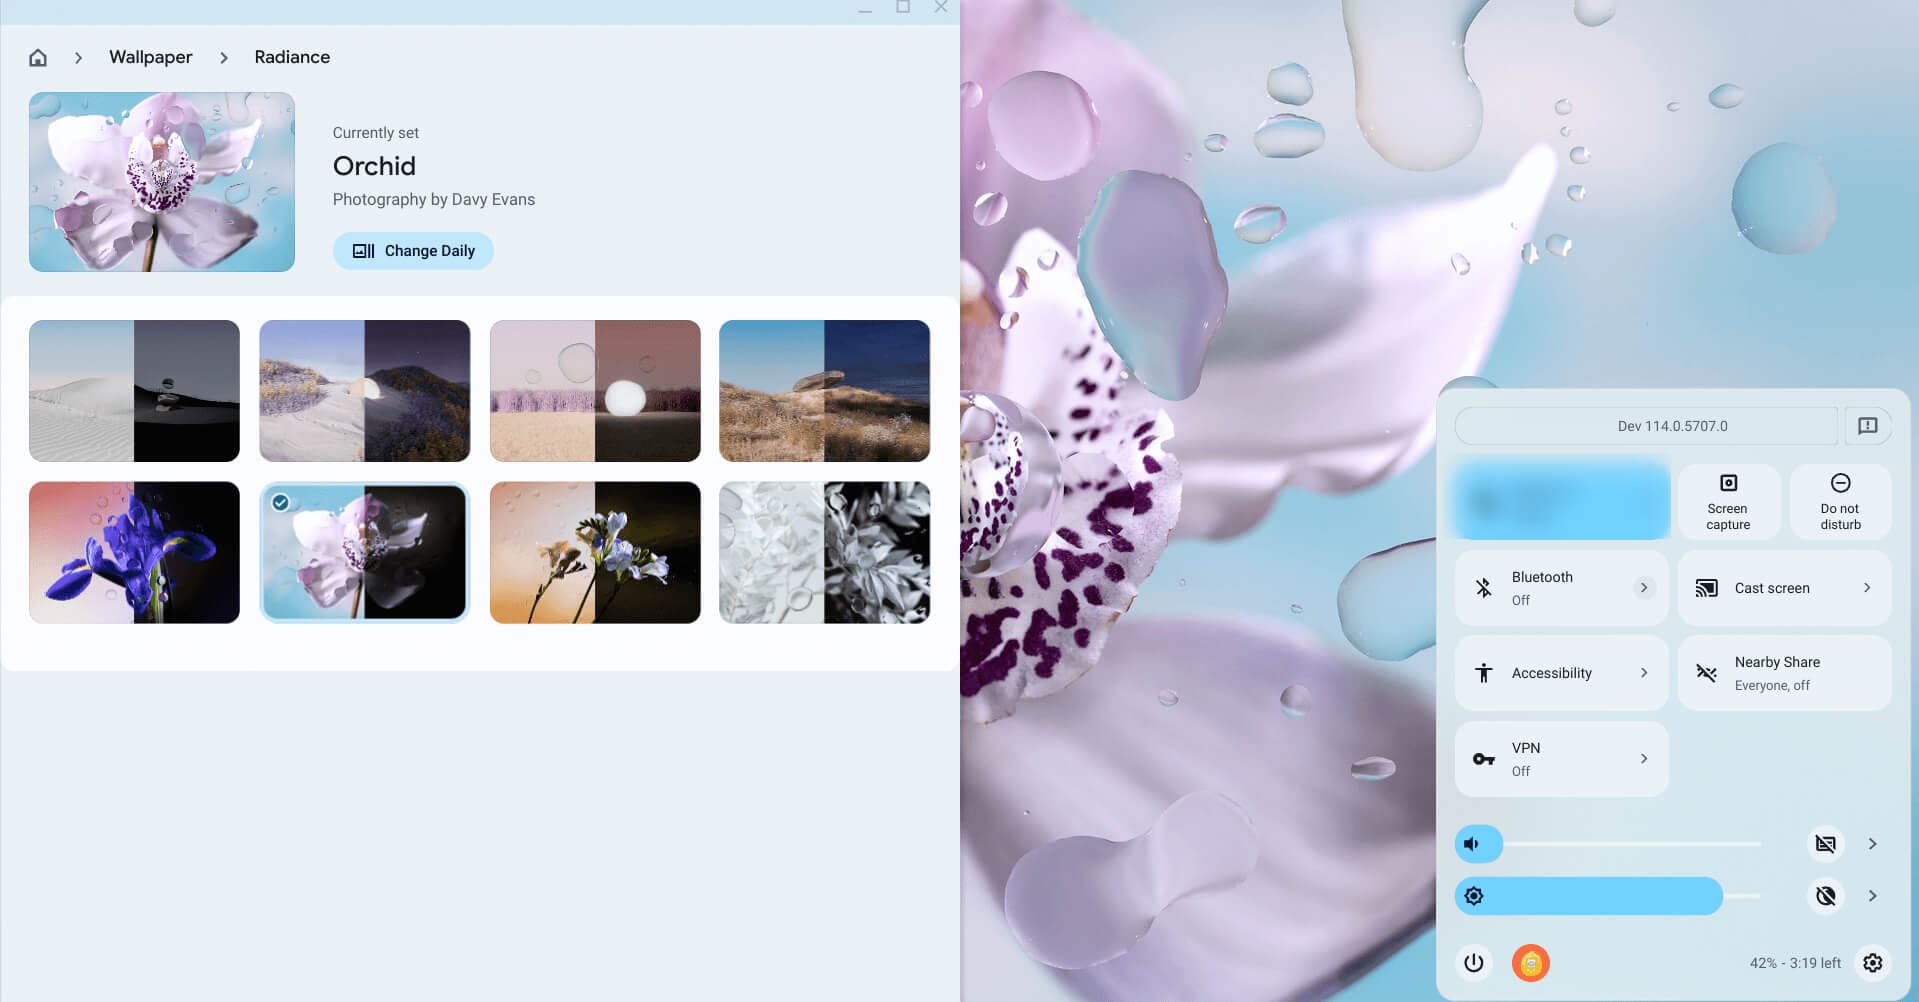
Material You theming on ChromeOS
Even though Material You isn’t an official part of ChromeOS at the moment, the project still looks and feels nothing but excellent on Chromebooks. The layout of the various design elements of the user interface seems to have been switched up for the better, and they indeed exhibit more color and flamboyance than before.
Do note that given the experimental nature of this feature, your particular make and model of Chromebook could start experiencing performance issues and speed lags. If that is true, please switch back to the stable channel and disable all three flags you had enabled for trying out Material You.
Conclusion
ChromeOS is a highly uncomplicated operating system whose greatest strength lies in its ease of use. Whether you’re an expert user of the internet or someone starting their foray into the field just now, Chromebooks possess enough capability to become your primary devices, depending on your use case.
In this guide, we’ve looked at how you can personalize your Chromebook in several ways, including changing the wallpaper and theme and even switching up the appearance of the in-built Linux terminal. Do let us know in the comments section if you found the guide helpful.
As always, Chrome Ready wishes you good luck!
