Out of the many different features of Google Chrome, a tool allows you to receive curated notifications for the websites you follow. It’s a pretty convenient feature as long as it’s helpful to you and comes across as convenient. However, push notifications can sometimes get pretty annoying, especially if you no longer wish to follow the source of the alert. In that case, you can easily customize and control the notifications sent to your device.
In this guide, we’ll cover how to effectively utilize Google Chrome’s push notifications so they don’t bother you instead of instilling more convenience in your life. That way, you can benefit from a personalized experience going forward, like modifying your Chrome browser’s home page or creating and managing multiple profiles simultaneously to streamline your networking. Without any further delay, let’s jump into the matter at hand.
What are push notifications in Chrome?
Push notifications in Chrome refer to a specific type of alert. These usually come from various online websites whose push alerts are agreed to willingly by the user. After that occurs, the website with notification-sending access granted throws a push notification your way, even when you do not have that website opened or the Google Chrome browser. You may have subscribed to many different sites for sending push alerts over time.
After all, it’s hard to miss the prompt in the top-left area of Chrome’s interface, right below the “View site information” symbol denoted by a lock-shaped icon. The prompt is from the browser itself and is simply looking to confirm whether you want a particular domain to send you alerts, even when you’re not actively browsing it. The idea of these specific notifications is to keep users up to date with whatever new content websites push out.
Now, this scenario has both a good side and a wrong side. For instance, you may have enabled push alerts for websites that once interested you but no longer do that. In addition, you could be trying out this feature on your end but have now decided against it because it’s not for you. Whatever the case, you will be happy to know that push notifications are customizable and can be controlled in Google Chrome; you need the correct information.
The section ahead will cover what you need to know about the latter.
How to customize Google Chrome’s push notifications
It’s not difficult to customize push notifications in Google Chrome. Chrome keeps it quite simple to adjust your push alert preferences. Begin by opening the browser and clicking the “Customize and control Google Chrome” button in the top-right corner of the screen. Once done, choose “Settings” to get to the next step.
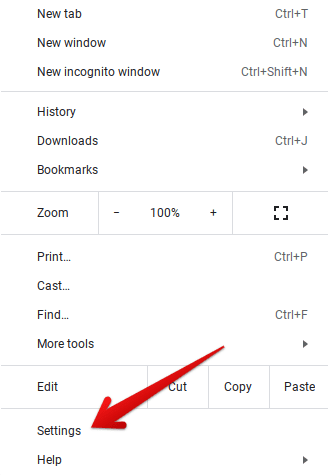
Clicking on Google Chrome’s “Settings”
Upon entering the “Settings” area, choose the “Privacy and security” section from the side panel to the left side of the screen. As you’re taken to the relevant section next, select the “Site settings” option.

Site settings in Google Chrome
After you get into the “Site settings” section, move forward by scrolling down the list of accessible entries and then clicking “Notifications,” which is right below “Microphone.”
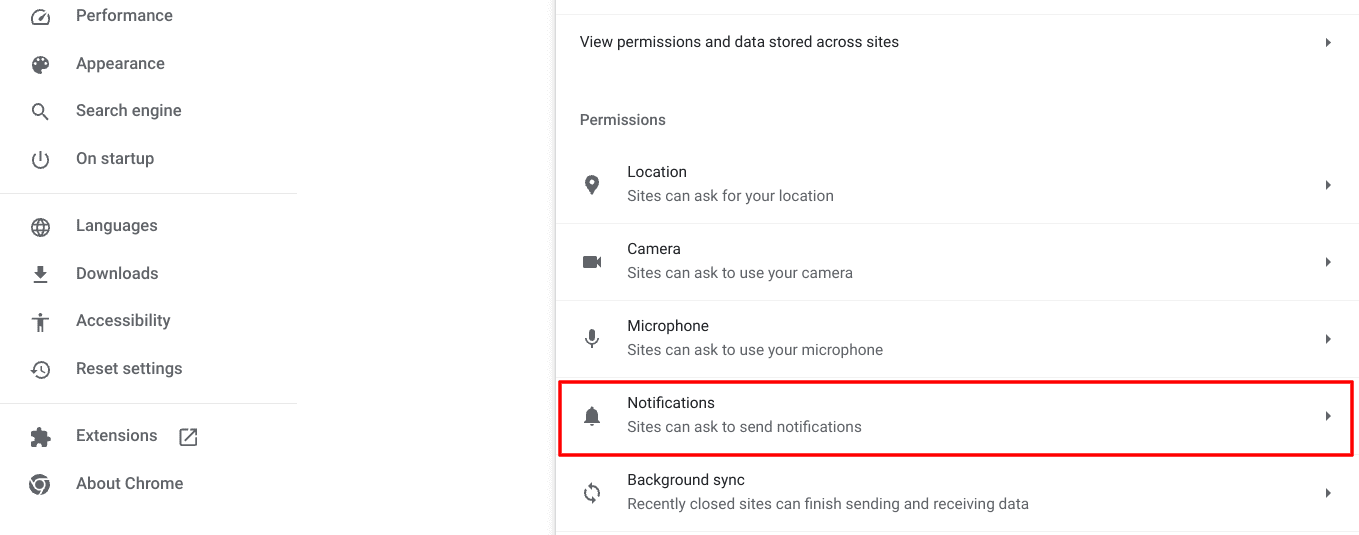
Choosing the “Notifications” section
Entering the “Notifications” area will lead you to access the various settings of this particular Chrome feature. The “Default behavior” area within the “Notifications” section lets you set a general preference for all notifications in Google Chrome. Your options include “Sites can ask to send notifications,” which is the standard choice, “Use quieter messaging,” and “Don’t allow sites to send notifications.
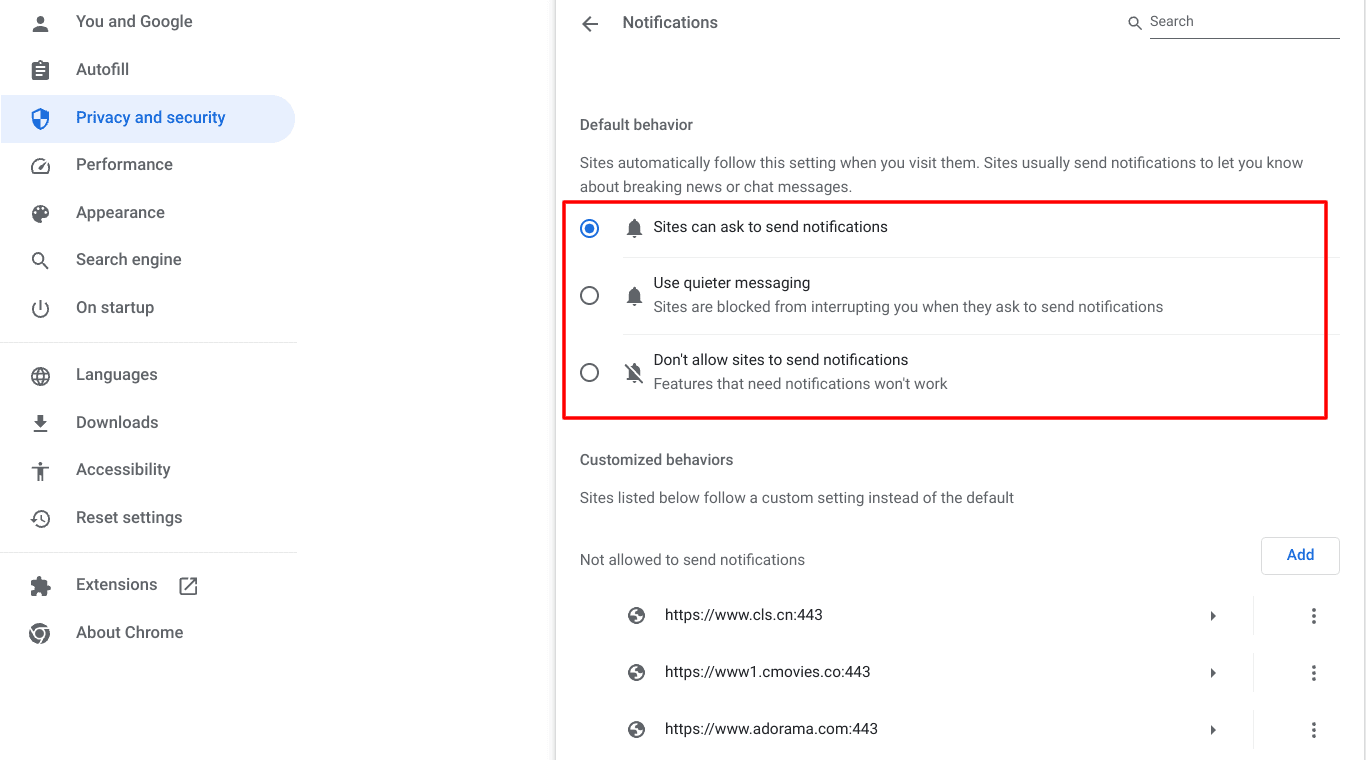
Adjusting the default behavior of push alerts in Chrome
You can now control the push notifications sent out by the Chrome browser using one of three different ways. Depending on your preferences, if you want to cut out push alerts completely, you can opt for the third option, which prevents sites from sending any notifications to you. Chrome won’t even prompt you for the notification sending permission. On the other hand, “Use quieter messaging” is a more balanced way to receive push alerts.
Now, the three methods of controlling push notifications discussed above are further corroborated by another feature within that section that relates to “Customized behaviors.” Using this functionality, you can specify permissions for particular websites instead of setting a general preference for all sites.
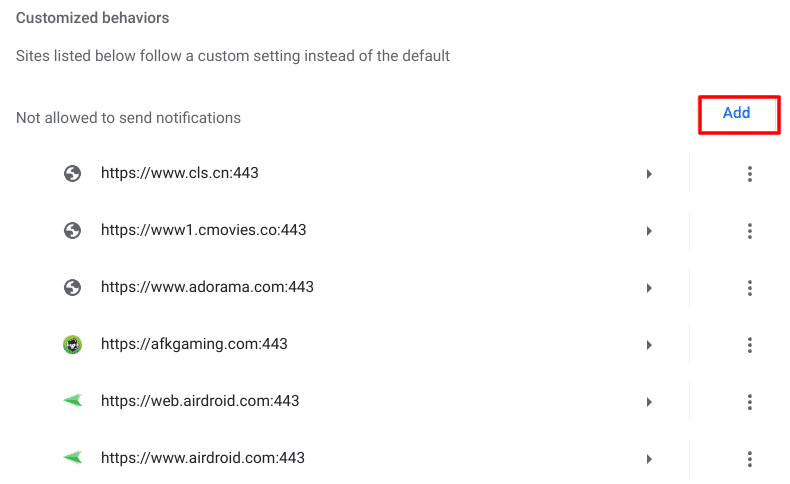
Adding a new website for customized behavior
In this area, Chrome’s interface has organized two types of websites—those allowed to send you notifications and those not. Over time, the Chrome browser has automatically kept a record of sites you’ve permitted to send push alerts and those whose notifications were blocked. All those domains are grouped together under the “Customized behaviors” section. Feel free to take a look and adjust your selections accordingly.
Next up, you can also opt for the different usable options for each website entry underneath the “allowed” and “disallowed” sections. Click the “More actions” button, denoted by three vertical dots spaced together, and further buttons will be revealed on the screen. You can remove websites from the section altogether, thereby reducing them to their default notification setting, edit their URL to make changes, and either allow or disallow alerts.
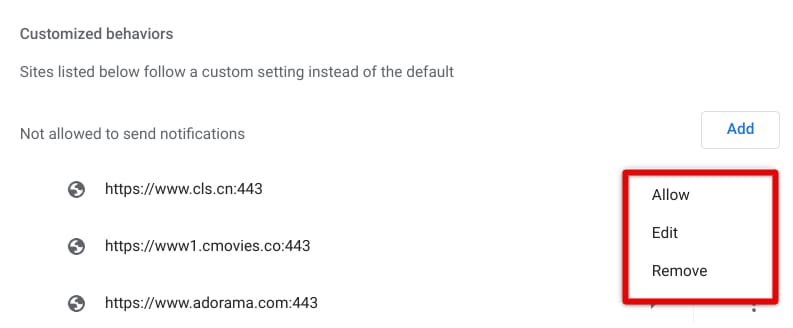
Further usable options
Customizing and controlling push notifications in Google Chrome is as simple as that. We recommend you evaluate the websites you visit and specify their push alerts according to your preferences now that you know the method to do so. Then again, if you wouldn’t want any site to send you push notifications, disabling alerts altogether is also readily available.
Conclusion
From effortlessly organizing your favorite websites with Chrome bookmarks and hidden browser features that streamline things to the availability of a private browsing mode, Google Chrome has acquired a world-renowned reputation across the spectrum. It stays regularly updated from the developers’ side regarding security patches, new feature additions, and other stability improvements.
With all the goodness that Chrome brings to its billions of users, some of its functionalities may not always appeal to the masses. One is push notifications and how certain websites can get quite bothersome. However, we’ve learned in this guide that you can tweak push alerts as per your preferences and make the feature work according to your interests, thereby exercising effective management.
