Chrome has millions of users relying on it for daily web browsing. Tab pinning is one of the many features that set Chrome Browser apart from others. It allows users to “pin” a tab to the browser window, keeping it open and easily accessible, even when multiple other tabs are open simultaneously. This feature is handy for users who frequently visit specific websites, as it allows them to quickly access their favorite ones with just a single click or tap.
In this article, we will explore how to use Chrome Browser’s tab pinning feature for quick access, including how to enable, pin, rearrange, and close pinned tabs and tips and tricks for making the most out of this helpful feature. Chromebooks are not devices that you’d typically have to go around troubleshooting with, but in case such a calamity does come before you, it never hurts to be prepared ahead of time. Here are 10 quick fixes for common ChromeOS problems.
What is the tab pinning feature?
Tab pinning is a feature in Chrome Browser that allows users to “pin” a tab to the browser window, keeping it open and easily accessible, even when multiple other tabs are open. When a tab is pinned, it becomes smaller and is moved to the left side of the tab bar. This lets users access their favorite websites quickly without searching through multiple tabs or windows.
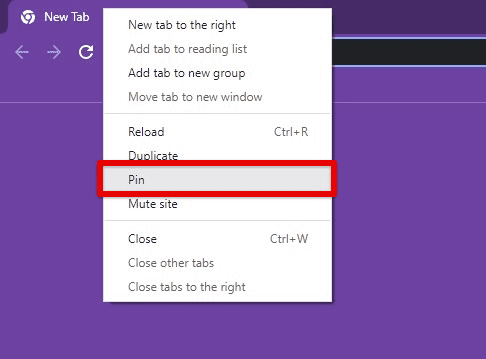
Google Chrome tab pinning feature
Pinned tabs are also less prone to accidental closure, requiring users to right-click on the tab and select “Close tab” or use a keyboard shortcut to close the tab. Additionally, pinned tabs can be set to open automatically when the browser is launched, providing users with quick access to their frequently visited web pages.
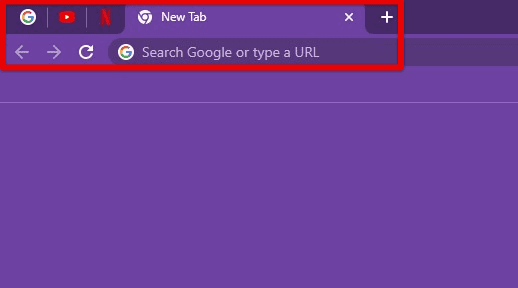
Opening pinned tabs on startup
The tab pinning feature is handy for users who frequently visit specific websites, such as email, social media, or productivity tools. By pinning these tabs, users can quickly access these links. Therefore, tab pinning can improve productivity and streamline the browsing experience, especially for users who rely heavily on specific sites daily.
How to enable tab pinning in Google Chrome?
Firstly, you must enable the tab pinning feature in the browser. Open Google Chrome on your computer. Click on the three-dot menu icon in the browser window’s top-right corner. Select “Settings” from the drop-down menu.
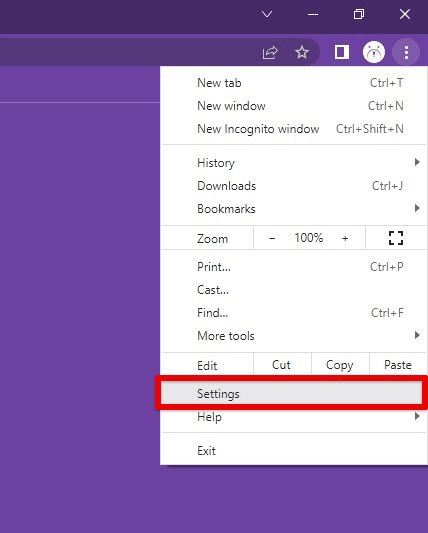
Opening Google Chrome settings
Scroll down to the “On startup” section and select “Open a specific page or set of pages”. Click on the “Add a new page” button.
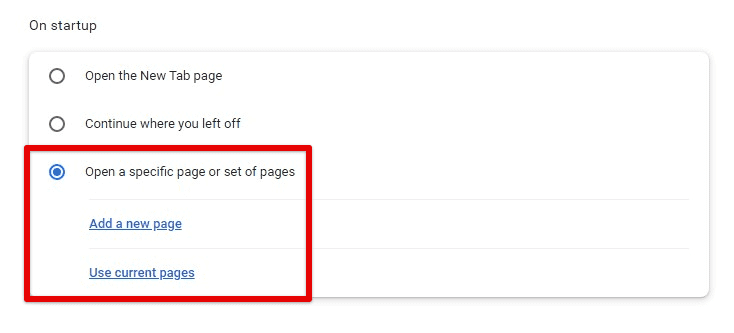
Open a specific page or set of pages option
Enter the URL of the website you want to pin. Click on the “Add” button to proceed. Next to the website URL, click on the three-dot menu icon. Select “Pin” from the drop-down menu.
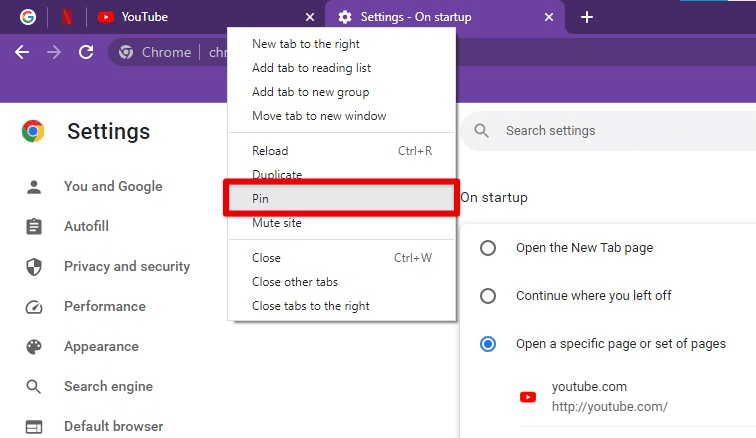
Pinning an on the startup page
Once you’ve completed these steps, the website tab will be pinned to the left side of the tab bar and available for quick access whenever you open Google Chrome. You can also pin additional tabs by following the same process for each website you want to pin.
Chromebooks, although minimal devices are also closely concerned with RAM. Most of them comprise 4 GB of memory today, while many are still limited to a mere 2 GB. As you can presume, this isn’t much, so you do have to take measures for your RAM to stay in the safe zone and keep the device functioning at its best. Learn how to free up RAM on a Chromebook.
Pinning a tab in Google Chrome
To pin a tab on the go or from the page, open the website you want to pin in a new account. Right-click on the tab. Select “Pin tab” from the context menu.
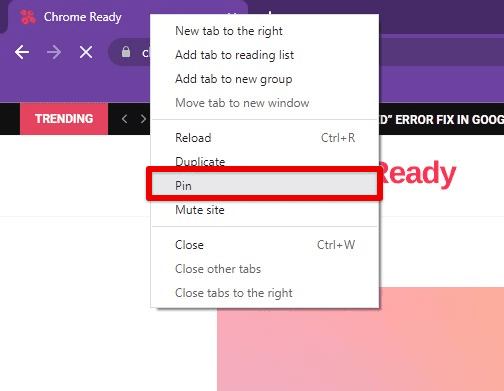
Pinning a tab in Google Chrome
Alternatively, you can right-click on the tab and press the “P” key to pin the tab. Once you have pinned it, the tab will move to the left side of the tab bar and become smaller in size. You can also see the website’s favicon displayed in the tab in this mode. The pinned tab will remain open and easily accessible, even when you open new tabs or windows alongside it.
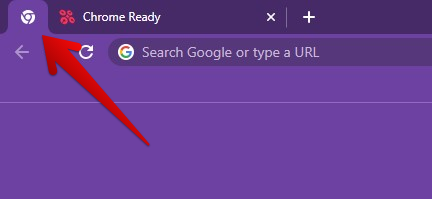
Tab pinned with a key shortcut
Pinning tabs can be especially useful for websites you use frequently, such as email or social media platforms. By pinning these tabs, you can quickly access them with just a single click without having to search through many tabs that might already be open then. Now that you have learned how to pin a tab let us see how you can unpin one in the next section.
Unpinning a tab in Google Chrome
If you want to unpin a tab in Google Chrome, right-click on the pinned tab and select “Unpin tab” from the context menu.
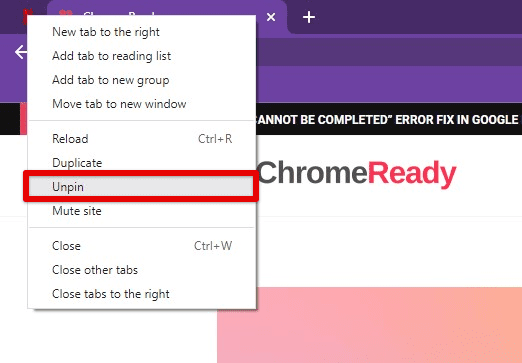
Unpinning a tab in Google Chrome
Alternatively, you can right-click on the tab and press the “U” key to unpin the tab. You can also drag the pinned tab out of the pinned area to unpin it. Click and drag the pinned tab to the right side of the tab bar, and it will become a regular tab once again.
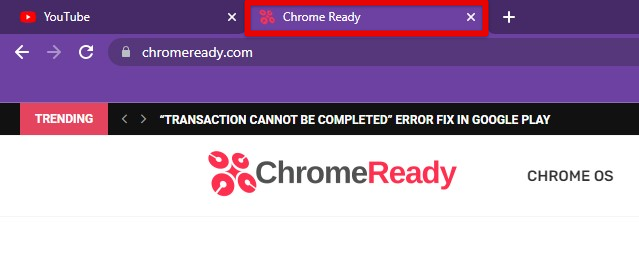
Tab unpinned with a key shortcut
As you unpin the tab, it will return to its regular size and position in the tab bar and behave like any other regular tab in the browser. You can close it by clicking on the “x” icon on the right or by using the keyboard shortcut “Ctrl + W” (Windows, Linux) or “Command + W” (Mac).
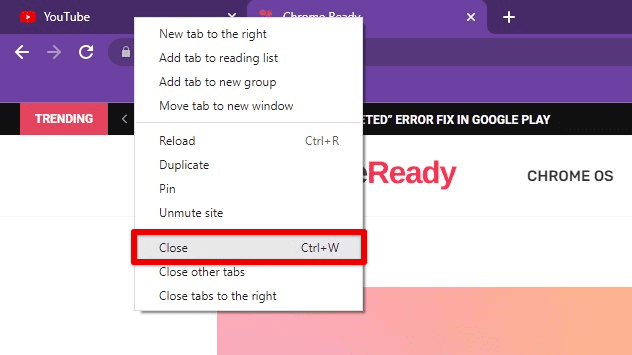
Closing an unpinned tab
Note: If multiple tabs open and close Chrome Browser, any pinned tabs will automatically be saved and become available the next time you open the browser. If you want to prevent this from happening, unpin the tabs before ending the current session.
Rearranging pinned tabs
In Google Chrome, you can easily rearrange your pinned tabs by dragging or dropping them in a preferred location or with the help of some quite useful Chrome keyboard shortcuts.
Drag-and-drop: To rearrange a pinned tab, click and hold on to the tab and drag it to the desired position in the tab bar. You can move the tab to the left or right of other pinned tabs or even move it to the right side of the tab bar to make it a regular tab once again.
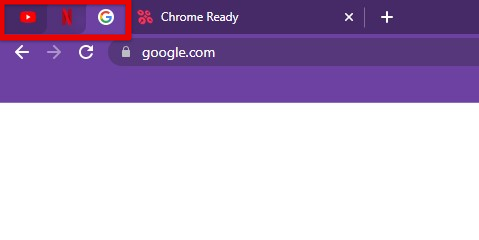
Rearranging pinned tabs
Keyboard shortcut: Another way to rearrange your pinned tabs is by using the keyboard shortcut “Ctrl + Shift + Left arrow” (Windows, Linux) or “Command + Shift + Left arrow” (Mac) to move the selected tab to the left, or “Ctrl + Shift + Right arrow” (Windows, Linux) or “Command + Shift + Right arrow” (Mac) for moving it to the right.
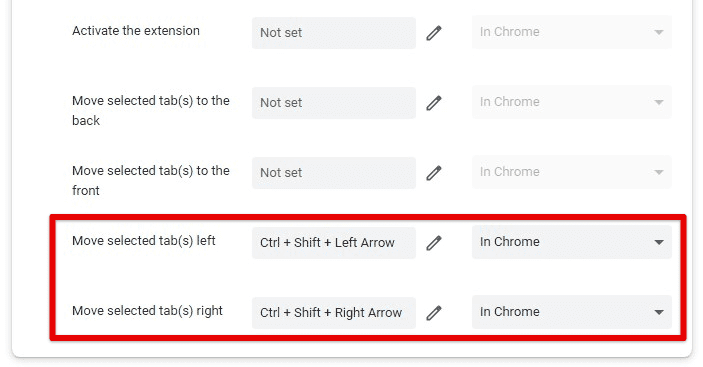
Rearranging pinned tabs with keyboard shortcuts
By rearranging your pinned tabs, you can quickly prioritize the websites you use and make them more easily accessible. You can also use this feature to group tabs together based on your workflow or project, making navigating and staying organized easier.
Note: Rearranging pinned tabs will not affect the content or behavior of the websites themselves, and the tabs will retain all of their original settings and data.
Closing a pinned tab
Closing a pinned tab in Google Chrome is similar to closing any other tab in the browser. There are several ways to close a pinned tab. To close a pinned tab, click on the “x” icon on the right side. This will close the tab and remove it from the tab bar. Remember that you can only do this once a tab has been unpinned. Otherwise, the “x” icon will not be visible.

Closing a tab after unpinning
You can also use the keyboard shortcut “Ctrl + W” (Windows, Linux) or “Command + W” (Mac) to close the selected tab directly. This shortcut will work for pinned as well as regular tabs.
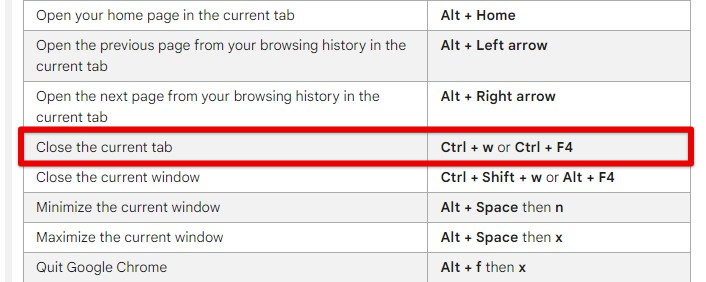
Closing pinned tabs with a keyboard shortcut
Another way to close a pinned tab is by right-clicking on the tab and selecting “Close” from the context menu.
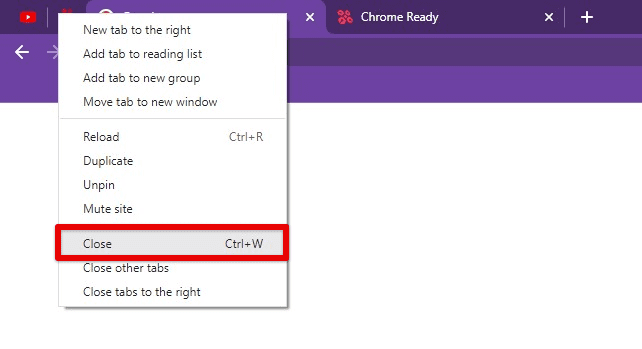
Closing a pinned tab from the context menu
Note: Closing a pinned tab will not affect the behavior or settings of other tabs in the browser. However, if you accidentally close a pinned tab and want to reopen it, you can go to the “History” menu in the browser and select “Recently closed tabs”. From there, select the tab you want to reopen and click on it to restore it to the tab bar.
Benefits of using tab pinning feature
The tab pinning feature in Google Chrome Browser provides several benefits that can improve productivity and organization.
Quick access to frequently used tabs: Pinning tabs allows you to keep your most commonly used websites easily accessible in the browser. This saves time by eliminating the need to search for the website or navigate multiple tabs to find it.
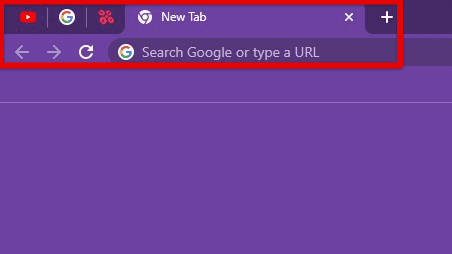
Pinning tabs for quick access
Reduced clutter: Pinning tabs shrinks the tab in the main bar and keeps it in a separate section, freeing up considerable space, especially if many tabs are opened. This can help reduce clutter and make it easier to navigate between tabs.
Improved organization: Pinning tabs allows you to group and organize related tabs by category. This can help improve your workflow by keeping all relevant tabs accessible and in one place.
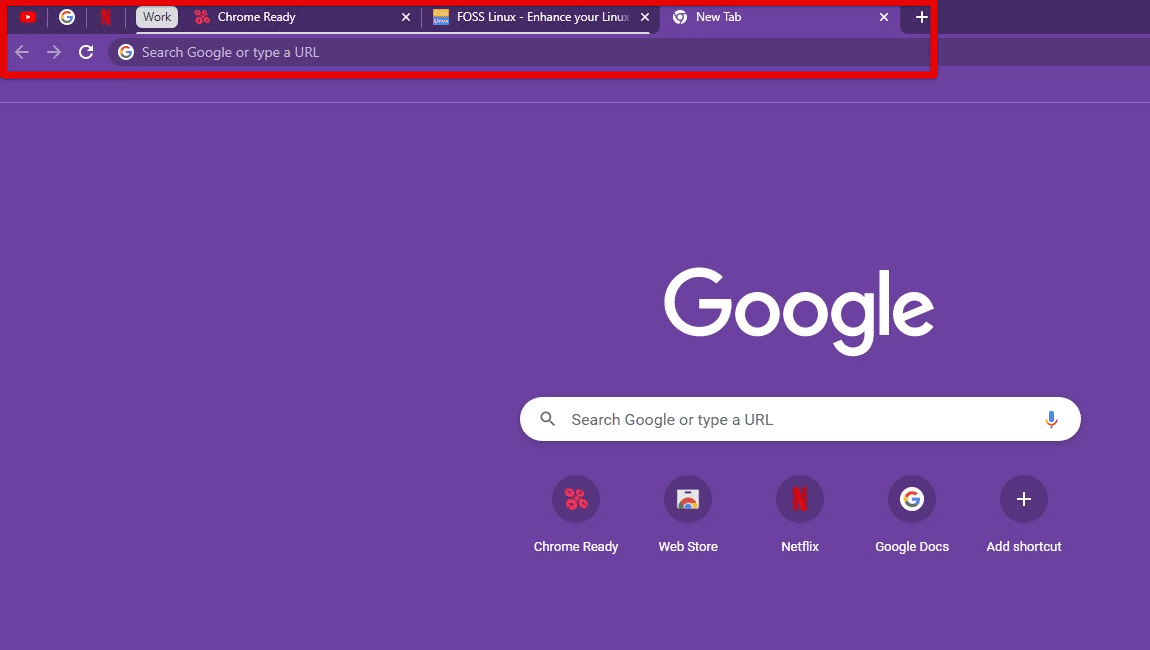
Improved organization
Prevent accidental closure: Pinned tabs cannot be closed accidentally, which can be especially useful if you have multiple tabs open and are in danger of closing an important tab. This ensures that they remain open and accessible, even if you accidentally close other tabs in the current session.
Conclusion
The tab pinning feature in Google Chrome helps users stay organized and productive while browsing the web. With the ability to easily access frequently used websites, group related tabs together, and prevent accidental closures, this feature is valuable to any browsing workflow. Following the instructions and tips in this article, you can easily enable or rearrange your pinned tabs to suit specific needs and preferences.
While Google Chrome’s base functionality is nothing less than remarkable, the Chrome Web Store is also teeming with dedicated extensions for a range of other tasks. Here are the top 9 accessibility extensions for Google Chrome.
