People often ask whether it’s more fruitful to opt for more storage or RAM when choosing a new Chromebook, and the answer to that is purely subjective. Although RAM has its own array of benefits to boast, having adequate storage is no joke, especially when you’re managing it properly.
In this guide, we’ll explain some of the most effective ways you can employ to manage your Chromebook’s storage. That way, you’ll rarely run out of enough space to store your important files and always know what type of file to keep and which one to let go of.
Let’s dive right in with no further ado.
Why you should manage storage on a Chromebook
Chromebooks are sleek, modern, and portable devices that are touted as nothing but lightweight. On that note, it would be a shame if the internals of the device were clogged up and the overall interface was reduced to feel clunky. That is what happens when heaps and heaps of unsupervised data start piling up, and you can no longer navigate the UI properly.
This is simply against what ChromeOS stands for, being built upon the founding principles of speed, simplicity, and security. The graphical user interface of Chromebooks is light, fast, and utterly reliable, so when all of that starts getting downsized significantly, the whole point of using a Chromebook starts going down the drain.
The fact is that overloading your device with a hefty amount of data leads never bodes well for the operating system as a whole. So if your storage compartment is filled up, we highly recommend clearing it to stay consistent with the core ChromeOS experience.
Other than that, there are specific ways to ensure that your Chromebook’s storage does not get convoluted in the first place. We’ll be detailing every tip, trick, and hack that can help us in this case and teach you how to better organize your device’s storage on the fly. The following section is going to take it from here.
How to check your Chromebook’s storage
Before we get into the managerial part of the storage compartment of your Chromebook, it’s crucial knowing how you can check the available and used space on your device. The latter will serve as the premise for conveniently managing your Chromebook’s storage, so it’s certainly worth following up on.
An easy way to check your Chromebook’s storage is by first opening the “Files” app and then following things up by clicking on the “More options” icon in the top-right corner of the screen, depicted by three small dots placed together vertically.

Revealing more options in the Files app
After completing the previous step, you should see a distinct section as one of the subsequently appearing options in the drop-down area. This section will quickly illustrate the amount of storage you have used and how much you have left. Again, we advise clicking this area for more details.
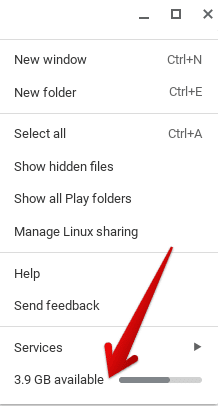
Accessing Storage Settings
Once done, your Chromebook’s “Settings” app should pop up, taking you straight to the “Storage management” section. From here, it’s simple to assess how storage across your device is divided. There will be separate sections here that will state how much space is occupied by what type of process, whether it’s a file, system-occupied space, or other.
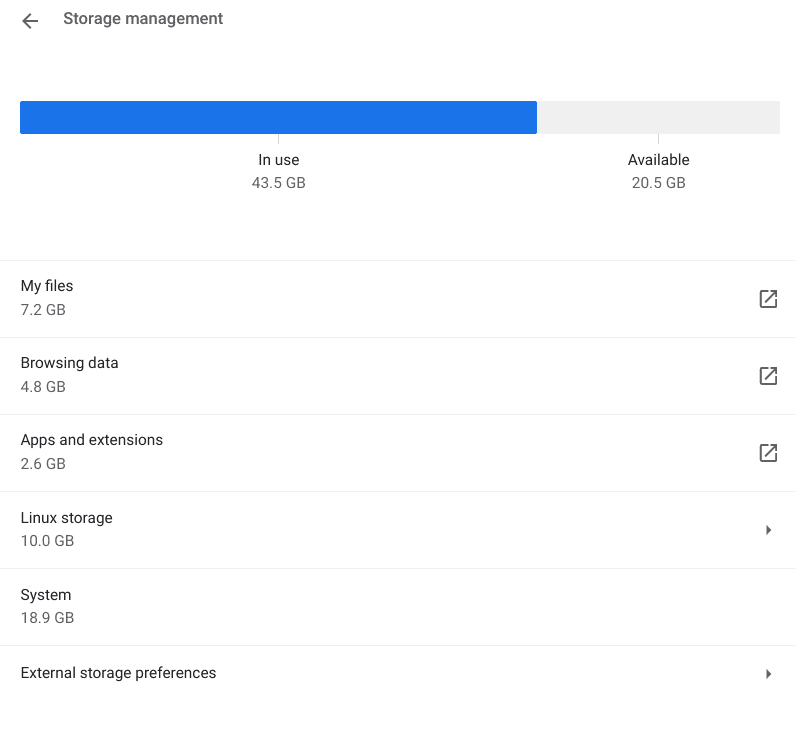
The “Storage management” section in ChromeOS
That’s about it for checking your Chromebook’s storage. Now that we’ve arrived at this point, we can proceed quickly regarding managing the available space and what measures you can take to free some storage on the device.
Best ways to manage your Chromebook’s storage
The following is our round-up of the preferable ways to manage your device’s storage. Read ahead, find out what you need to do, and enjoy favorable results afterward.
Explore your cloud storage options and utilize them
ChromeOS is a cloud-first operating system that benefits substantially from the cloud. Hence, there’s no reason you shouldn’t explore the cloud-based storage solutions surrounding your Chromebook’s functional capacity. After all, using the cloud to store your data boasts many benefits over conventional measures.
For starters, cloud storage doesn’t work like local storage, where all your data and other stuff are kept locally on a device. Instead, cloud servers are relied upon to accomplish the matter at hand. These provide the upper hand of heightened security, easy accessibility, and zero occupation of your device’s storage, so the latter remains unbothered.
Now, if you haven’t noticed already, Chromebooks integrate with Google Drive right off the bat. You’ll even find a dedicated section in your “Files” system app. Then, look to the left, and you’ll see how Drive has a compartment of its own that provides you quick access to your stored items in your Google account.

Google Drive in ChromeOS
Those who complain about the need to stay connected to the internet to access the world-renowned cloud storage platform can learn how to use Google Drive offline without breaking a sweat, which is another added plus you can take into account. A myriad of benefits and nothing else awaits you by shifting to the cloud for managing your Chromebook’s storage.
And it’s not just Drive to look forward to. The fact is that multiple other high-quality cloud storage options are available at your Chromebook’s disposal. Some of these include Dropbox, pCloud, and even OneDrive. To get started, you only need to sign up and enjoy your free storage, which usually ranges between 5-15 GB.
Therefore, packing your stuff and shifting to the cloud is one of the most robust ways to manage ChromeOS storage. If your use case requires more space than what a free account can get you, consider signing up for a Google One subscription to Drive to receive 100 GB of cloud storage. Even more so, you can expand from that figure just as well.
- Relevant read: 7 easy ways to organize your Google Drive.
Delete unnecessary files from the device
From here on out, we will focus on the clean-up part regarding maintaining your Chromebook’s storage. To get started, go to the “Files” app and take a close, hard look at all those files just sitting on your Chromebook and doing nothing for you.
Bring out the delete hammer for such files and clean your “Files” app in a step-by-step manner in this way. You’re bound to free up a significant amount of space if you’ve been using your device for a fairly long while now. The “Storage” section in your Chromebook’s “Settings” can also highlight how much of the “Files” app alone contributes to your overall storage.
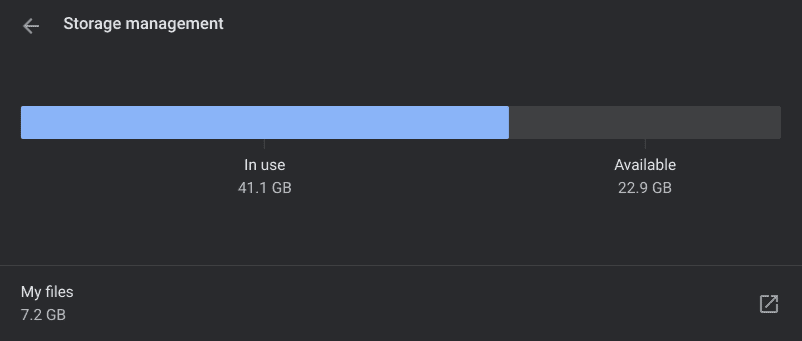
Contribution of the “Files” app to your Chromebook’s storage
If you have a lot of pile-up in the “Downloads” subsection of the “Files” app, there is a way to delete items in bulk. Tap on a single entry, press and hold the “Shift” key afterward, and use either the left or the down arrow key, depending on the layout of your files inside the app, to easily select more items. Use “Alt” and “Backspace” to remove the selected items.
We recommend shifting to the cloud for those files that are there to stay, just like we discussed above. Doing so will undoubtedly free up storage and give your device some breathing room while retaining your important content.
- A thoughtful read: How to find and recover deleted files on Google Drive.
Clear Google Chrome’s browsing history and data
Another prominent tip whose benefits not only protrude to maintaining your overall storage but also boosting your Chromebook’s performance revolves around clearing your Chrome browser’s history and browsing data. This is especially powerful if you haven’t tended to it in a while.
Over time, your Chrome browser may accumulate a hefty ton of browsing history and other relevant data that could be bogging it down in terms of performance and taking up space just the same. Thankfully, taking care of the matter at hand is quite simple, and it only takes a couple of minutes.
To get started, press “Ctrl” and “H” while within the Chrome browser to go straight to the “History” section. Once you’re there, select “Clear browsing data” on the left side of the screen. That will bring up an overlay menu on the screen.

vvvvvvvvcf Clicking on “Clear browsing data”
This overlay, or small-scale window, will help you clear your Chrome browser’s data effortlessly. In the “Basic” tab, you’ll find various options to tweak and optimize, such as deleting cookies, cached images, files, and browsing history. The “Basic” section can only do so much, so if you want to take things to the next level, we suggest checking out “Advanced.”
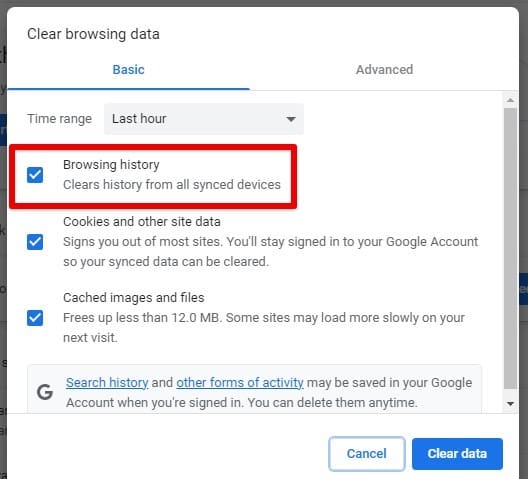
Clearing browsing history
Another important thing to tweak here is the “Time range.” Set it to “All time” for the best results, but be clear beforehand that you’re not removing anything needed, such as saved passwords or auto-fill data. Again, however, these parameters will only be available under the “Advanced” section, so do authenticate the operation thoroughly.
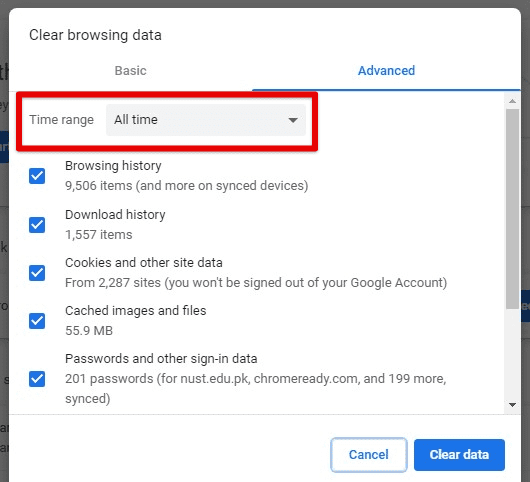
Selecting a time range for clearing browsing data
Click on “Clear data” when you’re done, and give the system a brief moment to process the deletion. You should be done in no more than a couple of seconds. We suggest restarting the device afterward to yield the best results.
Remove extra apps
Given the availability of the Google Play Store and the added feature of Chromebooks to sideload Android apps—even without enabling the developer mode sometimes—it’s not rare for one to install a myriad of programs on your end. So if this description fits you as well, fire up the launcher section in ChromeOS and carefully analyze all of your apps.
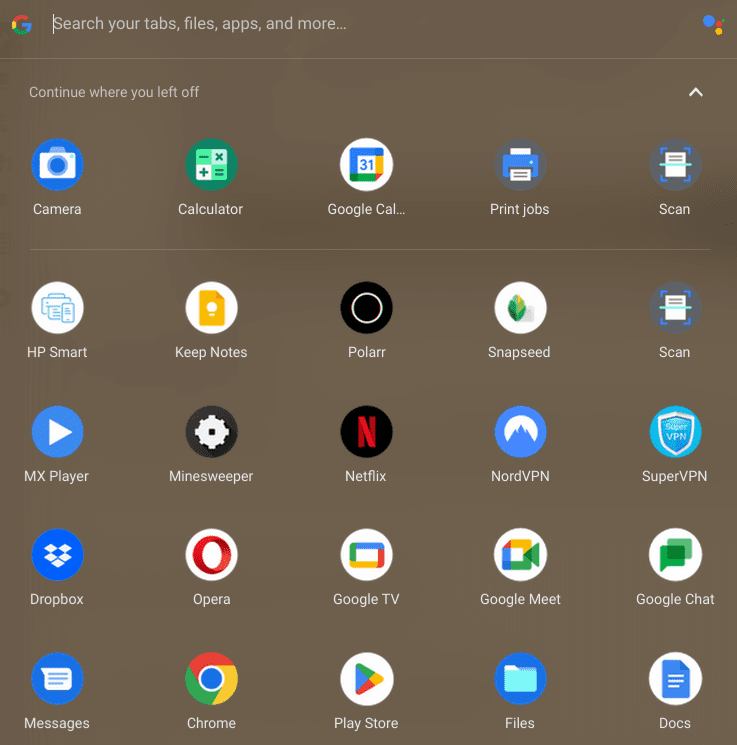
The launcher area in ChromeOS
You’ll need to verify the applications you no longer need to make the appropriate uninstallation choices. For a better view of what app takes up and how much space on your Chromebook, we suggest heading over to the “Settings” app, choosing the “Apps” area from the side panel to the left, and then clicking on the “Google Play Store” button.
- Ensure you have the Play Store activated now, just in case you haven’t tended to it before.
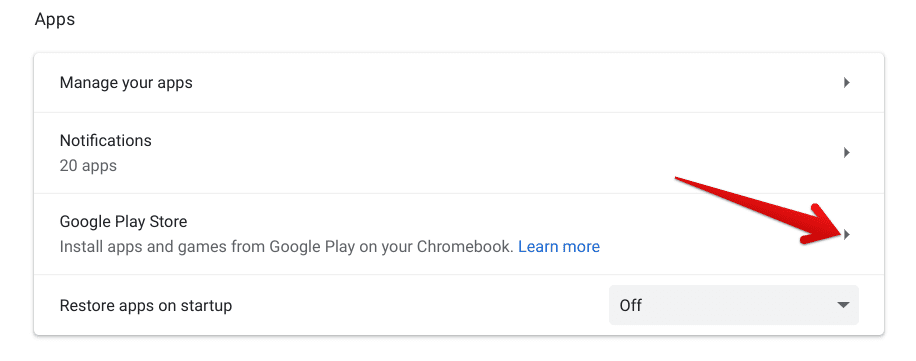
Clicking on the “Google Play Store” button
Right after that, you can click on the dedicated icon beside “Manage Android preferences” to launch another window.

Clicking on “Manage Android preferences”
Doing so will take you to the Android part of your Chromebook’s management functionality. Here, click on “Apps and notifications” to move forward.
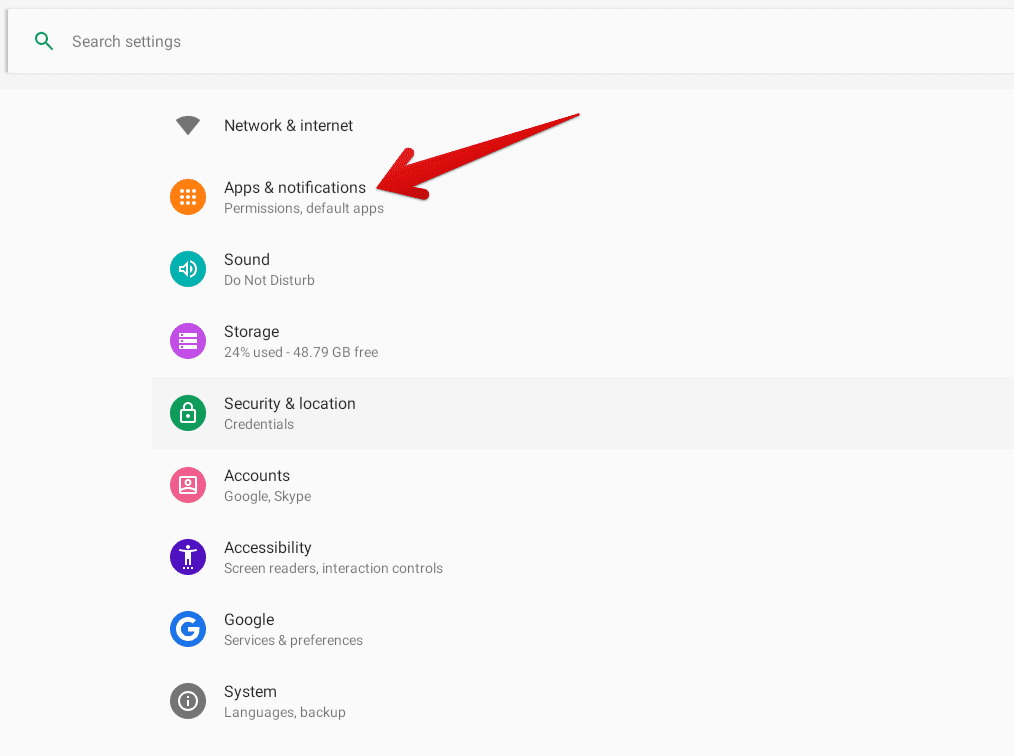
Selecting “Apps and notifications”
You should now be able to select the “See all apps” button. If that is not available, select “App info” instead to proceed.
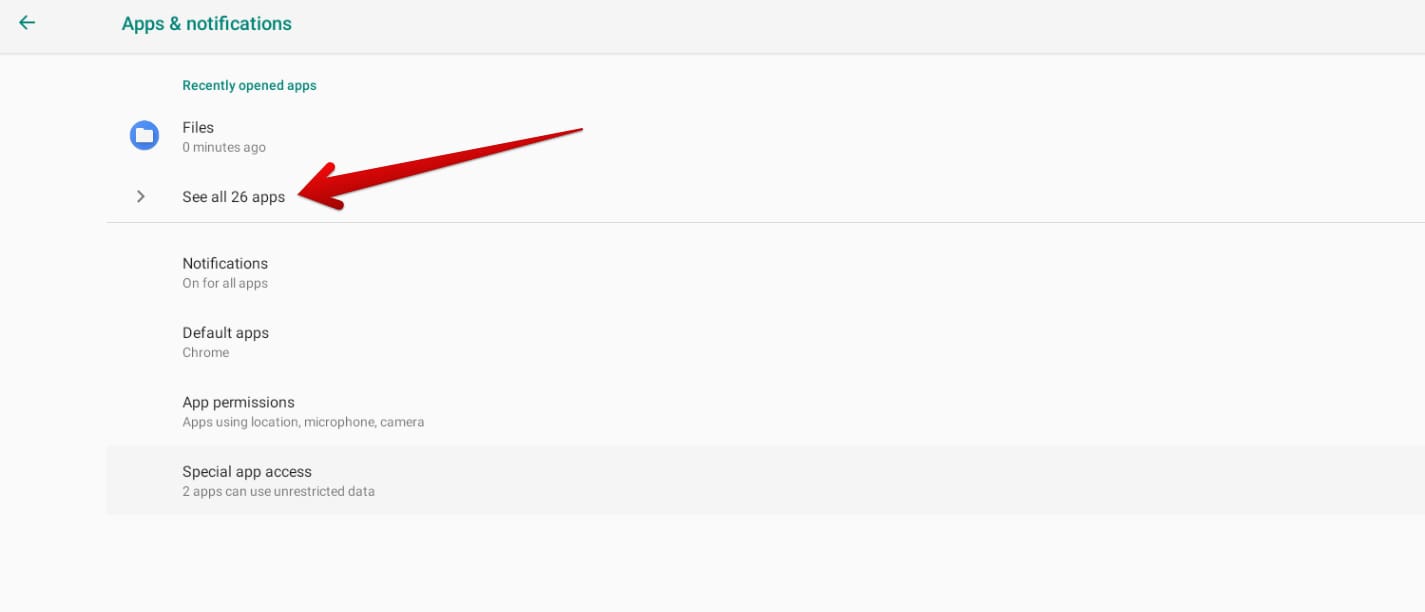
Accessing the app catalog of the Chromebook
Visualizing the full app catalog on your Chromebook will now be possible. Unfortunately, there’s no option to sort the given entries based on their size, so you must sift through them manually. Figure out which apps take up the most space on your Chromebook and decide whether you’d want to keep them.
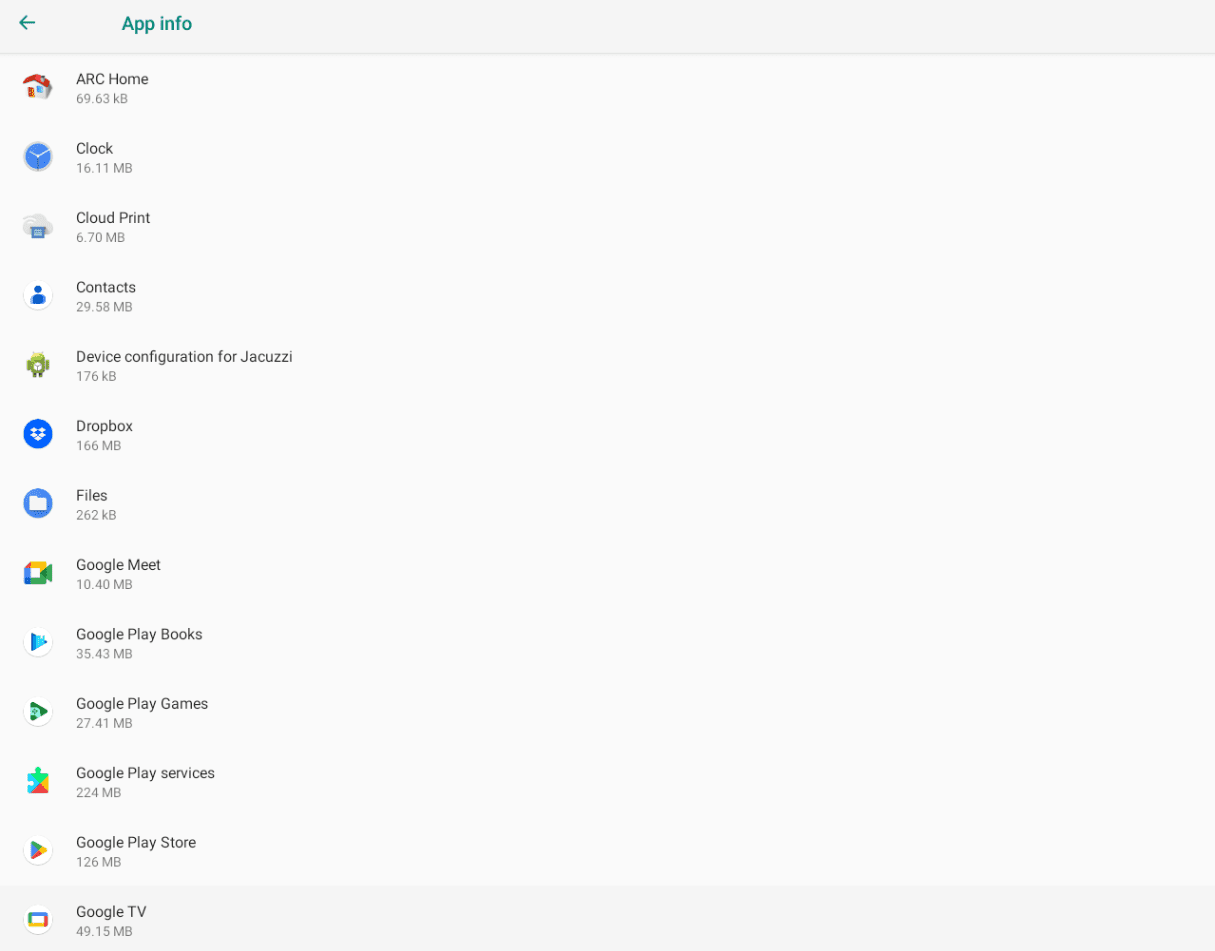
List of all installed apps on the Chromebook
Uninstalling unnecessary applications from your Chromebook is an excellent way to manage the device’s storage. However, it still isn’t enough in the grand scheme of things. So let’s see what further measures you can take to relieve more space on your end.
Delete unwanted user accounts
ChromeOS lets you add multiple user accounts for different people on your Chromebook. Although this boasts many benefits, such as enjoying more freedom and privacy on a shared device with password locking, doing so can often lead you to suffer from storage issues.
You have to step in and evaluate whether your once-added user accounts are still relevant. To do this, sign out of your Chromebook by pressing and holding the “Power” key until you see the overlay menu. Then, click “Sign out” and wait for your device to process through the log-out phase.
When you’re back on the sign-in screen, look for the drop-down arrow beside the user profile’s name and choose “Remove this user.” Once confirmed, all user data for that profile stored locally will be plucked out from the Chromebook. Hence, ensure you’ve taken care of all of the latter beforehand to avoid any inconvenience.
Try dedicated extensions that save RAM
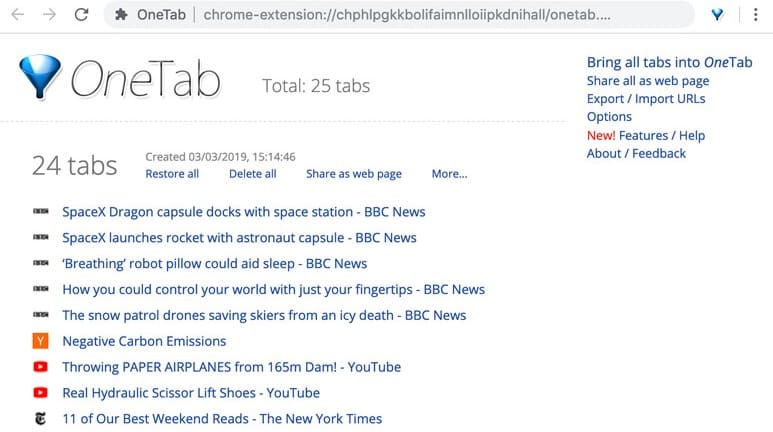
OneTab on ChromeOS
Although RAM has little to do with your Chromebook’s overall storage and more with performance, it’s still a substantial part of the device’s temporary space-occupying measures. And what better way to manage your device’s storage than taking care of one of its constituents that correlates with a noteworthy end-product of maintaining adequate space?
If you wish to keep the Chromebook’s performance going smoothly, we highly recommend you pay attention to the device’s RAM usage side by side. For that purpose, the Chrome Web Store can offer some help, being one of the major storefronts for the best extensions in town.
Extensions such as The Great Suspender and OneTab are all highly adept at freeing up RAM on a Chromebook in an intuitive way, thereby making you more productive and organizing your tabs for you just as well. We recommend giving these add-ons a go and observing how much of an impact they leave on your device’s overall storage and performance.
- Recommended read: Why is Google Chrome using so much RAM, and how to optimize it.
Plug in an external drive
Another major helping hand that you can borrow comes from plugging in an external thumb drive to help you expand your Chromebook’s storage options. This is one of the reasons that developers incorporate SD card or microSD card ports into modern-day Chromebooks, such as how you spot one on the Acer Chromebook Spin 713.
- On a side note, here’s everything you need to know about USB ports on a Chromebook.
If you don’t have an external drive yet, our guide on the top 10 USB flash drives for Chromebooks in 2022 will nudge you in the right direction. The moment your use case is getting too expansive for your Chromebook’s default storage, you should readily grab a USB and plug it right in.
- Suggested read: How to eject a USB drive from a Chromebook.
Conclusion
Chromebooks are some of the most effective computers on the planet right now, with several added features, such as strict security, unflinching speed, and thorough simplicity. Over time, the developers have refined ChromeOS to a reasonable extent, making sure Chromebooks do more than stand out in the competitive space they’ve launched in.
In this guide, we have highlighted a portion of a Chromebook’s overall functionality, basing the guide around storage management. Taking up cloud storage is a must in the day and age we live in today, not to mention some of the other approachable measures that can help you keep tabs on your device’s available space.
Let us know in the comments ahead if you have anything to add to the table. Chrome Ready wishes you good luck!
