A hanging indent, also known as a second line indent, is a formatting technique used in text documents to separate a list of items visually or to set off a quotation. It is achieved by indenting all paragraph lines except for the first line. This creates a “hanging” effect, where the first line sticks out to the left while the remaining lines are indented. Hanging indents are commonly used in academic writing, such as in bibliographies, or works cited pages, to list multiple sources in a clear and organized manner. They can also be used in creative writing to set off quotations or to separate items in a list.
Why should I use a hanging indent?
In addition to its aesthetic appeal, a hanging indent can improve readability by helping the reader distinguish between different text sections. It also makes it easy for readers to scan the document and locate important information. Another use of hanging indents is for citations, particularly for MLA and APA formats. In MLA, it is used for cited entries, where second and further lines are indented. In APA, it is used for in-text citations instead.
Applying hanging indent on Google Docs
In the following article, we will look at how you can create and use hanging indent on Google Docs. Never tried adding images or drawings to your documents? Here is a comprehensive beginner’s guide to drawing on Google Docs.
Hanging indent in Google Docs using the ruler
Creating a hanging indent in Google Docs using the ruler is a simple process that can be done in a few easy steps.
Step 1: Open your Google Docs document and highlight the text you want to format with a hanging indent.
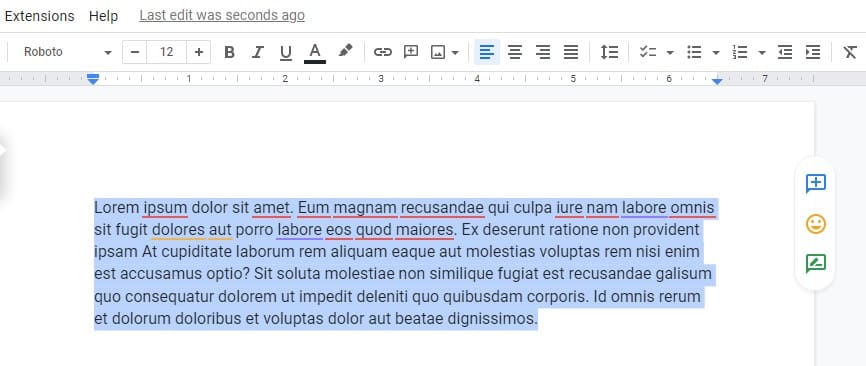
Highlighting the text
Step 2: Locate the ruler at the top of the page. It should be just above the document and may be hidden by default. If it’s not visible, go to “View” in the menu bar and select “Show ruler”.
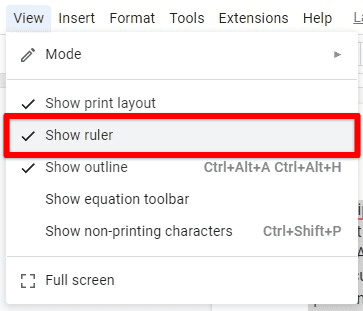
Making the ruler visible
Step 3: On the left side of the ruler, you’ll see a small blue bar. This is the “first line indent marker”. Click and hold the marker and drag it to the right to create an indent for the first line of the paragraph.
Step 4: Below it, you’ll see a small blue triangle. This is the “hanging indent marker”. Click and hold the marker and drag it to the right to create the hanging indent for the rest of the lines in the paragraph.
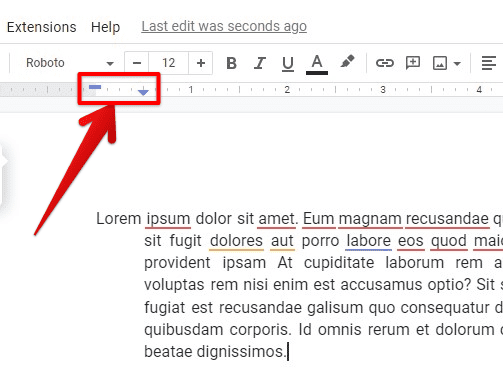
Hanging indent using the ruler
Step 5: Release the marker when you are satisfied with the indentation.
Step 6: Repeat the process for any other paragraphs you want to format with a hanging indent.
That’s it! Using the ruler, you have successfully created a hanging indent in Google Docs.
Note: If you want to adjust the hanging indent size, you can click on the hanging indent marker and drag it left or right. You can also use your keyboard’s left and right arrow keys to make minor adjustments.
It’s worth mentioning that you can also select multiple paragraphs at once and then adjust the hanging indent. This can save you time and effort if you have a lot of paragraphs that need the same formatting.
Hanging indent in Google Docs using the paragraph format options
Creating a hanging indent in Google Docs using the paragraph format options is just as simple.
Step 1: Open your Google Docs document and highlight the text you want to format with a hanging indent.
Step 2: Go to the “Format” menu in the menu bar and select “Align & indent” and then “Indentation options”.
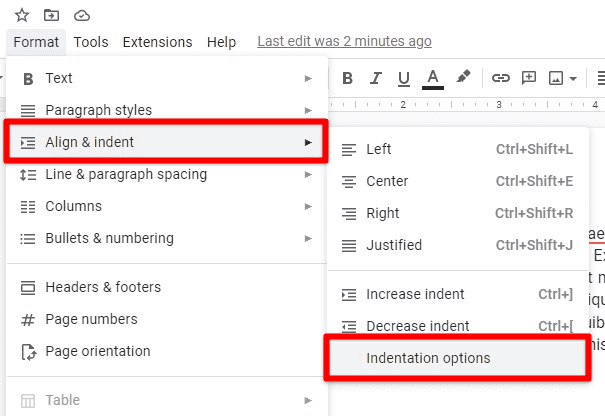
Opening indentation options
Step 3: You’ll find the “Special” option in the Indentation section. From the drop-down menu, select “Hanging”.
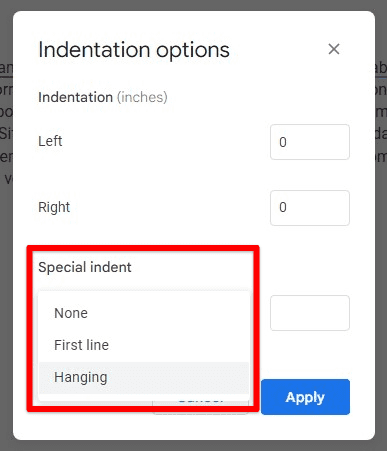
Selecting hanging indent
Step 4: You will see that the “By” field is set to 0.5 inches by default; you can increase or decrease the size of the hanging indent by adjusting this value.
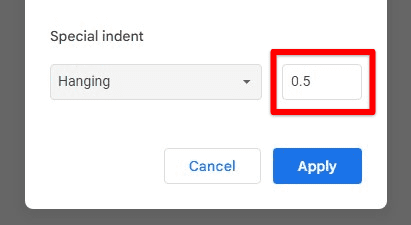
Default hanging indent value
Step 5: Click on the “Apply” button for formatting.
Step 6: Repeat the process for any other paragraphs you want to format with a hanging indent.
Using the paragraph format options, you have successfully created a hanging indent in Google Docs.
Note: If you want to adjust the hanging indent size, go back to the paragraph format options and adjust the “By” field. You can also use the “first line” option to adjust the first line indent.
This method is helpful if you want to apply the same hanging indent formatting to multiple paragraphs and don’t want to use the ruler for each one. Also, it’s faster to apply the hanging indent if you are formatting a large document and know the exact size of indent you want beforehand.
Adjusting the hanging indent in Google Docs
Adjusting the hanging indent in Google Docs can be done in two ways, using the ruler or using the paragraph format options. To use the ruler, open your Google Docs document and locate the ruler at the top of the page. Find the hanging indent marker, the small blue triangle on the ruler’s left side. Click and hold the marker and drag it left or right to adjust the size of the hanging indent. Release the marker when you are satisfied with the indentation. Repeat the process for any other paragraphs in which you want to adjust the hanging indent.
To use the paragraph format options, open your Google Docs document and select the text you want to adjust the hanging indent. Go to the “Format” menu in the menu bar and select “Align & indent” and then “Indentation options”. In the Indentation section, you’ll find the “Special” option. From the drop-down menu, select “Hanging”. In the “By” field, you can increase or decrease the size of the hanging indent by adjusting this value. Click on the “Apply” button to apply the formatting. Repeat the process for any other paragraphs you want to change the hanging indent.
Note: You can also use the shortcut keys (Ctrl + T on Windows or Command + T on Mac) to quickly access the paragraph format options and adjust the hanging indent.
Removing a hanging indent in Google Docs
Removing a hanging indent in Google Docs is similar to creating one. Also, it can be done using both methods we have discussed previously. When using the ruler method, open your Google Docs document and locate the ruler at the top of the page. Find the hanging indent marker, the small blue triangle on the ruler’s left side. Click and hold the marker and drag it to the left until the hanging indent is removed. Repeat the process for other paragraphs if you want to remove the hanging indent.
When using the paragraph format options, open your Google Docs document and select the text you want to remove the hanging indent. Go to the “Format” menu in the menu bar and select “Align & indent” and then “Indentation options”. In the Indentation section, you’ll find the “Special” option. From the drop-down menu, select “None”. Set the “First line” option to 0 or any other desired value. Click on the “Apply” button to apply the new formatting. Repeat the process for other paragraphs if you want to remove the hanging indent.
Tips for using the hanging indent in Google Docs
Here are some tips for using the hanging indent in Google Docs,
Use ruler for precise adjustments: Using the ruler to create and adjust the hanging indent allows for more precise control over the size of the indent. This is particularly useful when working with long documents or when the indent size needs to be exact.
Use paragraph format options for bulk formatting: If you have multiple paragraphs that need the same hanging indent formatting, you can use the paragraph format options to apply the formatting to all of them simultaneously. This can save you time and effort.
Use a hanging indent for quotations: A hanging indent is excellent for setting off citations in your text. This makes the quotation stand out and makes it clear to the reader that it is a direct quote from another source.
Use a hanging indent for lists: A hanging indent can visually separate items in a list. This makes a list more organized and easier to read.
Use a hanging indent for citations: As mentioned before, a hanging indent is commonly used for citations, particularly for MLA and APA citations. In MLA, it is used for works cited entries, where the second and further lines are indented. In APA, it is used for in-text citations, where the first line is not indented, but the second and other lines are indented.
Use shortcut keys to access the paragraph format options: You can use the shortcut keys (Ctrl + T on Windows or Command + T on Mac) to quickly access the paragraph format options and create or adjust the hanging indent. This can save you time and effort.
Keep it consistent: When using a hanging indent, it’s important to be consistent in its application throughout the document. This improves readability and makes your document look more professional.
By following these tips, you can effectively use the hanging indent in Google Docs to improve the organization and readability of your text. However, do you often lose track of the modifications in a shared file? Read through our article on tracking changes in Google Docs.
Frequently asked questions about the hanging indent
Following are some frequently asked questions about the hanging indent,
How do I adjust the size of the hanging indent in Google Docs?
To adjust the size of the hanging indent in Google Docs, you can use the ruler and click and hold the hanging indent marker and drag it left or right. You can also use the paragraph format options and adjust the “By” field.
Can I use the hanging indent for citations?
A hanging indent is commonly used for citations, particularly for MLA and APA citations. In MLA, it is used for works cited entries, where the second and further lines are indented. In APA, it is used for in-text citations, where the first line is not indented, but the second and other lines are indented.
Can I apply the hanging indent to multiple paragraphs at once?
You can select multiple paragraphs and then apply or adjust the hanging indent. This can save you time and effort if you have a lot of paragraphs that need the same formatting.
Conclusion
It’s also worth noting that you can apply or adjust the hanging indent to multiple paragraphs at once; this can save you time and effort if you have a lot of paragraphs that need the same formatting. When using a hanging indent, it’s essential to be consistent in its application throughout the document. Additionally, you can use it for citations, particularly for MLA and APA formats. Want to make your documents more appealing? Learn how to add new fonts in Google Docs.
