ChromeOS is one of the most reliable operating systems in the world at the moment, featuring strict security, speed, and stability, all bundled up within one single package. To date, Chromebooks have been developed to a point where they can run software like WordPress, Kali Linux, and even Adobe Photoshop on the web.
In addition to that — and this is much contrary to popular belief — there is even a method out there that can help aspiring game developers install and use Unity on ChromeOS. The latter certainly requires no introduction to anyone remotely associated with the vast gaming industry, provided how famous and widespread it is in this particular realm.
With the help of the instructions laid out ahead, you’ll be learning how to install and use Unity on Chromebook in no time. But first, let’s take a close, hard look at some of Unity 3D’s most defining features.
- In the meantime: Guide to choosing the best Chromebook for Kali Linux.
Best features of Unity 3D
The following is our round-up of some of the best features of Unity 3D that empower users around the world to do more and be more. Since the game-developing engine is so advanced in terms of its functional capacity, discussing its tools can become daunting. That is why we’ll discuss Unity’s complete feature sets below.
3D world-building
Arguably the most prominent use-case of Unity 3D that the majority of the world employs is 3D world-building. This is where Unity excels, capable of going toe-to-toe against Unreal Engine when it boils down to it. However, people tend to show a proclivity toward Unity for its relatively easier-to-grasp graphical interface.
The developer says that the game engine in question is loaded to the brim with artist-friendly tools, making it possible for aspiring users to gain a heightened understanding of Unity’s interface right off the bat, provided that they’ve gained some semblance of prior experience already.
Some of the best packages that fall under the category of 3D world-building include ProBuilder, Polybrush, Terrain Tools, and FBX Exporter. While ProBuilder is oriented around creating modifiable geometry in Unity, including on-the-go play-testing, the Polybrush feature offers you the convenience of tools such as mesh painting.
Storytelling capability
Some of the best ways that you can use to transform your ordinary-looking games into cinematic masterpieces—just like how big-budgeted game developers do it. In this regard, the most noteworthy packages included in gameplay and storytelling revolve around Cinemachine, Timeline, and Visual Scripting.
Unity defines the Cinemachine tool as a “smart camera for passionate creators” primarily because of its intuitive build and the added capacity of allowing users to work in a freeform manner. Other than that, the Timeline functionality is what you’ll be categorizing as thoroughly imperative for your cause.
You’ll be using that tool to create cinematic gameplay footage, playable sequences, particle effects, and much more. As for Visual Scripting, this feature helps developers create behaviors using node-based graphs instead of relying on lines of other programming languages.
Mobile optimization
In case you aren’t aware of this already, millions of mobile games on the Google Play Store are built using Unity 3D. Some of these include Shadow Fight 3, one of the top 15 Google Play Store games for ChromeOS, and even Among Us. Unity has enabled developers to optimize their apps for mobile operating systems and create new ones.
Three of the most well-established packages brought forth by Unity include Adaptive Performance, Android Logcat, and Mobile Notifications. Adaptive Performance stands out, particularly in this regard, allowing users to benefit from a feedback system that details smartphones’ thermal and power states.
This, in turn, leads to the implementation of performance-centric adjustments, so the device can adapt to the available resource limit and make changes accordingly. It’s a pretty innovative functionality that can bridge the gap between performance issues and general replayability hassles.
AR and VR feature set
Unity, being the feature-filled game engine it is, boasts immersive AR and VR feature sets to help you dive right into developing VR and AR games as soon as you get Unity up and running. With the help of pre-installed packages via the Unity 3D app, you can enjoy the convenience of the OpenXR software right alongside the Oculus XR plugin.
The latter is designated for direct Oculus VR development, should you choose to tread that route. On Windows, though, Unity integrates with the Windows Mixed Reality program to provide a cutting-edge platform-like experience, not to mention compatibility with AR and VR headsets.
Animation and 3D character creation
Working in tandem with the prospect of 3D world-building, Unity sports the added ability to provide users with animation and 3D character creation feature sets. Dedicated plugins in Unity let you build “interactive character rigs,” not to mention specific “GameObjects.”
The Timeline’s functionality of Unity’s interface kicks into motion again, letting developers arrange and categorize their clips to connect sequences. There’s just so much that the GUI of Unity 3D has involved; it can often get hard to keep track of all it proposes. Only time can make you a seasoned Unity 3D developer.
Installing Unity on ChromeOS
The installation steps of Unity aren’t that complex; you need to take care of some prerequisites, and you’ll be golden. First, your device must have Linux set up and configured already. If you’ve happened to miss out on that, check out this tutorial for step-by-step instructions. Here’s a screenshot just in case for the primary setting involved with enabling Linux.

Enabling Linux on ChromeOS
Moreover, it’s worth noting that ARM Chromebooks are unlikely to accept a broad range of Linux applications. If you’re still choosing a Chromebook to purchase for running Linux on it, it can definitely pay off to buy one powered with an x86 CPU architecture.
Let’s move ahead with the installation steps of Unity 3D for your Chromebook. The following guidelines will take it from here, so make sure to replicate them until the end for the best results.
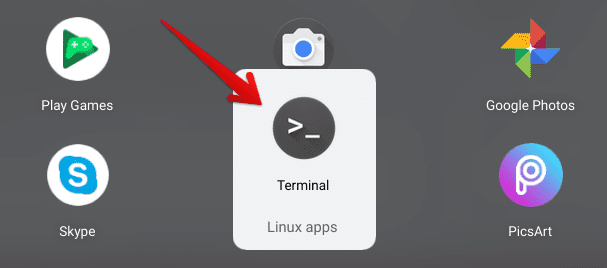
1. The first step is to open the Linux Terminal app on your Chromebook. You’ll find the program sitting within the “Linux apps” folder in your launcher area after enabling the feature from your device’s “Settings.”

Opening the Linux Terminal
2. After arriving at the Terminal command-line interface, the next step is to check the program for any upcoming updates or upgrades. Feel free to use the following command to get that done.
sudo apt-get update && sudo apt-get dist-upgrade
Updating and upgrading Linux on ChromeOS
3. After ensuring that your Chromebook’s Linux has been updated and upgraded, move forward with the following command. We now need to download Flatpak on the Chromebook to proceed with the installation of Unity. This is a handy utility that helps with package management for Linux.
sudo apt install libgconf-2-4 libarchive13 mono-devel libnss3 flatpak

Installing Flatpak on ChromeOS
4. The installation of Flatpak will be complemented with the help of the following command, where you’ll add the required repositories for the forthcoming installation of Unity 3D.
Use the string of text outlined in the Terminal window and press the “Enter” key as soon as you’re done. Doing so should commence the process and wrap things up at no more than a moment’s notice.
sudo flatpak remote-add --if-not-exists flathub https://flathub.org/repo/flathub.flatpakrepo

Adding packages
5. The final command you’ll need to use pertains to the installation of Unity 3D itself. Please copy the following and paste it into the Terminal window. Press the “Enter” key as you’re done to proceed. You will be asked to confirm the download at the start of the operation, so be sure to press the “Enter” key one more time to top things off.
sudo flatpak install flathub com.unity.UnityHub
Installing Unity on ChromeOS
6. That’s all there is to know about Unity 3D’s installation on your Chromebook. After completing the previous steps successfully, you should now be able to access the famous game engine from your side.
Unity Hub app icon on ChromeOS
Using Unity on a Chromebook

Unity installed on ChromeOS
The image above represents the user interface of the Unity Hub application on a Chromebook. It’s clean, simple, and easy to grasp, so getting around the interface shouldn’t be an issue. However, trying to utilize the Unity app on your Chromebook without purchasing an official license will be an issue.
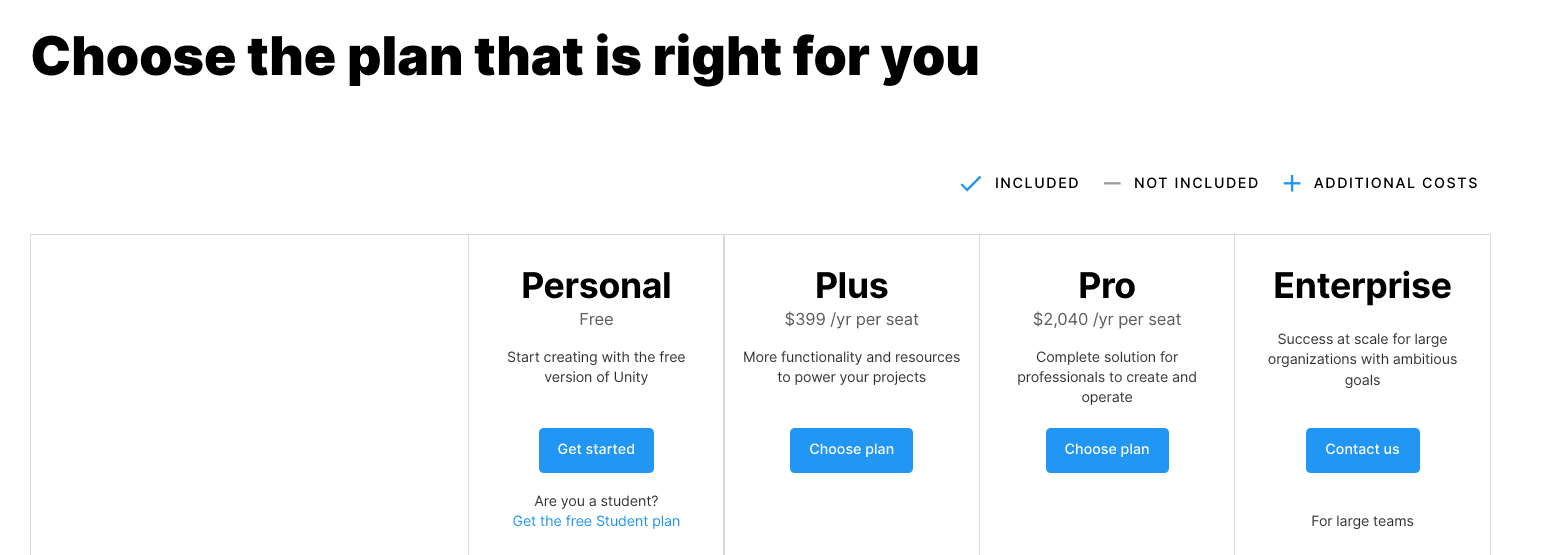
That is where things can get entirely mixed up. To continue to utilize Unity’s diversified services, you need to visit the official Unity website and compare the available license plans. Unity also offers a free plan for users, should you choose to get into it. However, do expect limited functionality on that front. More details are laid out on the official Unity 3D web page.

Unity 3D’s purchasable plans
As for the application’s user interface, you can use the “Add” button to import projects or “New” to start a build from scratch. The rest of the operative capacity of the popular game engine will be taken forward from its in-editor user interface, which will kick into motion after redeeming or purchasing a Unity 3D license.
That’s all there is to learn about installing and using Unity 3D on a Chromebook. It’s high time to conclude the write-up now.
Conclusion
ChromeOS has never been the same after integrating with Linux in 2016. Before that, however, only a select number of Chromebooks were compatible with running Linux. Following that year, every new Chromebook shipped out involved Linux as a built-in feature. Thanks to that, Chromebooks are now the best they have ever been.
In this guide, we’ve talked about Unity 3D—one of the world’s most popular game-developing engines and what measures one can take to run it on their Chromebook.
The installation process with the help of Linux isn’t too difficult to follow, as you can comprehend from the guidelines above, but do let us know in the comments section whether things went smoothly on your end.
As always, Chrome Ready wishes you good luck!

2 comments
Well, this happened during the last step:
error: Nothing matches com.unity.UnityHub in remote flathub
did you do all the commands?