Google Chrome is available on various platforms, such as macOS, Chrome OS, Linux, and of course, Microsoft Windows. At times, it can start utilizing an unusual amount of RAM for no apparent reason, slowing the system and giving rise to other issues. If you think you’re facing a similar situation, the guide ahead is undoubtedly for you.
In this write-up, we will learn tried-and-tested methods that you can use to make Google Chrome use less RAM on your PC. Be sure to read until the end for the best results.
- Recommended article: How to take a screenshot on Google Chrome.
Best ways to make Google Chrome use less RAM on a PC
Although it’s not uncommon for Google Chrome to start eating up an atypical amount of important system resources such as CPU, Memory, and GPU, there are ways to counter the situation. You will need to go through the tutorial step-by-step, from the first tip to the last one, for the best results. Depending on your PC and specific scenario, you can fix Chrome using lots of RAM at any step.
With that said, let’s start right away.
1. Only keep important tabs open
This is the simplest and most important piece of advice that we can offer to anyone troubled with their Chrome browser eating up a lot of RAM. You have to be wary of the number of tabs you have opened, and you’ll shortly observe how much of a difference this makes. We often leave tabs open and forget to shut them down when they’re no longer required. If you keep this up for too long, Chrome will automatically utilize a lot of RAM.
You can break this from happening simply by focusing on essential tabs of use to you concurrently. As for the rest of the pages you have opened on the Chrome browser, it’s best to shut them down immediately. People have tried this technique and have discovered favorable results. Click on the “X” button on any opened tab to shut it down. Alternatively, you can press “Ctrl” and “W” together on your keyboard to shut down any opened tab.
We highly recommend evaluating this on your end and assessing whether you have inadvertently opened Chrome tabs. You’ll soon experience a massive bump in your Chrome browser’s overall performance if you build a habit of keeping only important tabs opened, with the rest of them being promptly shut down.
2. Remove outdated extensions
Another significant way you can make Chrome use less RAM is by uninstalling extensions that you no longer use. If you observe a Chrome extension that consistently crashes, likely, this particular extension is no longer up to date. You will need to venture into the “Extension manager” section on the Chrome browser to look better at these particular extensions.
We’ve often dug up reports that people who have had their Chrome browser eat up a lot of RAM have found outdated extensions to be the primary culprit. You have to be wary of this by keeping only those extensions in Chrome that are useful to you, similar to keeping only important tabs open and closing down the rest. To go to the “Extension manager” area, click on the “Customize and control Google Chrome” button in the top-right corner of the screen to get started.
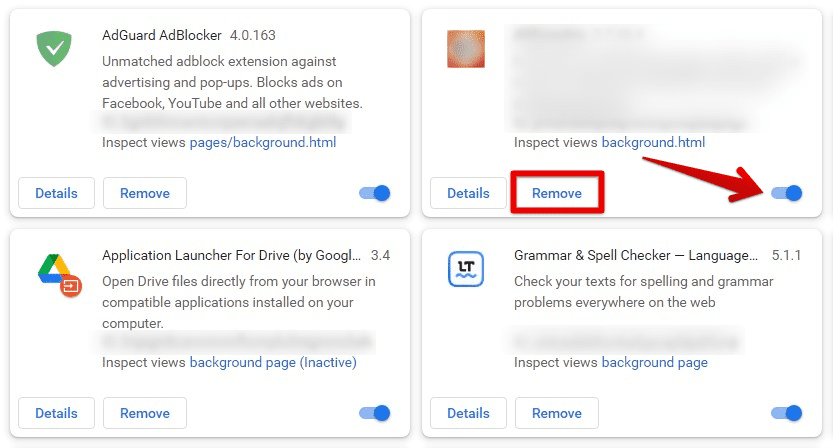
Once done, hover over the “More tools” area and select “Extension manager.” That should do the trick and take you straight to the “Extensions manager” area on the Chrome browser. Once you’re here, the next step is to locate extensions that you no longer need or crash consistently. The following screenshot takes the example of the Monosnap extension, which is a great extension to keep taking screenshots on Google Chrome.
To uninstall the extension immediately, you can click the “Remove” button, as highlighted in the screenshot below. That’s all you need to do to remove outdated extensions on Google Chrome. Then, repeat the process as often as necessary for the most positive results.

Removing suspicious or harmful extensions
- If you have to uninstall an extension that you need, consider looking at these top 25 high-rated Google Chrome extensions to find working alternatives.
3. Disable the feature to run background apps
Next up, we have another in-built Chrome functionality to look into. This one is mainly responsible for Chrome’s RAM utilization. Still, in cases where you have a lot running in the background and foreground of your PC, it’s worth checking out the functionality in question and confirming whether it’s enabled or disabled. We need to toggle off what is known as “Continue running background apps when Google Chrome is closed.”
When caught in the wrong spectrum of things, this functionality can often be detrimental to Chrome users, and that’s why you should heed it without a second thought in mind. Residing in the “System” portion, you’ll need to venture into your Chrome browser’s “Settings” area to move forward with the procedure here. You may even use the search bar provided inside the “Settings” area to look for this feature in specific.
Check out the following screenshot to learn how it’s done. Ensure the toggle beside the feature is turned off for the best results. The specified function should be under “System” settings in Chrome that relate to the operating system you have installed Chrome on. Several users have observed a noteworthy change after disabling the functionality in question, but fingers are crossed moving forward due to the scenario-specific nature of the affair.

Disabling background apps in Google Chrome
4. Use the Reset feature in Google Chrome
If none of the techniques we have laid out above have worked so far, there’s another trick you can employ to make Chrome use less RAM. One of the best ways to identify related problems with Chrome is to delve into its “Reset settings.” That way, you can pick out anything unusual with the program causing it to use an atypical amount of RAM. No need to work your way to something specific—the “Reset” feature will do the job for you.
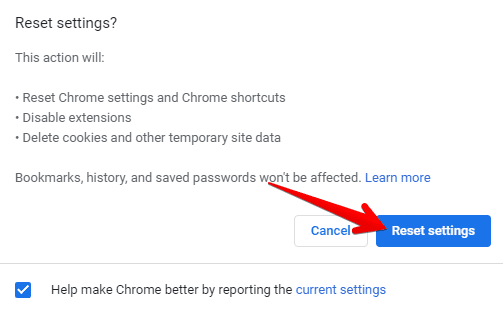
Head over to Chrome’s “Settings” section and click “Reset settings” in the sidebar on the left of the screen. Once done, an option to reset Chrome will appear. Click on it, and you’ll be made to see a confirmation prompt pop up on your screen. This menu will notify you of the actions that will take place after you click on “Reset settings,” as you can see in the screenshot below.
For starters, the “Reset” function will reset Chrome settings and Chrome shortcuts, not to mention that it’ll also disable extensions and delete cookies and other temporary site data. Once you’ve acknowledged all this, go ahead and finalize the process.

Resetting the Chrome browser
After completing this step, relaunch Google Chrome and observe it for less RAM usage. You should be met with positive results, but if you haven’t got it quite right, please try the rest of the following solutions.
5. Utilize Google Chrome’s Task Manager functionality

The Google Chrome Task Manager
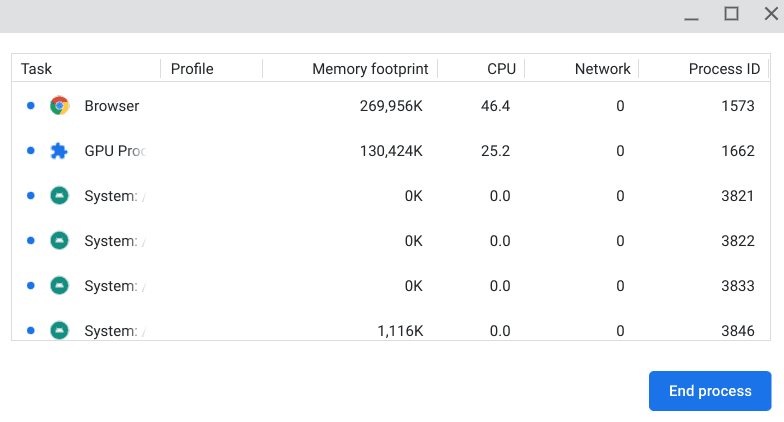
Google Chrome is packed with various functionalities that cater to specific use cases. One of them happens to be Google Chrome’s very own Task Manager, which differs from the Task Manager of the Windows PC. Chrome’s Task Manager can keep the internet browser’s performance in check, allowing users to visualize all the different processes that Chrome undergoes.
In addition, the Task Manager window allows people to shut down tasks that are eating up a lot of RAM. You can use this feature of Chrome to terminate unneeded processes essentially. This would free up some internal memory of the device and speed up Google Chrome. To open up the Task Manager, you can press the “Search” and “Esc” keys together, which will open up the utility immediately.
Once done, look for any processes using up a lot of RAM, select them one by one, and then terminate accordingly. It’s pretty easy to utilize the core functions of the Task Manager app, so you shouldn’t be struggling with it moving forward. After clearing the resource-hungry programs, the Chrome browser is due to improve its performance drastically. However, if this strategy does not work either, please try out this final trick we have laid out for you.
- Related read: How to use Google Chrome’s Task Manager
6. Reinstall Google Chrome
If nothing else works, there’s this final ace in the hole that you can implement on your end. Uninstalling Google Chrome from your Windows PC and then installing it again from the office might be the solution that could work for you. To uninstall the software, you can search for the “Add or remove programs” section of your Windows 10 PC’s “Settings” to continue. This can be done simply by searching for the utility using the Windows search bar.
As soon as you’re in the “Apps” section, search for Google Chrome by scrolling down the list of installed apps on your end and then click on the “Uninstall” button. The procedure should be painless to attempt, given the user-friendliness of the operating system’s GUI. Here’s a screenshot of Chrome being uninstalled from the device.

Uninstalling Google Chrome
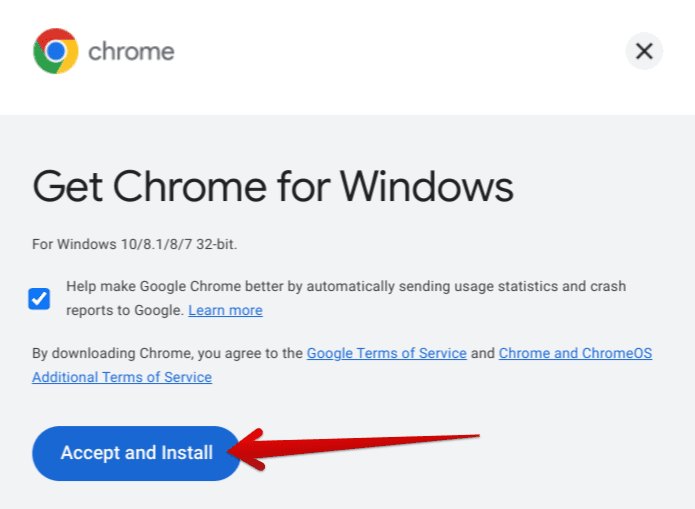
After uninstalling Google Chrome from your Windows PC, you can head to the official website of Google Chrome and grab the software from there to install on your PC. Installing the internet surfer from scratch should bode well in letting the program use less RAM on the device. The following screenshot shows one of the few installation steps of downloading and getting Chrome for Windows. For more details, check out the interlinked guide.

Accepting and installing the Chrome download file
Conclusion
If things go wrong, such as when Chrome starts becoming responsive, there are measures you can take to resolve the issue promptly, similar to how you can make the browser use less RAM on your PC. In this guide, we’ve discussed some of the best ways to get that done without putting up too much of a struggle. If the tutorial helped you, please let us know in the comments section ahead.
