Google Chrome has evolved its feature set into something much more productive and user-oriented compared to its stature a decade ago. Today, in 2022, Chrome can help you import and export saved passwords, auto-refresh its pages thanks to the helping hand of some capable Chrome extensions, and even make it possible to use many of the hidden features of Google Chrome. However, that’s not all there is to the boundless capacity of the Chrome browser.
The fact is that individuals can now store their credit card information in Chrome to make their online purchases quick and seamless. When the prospect was introduced initially, people had doubts about the safety of the operation. That said, Chrome has proven its unflinching levels of security over time by keeping the autofill data of its users protected. In this detailed guide, learn how to view and manage saved credit cards in Google Chrome.
Viewing saved credit cards in Google Chrome
Viewing saved credit cards in Google Chrome is a walk in the park, but it has quite a basic prerequisite. You need to have your credit card information stored in Chrome either on your device or your previous device for successful viewership of the credit card. If you didn’t transfer your Google account information to the new device from your earlier one, you might need to tend to this before moving ahead.
However, as soon as that is out of the way and you know that there are saved credit cards in your Chrome account, you may follow the steps and understand how to view them. We recommend replicating the instructions on your end word-to-word for successful results.
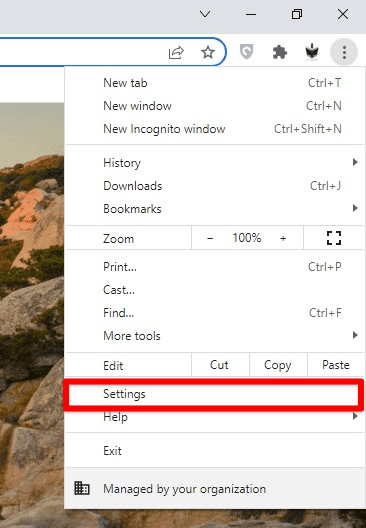
1. The first step after opening the Google Chrome browser is to click on the “Customize and control Google Chrome” button in the top-right corner of the app’s interface. As you do that, a whole list of options will appear on the screen. Continue by clicking on “Settings.” The following image should help clarify things for you.

Opening “Google Chrome” settings
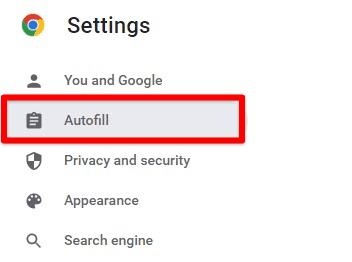
2. After opening Chrome’s “Settings,” you need to click “Autofill” on the side panel to the left. Doing so will take you to the relevant section within the browser’s settings.

Autofill tab
3. Next up, you will need to click on “Payment methods” after being directed to the “Autofill” section. The option is vividly apparent, so you won’t be able to miss it.

Clicking on the “Payment methods” option
4. As soon as you have accessed the “Payment methods” section, you will see how your credit cards are displayed in a list form accordingly. Therefore, you have arrived at the relevant space where stored credit card information is easily available. Take your time to sift through the addedreadilyntials. It was as easy as viewing your saved credit cards in Google Chrome.

All saved credit cards in Google Chrome
That’s about it for the first part of this tutorial! You may proceed to the next section to learn how to manage your saved credit cards in Chrome.
Managing saved credit cards in Google Chrome
Now that you have learned how to access your saved credit cards in Google Chrome let us go to the next level and talk about their management. Of course, credit cards will expire sooner or later, so you may need to update your current information on the Chrome browser to make your future purchases uninterrupted and seamless. Taking care of such instances beforehand is better than leaving them up later.
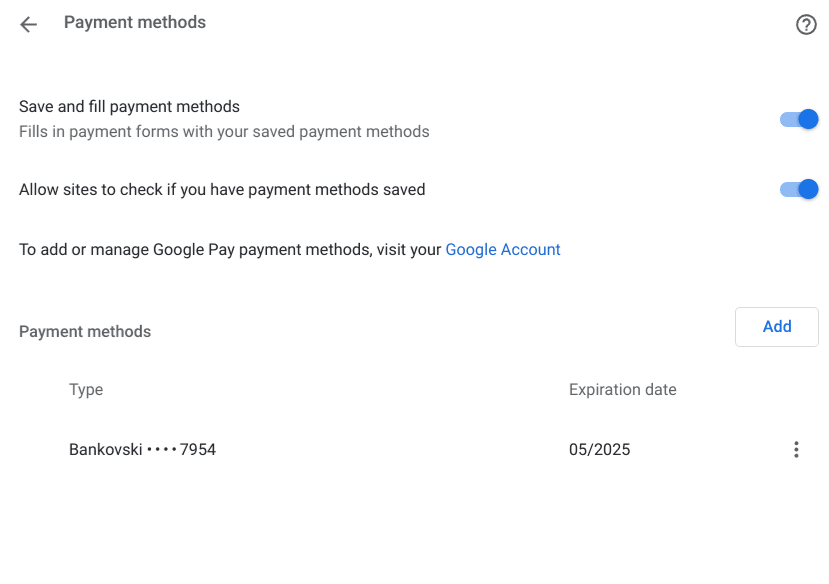
We will pick up right where we left off in the previous section. Assuming that you’ve arrived at the “Payment methods” section in Chrome, let’s look at how you can manage your saved credit cards in Chrome. At first, you’ll see two toggles and one outbound link at the top half of the page in question. With the help of the following screenshot, we’ll explain the features one by one.

Managing features of the Payment methods section
The first toggle is called “Save and fill payment methods,” and it’s geared toward the automation of your payment forms filling in. As soon as you come across a web handle demanding you to enter your card details, this innate feature of Chrome is bound to kick in, allowing you to get through the initial steps quickly. As for the second toggle, which is “Allow sites to check if you have payment methods saved,” this is yet another convenient tool.
Its main purpose is to make it possible for different websites to gain access to the payment information you’ve saved in Chrome. If you keep this feature disabled, you won’t be able to pull up your credit card credentials whenever required, so it’s helpful to have the functionality turned on. Moreover, the third and last setting you can perceive from the screenshot above relates to Google Pay.
The latter pertains to mobile operating systems and their respective Google Chrome variants. It’s a payment service that can make contactless purchases effortless on your end, but only when using a mobile phone. You must head to your Google account to follow through with this operation.
Adding, editing, and deleting saved credit cards in Google Chrome
This brings us to the final manageable portion of saved credit cards in Google Chrome. This subsection will walk you through the easy adding, editing, and updating process of your payment credentials. To get started, click the “Add” button to fill in the information required to use a new credit with Chrome.

Adding a new payment method in Chrome
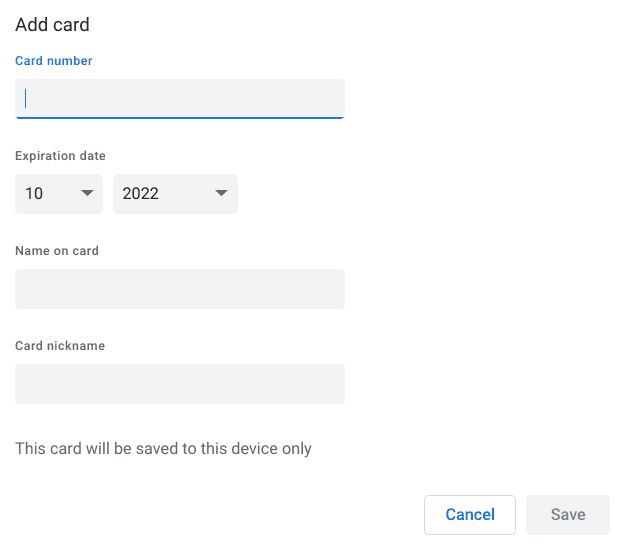
After clicking on “Add,” the following is what you’ll see on your screen. The card number, expiration date, and name on the card fields must be filled in for you to add a new payment method in Chrome. You may as well also pick a nickname for your card to remember it better moving forward. Once you’ve filled in all the blanks, click “Save” to complete the payment method addition.

Adding a new card in Chrome
Let’s consider a scenario where you need to edit your existing card’s important information, such as its expiration date or card number, or remove the card from Chrome altogether. In such cases, you must first click on the “More actions” button and select either option.

Clicking on the “More actions” button for the existing card
As iterated earlier, clicking on the “More actions” button for your existing card will bring two options on the screen for you. Next, click “Edit” or “Remove,” depending on your use case, to move forward. Editing will take you back to the same screen you saw when adding a new payment method while removing it will do that; remove the entered credit card from your Google Chrome browser.

Editing or removing the card
That’s all there is to know about viewing and managing saved credit cards in Google Chrome.
Conclusion
In this guide, we’ve talked about viewing saved credit cards in Google Chrome, including how to manage them just in case you ever decide to remove your stored information in that specific section of Chrome. Moreover, you may update your current credit card information using the managing feature. Please let us know in the comments section down ahead whether you found this tutorial useful. We would love to read your feedback.
