Are you tired of refreshing pages in Google Chrome time and time again? Whether you’re waiting for your favorite products to go in stock or need constant reboots to make your work go by smoothly, we have you covered. In this guide, we’ll learn a go-to method for you to replicate and understand how to use an auto refresh in Google Chrome. It’s no wonder why people can’t get the hang of this functionality at the start; the functionality isn’t out in the open.
Using auto refresh in Google Chrome
We have conducted extensive research and personal testing and have concluded that there is no native method to keep the Chrome browser refreshing on its own. Currently, Google Chrome does not offer a feature that will allow it to refresh consistently. However, there are dedicated extensions or plugins available on the Chrome Web Store that can help you refresh Google Chrome automatically.
If you didn’t know, the Chrome Web Store is a marketplace where users can find many extensions and add-ons that can enhance the regular Chrome experience. We have compiled a list of two distinct programs that have earned a spot as our final picks. Let’s review these extensions to help you understand their features and installation techniques with ease.
Extension 1. Easy Auto Refresh
We have access to one of the most popular Chrome extensions in the market – Easy Auto Refresh.
1. The first step is to visit this direct link so that you can get straight to the official installation page of Easy Auto Refresh. Once you’re there, click “Add to Chrome” to get to the next step.

Adding Easy Auto Refresh to Chrome
2. After clicking on the “Add to Chrome” button, a pop-up will appear at the top of the screen, allowing you to confirm the installation of the extension. Click on “Add extension,” and you’ll quickly have the add-on downloaded on your Chrome browser within seconds.
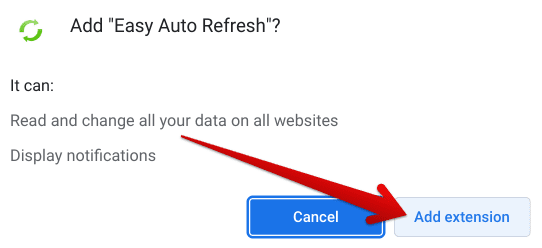
Confirming the installation of the extension
That’s about it as far as the installation of this program is concerned, so pat yourself on the back. The next step is to launch the extension from the extensions toolbar. If you don’t see the add-on, click on the “Extensions” button, which is shaped like a puzzle piece. After clicking on it, you’ll be able to visualize all installed extensions on your Chromebook. Finally, click on “Easy Auto Refresh” to move forward.
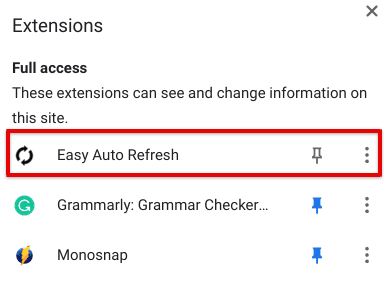
Launching the Easy Auto Refresh extension
After launching the extension in question, you’ll discover that the mode of operation of Easy Auto Refresh is nothing but straightforward. It appears on the screen as a prompt and makes it easy for users to go forth with auto-refreshing Google Chrome. However, to utilize the add-on successfully, you must head over to the web page you wish to auto-refresh and launch the extension from the “Extensions” page again.
Once done, type in the time after which you’d like the web page to be refreshed. It can be 5 seconds, 10 seconds, or even a minute. Once you’ve specified the time frame for the web page, click on the “Start” button. That will do the trick for you.
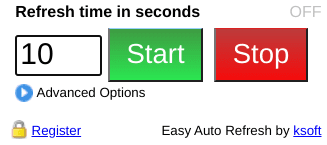
Starting the Easy Auto Refresh extension
We’re now done with the first noteworthy extension that aims to auto-refresh Google Chrome at your command. But, just for the sake of flexibility, let’s go over yet another high-quality add-on built to fulfill the same purpose but uniquely different. The following subsection will explain all there is to know about Auto Refresh Plus.
Extension 2. Auto Refresh Plus
The second extension we’ve got for you on this list pertains to Auto Refresh Plus. If we compare it to Easy Auto Refresh, this is an add-on that’s a class apart.
1. The first step is similar to what we did in the previous subsection. Next, you must head to the official Auto Refresh Plus extension page on the Chrome Web Store and click on the “Add to extension” button. Doing so will take you to the next step.

Clicking on “Add to Chrome”
2. After clicking on “Add to Chrome,” as shown in the previous screenshot, a prompt will appear on the top of the screen, asking you to confirm the installation. You now have to click on “Add extension” to get to the next step, where you’ll have the extension installed on your Chrome browser.
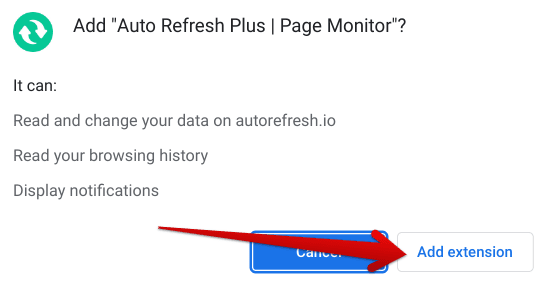
Confirming the installation of Auto Refresh Plus
After you have been notified that the extension has been successfully installed on your end, launch it with the help of your extension toolbar. If you do not visualize the add-on, click on the “Extension” button, and all of your installed extensions will surface on the screen. From there, click on the “Auto Refresh Plus” program and watch the extension launch right away for you.
Now, you’ll notice that this add-on does explicitly not ask for permission, unlike the aforementioned Easy Auto Refresh extension. This is one of the significant advantages of opting for Auto Refresh Plus since managing permissions can become quite a hassle when you’re using too many of them at once. Anyhow, clicking on the extension’s icon will show you the following on your screen. As you can comprehend, the extension’s user interface is much more advanced.
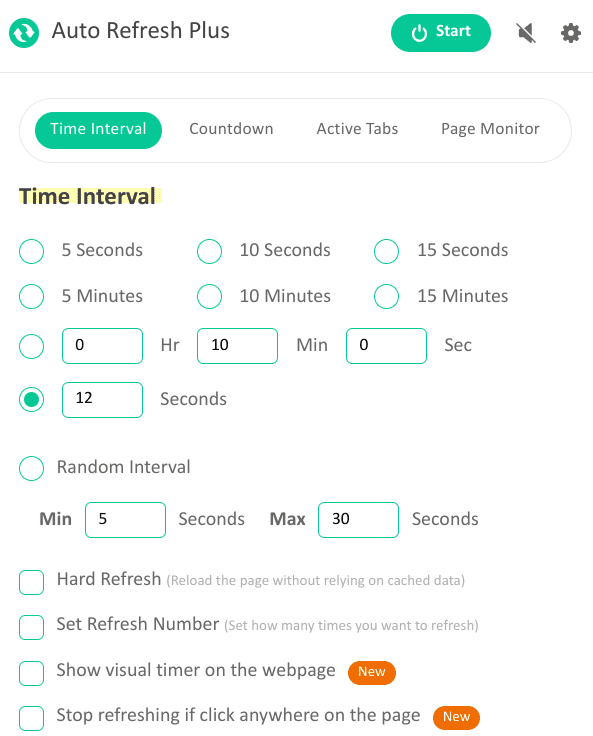
Auto Refresh Plus on Google Chrome
Auto Refresh Plus is a browser extension that offers several options to the users for refreshing web pages. You can set time intervals, countdowns, and page monitors as per your preference. The extension also offers a niche feature called “page monitors,” which allows you to dedicate certain pages to be refreshed. This way, the domains you are currently working on won’t be affected.
Auto Refresh Plus also has some additional functionalities, such as the “Hard Refresh” feature, which enables you to auto-refresh the page without using cached data. This feature is useful for troubleshooting issues, especially when a particular website causes problems.
To use the Auto Refresh Plus extension, you can modify the extra features as per your requirements and then click on the “Start” button at the top corner of the add-on prompt to initiate the countdown. Once the specified time elapses, your Google Chrome browser will automatically refresh. That’s all you need to know about using this program as an end-user.
Now that you’ve gone through two of the most high-quality Chrome auto-refreshing extensions out there, we must conclude the write-up at hand. Thanks for reading!
Conclusion
Feel free to install and try out both options. After all, they’re free to download, so that won’t be an issue here. Please comment below and give feedback on whether this article proved valuable to you. In addition, both the options detailed above are equally high-performance, with a couple of differences between the two. So do let us know which one you ended up going with. We would love to hear from you!