GPU acceleration, also known as hardware acceleration in Google Chrome, is neat trick developers employ to make the browser perform better, but only in specific scenarios. We’ve curated a complete guide if you’d like to learn more about this highly desirable functionality. In this write-up, we will know what exactly GPU acceleration is and how you can enable it in Google Chrome for the better.
Keep on reading to learn what GPU or hardware acceleration in Google Chrome is and how you can enable it on your end. Do read until the end for the most favorable results.
What is GPU acceleration in Google Chrome?
GPU acceleration in Google Chrome also goes by the name of hardware acceleration. It turns out that there are numerous ways of enabling this functionality and getting the most out of its features. However, before we get into any of that, it’s worth talking about the purpose of the feature and why you should even bother with it in the first place. Is it useful for users? Perhaps the tool has downsides that do not come out in the open initially. So let’s discuss all that.
First, GPU and hardware acceleration are synonymous, and you’ll see them implemented in the forthcoming section. Next, if you focus on the term “GPU acceleration,” you’ll discover that the feature is just a technique that boosts your device’s processing power with the help of your graphics card.
Talk about the GPU and the CPU components, in particular, the CPU responsible for dealing with every task on a PC that requires processing, hence the complete form of the acronym Central Processing Unit. Therefore, it serves the role of a brain in a computer, coordinating different inputs and ensuring things are working, and the correct response is produced. However, this is much easier said than done. Processing everything on a PC can be a daunting task.
Sometimes, the process, software, or program you’re running on the device would be too much for the CPU to bear alone. To run and execute that particular application, the CPU component would have to spend too much of the PC’s resources, thereby not leaving much juice for the rest of the tasks that must be processed. This could lead to dire performance and other problems, but one distinct functionality can help in this case.
And that is called GPU acceleration or hardware acceleration. Both terms are synonymous, but the former does a better job of explaining the type of component that will be used in assisting the CPU with task procession. When your CPU could use some help in its allotted tasks, the hardware acceleration feature can bear some part of the load and help the CPU with its working mechanism.
So to speak, if you’re playing games on the Chrome browser or watching videos in high-definition, rendering power is needed to ensure all those tasks go by smoothly. With GPU acceleration, you can expect a slight bump in performance with a major focus on negating any potential crashing or buffering issues. However, in some aspects that mainly vary with your PC’s configuration and specs, GPU acceleration can do more harm than good and end up slowing the browser down.
In instances such as this, you can disable the functionality on your Chrome browser and see if doing so improves. That said, hardware acceleration is more often known to help PCs struggling with performing optimally. It varies from device to device in the grand scheme of things, but the broad consensus seems to conform to the feature’s positive working.
Without wasting any further time, let’s determine all the different ways you can approach enabling GPU or hardware acceleration in Chrome. The following section is going to take it from here.
How to enable GPU acceleration in Google Chrome
As mentioned in the previous heading, GPU acceleration in Google Chrome can be toggled on in more than one way. To ensure you’re all caught up with your options, we’ll enlist every method in-depth, so you’ll find the steps easy to replicate. Let’s begin now with the most undemanding process of enabling hardware acceleration and work our way up from there.
1. Method 1. Enabling hardware acceleration from the Chrome browser
The simplest method of enabling hardware acceleration in Google Chrome relates to flipping a switch on the right within the browser. In this way, you no longer need to approach other methods, and the operation is taken care of natively. The steps will describe how to get it done on the fly.
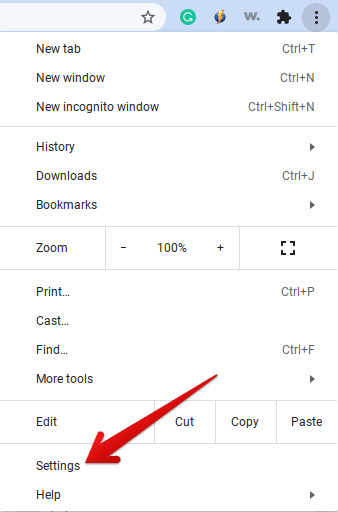
1. The first method is to open the Google Chrome browser and access its “Settings” section. This can be done by clicking on “Customize and control Google Chrome” in the top-right corner of the browser’s interface. As a list of options appears on the screen, click “Settings” to move forward.

Clicking on the “Settings” button in Chrome
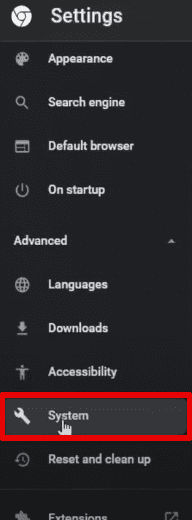
2. As soon as you’re done there, you will need to click on “System” in the side panel to the left to proceed. This step will take you to the page you need to be on to enable hardware acceleration. On a side note, you may need to click the “Advanced” button before “System” becomes accessible.

Clicking on the “System” button
3. After clicking on the “System” button, the following is what you’ll see on your side of things. Continue by simply enabling the “Use hardware acceleration when available” toggle, and you’ll be done here. Restart Chrome afterward to make sure the changes take effect properly. We’re now done here.

Enabling hardware acceleration in Chrome
This was the first method for enabling hardware acceleration in Google Chrome. It’s easy, simple, and quick to perform on your end, but if your curiosity wants to know what’s next, continue reading from the abovementioned subheading. You’ll better understand another workable technique to accomplish the task at hand.
2. Method 2. Using a Chrome flag to enable GPU acceleration
In case you have missed it all this time, the Google Chrome browser comprises a list of experimental features that are either partially developed or not developed to be stable. These features are named “flags” and exist right within the internet surfer, fully available at your disposal. Now, one of these flags is called “Override software rendering list,” and it has an interesting description.
“Overrides the built-in software rendering list and enables GPU acceleration on unsupported system configurations,” reads the explanation of the flag in question. You may as well enable this flag in tandem with the first method of hardware acceleration for the best results. However, after toggling these features, you must consistently observe your device for any excess battery drainage or poor performance.
You know what to do if any of these issues start to spring up. For now, let’s enable the “Override software rendering list” flag to toggle on GPU acceleration in Google Chrome. The following steps are going to take it from here.
1. The first step is to open the Google Chrome browser and type the following into its address bar. When you’re done typing, hit the “Enter” key, and the “Flags” page will automatically open on the browser.
chrome://flags
2. After opening the “Flags” page on the Chrome browser, look for the following flag. You may copy it from below and paste it into the search bar to immediately dig up the flag.
#ignore-gpu-blocklist
3. As soon as you dig up the flag in question, the browser will highlight it in yellow. In addition, a toggle will be beside the flag containing an Enabled/Disable button. Select it once and then choose “Enabled” to get the flag to start its operation on your Chrome browser. That’s about it.

Enabling GPU acceleration in Chrome
You have done great so far! Both methods of enabling GPU acceleration in Chrome should be crystal clear now, so you can quickly delve into the two outlined techniques for favorable results. We recommend trying both methods concurrently to see if your PC can benefit from them. If not, you might as well disable the two features altogether. It’s now time to conclude. Thanks for reading!
Conclusion
Hardware or GPU acceleration in the internet surfer is a real deal, and it can truly make a substantial difference on your end if you know how to enable it on Google Chrome. It’s a feature that sits within the “Settings” portion of the Chrome browser’s interface and can be toggled on relatively painlessly, as we’ve shown you above in this guide. Do let us know in the comments section ahead whether you found the tutorial helpful. We would love to read your feedback!
