If you’ve been meaning to learn how to access Chrome plugins and manage them effectively, you’re definitely on the right path to tap into the unbound potential of your Google Chrome browser and make your work hours more productive. In this guide, we’ll focus on what these plugins are, how they can facilitate your working experience with Chrome, and in what ways you can manage these add-ons properly on your end. So keep on reading until the end for the best results.
Google Chrome happens to be one of the world’s most popular internet browsers in the world. It owes its success to the constant array of features, bug fixes, and other improvements the internet crawler has received over time. From using multiple profiles simultaneously in Google Chrome to enabling JavaScript for added use, there’s no shortage of features that Chrome has got going for itself. For now, though, let’s focus on one particular browser aspect.
What are Chrome plugins?
The word “plugin” is a broad term that probably stood for something like Adobe Flash a decade ago. However, the word has evolved and revolves around a neat Google Chrome feature called “extensions.” These are particular add-ons for the Chrome browser that enhance the internet crawler’s base user experience. For instance, think of a regular Google Chrome browser without any installed extensions only to offer you its fundamental features.
Browsers in that shape can offer users nothing extra, but not unless you decide to take the next step and go to the higher level. In that case, you can comfortably delve into the domain of the Chrome Web Store, where there’s simply no shortage of various downloadable extensions. We have covered some of the most high-rated Google Chrome extensions you should be using at Chrome Ready as well, should you choose to look into any of them.
Extensions, therefore, offer an added experience that you otherwise won’t be getting at all. For instance, if we consider an add-on like The Great Suspender, it doesn’t take long to realize how effective some extensions can be. In the case of The Great Suspender, we have at our disposal a high-quality RAM-saving add-on that can suspend idle tabs and prevent them from utilizing essential system resources.
These extensions or Chrome plugins are tucked away in a dedicated section on the Google Chrome browser. Those who have just started and are relatively new to the overall Google Chrome user experience might not find it easy to dig up that section. We have decided to put together this resourceful article as an all-in-one guide. The forthcoming subsections are going to show you how to access as well as manage these plugins too.
That’s because learning how to access Chrome plugins is only half the work—you should also know how to manage them if you want to avoid potential problems with your extensions down the road. We highly recommend reading until the end from here on out for the best results. Being wary of your Chrome extension permissions is the right way forward. Before we get into that, though, let’s determine how you can access Chrome plugins in the first place.
Accessing Chrome plugins
Now that you have a fair idea of what Chrome plugins are, it is high time to learn a practical methodology to access them. After all, what good is all that theoretical knowledge if you’re not putting any of it to practical use? It turns out that there are multiple ways of accessing Chrome plugins on your device. We’ll be walking you through the simplest of them all so the procedure does not confuse you overall. Follow the steps listed ahead to get started.
1. The first step is to click on the “Customize and control Google Chrome button. It looks like three vertical dots joined together and is placed in the top-right corner of Chrome’s interface. Clicking on it will reveal multiple options.

Customizing Google Chrome
2. Right after the list of options appears on the screen, move your cursor to the “More tools” feature and select “Extensions” correspondingly. This should take you to the next step.

Clicking on “Extensions”
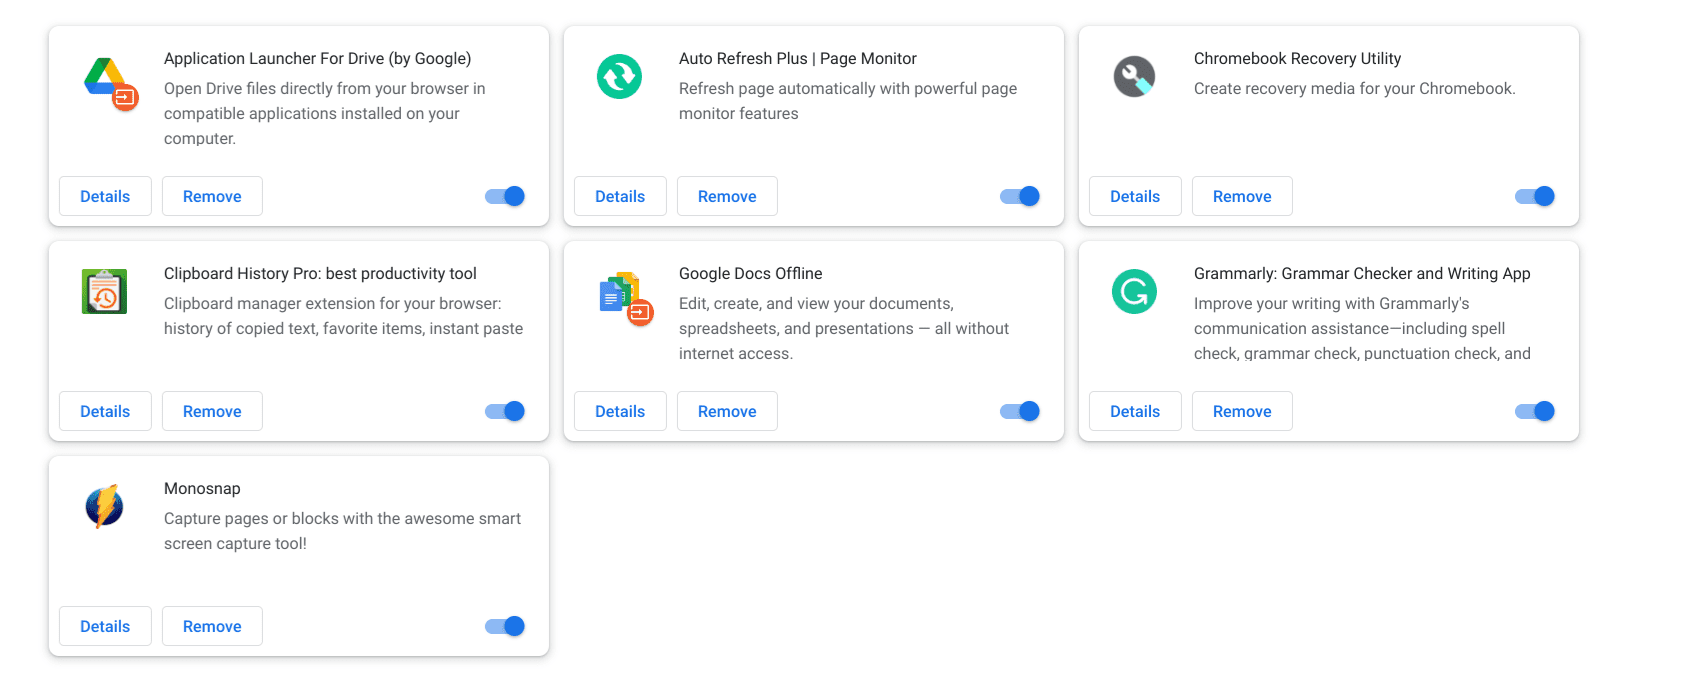
3. After the previous step, you will now be sitting within the Chrome plugins section or, as the developer likes to refer to it now, the “Extensions” space. Congratulations! You have now arrived at the “Extensions” section in the Chrome browser, which is basically what Chrome plugins are all about.

Chrome plugins accessed
That’s the first part of this write-up all wrapped up! If you’ve followed the steps cautiously up until now, you’ll directly have accessed Chrome plugins seamlessly now. However, we’re far from topping things off at the moment. We will now need to learn how to manage these plugins to get the desired use out of them and not let any extension wander off in an unsupervised manner.
Managing Chrome plugins
This section will pick off right where the previous headline ended. Since you have now arrived at the Chrome plugin space, each installed extension is available at your disposal. To evaluate a good working strategy from this point onward, we will have to pinpoint one specific plugin. Let’s go with Auto Refresh Plus to determine how we can manage this extension, so you can do the same with the add-ons you’ve installed on your end.
Therefore, click on any Chrome plugin from the list of available options. If, unluckily, you do not have any extensions installed at the moment, check out our guide on the ten best dark mode extensions for Google Chrome in 2022 for some noteworthy options. Taking Auto Refresh Plus as an example, the following screenshot will explain how to move forward from the “Extensions” section. Click on the “Details” button on your desired plugin, and that’ll be it.

Clicking on the “Details” button
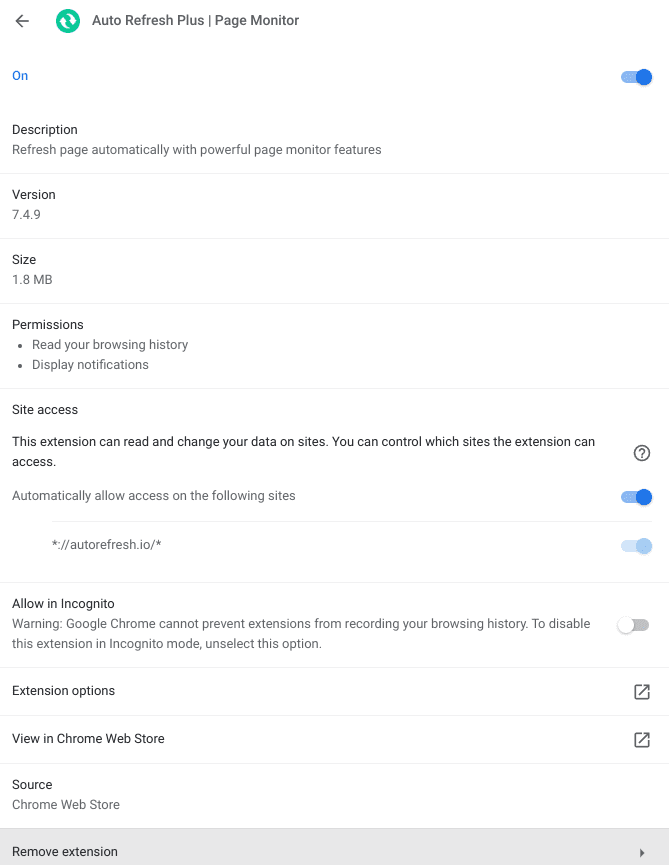
Right after that, you will be taken to a new page on the Chrome browser, and this will be exactly where you can manage the ins and outs of your selected Chrome plugin. First, you might as well disable the extension from working altogether just by flipping this simple switch of “On.” Next, you can tweak your plugin’s “Site access” section by using the provided option at the bottom half of the page.
As soon as you’ve covered that ground, you can either allow or disallow the extension from operating in “Incognito Mode.” Lastly, there are options available unique to each installed extension that can modify its behavior. You may look further into it, but we cannot say what the adjustable features will be since you’re probably selecting a different entry on your side.
The moment you move past the plugin-specific settings of your extension is when you can access the “Remove extension” feature as well. This is, of course, only to be utilized when you’re at your wit’s end about a particular plugin and you want to dispatch it from the face of your browser. In cases like that, opting for a complete uninstallation is the logical choice moving forward.

Managing an extension
That’s all there is to know about accessing Chrome plugins and managing them effectively. To talk about the latter a bit, you can manage the plugin’s various permissions, its ability to be utilized in the Chrome browser’s “Incognito Mode,” and its usability. That is to say, if you do not want a specific plugin to be operating on your end, you can use the information learned above to disable it and keep on using Google Chrome effectively.
Please don’t forget that while we have showcased one specific Chrome plugin for this write-up above, you can repeat the process for every installed add-on on your device. Doing so will yield favorable results, no matter the type of plugin you’re working with. Now that you’re all caught up on this critical topic, we have to conclude this article. Thanks for reading!
Conclusion
Google Chrome’s efficiency knows no bounds, especially when paired with a high-quality plugin that can alter the browser’s functioning and steer it in a brighter direction. The best Chrome plugins offer to do just that, thereby increasing our work rate and productivity as we get around to doing our work on the wide interweb.
In this descriptive guide, we have talked about the fundamental matter of accessing and managing extensions in the Chrome browser or, in other words, plugins. We highly recommend staying up to speed with functionalities like this to get the most out of your installed programs. Do let us know in the comments section ahead whether you found this tutorial helpful for yourself. We would love to read your feedback!
