Have you been meaning to learn how to customize the keyboard on a Chromebook? Fortunately, there are a couple of ways you can delve into the matter and personalize your device’s keyboard to your heart’s content. All that you need to do is pull the right strings, and you’ll soon be able to reap quality benefits. Keep on reading to discover how it’s done.
Chromebooks are highly accessible machines loaded from top to bottom with convenient tools and customizability options despite lacking the complicated infrastructure that Windows 10 or 11 ever so sports typically. From customizing the new tab background in Chrome to switching up the appearance of the Linux terminal, your options are vast.
For now, though, we’ll be talking about the customizability of a Chromebook keyboard in-depth, so you wouldn’t have to look toward any other tutorial for the matter at hand. Let’s get started with no further ado.
- Recommended read: How to customize cursors on a Chromebook.
Customizing your Chromebook’s keyboard
From how the different keys on your keyboard work to slapping on an extra skin on your Chromebook keyboard, we’ll be taking you through all that can be done to customize this hefty device component without putting in too much effort. Each plausible method of customization will have its subsection ahead for your better understanding.
To get started, you will first need to get to the part of ChromeOS where all the magic takes place. Begin by opening the “Settings” app on the device and clicking on “Device” in the side panel. Once done, click on the “Keyboard” part, and you’ll gain access to a section where it’s possible to modify your keyboard’s working mechanism.

Accessing the keyboard section
Now that you’re ready to proceed let us break down each facet of your keyboard’s customizability and illustrate how to continue from there on out.
- Related read: 6 best keyboards for Chromebook.
Reassigning the keyboard keys
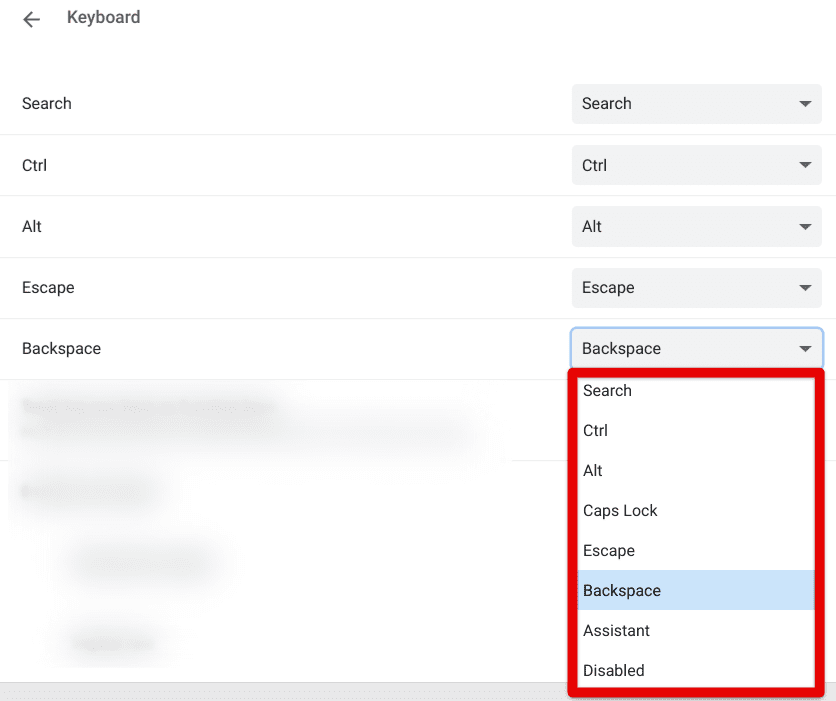
Reassigning keys
One of the first ways you can customize your Chromebook’s keyboard is by reassigning some of its keys to perform a different function than what they’re already assigned. From what we can gather, 5 keys can be remapped on your Chromebook with the help of the native “Settings” app. These keys are:
- Search
- Ctrl
- Alt
- Escape
- Backspace
You can take all these keys and make them serve a different purpose. Moreover, it’s possible to disable keys on your keyboard altogether if that’s what you prefer. Each assignable key can be set to perform the function of the following keys:
- Search
- Ctrl
- Alt
- Caps Lock
- Backspace
- Escape
- Assistant
If you were wondering, this is precisely how you enable the “Caps Lock” key on your Chromebook. Feel free to make changes that work for you and enhance your user experience as compared to before. Therefore, this was one of the ways you can customize the keyboard on your Chromebook, but we’re far from done yet. Keep on reading to explore other options.
- In the meantime: Missing the Delete key on your Chromebook? Check this out!
Enabling function keys
The following method that can help you achieve a better sense of customizability on your Chromebook pertains to function keys. Remember how there are the F1, F2, and F3 keys on keyboards of Windows PCs? It doesn’t take long for a ChromeOS user to realize the latter is completely missing on a Chromebook.
However, with the help of the forthcoming functionality, we can seemingly make the keys present in the topmost row of our Chromebook’s keyboard behave just like function keys. However, the “Esc” key and the “Power” keys will be left out from the implementation of this change because those two remain standard across every operating system.
Enable the toggle that says “Treat top-row keys as function keys,” and you’ll be all set for the most part. Starting from the “Back” key and ending until the “Volume up” key, all top-row keys will now work as F1, F2, F3, F4, F5, F6, F7, F8, F9, and F10 accordingly.

Enabling the top row as function keys
Tweaking the auto-repeat feature

Auto-repeat feature
The auto-repeat feature is nothing but a helpful tool, making it possible for users to bump up their productivity levels by leaps and bounds in the wake of having it enabled. As you press a specific key down and hold it, its implementation will be repeated until you take your finger off the key.
Doing so can allow you to get your work done quicker and improve your typing speed. Therefore, click on the toggle beside “Enable auto-repeat” to first switch the functionality on if it was turned off previously. Next, you may as well tweak the two relative settings associated with “Auto-repeat” to be given a curated user experience.
Both options are related to the speed of the feature, where the first one determines the amount of delay before the repetition can happen. We like to keep this one as short as possible for maximum efficiency. The final option, “Repeat rate,” is just the speed at which your input will be repeated. Find the balance here that follows what you’d prefer.
Making the input option icon visible
What’s next does not directly relate to your keyboard but is undoubtedly helpful in the grand scheme of things, especially when using multiple input methods instead of just one. To switch back and forth between different languages, you can click on this purposeful icon on the status bar, which will do the trick for you.
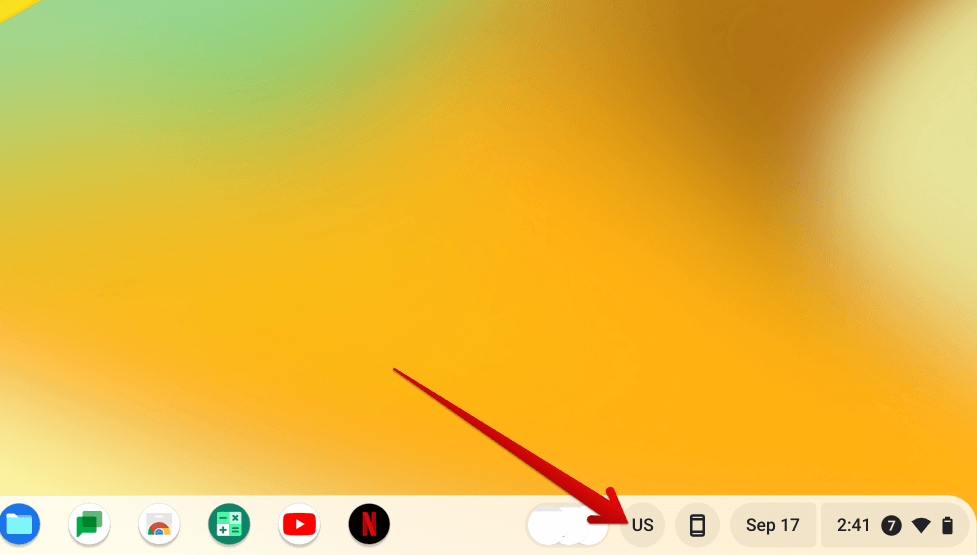
Input options toggle
Before doing any of that, you will need to access the “Input settings” section of your Chromebook to proceed. Click on the “Change input settings” button, as shown in the screenshot below, to move forward.
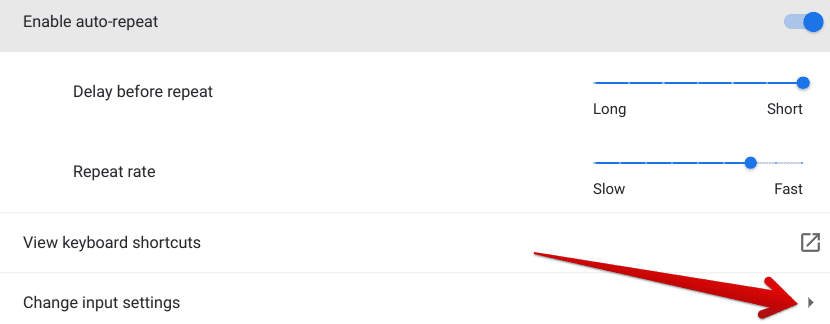
Clicking on “Change input settings”
As soon as you’re done, you will be shown a different page than before, and here, it’ll be possible to delve further into the customization of your Chromebook’s keyboard. Click on the toggle as shown ahead to finalize the process.

Enabling the input option toggle
Adding another input method
Furthering your options is the ability to add another input method, so you can use your keyboard with the layout that you’d prefer. It’s possible to add more languages to your keyboard in this section if you are multi-lingual. The fact that you can switch up your keyboard’s layout is highly convenient for those that favor another form of typing.
Click on the “Add input method” button, as shown in the screenshot below, and choose from the hundreds of different available languages to proceed. The English language alone comprises more than 10 unique variants for you to get into, such as English (US) with International PC keyboard and Dvorak keyboard.

Adding more input methods
Select the languages you want and click “Add” to finalize the process. Now, whenever you’re typing, you can use the aforementioned input toggle option in tandem to switch between different languages on the fly. The shortcut key combination of “Ctrl” and “Spacebar” will also help you uncover similar results.
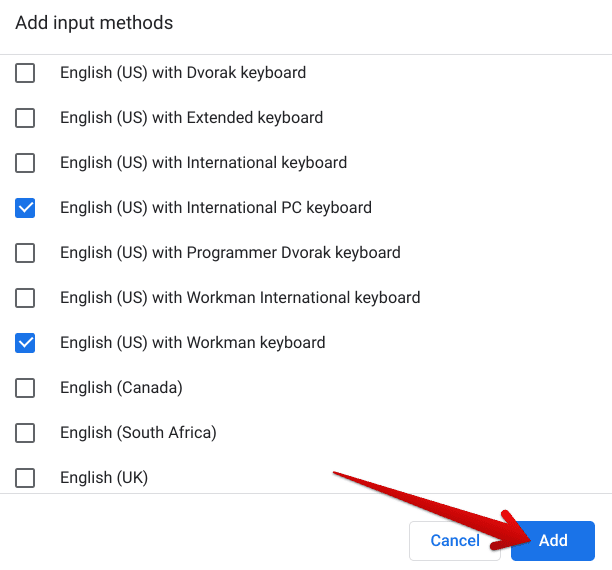
Clicking on “Add”
Customizing the spelling and grammar check
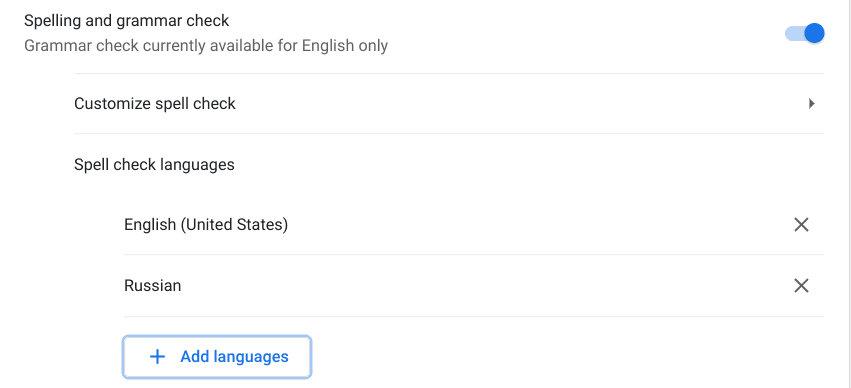
Customizing the spelling and grammar check
The final way you can customize the keyboard on a Chromebook is by ensuring no piece of writing goes by unattended. Chromebooks feature an in-built spelling and grammar checking functionality that watches over your writing as if it is a paid tool. Thankfully, with this kind of feature being available natively, users don’t have to look for other options.
Ensure that the toggle for “Spelling and grammar check” is enabled. Google makes it clear beforehand that the grammar verifying option currently only kicks in for English, so you may have to sit tight until other languages are supported in this manner. As for the handful of languages tested for spelling checks, feel free to dive in.
You can click on the “Add languages” button to bring up a list of all those languages that are currently supported for spelling checks. If you’d like to freestyle and wouldn’t want your Chromebook to get in the way, go ahead and keep the functionality disabled.
Purchase a Chromebook keyboard skin
SANFORIN Silicon Chromebook Keyboard Skin
The meaning of the word “customize” doesn’t necessarily reside within the constraints of software-end modification. Why not up the ante and tend to the hardware side to make your Chromebook look aesthetically more appealing? It’s possible to purchase a keyboard cover skin to slap onto your device and make it stand out like never before.
Amazon has a whole ton of these specially crafted Chromebook keyboard skins, so you shouldn’t worry about having to look elsewhere. For instance, this high-quality Keyboard Cover for HP Chromebook 14 is priced highly competitively and packs a celestial punch in terms of looks. You may as well grab it from Amazon straight away today.
Conclusion
In this guide, we’ve taken a close, hard look at all the different customizability options available concerning a Chromebook’s keyboard. After going through the write-up, it’s safe to say that ChromeOS grants its users the to tweak how the keyboard plays out. We do hope that you’ve got what you came for.
Chromebooks boast a high potential of customizability not just from the software side but quite possibly from the hardware end. Although the functional part indeed rests within ChromeOS, it does not hurt to make your device more fashionable.
- Highly recommended: How to maintain your Chromebook and extend its life.
