Chromebooks are not devices that you’d typically have to go around troubleshooting with, but in case such a calamity does come before you, it never hurts to be prepared ahead of time. Behold the 10 most common ChromeOS problems and how to fix them step-by-step. We’ll be sure to leave the instructions in an easy-to-grasp format for the guide ahead.
Similar to how the Google Play Store can often throw tantrums on your end, making it necessary to look at common Google Play issues, the device itself may cause things to go haywire for various reasons. We’re here to decipher the most usual instances and help you through them without breaking too much sweat.
- In the meantime: A comprehensive guide to Chromebook’s accessibility tools and features.
10 of the quickest fixes for common Chromebook issues
The following is our round-up of the best potential solutions that are most likely to resolve a great deal of ChromeOS problems. They can be easily implemented, and even the most beginner users will have no trouble following the forthcoming procedures.
1. Perform a swift restart
First things first—before we get into the complicated end of this error-fixing spectrum, it’s worth pointing out the sheer effectiveness of restarting your Chromebook. ChromeOS is a lightweight operating system that can get back on its feet with the help of rebooting the device, no matter if you knock the wind out of your Chromebook.
From software-centric issues to any component of your networking system that’s not feeling up to scratch, a restart can breathe fresh life into your device, given that the origin of the problem isn’t excessively deep-dyed. More often than not, the issue about a Chromebook is more likely to be superficial, which is something that a reboot will tend to immediately.
The gist is that before getting yourself into anything complicated, it’s undoubtedly worth restarting your device in the hope of noticeable results, which are bound to come your way most of the time. Furthermore, rebooting a Chromebook is relatively painless to go through as well. All you need to do is press and hold the “Power” key, which will do the trick.
You can also press the “Power” key once and select “Shut down” to do the deed just as well with similar effects. We recommend the restart option as a viable one for a swath of Chromebook problems out there, but not all calamities will vanquish after a restart. That is why there are nine more subsections to read on ahead.
- Highly recommended: 20 tips for first-time Chromebook users.
2. Reset your Chromebook hardware
The next step pertains to a Chromebook hardware reset—a function implemented inside every Chromebook to cater to moments of need. Aside from a normal restart, your device is capable of performing a hardware reset just as well. This will be done by pressing the “Power” key and tapping on the “Refresh” key.
The latter is in place of F3 on your Chromebook’s keyboard and is shaped like a circular arrow. Check out the following image for a visual explanation of performing a hardware restart.
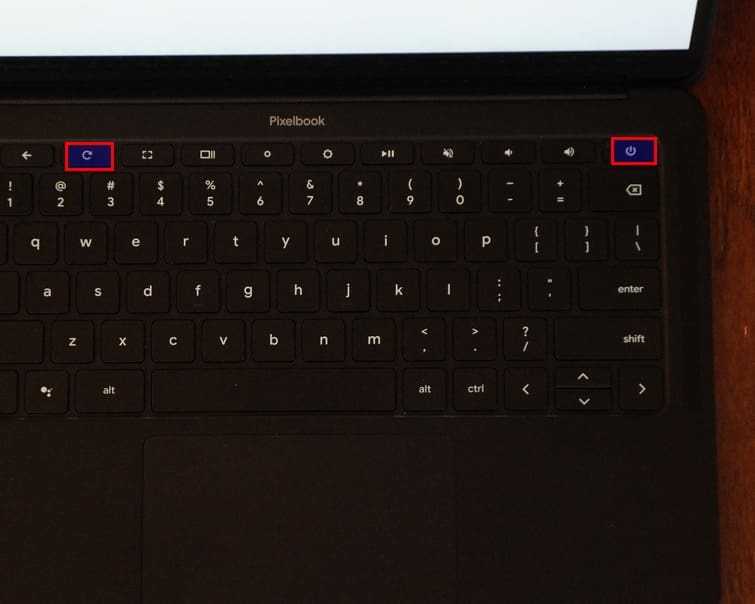
Key combination for a hardware reset
Now, you must be wondering: If a simple restart effectively takes care of regular Chromebook issues, what good is a hardware reset? You’re asking the right question here. A hardware reset is just what its name depicts it to be. It caters to your Chromebook’s trackpad, keyboard, and other hardware components, such as speakers.
For instance, if there’s a problem with the trackpad where it just isn’t working as it should, implementing a hardware reset will most likely resolve the issue immediately. That is why it’s necessary to keep this hefty trick in mind whenever one of your device’s hardware components starts acting up.
3. Terminate excess background processes
Moving forward, another facet of your Chromebook’s working mechanism can help you get a firmer grip on things. Like Windows PCs, ChromeOS also comprises a Task Manager tool that details users the number of processes running in the foreground and background along with their level of system resource consumption.
If you ever find your Chromebook running slow, press the “Search” and “Esc” keys to pop open the Task Manager window. Doing so will allow you to visualize all operating processes, apps, and other programs concurrently. Then, terminate the ones you don’t need to free up some resources and speed up your Chromebook.
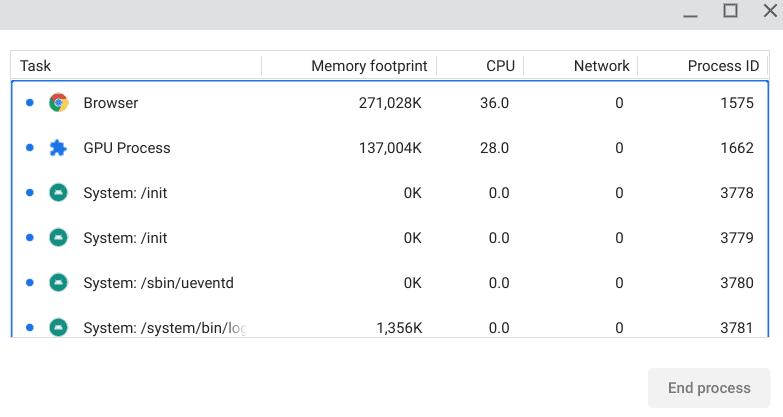
ChromeOS Task Manager
4. Update your Chromebook

Checking ChromeOS for updates
Having your Chromebook up-to-date at all times is likely the best course of action for solving common Chromebook problems and preventing them in the first place. ChromeOS is where it is today, thanks to a swath of carefully crafted improvements rolled out to it over time.
The operating system receives scheduled updates, making it stable, speedy, and overall admirable, minus any unwanted hassle of bugs, glitches, and other issues. Moreover, the best part here is that all updates download on the fly without realizing it.
That said, you will be prompted to restart your Chromebook whenever an update is done downloading, so the changes can be applied. What most people do is that they ignore this prompt and postpone it to a later time. Stay ahead of the curve, and don’t follow suit. Continually update Chromebooks whenever you get the chance for nothing but the best results.
- Recommended: How to update Chromebook.
5. Clear the data and cache of the Google Play Store
The Google Play Store is a substantial part of Chromebooks in 2022. The famous Android storefront opens up a gateway for ChromeOS users to enjoy the best in the mobile operating system with specific optimizations for Chromebooks. Google Play is a welcome addition to ChromeOS, from maximum productivity to entertainment and streaming.
However, as we’ve pointed out in our how to fix issues with the Google Play Store write-up, several things can go wrong with the Android marketplace if you’re not being wary of how you use it. In some cases, an issue could protrude to the rest of the operating system and impede the Chromebook’s ability to run Android apps.
A quick and easy fix to deal with such scenarios is to clear the data and cache of the Google Play Store. Find “Google Play Store,” similar to how you’d do it on mobile through the “Manage Android preferences” section in your Chromebook’s “Settings,” and make sure to click on both “Clear Storage” and “Clear Cache” before you leave.
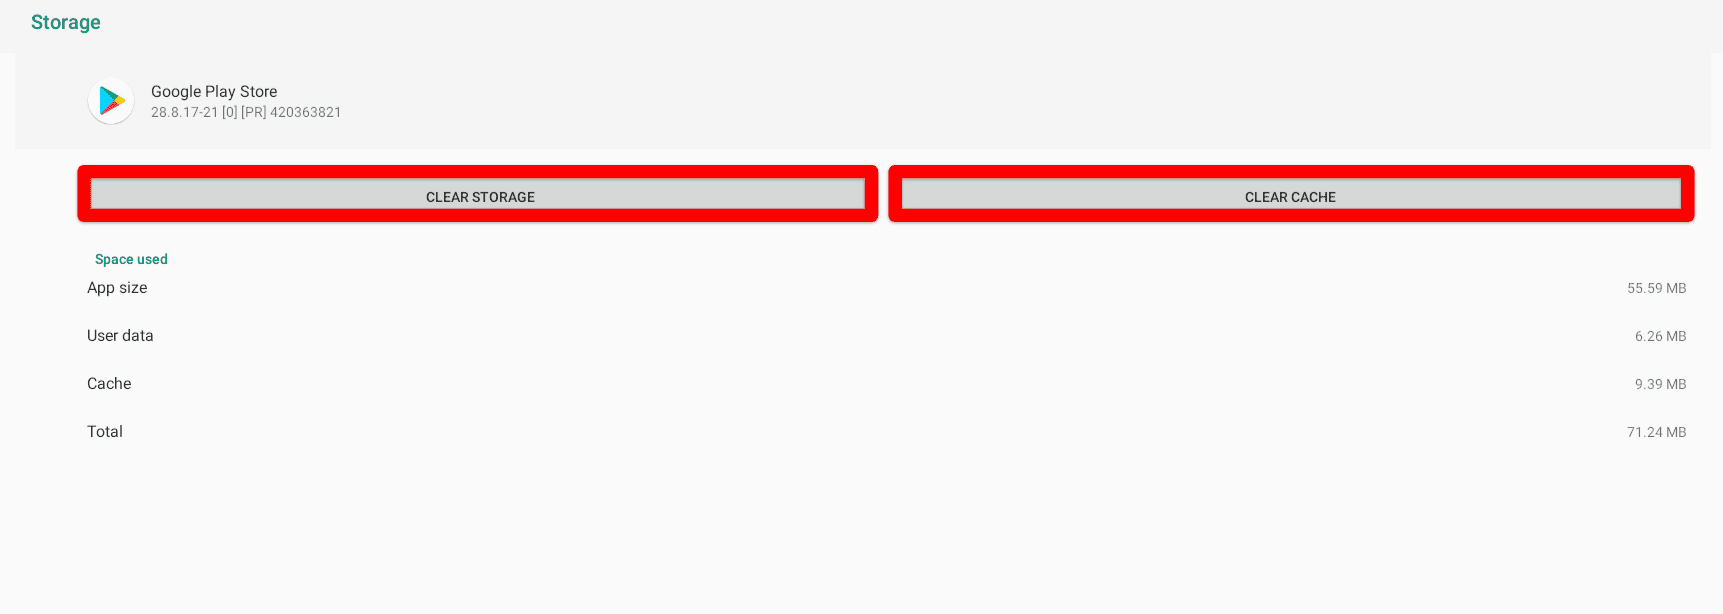
Clearing the storage and cache of Google Play
Doing so resolves most Play Store-centric issues, so here’s hoping you’ll find this neat trick handy in your case too.
6. Reinstall Chrome extensions
Although ChromeOS benefits greatly from the best Google Chrome extensions, trouble can often spring up when a particular extension has delayed security patches, so it starts acting up wildly.
If you cannot use the Chrome browser as you should and the surfer is freezing or stuttering too often now, look at your recent extension installations. An add-on you got on your PC in the latest times might affect the web crawler’s ability to run optimally.
In this case, head over to your “Extensions” page within Google Chrome with the help of the three vertical dots button in the top-right corner of the screen. From there, uninstall your freshest installations and restart the Chrome browser. Moreover, check for browser updates just as well.
Check out the following screenshot for a visual illustration of the “Extensions” page on a Chromebook.
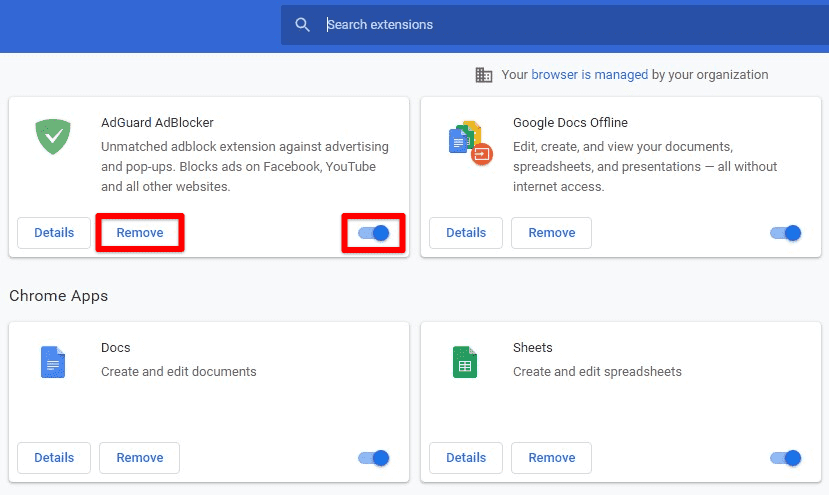
Extensions page
By removing faulty extensions, you may as well breathe new life into your Chromebook again. Try it on your end, and let us know how it goes.
7. Log out and log into your account again
Logging out of your Google account on a Chromebook is subject to resolving various account-related issues on your Chromebook, particularly those that hinder the device from functioning normally. If you’re facing trouble with an upcoming update, signing out and signing back into your account can drastically help escalate the solution.
It’s nothing but effortless to log out of your Chromebook. All you have to do is keep the “Power” button pressed until you can visualize some options on the screen. Once that happens, click on the “Sign out” button. Reenter your email address and start accordingly when you’re taken back to the initial sign-in screen.
If pulled off just right, you’re likely to start using your Chromebook just like before when the device blossomed with functionality and posed no threat of performance stutters.
8. Use the Diagnostics app
Another novel piece of functionality that every modern-day Chromebook comes equipped with is the Diagnostics application. Due to the courtesy of ChromeOS 90, this sleek operating system has its troubleshooting tool that allows you to examine the device’s battery, RAM, and CPU and determine if anything is wrong with these components.
The Diagnostics tool won’t be present in the launcher on its own, so you will have to look for it using the search feature. Type in “Diagnostics,” and the application in question will pop right up. Running these scans can take care of your Chromebook’s three major facets: the memory, the battery, and the mainline processor.
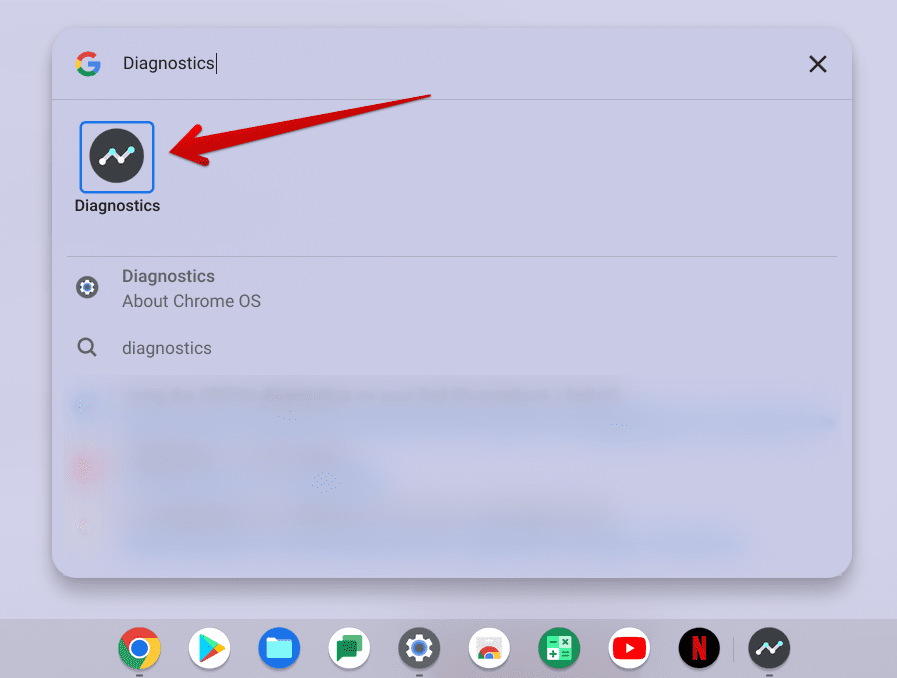
Opening the Diagnostics app
9. Use a Powerwash – The ace in the hole
Powerwashing a Chromebook is akin to making it feel brand-new again. The term “Powerwash” is synonymous with factory resetting a device, which all of us are familiar with on mobile platforms and desktops.
However, don’t go about using the Powerwash feature at the slightest of inconveniences—it’s supposed to be utilized as a last-ditch effort to resolve a big pertinent issue with your Chromebook. Go forth with it. However, if you’ve tried all there is to it, none of the potential solutions have proved valuable.
The gist of it is that you venture into the “Reset settings” area in your Chromebook’s “Settings” app and follow it up by clicking on the “Reset” button right beside Powerwash. Check out the screenshot below for a better visual explanation.

Reset Settings
After clicking the “Reset” button, you need to click on “Restart.” Doing so will set things in motion and properly reset your device back to factory conditions.

Performing a Powerwash
A Powerwash is usually a functionality that tends to most common problems with your Chromebook, but if not even the latter manages to do the trick for you, feel free to dive into full-fledged ChromeOS recovery.
10. Recover ChromeOS
As for the final pointer on the list, we have an easy-to-implement trick at our disposal that will help you recover your operating system if it’s rendered unworkable. Recovery comes right after a Powerwash in line when the latter fails to come to fruition. Thankfully, it’s no more than a cakewalk to recover your Chromebook.
We’ve dished out a complete guide that explains how ChromeOS recovery is simpler than you think, so you should honestly give it a read and get shown the ropes. Most of the process is carried forward thanks to a highly utilitarian tool called Chromebook Recovery Utility—a first-party software that automates the ChromeOS recovery process.
Conclusion
Chromebooks are incredibly low-maintenance. A substantial part of what makes them great is the lightning-fast speed of ChromeOS and how it’s capable enough of handling things on the fly, considering its cloud-oriented nature. Owning a Chromebook, you will rarely ever run into a system-breaking issue, which comes from personal experience.
However, when you finally come face to face with a problem impeding your optimal usability, feel free to confide in the above solutions to avoid any pertinent hassle. Please let us know in the comments section below if you’ve had to fix your Chromebook.
We genuinely hope you never have to run into a Chromebook issue. Good luck!
