ChromeOS is a lightweight operating system that guarantees speed, simplicity, and security a cut above the rest of the competition. It is pre-installed on sleek and compact devices called Chromebooks, which boast high-class battery runtimes and excellent portability. ChromeOS is pretty minimal in its operations, given its simple nature.
However, Google’s front-running desktop system software does pack several tricks up its sleeve. There’s much more than what meets the eye looking at ChromeOS initially, and this article will cast a lens on that. Behold the best Chromebook features to try in 2022 and take your experience to the next level without breaking a sweat.
If you own one of these, it’s imminent for you to test all these great Chromebook features and revamp your productivity like never before. Be sure to read until the end for the best results now that we’re about to dive right into this guide. In the meantime, do consider checking out our curated guide on how to maintain your Chromebook and extend its life.
- An interesting read: Helpful tips for working with Chrome Canvas.
15 of the best Chromebook features you shouldn’t ignore
The following is our round-up of the best features available at your disposal in a Chromebook that you should get started with right away. Do try them all out step-by-step to determine your favorite one.
1. Enable the in-built Linux Terminal
One of the first high-quality Chromebook features we want to nudge you toward is the built-in Linux container with ChromeOS.
Chromebooks come with their very own Linux container. Simply put, this fantastic feature revamps the operating system’s functionality by leaps and bounds, making the device more loaded with functionality than ever.
It’s pretty easy to get Linux up and running on the device since there’s a separate section available for it right within the “Settings” portion of the device. Continue down to the “Developers” section of the “Settings” app to eventually find the option to enable Linux on your Chromebook. It’s as easy as that.
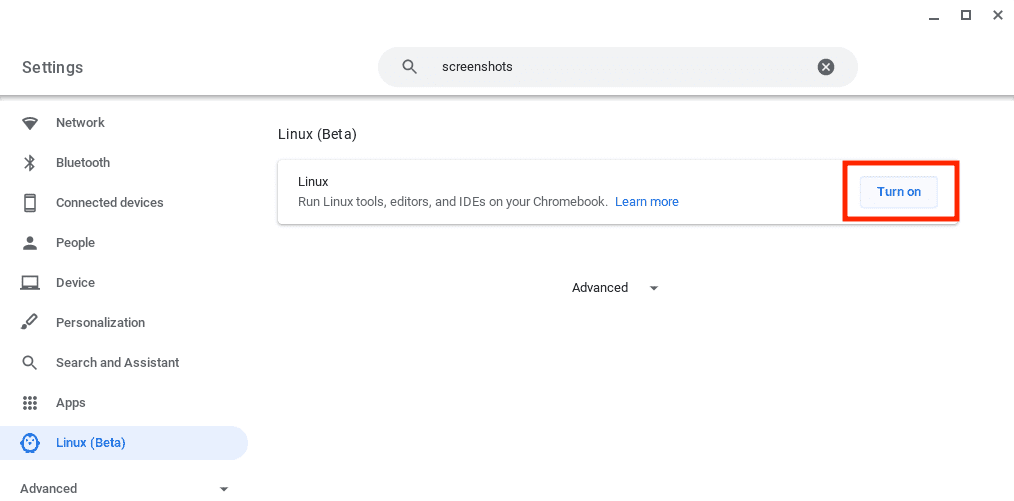
Enable Linux Applications
As soon as you’re done, the next step is to enjoy the top 20 Linux apps available for you to install on ChromeOS. The most robust Linux software does no less than offer a great user experience.
For instance, OpenShot Video Editor is a terrific video editing software that can compensate for the lack of Adobe Photoshop on Chromebooks. However, that too is officially making headway for the lightweight operating system. When you’ve got Linux to operate on ChromeOS, the sky is the limit.
2. Learn particular Chromebook keyboard shortcut keys
Chromebook users can do well within the boundaries of their work or personal life if they learn how to use their devices more efficiently. As it happens, this is all that keyboard shortcuts are about on ChromeOS, providing users with the speed and skill they require to conquer their work sessions day in and day out.
For more information, check out our detailed write-up on how to see keyboard shortcuts on a Chromebook. A separate window pops up on the desktop interface where all usable shortcuts are grouped in different categories. Check them out, and you’ll see how much of a boost you receive in your overall productivity.
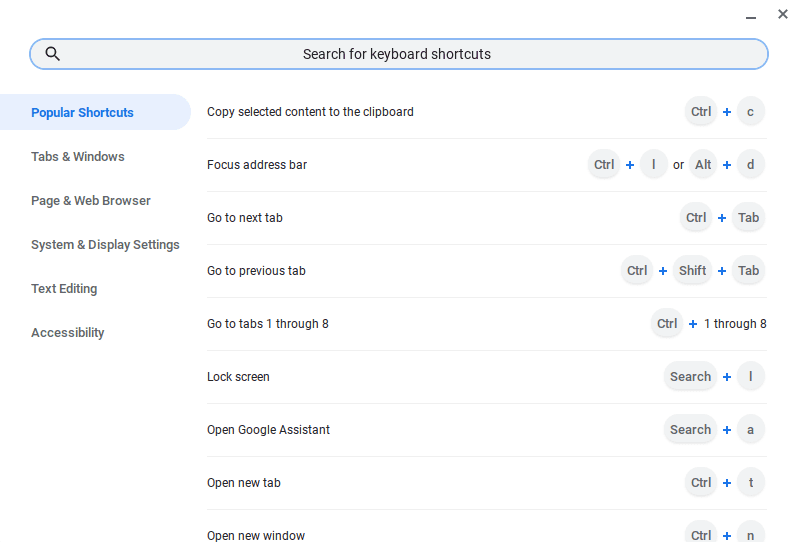
Keyboard shortcuts on ChromeOS
3. Take a quick screenshot
The native screenshot tool provided to Chromebook users is a personal favorite over at Chrome Ready. It just makes life so much easier and negates the use of third-party screenshot tools as well, although you are going to need them for annotation purposes. Press the “Ctrl” and “Show Windows” keys together, and you’ll instantly snap a screenshot.
If you want more control in that regard, add another key to the mix—Shift—to enjoy more flexibility. We’ve dished out a complete guide on how to take a screenshot on a Chromebook, so do check that out if you want step-by-step instructions.
4. Download and experience the best Android apps and games
Thanks to their integration with the Google Play Store, Chromebooks can be truly fun-filled devices of entertainment. Feel free to explore the famous Android marketplace for some high-quality games and apps. If you’re packing a specced-out machine like the Asus Chromebook CX9, you’ll have a blast experiencing the top 10 fun games to play on ChromeOS.
Some unique options include Genshin Impact and PUBG Mobile, which are pretty high-ranking in their respective categories and deliver an excellent gaming experience on ChromeOS. So harness the power of your device’s hardware and relish a smooth gaming experience to make the most out of the Chromebook.
And when you’re done playing games and looking to bump up your productivity levels, look at the best Google Play Store apps for Chromebooks to get that done in due time.
5. Try out Google Assistant

Google Assistant in ChromeOS
Google Assistant is the mainline virtual assistant that Chromebook users can painlessly enjoy. Setting up usually takes a couple of minutes and opens up a world of convenience on your end. Set alarms, timers, and reminders, and get around your device with the help of voice commands using Assistant.
If you’re looking to get the most out of your Chromebook, utilizing this feature’s diverse functionality is probably the right way to move forward from this point on. From making the digital secretary remember what you say to allow it to play calming sounds for you, Google Assistant is handy to have over at ChromeOS.
We’ve jotted down a complete guide on the subject at hand that’ll allow you to tap into the full potential of Assistant on the go. For good measure, here’s our thorough Google Assistant guide for you to relish.
6. Check out the ChromeOS overview mode
The ChromeOS overview mode is the intrinsic ability of the operating system to pull up all your opened windows and let you visualize them on the fly. So if you often multitask where a whole ton of windows are fired up simultaneously on your desktop, you will benefit significantly from what we’re about to tell you.
While there are many ways of kicking the user interface into overview mode, using the trackpad to get this done is the most efficient. Swipe three fingers upward on your device’s touchpad to see the transition. Quick and easy.
Moreover, it’s also possible to enable a dedicated “Overview” button in the far right corner of your Chromebook’s shelf area. This will allow you to utilize the multitasking capability of Chrome OS, especially when you’re using several virtual desks at once. Type in the following into the Omnibox of the Chrome browser and press the “Enter” key.
chrome://flags#ash-overview-button
Once the Chrome flag is enabled, go through the usual restart and find the all-new Overview button beside your Chromebook’s clock.

The “Overview” button alongside the Chrome OS status bar
7. Toggle on Night Light
If you use your Chromebook way too often during the night with low background lighting, it’s worth turning on the Night Light feature accordingly. Thankfully, Chromebooks make this functionality relatively easy to get the ball rolling. Night Light filters out blue light from your Chromebook’s display.
To enable the feature, click on the Status Tray area in the lower-right corner of the ChromeOS interface and tap “Night Light,” similar to how we’ve done it in the screenshot below.
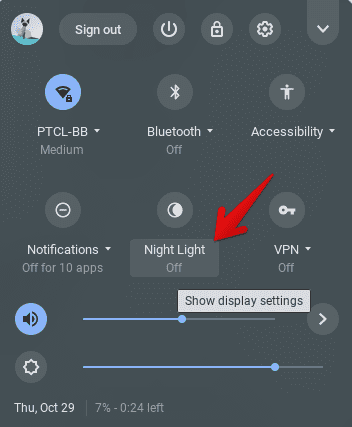
Turning on Night Light on ChromeOS
8. Improve sharability with Nearby Share
Nearby Share got added to the arsenal of the best Chromebook features in Chrome 91. Its functionality makes sharability fast, easy, and simple between friends, family, co-workers, and others. The best way to get going with it is through the Status Tray—the utilitarian menu can be found in the lower-right corner of the ChromeOS interface.
You can also see the time, Wi-Fi icon, battery life, and other essential system components. Clicking on it will reveal many options for you, and one of them will be Nearby Share. Click on it to proceed.
Clicking on the Nearby Share icon in Status Tray
As soon as you click the relative button, you’ll be taken straight to the main menu of Nearby Share within the device’s “Settings” app. Upon arriving there, you’ll be notified that your Chromebook is now appearing visible to other nearby devices. Therefore, Nearby Share on your device has been enabled now.
This is only half part of the whole process. We suggest checking out our guide on how to share files with devices using Nearby Share in ChromeOS for further instructions.
9. Hide your files
Did you know it is possible to hide your files in a Chromebook? It’s easily possible with the help of the “Files” system application on your Chromebook.
A nifty feature lets you conceal some of your personal data from others whenever the situation warrants it. To get started, check out the following steps and replicate them on your end accordingly.
1. The first step is to open the “Files” system app on your Chromebook.
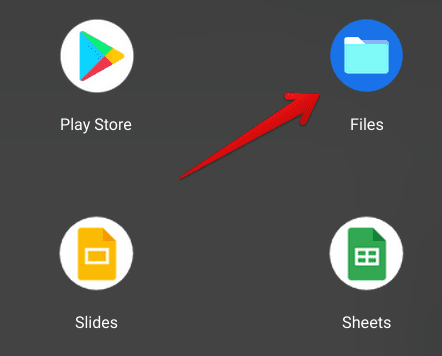
Opening the “Files” system app
2. As soon as you’re done with the first step, you’ll be taken straight to the app’s window. From there, click on the “More” button shaped like three vertical dots in the top-right corner of the section. Doing so should disclose many options for you.

Revealing more options in the Files app
3. Right after that, a list of options will appear on the screen for you. Click on “Show hidden files” to get to the next step.
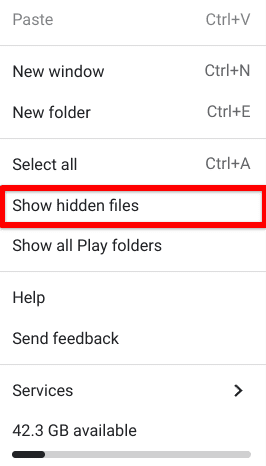
Showing hidden files
4. This might seem quite the opposite of what we’ve set out to do, but bear with us for a little more. You now have to select any file you want to hide from the common eye and rename it. When doing the deed, add a period or dot at the beginning of the file’s name and press the “Enter” key. Repeat the process with as many files as you’d like.

Renaming the file to hide it
5. After successfully renaming the file with a period at its start, click on the three vertical dots button once more and find the “Show hidden files” button. You’ll need to click on it again to unselect the feature. Doing this should be pretty straightforward.
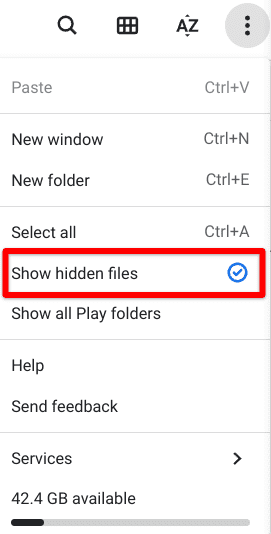
Toggling off “Show hidden files”
That’s about it! You’ve successfully learned how to hide files on ChromeOS. It’s one of the better features you’ve got to learn with your Chromebook by your side.
10. Mute incoming prompts and alerts
You might be familiar with the “Do Not Disturb” mode on your mobile phone that bars incoming calls and notifications from disturbing you. There’s something much similar over on Chromebook as well, tucked away inside the Status Tray of the operating system. Click on the clock and observe the “Notifications” button to start.
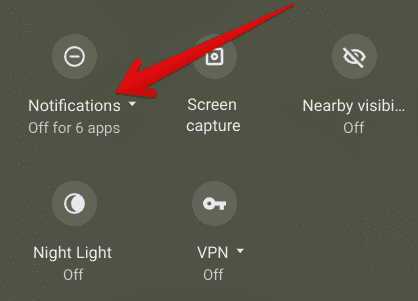
Clicking on the “Notifications” button
After that, a subsection will appear on the screen, allowing you to click on the toggle beside “Do not disturb.” Check out the following screenshot for a visual illustration of how to get this done.
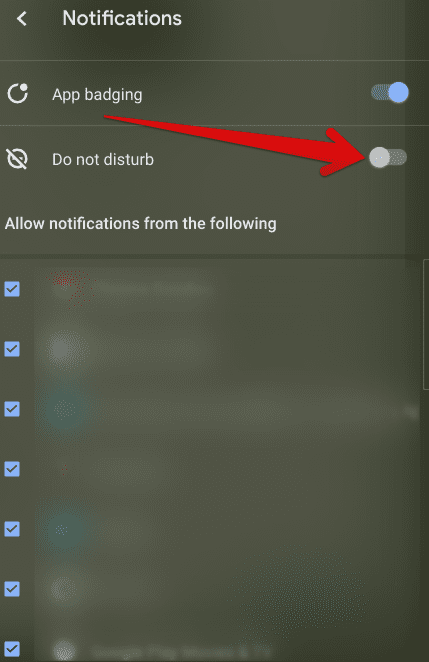
Enabling “Do not disturb” on a Chromebook
Within this functionality, there’s also the possibility of disabling a specific set of applications from sending you notifications. You can approach the latter if that is what suits you as well.
11. Slap on a screensaver
Chromebooks make it easy to use a screensaver as well. The functionality resides in your device’s “Settings” section, thereby warranting as little as a few clicks to toggle it on. A screensaver serves as eye candy for the Chromebook’s display, making the whole unit look colorful while preventing the device from going to sleep.
There is a variety of different factory images that you can choose as your screensaver. However, if none of them feel right to you, there’s the option to select your photos for the ChromeOS screensaver. To get the ball rolling with this feature, head to your “Settings,” followed by clicking on “Personalization” in the side panel.
The option to toggle on your Chromebook’s screensaver will be visible. If you’re after a step-by-step guide on using this feature from start to finish, check out our specialized article on how to enable a personalized screen saver on Chromebook.

Enabling the ChromeOS screensaver
12. Split your screen for effective multitasking
It’s possible to divide your screen into two portions for the grand purpose of multitasking, which is a term for doing several things at once. Splitting your screen is a straightforward process on Chromebooks and involves many user options.
That is to say, there are various ways you can split your screen on ChromeOS. If you want to discover what they are, check out our in-depth guide on how to split screen on Chromebooks. One way of doing it is clicking and dragging the “Minimize” or “Maximize” button of any opened window to either side of the screen.
An animation will manifest, allowing you to lock in the window on one side of the whole screen. It’s pretty clicky and doesn’t require you to pull off anything complicated.
13. Organize the Chromebook Launcher with folders
Looking to arrange the Chromebook Launcher more proficiently, so it looks tidy? Chromebooks now allow users to create folders within the Launcher section and name them accordingly.
To do this, click and drag an app toward the app that you’d like to group and release the click. Proceed toward naming the folder, and you’ll be done in a few seconds.
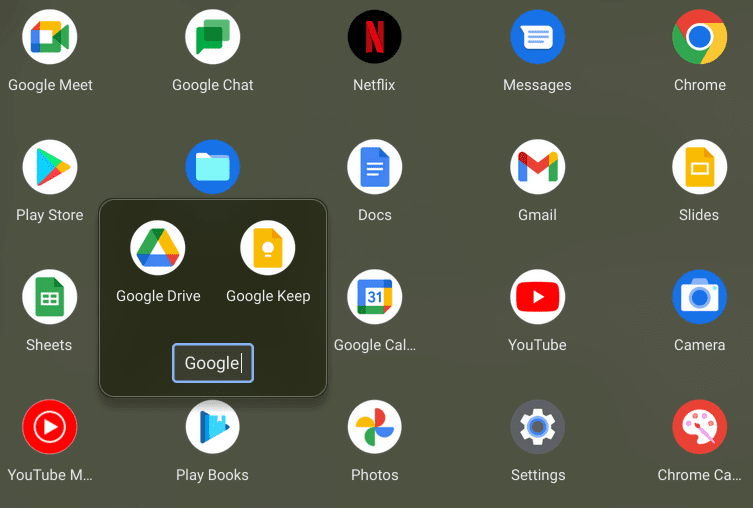
Creating a folder in the Chromebook Launcher
14. Experience the ChromeOS developer mode
We advise you not to play with the ChromeOS developer mode if you are unsure what to do. Still, if genuine curiosity interests you in pushing your Chromebook to its limits, you’ve got to give it a shot at least once.
The developer mode offers distinct changes to the operating system as a whole, but strictly in the sense that you become capable of installing other operating systems on your Chromebook.
This includes Windows 10, 11, Ubuntu, GalliumOS, and CloudReady, seamlessly transitioning into ChromeOS Flex. If this is something that piques your interest, do try this experimental-grade feature out and let us know how it goes down in the comments section.
- There are certain downsides associated with the developer mode. Please make sure you’re wary of them by reading the interlinked guide.
15. Enable Calendar View
Calendar View is a convenient feature that adds a small-scale date portion to the ChromeOS Status Tray. The latter sits in the bottom-right corner of the operating system’s user interface. Unfortunately, this isn’t something that’s enabled by default. The feature is still experimental, so you’ll have to tend to it yourself.
Fret not, though. Toggling it on is straightforward and painless. Type in the following into the omnibox of your Chrome browser and press the “Enter” key to get to the Calendar View feature.
chrome://flags#calendar-view

Enabling the Monthly Calendar View in Chrome OS
Once you’re there, click on the toggle and select “Enabled.” After switching it on, you’ll need to restart the Chromebook to finalize the changes. As soon as the device boots back on, you’ll observe Calendar View in the bottom-right corner of the ChromeOS interface.
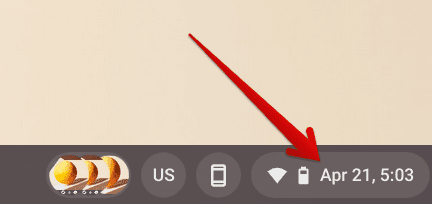
Calendar View in full flight
Bonus: Know how to Powerwash ChromeOS
If your Chromebook starts giving you a ton of trouble, including error codes, bugs, and glitches, or you’re simply looking to clean up the device before selling it to someone, you have to learn how to Powerwash your Chromebook. This essential trick of hard resetting the device is integral when it boils down to multiple scenarios, as you understand by now.
We’ve curated a complete guide on how to Powerwash your Chromebook to achieve the purpose. Please take a look at it for more information and step-by-step instructions. As for the gist of it, you have to venture into the “Settings” app of your Chromebook and make way to the “Reset settings” area, which falls under the “Advanced” portion itself.
When you’re there, click the “Powerwash” button, and the process will begin. No need to delve into anything other than following the on-screen instructions.

Performing a Powerwash
Conclusion
Chromebooks have always been convenient devices, and with the developer’s focus on making them more stand-out in the competition, many awesome ChromeOS features most users are missing out on. This article has shed light on the best ones out of the bunch so that you can use your Chromebook efficiently—just the way the developers meant it to play out.
Aside from running the Linux container and trying out the best Android apps via the Google Play Store, there’s a lot that you can do to open up your Chromebook even more, such as toggling on the developer mode and testing experimental features. Our favorite is Calendar View, which adds a date section in the ChromeOS Status Tray.
The latter then makes it quite convenient to catch a glance of the occasion without opening up a dedicated Calendar application or looking it up on Google. Please let us know in the comments section below what feature you found the most compelling. As always, Chrome Ready wishes you good luck!
- Before you go: 10 tips for faster browsing with Google Chrome.
